
Popular categories
Looking for a yarn?


Comments / Questions (250)
![]() Andrea wrote:
Andrea wrote:
Hallo Irs, vielleicht einTip für Dich: Ich habe die Ärmel nicht auf dem Nadelspiel sindern in hin und Rück reihen gestrickt.Bedeutet etwas weniger Faden wirrwarr und es wird deutlicher, dass das Muster an den Zunahmen nicht aufgehen kann, bedeutet aber auch etwas Obacht bei der Mustereinteilung, damit die Anordnung en passend sind. zu nähen ist dann lediglich die Umterarmnaht.... Vielleicht hilft es, LG
29.01.2019 - 10:21
![]() Iris wrote:
Iris wrote:
Hallo, ich scheitere gerade an den Ärmeln. Bekomme das mit dem Muster und den Zunahmen nicht hin. Kann mir bitte jemand einen Tipp geben, wie ich die Zunahmen in A4, A2 einarbeiten muss. Habe die Anleitung schon 1000mal gelesen und den angefangenen Ärmel mehrmals wieder augeribbelt
24.01.2019 - 16:41DROPS Design answered:
Liebe Iris, die Zunahmen am Ende der Runde stricken Sie wie die nächste Masche in A.4/A.2 (lesen Sie rechts nach links) und die Zunahmen am Anfang der Runde stricken Sie wie das vorrige Masche in A.4/A.2 (lesen Sie jetzt das Diagram links nach rechts), so werden die Muster breiter sein, aber in der untere Mitte bei den Ärmel passt das Muster nicht wegen den Zunahmen. Viel Spaß beim stricken!
25.01.2019 - 08:38
![]() Vicky Williams wrote:
Vicky Williams wrote:
When decreasing in the neck what does - knit together the next 20-20-20-24-24-24 stitches 2 and 2 (= 10-10-10-12-12-12 stitches decreased) actually mean ???
24.01.2019 - 16:21DROPS Design answered:
Dear Mrs Williams, you will K2 tog a total of 10-12 times (see size) over these 20-24 sts = so that you will have decreased 10-12 stitches. Happy knitting!
24.01.2019 - 17:06
![]() Linda Marit Bjørke wrote:
Linda Marit Bjørke wrote:
Er kommet til bolen str S. Her står det at man skal starte omgangen i overgang mellom venstre erme og bakstykke, altså bak på venstre skulder, og strikke A5. Hvis man deretter strikker 97 masker slik det står i mønsteret før man strikker A5 igjen havner man jo et stykke foran på bolen, istedenfor i overgangen mellom venstre erme og forstykke der jeg trodde neste raglandfelling skulle være. Hva misforstår jeg?
20.01.2019 - 16:25DROPS Design answered:
Hei Linda. Du har helt rett, starten blir i overgangen mellom høyre erme og bakstykket. Dette er nå blitt endret. Takk for beskjed og god fornøyelse
29.01.2019 - 07:32
![]() Charlotte wrote:
Charlotte wrote:
Vet dere hvilken størrelse det er strikket til hun som er modellen på bilde?
18.01.2019 - 23:42DROPS Design answered:
Hei Charlotte. Det er en S eller M. Nederst på siden finner du en målskisse med alle plaggets mål i alle størrelser. Anbefaler at du ser på denne når du velger størrelse. God fornøyelse
21.01.2019 - 10:22
![]() Erika wrote:
Erika wrote:
I want to knit size s. But om A3 it looks like you knit more in size s than in size m. I have to knit from the bottum to the top and fitst is size m and then size s. I dont understand what i have to knit to get size s.
18.01.2019 - 09:07DROPS Design answered:
Dear Erika, you work some more rows in A.3 in size S so that the body (rib + body before armholes) are a bit longer = 38 cm (35 cm in size M) and the yoke will be shorter in size S (= 20 cm while it measures 23 cm in size M). Happy knitting!
18.01.2019 - 09:52
![]() Erika wrote:
Erika wrote:
Hello I have asked a question on januari the 5 Th. And never received na answer. The Pattern is hard to follow. When do you use sertain lengths of needles? And witch part do I need to knit for site s? On the pattern at A3. I dont understand!!! Can you help me please?
17.01.2019 - 22:08DROPS Design answered:
Dear Erika, you will need the 60 or 80 cm from beg of body to first decreases on yoke, when the needle is then too long for the number of sts, change to shorter circular needle. In size S follow each first number, ie cast on 260 sts and dec 44 sts evenly = 216 sts remain. Can you explain what you don't understand in A.3? Thank you!
18.01.2019 - 09:00
![]() Astrid wrote:
Astrid wrote:
Bij A4 staan bij de maat S en M delen a en c streepjes wat er gebreid moet worden. Maar: klopt het aangegeven deel bij a wel als het gaat om maat S?
09.01.2019 - 21:57
![]() Andrea wrote:
Andrea wrote:
Fertig, gestrickt in Lima, mit leichten Änderungen. Sitzt super, sieht super aus. Tolle Anleitung, aber bitte genau!!! lesen :-)
08.01.2019 - 18:58
![]() Tina Brissmalm wrote:
Tina Brissmalm wrote:
Hej, jag förstår inte hur jag ska få mönstret snygg på ärmen där man gör ökningar. Ökningen passar inte med mönstret på föregående varv, det blir två maskor för mycket som gör att de nya maskorna/färgen förskjuts och då blir det fel i mönstret. Är det meningen att det inte ska bli en tydlig mönsterrapport, eller gör jag fel??
07.01.2019 - 17:26DROPS Design answered:
Hei Tina. De økte maskene strikkes inn i mønster slik: Om du feks strikker siste maske i A.2 før du øker før merket, strikkes den økte masken som første maske i A.2 på neste omgang (altså du begynner på en ny rapport). Det samme gjelder masken etter merket: om masken etter denne økte masken er første maske i A.2, så strikkes den økte masken som siste maske i A.2 (altså det vokser ut en ny rapport av A.2 den veien også). Du strikker altså de maskene du allerede har på samme sted i diagrammet oppover, de forskyves ikke. Det vil alltid bli en ujevn overgang mellom omgangene, men dette er under ermet så vil sjelden synes når plagget brukes. God fornøyelse.
11.01.2019 - 14:05
|
||||||||||||||||
Valdres#valdressweater |
||||||||||||||||
 |
 |
|||||||||||||||
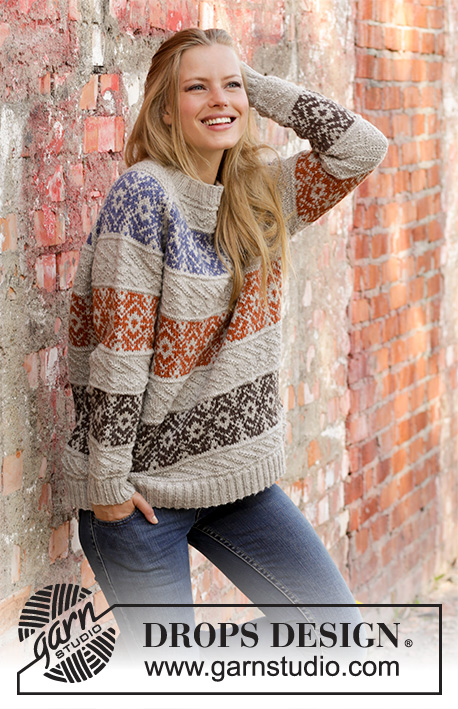
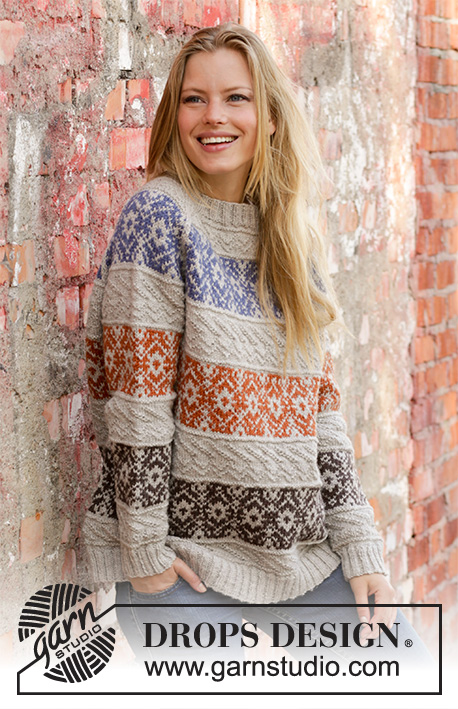
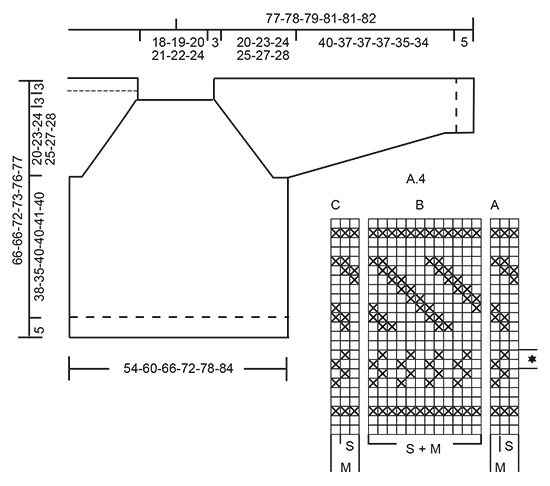
Knitted jumper with raglan in DROPS Karisma. The piece is worked bottom up with Nordic pattern and textured pattern in stripes. Sizes S - XXXL.
DROPS 197-1 |
||||||||||||||||
|
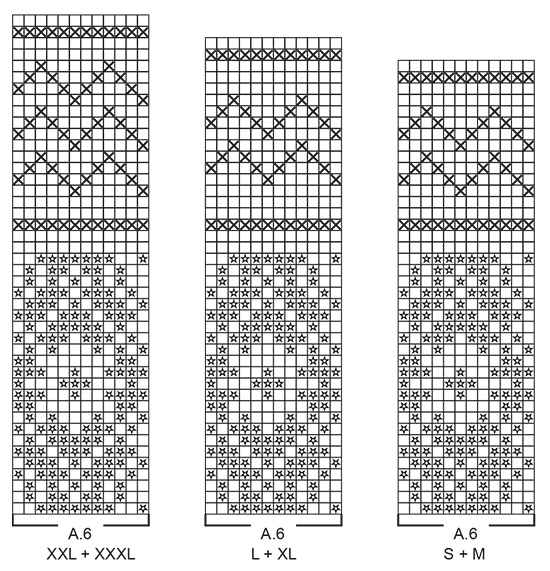
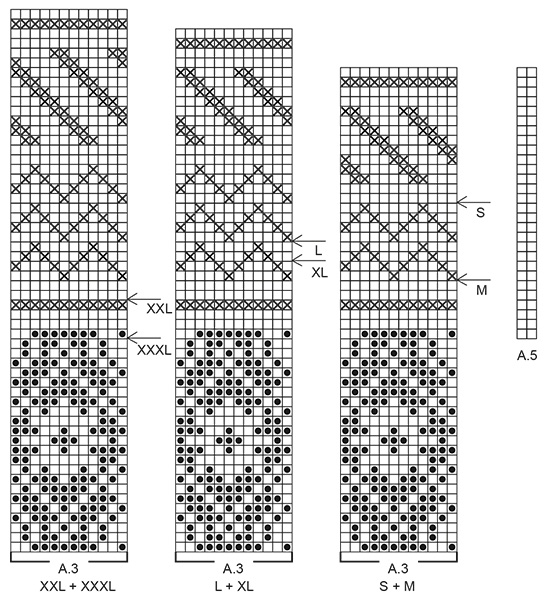
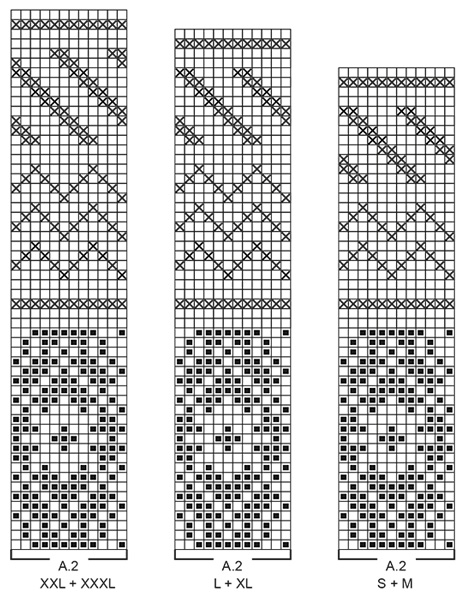
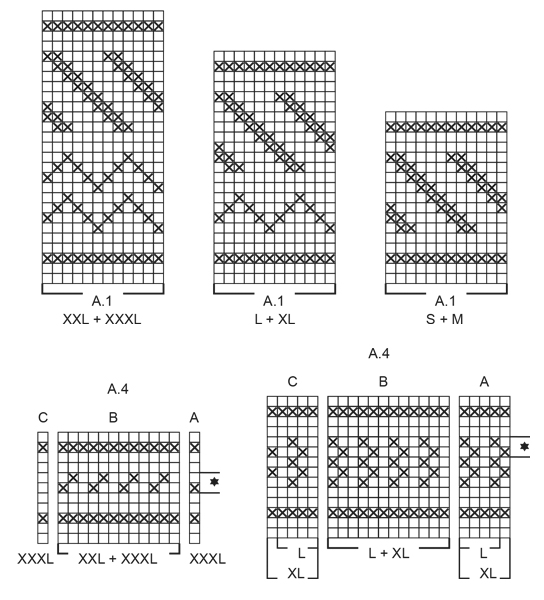
------------------------------------------------------- EXPLANATIONS FOR THE PATTERN: ------------------------------------------------------- PATTERN: See diagrams A.1 to A.6. Choose diagram for your size. DECREASE TIP (evenly spaced): To work out how to decrease evenly, count the total number of stitches on the needle (e.g. 260 stitches) and divide by the number of decreases to be made (e.g. 44) = 5.9. In this example, work together approx. each 5th and 6th stitch. KNITTING TIP-1: To avoid the knitting tension becoming tighter when working Nordic pattern, it is important that the strands at the back of the piece are not tight. You can use a size larger needle when working pattern if this is a problem. KNITTING TIP-2 (for yoke): If the knitting tension is not right in height and you work more rows on 10 cm than described in the text, the yoke will be too short and the armholes too small. This can be adjusted for by working 1 extra row of stocking stitch regularly on the yoke. INCREASE TIP (for sleeves): Work until there are 2 stitches left before the marker thread, make 1 yarn over (= 1 stitch increased), knit 4 (the marker thread sits in the middle of these 4 stitches), make 1 yarn over (= 1 stitch increased). On the next round knit the yarn overs twisted to avoid holes. RAGLAN: Decrease to raglan on each side of each A.5 as follows: Decrease 1 stitch after A.5 as follows: Slip the last stitch in A.5, knit 1, pass the slipped stitch over the knitted stitch (= 1 stitch decreased). Decrease 1 stitch before A.5 as follows: Work until there is 1 stitch left before A.5, knit the next 2 stitches together (= 1 stitch decreased). In other words you decrease 2 stitches by each A.5 and a total of 8 stitches on the round. ------------------------------------------------------- START THE PIECE HERE: ------------------------------------------------------- JUMPER - SHORT OVERVIEW OF THE PIECE: The piece is worked in the round with circular needle, bottom up. The sleeves are worked with short circular needle/double pointed needles. The pieces are placed together and the yoke is worked in the round. BODY: Cast on 260-288-316-344-376-400 stitches with circular needle size 3.5 mm and light oak. Work rib (= knit 2 / purl 2) for 5 cm. Change to circular needle size 4.5 mm and knit 1 round where you decrease 44-48-52-56-64-64 stitches evenly on round – read DECREASE TIP = 216-240-264-288-312-336 stitches. Knit 1 round as follows: Insert 1 marker in the first stitch, knit 107-119-131-143-155-167 stitches, insert 1 marker in the next stitch, knit to end of round. The markers mark the sides of the piece. Then work A.1 over all stitches (= 18-20-22-24-26-28 repeats of 12 stitches). REMEMBER THE KNITTING TENSION! When A.1 has been worked 1 time in height, insert 1 marker in the middle of the round (you will measure from this marker later). Then work A.2 over A.1- read KNITTING TIP-1. When A.2 has been worked 1 time in height, work A.3 over A.2. When you have worked as far as the arrow in A.3 (see arrow for your size) work the next round in A.3 as follows: Cast off 4 stitches, work the next 101-113-125-137-149-161 stitches as before, cast off the next 7 stitches, work the next 101-113-125-137-149-161 stitches as before, cast off the last 3 stitches. The piece measures approx. 32-29-32-32-31-30 cm from the marker (approx. 43-40-45-45-46-45 cm whole length). Lay the piece to one side and work the sleeves. SLEEVES: The piece is worked in the round with double pointed needles; change to short circular needle when necessary. Cast on 48-52-52-56-56-60 stitches with double pointed needles size 3.5 mm and light oak. Work rib (= knit 2 / purl 2) for 5 cm. Change to double pointed needles size 4.5 mm and knit 1 round where you decrease 8-10-8-10-8-10 stitches evenly on round = 40-42-44-46-48-50 stitches. READ THE WHOLE SECTION BEFORE CONTINUING: You work a pattern of approx. 8-8-5-5-4-4 cm, if you wish to adjust the length of the sleeve, do it now – see below. Then work the same pattern stripe as on the body (from the marker to the armhole = approx. 32-29-32-32-31-30 cm), i.e. the whole sleeve should measure approx. 45-42-42-42-40-39 cm. Work as follows: Insert 1 marker thread at the beginning of the round (= mid under sleeve). Work 1 round in stocking stitch, then work the next round as follows: Work A.4a (= 2-3-4-5-0-1 stitches), A.4b (= 12 stitches) a total of 3-3-3-3-4-4 times in width, A.4c (= 2-3-4-5-0-1 stitches). Continue until A.4 has been worked 1 time in height – NOTE: if you would like a longer sleeve, repeat the 2 rows marked with a star to desired length before continuing with the next round in A.4. If you would like a shorter sleeve, just work the desired number of rounds of A.4, but work a minimum of 1 of the purled rounds. – AT THE SAME TIME when the piece measures 10-9-9-10-12-12 cm increase 1 stitch on each side of the marker thread (= 2 stitches increased) – read INCREASE TIP! Increase like this every 2-1½-1½-1½-1-1 cm a total of 16-21-20-19-24-23 times = 72-84-84-84-96-96 stitches. The stitches in A.4a and A.4c and the increased stitches are worked into pattern A.4b as you go. When A.4 has been worked 1 time in height, work A.2 (= 12 stitches) over all stitches – A.2 is worked over A.4b and is adjusted out to each side; the increased stitches are worked into the pattern as you go. When A.2 has been worked 1 time in height, work A.3 (= 12 stitches) over A.2. When all the stitches under the sleeve are increased, work A.3 a total of 6-7-7-7-8-8 times in width. When you have worked as far as the arrow in A.3, work the next round as follows: Cast off 4 stitches, work the next 65-77-77-77-89-89 stitches as before, cast off the last 3 stitches. The sleeve measures approx. 45-42-42-42-40-39 cm. Work 1 more sleeve in the same way. YOKE: Place the sleeves on the same circular needle as the body, where you cast off stitches for the armholes = 332-380-404-428-476-500 stitches. Start the round in the transition between right sleeve and back piece. Work as follows: * A.5 (= 2 stitches, raglan line), continue with A.3 as before over the next 97-109-121-133-145-157 stitches (= front/back piece), A.5 (= 2 stitches, raglan line), work pattern A.3 as before over the next 65-77-77-77-89-89 stitches (= sleeve) *, work from *-* a total of 2 times – read KNITTING TIP-2. Continue this pattern and decrease to RAGLAN – read description above, every 2nd round a total of 27-31-32-33-37-39 times. When A.3 has been completed in height, work A.6 (= 12 stitches) over A.3. After the last decrease to raglan there are 116-132-148-164-180-188 stitches on the round. Continue until A.6 has been completed. The yoke measures approx. 20-23-24-25-27-28 cm. You can now work an elevation in the back of the neck so that the yoke is slightly higher at the back. This elevation can be left out; the neck is then the same both front and back. Work elevation in back of neck or go straight to working neck if you do not want an elevation. ELEVATION IN BACK OF NECK: Skip this section if you do not want an elevation. Insert 1 marker at the beginning of the round (this marks the start of the round after the elevation has been worked). Continue with light oak and knit to mid back, insert 1 marker. Start from the right side and knit as far as 30-30-34-34-40-40 stitches past the marker, turn, tighten the strand and purl 60-60-68-68-80-80 stitches back. Turn, tighten the strand and knit 54-54-61-61-72-72 stitches, turn, tighten the strand and purl 48-48-54-54-64-64 stitches back. Turn, tighten the strand and knit 42-42-48-48-56-56 stitches, turn, tighten the strand and purl 36-36-42-42-48-48 stitches back. Turn, tighten the strand and knit 30-30-35-35-40-40 stitches, turn, tighten the strand and purl 24-24-28-28-32-32 stitches, turn, tighten the strand and knit to mid back. Cut the strand. The round now starts at the marker, i.e. the transition between right sleeve and back piece. NECK: Continue with light oak and work the next round with decreases as follows: Knit * 40-46-54-58-66-70 stitches and decrease 0-6-12-13-19-22 stitches evenly over these stitches – remember DECREASE TIP, knit together the next 18-20-20-24-24-24 stitches 2 and 2 (= 9-10-10-12-12-12 stitches decreased) *, work from *-* a total of 2 times = 98-100-104-114-118-120 stitches. Change to circular needle size 3.5 mm and work the next round as follows: * Knit 2, purl 2, knit 1, 1 yarn over (= 1 stitch increased), purl 2, knit 2, 1 yarn over (= 1 stitch increased), purl 1 *, work from *-* until there are 8-0-4-4-8-0 stitches left, work rib (= knit 2 / purl 2) over the remaining stitches = 116-120-124-136-140-144 stitches. The yarn overs are worked twisted in rib (i.e. knit 2 / purl 2) on the next round to avoid holes. Cast off with knit over knit and purl over purl when the rib measures 3 cm. ASSEMBLY: Sew the openings under the sleeves in the outermost loop of the outermost stitch. |
||||||||||||||||
Diagram explanations |
||||||||||||||||
|
||||||||||||||||
 |
||||||||||||||||
 |
||||||||||||||||
 |
||||||||||||||||
 |
||||||||||||||||
 |
||||||||||||||||
Have you finished this pattern?Tag your pictures with #dropspattern #valdressweater or submit them to the #dropsfan gallery. Do you need help with this pattern?You'll find 31 tutorial videos, a Comments/Questions area and more by visiting the pattern on garnstudio.com. © 1982-2026 DROPS Design A/S. We reserve all rights. This document, including all its sub-sections, has copyrights. Read more about what you can do with our patterns at the bottom of each pattern on our site. |
||||||||||||||||


With over 40 years in knitting and crochet design, DROPS Design offers one of the most extensive collections of free patterns on the internet - translated to 17 languages. As of today we count 325 catalogues and 12298 patterns translated into English (UK/cm).
We work hard to bring you the best knitting and crochet have to offer, inspiration and advice as well as great quality yarns at incredible prices! Would you like to use our patterns for other than personal use? You can read what you are allowed to do in the Copyright text at the bottom of all our patterns. Happy crafting!
Post a comment to pattern DROPS 197-1
We would love to hear what you have to say about this pattern!
If you want to leave a question, please make sure you select the correct category in the form below, to speed up the answering process. Required fields are marked *.