
Popular categories
Looking for a yarn?


Comments / Questions (250)
![]() Siri Saltnes wrote:
Siri Saltnes wrote:
Jeg har kjøpt garnpakke til Valdresgenseren, men nå finner jeg ikke størrelsesberegneren, altså vidde og lengde på plagget i de ulike størrelsene.
09.02.2020 - 21:04DROPS Design answered:
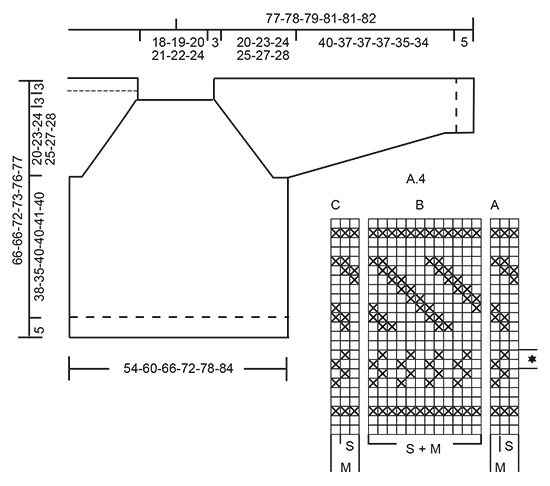
Hei Siri, Du finner en skisse på bunnen av oppskriften med alle mål for de forskjellige størrelsene. God fornøyelse!
10.02.2020 - 07:12
![]() Doris Inskeep wrote:
Doris Inskeep wrote:
In the pattern Karisma for the yoke. When u are decreasing do you decrease the sleeves as well as the front and back or just on the front and back?
19.01.2020 - 23:37DROPS Design answered:
Dear Doris, when you are shaping the raglan, you should decrease on both side of every A.5 pattern - toward the body as well as toward the sleeves = 8 stitches decreased on the round. Happy Knitting!
20.01.2020 - 02:59
![]() Claire Cummins wrote:
Claire Cummins wrote:
I cant find the A5 section of chart to join the sleeves to the body to commence the yolk. Am I just being dim lol
19.01.2020 - 20:43DROPS Design answered:
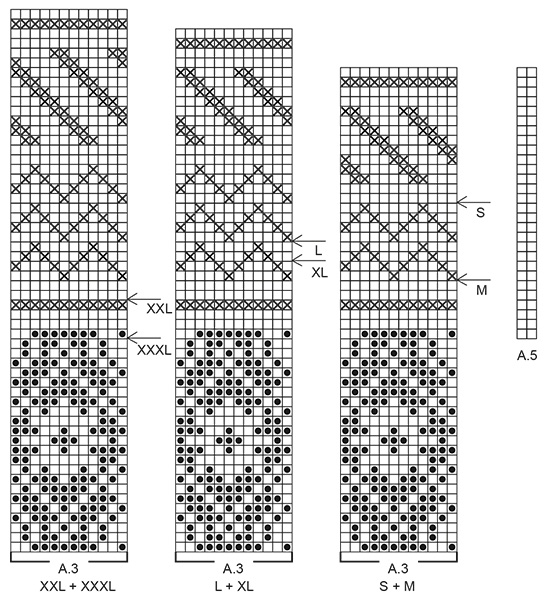
Dear Claire, the diagram for the A.5 pattern is right next to the diagrams of A.3, it is basically a column of 2 stitches knitted with stocking stitch. Happy Knitting!
20.01.2020 - 03:07
![]() Tamsin wrote:
Tamsin wrote:
Yoke: to start between left sleeve and back piece: instructions are for knitting over front/back before top of sleeve so this doesn’t work. Decreases on yoke: I used the charts as instructed for A6 for size S. The chart finishes a row before the 27th decrease. I’ll either knit an extra row or decrease on the last row of pattern which should work ok but thought you should know! Otherwise it all seems to have worked but glad I just spotted the changes to neck.
13.01.2020 - 00:19
![]() Andréa wrote:
Andréa wrote:
Bonjour, Très joli modèle , J'ai tricoté les dos et devant , pas de problème particulier . Maintenant les manches et les augmentations en cours de jacquard et ça se complique . Ave vous une astuce pour reprendre le diagramme sans se perdre dans le motif . Merci beaucoup
08.01.2020 - 21:31
![]() Claire wrote:
Claire wrote:
Bonjour Je fais à taille L j ai tricoté A3 jusqu a la flècheL puis je fais les diminutions et tricote les125 mailles en quel point? Merci A3
31.12.2019 - 13:27DROPS Design answered:
Bonjour Claire! Vous faites 125 mailles suivantes selon le diagramme A.3. Bon tricot!
31.12.2019 - 17:23
![]() Gisèle Fleury wrote:
Gisèle Fleury wrote:
Bonjour, j'ai commencé ce modèle en taille L et m'aperçois que les bandes couleur chêne points reliefs font gaufrées par rapport au point jacquard. Dois-je prendre une aiguille plus grosse pour le jacquard qui paraît plus serré ? Merci.
10.12.2019 - 13:12DROPS Design answered:
Bonjour Mme Fleury, vérifiez bien votre tension; pour que les mesures finales soient les mêmes que celles du schéma, vous devez avoir 20 m x 26 rangs en jersey et jacquard et 20 mailles x 28 rangs en point texturé = 10 x 10 cm. Adaptez la taille des aiguilles si besoin - plus d'infos ici. Bon tricot!
10.12.2019 - 13:28
![]() Jorunn Kløve wrote:
Jorunn Kløve wrote:
Jeg strikker str M
21.11.2019 - 14:48
![]() Jorunn Kløve wrote:
Jorunn Kløve wrote:
Hei, Jeg trenger å snakke med noen om denne genseren. Sliter med å forstå fellingen på halskanten?? Mvh Jorunn
18.11.2019 - 22:26DROPS Design answered:
Hej Jorunn, hvilken størrelse strikker du, så skal vi forklare hvordan du feller over maskerne til halskant :)
21.11.2019 - 14:46
![]() Knitinoz wrote:
Knitinoz wrote:
This pattern is too big in the shoulders if you are a small or short person I find these essays rather tedious not how I or others would write a pattern , I had to alter this pattern as I have had to do with other patterns from drops, out of 6 patterns both knitting and crochet I always have to make alterations as they never fit well.
08.10.2019 - 06:53
|
||||||||||||||||
Valdres#valdressweater |
||||||||||||||||
 |
 |
|||||||||||||||
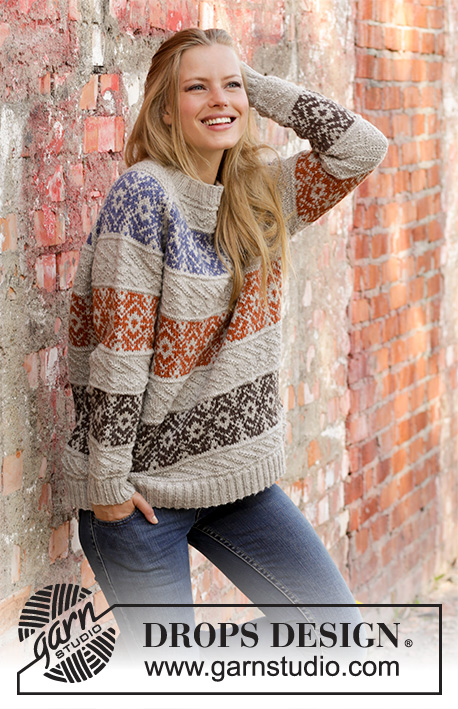
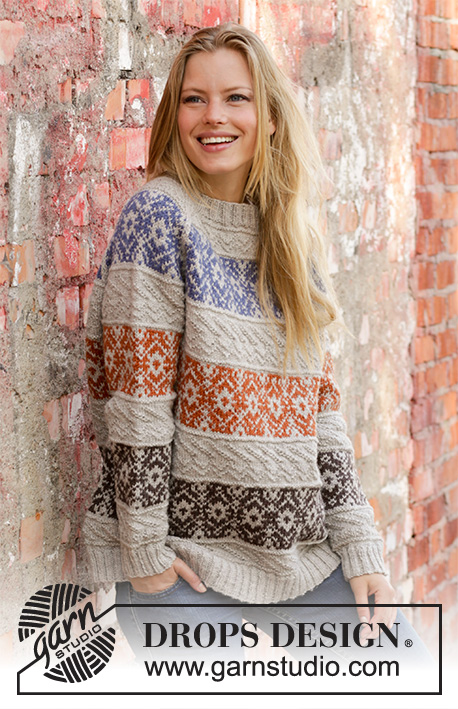
Knitted jumper with raglan in DROPS Karisma. The piece is worked bottom up with Nordic pattern and textured pattern in stripes. Sizes S - XXXL.
DROPS 197-1 |
||||||||||||||||
|
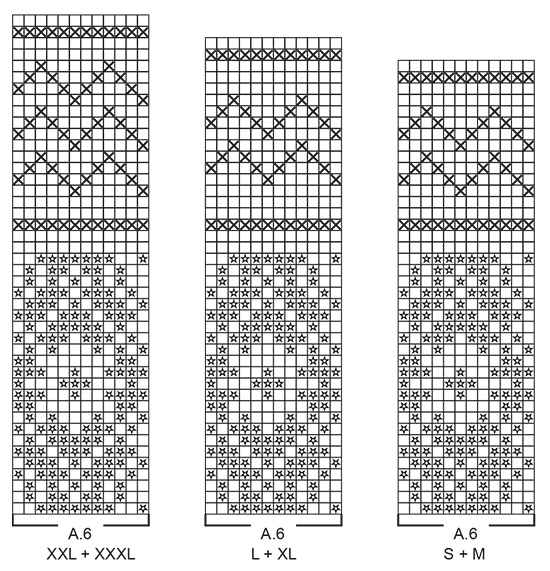
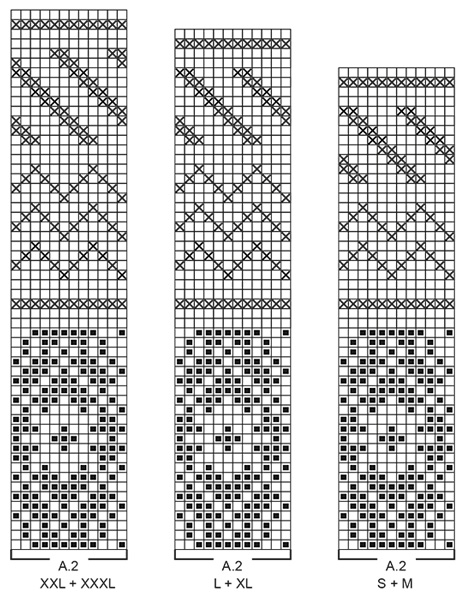
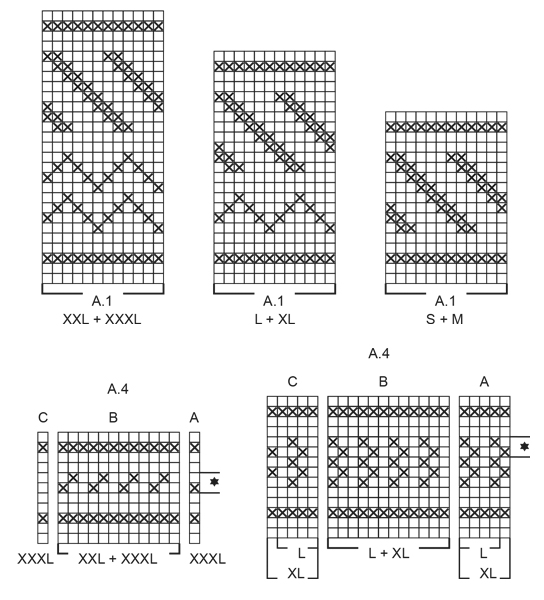
------------------------------------------------------- EXPLANATIONS FOR THE PATTERN: ------------------------------------------------------- PATTERN: See diagrams A.1 to A.6. Choose diagram for your size. DECREASE TIP (evenly spaced): To work out how to decrease evenly, count the total number of stitches on the needle (e.g. 260 stitches) and divide by the number of decreases to be made (e.g. 44) = 5.9. In this example, work together approx. each 5th and 6th stitch. KNITTING TIP-1: To avoid the knitting tension becoming tighter when working Nordic pattern, it is important that the strands at the back of the piece are not tight. You can use a size larger needle when working pattern if this is a problem. KNITTING TIP-2 (for yoke): If the knitting tension is not right in height and you work more rows on 10 cm than described in the text, the yoke will be too short and the armholes too small. This can be adjusted for by working 1 extra row of stocking stitch regularly on the yoke. INCREASE TIP (for sleeves): Work until there are 2 stitches left before the marker thread, make 1 yarn over (= 1 stitch increased), knit 4 (the marker thread sits in the middle of these 4 stitches), make 1 yarn over (= 1 stitch increased). On the next round knit the yarn overs twisted to avoid holes. RAGLAN: Decrease to raglan on each side of each A.5 as follows: Decrease 1 stitch after A.5 as follows: Slip the last stitch in A.5, knit 1, pass the slipped stitch over the knitted stitch (= 1 stitch decreased). Decrease 1 stitch before A.5 as follows: Work until there is 1 stitch left before A.5, knit the next 2 stitches together (= 1 stitch decreased). In other words you decrease 2 stitches by each A.5 and a total of 8 stitches on the round. ------------------------------------------------------- START THE PIECE HERE: ------------------------------------------------------- JUMPER - SHORT OVERVIEW OF THE PIECE: The piece is worked in the round with circular needle, bottom up. The sleeves are worked with short circular needle/double pointed needles. The pieces are placed together and the yoke is worked in the round. BODY: Cast on 260-288-316-344-376-400 stitches with circular needle size 3.5 mm and light oak. Work rib (= knit 2 / purl 2) for 5 cm. Change to circular needle size 4.5 mm and knit 1 round where you decrease 44-48-52-56-64-64 stitches evenly on round – read DECREASE TIP = 216-240-264-288-312-336 stitches. Knit 1 round as follows: Insert 1 marker in the first stitch, knit 107-119-131-143-155-167 stitches, insert 1 marker in the next stitch, knit to end of round. The markers mark the sides of the piece. Then work A.1 over all stitches (= 18-20-22-24-26-28 repeats of 12 stitches). REMEMBER THE KNITTING TENSION! When A.1 has been worked 1 time in height, insert 1 marker in the middle of the round (you will measure from this marker later). Then work A.2 over A.1- read KNITTING TIP-1. When A.2 has been worked 1 time in height, work A.3 over A.2. When you have worked as far as the arrow in A.3 (see arrow for your size) work the next round in A.3 as follows: Cast off 4 stitches, work the next 101-113-125-137-149-161 stitches as before, cast off the next 7 stitches, work the next 101-113-125-137-149-161 stitches as before, cast off the last 3 stitches. The piece measures approx. 32-29-32-32-31-30 cm from the marker (approx. 43-40-45-45-46-45 cm whole length). Lay the piece to one side and work the sleeves. SLEEVES: The piece is worked in the round with double pointed needles; change to short circular needle when necessary. Cast on 48-52-52-56-56-60 stitches with double pointed needles size 3.5 mm and light oak. Work rib (= knit 2 / purl 2) for 5 cm. Change to double pointed needles size 4.5 mm and knit 1 round where you decrease 8-10-8-10-8-10 stitches evenly on round = 40-42-44-46-48-50 stitches. READ THE WHOLE SECTION BEFORE CONTINUING: You work a pattern of approx. 8-8-5-5-4-4 cm, if you wish to adjust the length of the sleeve, do it now – see below. Then work the same pattern stripe as on the body (from the marker to the armhole = approx. 32-29-32-32-31-30 cm), i.e. the whole sleeve should measure approx. 45-42-42-42-40-39 cm. Work as follows: Insert 1 marker thread at the beginning of the round (= mid under sleeve). Work 1 round in stocking stitch, then work the next round as follows: Work A.4a (= 2-3-4-5-0-1 stitches), A.4b (= 12 stitches) a total of 3-3-3-3-4-4 times in width, A.4c (= 2-3-4-5-0-1 stitches). Continue until A.4 has been worked 1 time in height – NOTE: if you would like a longer sleeve, repeat the 2 rows marked with a star to desired length before continuing with the next round in A.4. If you would like a shorter sleeve, just work the desired number of rounds of A.4, but work a minimum of 1 of the purled rounds. – AT THE SAME TIME when the piece measures 10-9-9-10-12-12 cm increase 1 stitch on each side of the marker thread (= 2 stitches increased) – read INCREASE TIP! Increase like this every 2-1½-1½-1½-1-1 cm a total of 16-21-20-19-24-23 times = 72-84-84-84-96-96 stitches. The stitches in A.4a and A.4c and the increased stitches are worked into pattern A.4b as you go. When A.4 has been worked 1 time in height, work A.2 (= 12 stitches) over all stitches – A.2 is worked over A.4b and is adjusted out to each side; the increased stitches are worked into the pattern as you go. When A.2 has been worked 1 time in height, work A.3 (= 12 stitches) over A.2. When all the stitches under the sleeve are increased, work A.3 a total of 6-7-7-7-8-8 times in width. When you have worked as far as the arrow in A.3, work the next round as follows: Cast off 4 stitches, work the next 65-77-77-77-89-89 stitches as before, cast off the last 3 stitches. The sleeve measures approx. 45-42-42-42-40-39 cm. Work 1 more sleeve in the same way. YOKE: Place the sleeves on the same circular needle as the body, where you cast off stitches for the armholes = 332-380-404-428-476-500 stitches. Start the round in the transition between right sleeve and back piece. Work as follows: * A.5 (= 2 stitches, raglan line), continue with A.3 as before over the next 97-109-121-133-145-157 stitches (= front/back piece), A.5 (= 2 stitches, raglan line), work pattern A.3 as before over the next 65-77-77-77-89-89 stitches (= sleeve) *, work from *-* a total of 2 times – read KNITTING TIP-2. Continue this pattern and decrease to RAGLAN – read description above, every 2nd round a total of 27-31-32-33-37-39 times. When A.3 has been completed in height, work A.6 (= 12 stitches) over A.3. After the last decrease to raglan there are 116-132-148-164-180-188 stitches on the round. Continue until A.6 has been completed. The yoke measures approx. 20-23-24-25-27-28 cm. You can now work an elevation in the back of the neck so that the yoke is slightly higher at the back. This elevation can be left out; the neck is then the same both front and back. Work elevation in back of neck or go straight to working neck if you do not want an elevation. ELEVATION IN BACK OF NECK: Skip this section if you do not want an elevation. Insert 1 marker at the beginning of the round (this marks the start of the round after the elevation has been worked). Continue with light oak and knit to mid back, insert 1 marker. Start from the right side and knit as far as 30-30-34-34-40-40 stitches past the marker, turn, tighten the strand and purl 60-60-68-68-80-80 stitches back. Turn, tighten the strand and knit 54-54-61-61-72-72 stitches, turn, tighten the strand and purl 48-48-54-54-64-64 stitches back. Turn, tighten the strand and knit 42-42-48-48-56-56 stitches, turn, tighten the strand and purl 36-36-42-42-48-48 stitches back. Turn, tighten the strand and knit 30-30-35-35-40-40 stitches, turn, tighten the strand and purl 24-24-28-28-32-32 stitches, turn, tighten the strand and knit to mid back. Cut the strand. The round now starts at the marker, i.e. the transition between right sleeve and back piece. NECK: Continue with light oak and work the next round with decreases as follows: Knit * 40-46-54-58-66-70 stitches and decrease 0-6-12-13-19-22 stitches evenly over these stitches – remember DECREASE TIP, knit together the next 18-20-20-24-24-24 stitches 2 and 2 (= 9-10-10-12-12-12 stitches decreased) *, work from *-* a total of 2 times = 98-100-104-114-118-120 stitches. Change to circular needle size 3.5 mm and work the next round as follows: * Knit 2, purl 2, knit 1, 1 yarn over (= 1 stitch increased), purl 2, knit 2, 1 yarn over (= 1 stitch increased), purl 1 *, work from *-* until there are 8-0-4-4-8-0 stitches left, work rib (= knit 2 / purl 2) over the remaining stitches = 116-120-124-136-140-144 stitches. The yarn overs are worked twisted in rib (i.e. knit 2 / purl 2) on the next round to avoid holes. Cast off with knit over knit and purl over purl when the rib measures 3 cm. ASSEMBLY: Sew the openings under the sleeves in the outermost loop of the outermost stitch. |
||||||||||||||||
Diagram explanations |
||||||||||||||||
|
||||||||||||||||
 |
||||||||||||||||
 |
||||||||||||||||
 |
||||||||||||||||
 |
||||||||||||||||
 |
||||||||||||||||
Have you finished this pattern?Tag your pictures with #dropspattern #valdressweater or submit them to the #dropsfan gallery. Do you need help with this pattern?You'll find 31 tutorial videos, a Comments/Questions area and more by visiting the pattern on garnstudio.com. © 1982-2026 DROPS Design A/S. We reserve all rights. This document, including all its sub-sections, has copyrights. Read more about what you can do with our patterns at the bottom of each pattern on our site. |
||||||||||||||||


With over 40 years in knitting and crochet design, DROPS Design offers one of the most extensive collections of free patterns on the internet - translated to 17 languages. As of today we count 325 catalogues and 12298 patterns translated into English (UK/cm).
We work hard to bring you the best knitting and crochet have to offer, inspiration and advice as well as great quality yarns at incredible prices! Would you like to use our patterns for other than personal use? You can read what you are allowed to do in the Copyright text at the bottom of all our patterns. Happy crafting!
Post a comment to pattern DROPS 197-1
We would love to hear what you have to say about this pattern!
If you want to leave a question, please make sure you select the correct category in the form below, to speed up the answering process. Required fields are marked *.