
Popular categories
Looking for a yarn?


Comments / Questions (234)
![]() Elke wrote:
Elke wrote:
Ich finde das Muster A1 nicht.
06.04.2024 - 15:54DROPS Design answered:
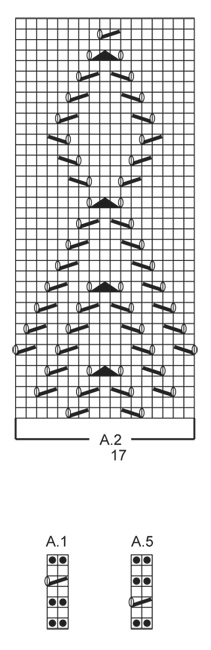
Liebe Elke, das Diagram A.1 finden Sie links von A.5 unter A.2 (über A.6). Viel Spaß beim Stricken!
08.04.2024 - 07:55
![]() Irmgard wrote:
Irmgard wrote:
Ist es tatsächlich so gedacht, dass das Muster am Saum nicht symmetrisch ist?
17.03.2024 - 14:39DROPS Design answered:
Liebe Irmgard, das Lochmuster sollte zentrier sein, beachten Sie, daß es richtig gestrickt wird. Viel Spaß beim Stricken!
18.03.2024 - 09:22
![]() Yvonne Havelaar wrote:
Yvonne Havelaar wrote:
Hallo, Ik ben bezig met maat l van deze jurk te maken, maar als ik de raglan moet maken dan kom ik niet uit met de meerdering die jullie aan geven . 1 steek voor de markering maar moet dat niet 2 steken zijn. Want hoe doe je anders 1 omsl 1 r.1 omsl. 1r gedr. en dan de gemarkeerde r.?
19.11.2023 - 11:35DROPS Design answered:
Dag Yvonne,
Je meerdert inderdaad 2 steken aan beide kanten van elke markeerder. Dit staat ook aangegeven bovenaan bij RAGLAN onder maat L-XL-XXL-XXXL.
21.11.2023 - 23:12
![]() Yvonne Havelaar wrote:
Yvonne Havelaar wrote:
Hallo, Ik ben bezig met maat l van deze jurk te maken, maar als ik de raglan moet maken dan kom ik niet uit met de meerdering die jullie aan geven . 1 steek voor de markering maar moet dat niet 2 steken zijn. Want hoe doe je anders 1 omsl 1 r.1 omsl. 1r gedr. en dan de gemarkeerde r.?
19.11.2023 - 11:34
![]() Elina wrote:
Elina wrote:
Merkkien selityksessä ei ole ruutupiirrosten selitystä kyllä oikein. Jos on poikki viiva kahden "silmukan" yli ja sen perässä pystyssä soikio niin onko se kaksi yhteen ja langankierto? Muutoin ei kyllä tule reikiä eikä merkkien selitykset ole ajantasalla.
11.05.2023 - 10:05DROPS Design answered:
Kun piirroksessa on poikkiviiva, tämän merkin kohdalla neulotaan 2 silmukkaa yhteen. Soikion kohdalla tehdään 1 langankierto 2 silmukan väliin (tämä kohta on merkitty erikseen, katso merkkien selitykset).
12.05.2023 - 14:15
![]() Corry wrote:
Corry wrote:
Ich bin bei dieser Stelle wo man die markierer gesetzt hat und nun soll ich gleichzeitig stricken und die raglanzunahmen machen. Geht aber nicht, da man bei der Vorrunde beim Setzen der markierer genau bei der 1. Markierten Masche ankommt und nun steht da man soll eine halbe raglanzunahme stricken... was soll das dann sein und wie mache ich das, wenn die nächste Masche schon die markierte ist? Liebe Grüße
22.02.2023 - 21:20DROPS Design answered:
Liebe Corry, am Anfang der Runde stricken Sie die Raglanzunahmen mit der rechts verschränke Masche nach der rechte Maschen mit der Markieurng - die Zunahme vor dieser Markierung stricken Sie am Ende der Runde. Viel spaß beim stricken!
23.02.2023 - 13:42
![]() Cianna wrote:
Cianna wrote:
I am a little confused at the point to separate the sleeves. I am making the XL pattern and it says I should finish A.3 and begin A.4, then I should have 358st which is about 6 3/4", but 358st is several rows before the end of A.3 and under 6". I am confused because I am on gauge but not sure what went wrong. I also noted that with my larger chest the neckline is a little wide and the back is just a little too wide. I may have to adjust the pattern.
03.02.2022 - 21:54DROPS Design answered:
Dear Cianna, when piece all increases are done, there are 358 sts and piece measures 6¾'', continue in pattern as explained before, but now divide piece for body and sleeve. When A.3 will be workred, just work A.4 over A.3 (this might happen after dividing piece, just make sure height is right to avoid tight armholes). Happy knitting!
04.02.2022 - 08:40
![]() Mathilde wrote:
Mathilde wrote:
Hej, jeg er forbi alle raglan udtagninger (20 i alt) og skal til at tage af til ærmer. Størrelse M. Jeg har 314 masker rundt, men mit arbejde måler 20 cm. Jeg har strikket med de foreslåede pinde og garntype (muskat), og synes ikke jeg strikker særlig løst. Hvordan kan det passe?
27.08.2021 - 18:31DROPS Design answered:
Hei Mathile. Strikket du en prøvelapp før du begynte? Og fikk du da en strikkefasthet på 21 masker x 28 pinner glattstrikk på 10 x 10 cm med pinne 4? Husk at strikkefastheten er veiledende, får du ikke den oppgitt strikkefastheten som er oppgitt i oppskriften, må du prøve med en tynnere eller tykkere pinne, slik at strikkefastheten stemmer. Da vil også målene stemme med det som står i oppskriften. mvh DROPS design
30.08.2021 - 12:00
![]() Sandra Lúcia wrote:
Sandra Lúcia wrote:
Gostaria de saber se tem como comprar essas peças lindas e qual valor e procedimento ? Obrigada ...
16.07.2021 - 10:58DROPS Design answered:
Bom dia, Pode comprar os fios para tecer estas peças nas lojas DROPS. Veja a lista de lojas que falam português no link abaixo: https://www.garnstudio.com/findastore.php?id=28&cid=28
20.07.2021 - 09:15
![]() Kolfinna wrote:
Kolfinna wrote:
Hello! I have been trying to wrap my head around the instructions for the raglan increases but it's not clicking. Is it (yo, k, yo, k, yo, k, yo) with the first and last yo twisted in the next round? And what does k1 twisted mean? Thanks!
01.07.2021 - 05:26DROPS Design answered:
Dear Kolfinna, in size L - XXXL increase for raglan starting 2 sts before the st with a marker: YO (work it into back loop on next round = no hole), K1, YO (work it in front loop on next round = hole), K1 twisted, K1 = marker, K1 twisted, YO (work it in front loop on next round = hole), K1, YO (work it into back of loop on next round = no hole). This video shows how to work a YO into front/back loop on next round, and this one shows how to knit a twisted stitch. Happy knitting!
01.07.2021 - 09:07
|
|||||||||||||||||||
Summer Feeling#summerfeelingdress |
|||||||||||||||||||
 |
 |
||||||||||||||||||
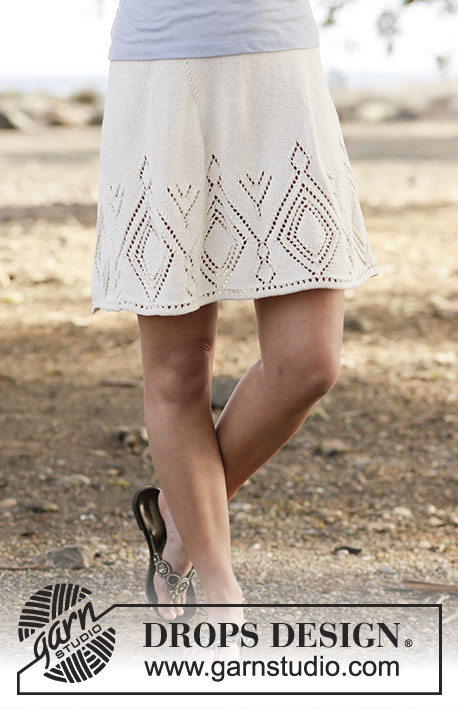
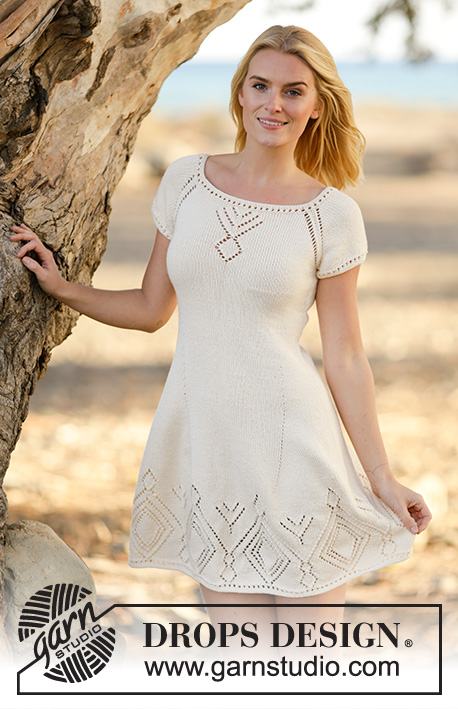
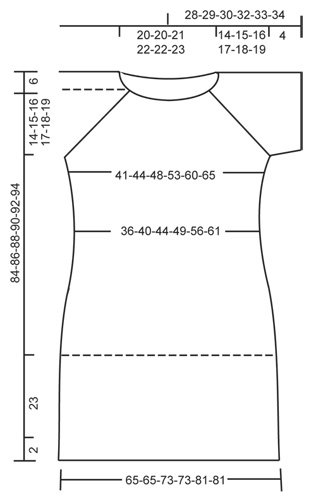
Knitted DROPS dress with lace pattern and raglan in ”Muskat” or "Belle". Worked top down. Size: S - XXXL.
DROPS 160-1 |
|||||||||||||||||||
|
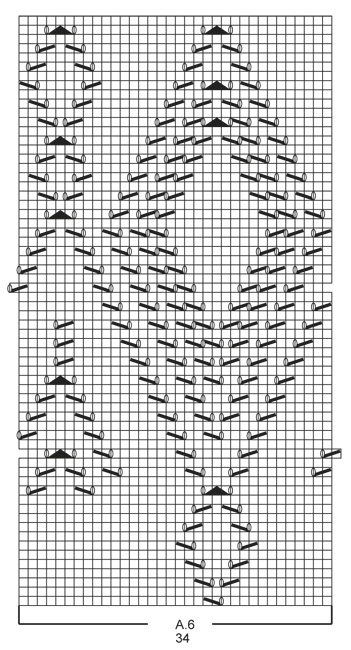
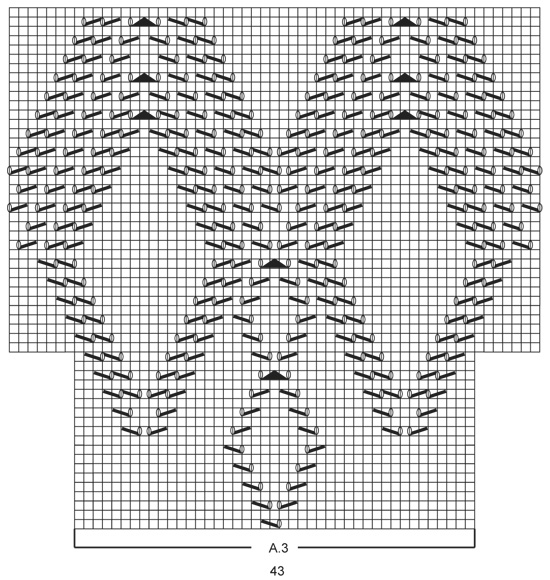
PATTERN: See diagrams A.1 to A.6. DECREASE TIP: Dec 1 st before marker as follows: Work until 2 sts remain before marker, slip 1 st as if to K, K 1, psso. Dec 1 st after marker as follows: K 2 tog. RAGLAN: Inc differently for raglan in the different sizes: SIZE S-M: Inc 1 sts on each side of each marker (= 8 sts inc in total) as follows: 1 YO, K 1 twisted, K 1 (= st with marker), K 1 twisted, 1 YO. NOTE: The inc on each sides of 1st marker (= in the last st on round) is worked as follows: at beginning of round, K 1 twisted, 1 YO. At the end of round: 1 YO, K 1 twisted, K.1 (= st with marker) Do not work YOs twisted on next round, they should make holes, repeat inc every other round 17-19 more times. SIZE L-XL-XXL-XXXL: Inc 2 sts on each side of each marker (= 16 sts inc in total each round) as follows: 1 YO, K 1, 1 YO, K 1 twisted, K 1(= st with marker), K 1 twisted, 1 YO, K 1, 1 YO (first and last YO is worked twisted on next round, it should not make a hole but, the 2 midle YO should be K as normal and make a hole). Repeat inc on every other round 1-1-1-3 more times. NOTE: The inc on eich side of 1st marker(= in the last st on round) is worked as follows: at beginning of round, K 1 twisted, 1 YO, K 1, 1 YO. At the end of round: 1 YO, K 1, 1 YO, K 1 twisted, K.1 (= st with marker) Then inc like as follows: Inc 1 sts at each side of each marker (= 8 sts inc in total) as follows: 1 YO, K 1 twisted, K 1(= st with marker), K 1 twisted, 1 YO. Do not K YOs twisted on next round, they should make holes. Repeat inc every other round 19-20-22-21 more times in total. INCREASE TIP: Inc 1 st by making a YO. On next round K YO twisted to avoid holes. ---------------------------------------------------------- YOKE: Worked in the round on circular needle, top down. Cast on 134-134-140-144-144-148 sts on circular needle size 3.5 mm with Muskat. Work A.1 (= 2 sts) over all sts. When A.1 has been worked 1 time vertically, switch to circular needle size 4 mm. On next round K all sts and inc 16-20-14-22-42-46 sts evenly = 150-154-154-166-186-194 sts. On next round insert 4 markers in the midle st of each raglan as follows: Insert 1st in last st on round, K 45-47-49-55-65-71 sts (= front piece), K 1 sts and insert 2nd marker in this st, K 28-28-26-26-26-24 sts (= sleeve), K 1 sts and insert 3rd marker in this st, K 45-47-49-55-65-71 sts (= back piece), K 1 st and insert 4th marker in this st, K 28-28-26-26-26-24 sts (= sleeve), K 1 sts (1st marker is placed in this st). REMEMBER THE KNITTING TENSION Then work as follows - AT THE SAME TIME inc for RAGLAN - see explanation above. Work half the raglan inc for 1st marker (see explanation above) K 13-14-14-17-22-25 sts, A.2 (= 17 sts), K until 1-1-2-2-2-2 st remains before 2nd marker, work RAGLAN - see explanation above, K until 1-1-2-2-2-2 sts remain before 3rd marker, work raglan, K 0-1-1-4-9-12 sts, A.3 (= 43 sts), K until 1-1-2-2-2-2 st remains before 4th marker, work raglan, K until 1-1-2-2-2-2 sts remain before 1st marker, work raglan. Work the inc sts in stocking st until they can be worked in pattern as shown in A.3. When A.2 has been worked 1 time vertically, work in stocking st over all these sts. When A.3 has been worked 1 time vertically, work A.4 (= 57 sts) over A.3. After all inc are done there are 294-314-338-358-394-426 sts on needle. Piece measures approx. 14-15-16-17-18-19 cm. Continue with pattern and stocking st as before AT THE SAME TIME work as follows: Work the first 81-87-95-103-117-129 sts (= front piece), slip the next 66-70-74-76-80-84 sts on a stitch holder for sleeve, cast on 6-6-6-8-8-8 sts under sleeve (insert a marker in the middle of the new sts), work the next 81-87-95-103-117-129 sts (= back piece), slip the next 66-70-74-76-80-84 sts on a stitch holder for sleeve, cast on 6-6-6-8-8-8 sts under sleeve (insert a marker in the middle of the new sts) = 174-186-202-222-250-274 sts remain on needle. Insert 1 marker in piece, NOW MEASURE PIECE FROM HERE. Continue to work A.4 and stocking st over the remaining sts. When piece measures 3 cm, dec 1 st on each side of each markers in the sides (= 4 sts dec) - READ DECREASE TIP! Repeat dec every 2½-4-4-4-4-4 cm 5-3-3-3-3-3 more times = 150-170-186-206-234-258 sts. When A.4 has been worked 1 time vertically, work in stocking st over all sts. When piece measures 18-19-20-21-22-23 cm insert 4 markers as follows: Work 15-17-19-21-25-27 sts, insert 1st marker, work 45-51-55-61-67-75 sts, insert 2nd marker, work 30-34-38-42-50-54 sts, insert 3rd marker, work 45-51-55-61-67-75 sts, insert 4th marker, work the remaining 15-17-19-21-25-27 sts. 1st and 2nd marker are on front piece, and 3rd and 4th marker are on back piece. Move the markers upwards when working. On next round inc 1 st before 1st and 3rd marker and 1 st after 2nd and 4th marker (= 4 sts inc) - READ INCREASE TIP. NOTE: No of sts mid front and mid back is the same, inc in side sts. Repeat inc every 6th round 1 more time, then every 4th round 6-5-6-5-6-10 times, then every other round 22-18-22-18-18-8 times = 270-270-306-306-338-338 sts. On next round, inc 2-2-0-0-2-2 sts evenly = 272-272-306-306-340-340 sts. Work in stocking st until piece measures 45-46-47-48-49-50 cm (or desired length, approx. 25 cm remain). Then work A.6 (= 34 sts) 8-8-9-9-10-10 times in total in width. When A.6 has been worked 1 time vertically, switch to circular needle size 3.5 mm. Work A.5 over all sts. Cast off. SLEEVE: Worked in the round on double pointed needles. Slip sts from stitch holder back on double pointed needles size 4 mm and cast on 6-6-6-8-8-8 sts under sleeve = 72-76-80-84-88-92 sts. Work in stocking st for 2 cm, on next round dec 8 sts evenly = 64-68-72-76-80-84 sts. Switch to double pointed needles size 3.5 mm. Work A.5 over all sts. Cast off. Work the other sleeve the same way. |
|||||||||||||||||||
Diagram explanations |
|||||||||||||||||||
|
|||||||||||||||||||
 |
|||||||||||||||||||
 |
|||||||||||||||||||
 |
|||||||||||||||||||
 |
|||||||||||||||||||
 |
|||||||||||||||||||
Have you finished this pattern?Tag your pictures with #dropspattern #summerfeelingdress or submit them to the #dropsfan gallery. Do you need help with this pattern?You'll find 24 tutorial videos, a Comments/Questions area and more by visiting the pattern on garnstudio.com. © 1982-2026 DROPS Design A/S. We reserve all rights. This document, including all its sub-sections, has copyrights. Read more about what you can do with our patterns at the bottom of each pattern on our site. |
|||||||||||||||||||


With over 40 years in knitting and crochet design, DROPS Design offers one of the most extensive collections of free patterns on the internet - translated to 17 languages. As of today we count 324 catalogues and 12290 patterns translated into English (UK/cm).
We work hard to bring you the best knitting and crochet have to offer, inspiration and advice as well as great quality yarns at incredible prices! Would you like to use our patterns for other than personal use? You can read what you are allowed to do in the Copyright text at the bottom of all our patterns. Happy crafting!
Post a comment to pattern DROPS 160-1
We would love to hear what you have to say about this pattern!
If you want to leave a question, please make sure you select the correct category in the form below, to speed up the answering process. Required fields are marked *.