
Popular categories
Looking for a yarn?


Comments / Questions (232)
![]() Doucet wrote:
Doucet wrote:
Bonjour, je tricote les augmentations du raglan suivant explications T S mais celles-ci semblent n'être que d'un côté du marqueur...je ne comprends pas comment augmenter de chaque côté du marqueur. Avant marqueurs 2 et 4 il reste 0 mailles, il n'y a donc pas d'augmentation avant le marqueur? Merci d'avance pour votre aide
16.03.2015 - 23:18DROPS Design answered:
Bonjour Mme Doucet, le raglan et l'empiècement ont été reformulés, il est recommandé d'imprimer à nouveau les explications. Bon tricot!
01.06.2015 - 16:02
![]() Jeanette wrote:
Jeanette wrote:
Hei, Etter å ha kjempet meg gjennom feilen som står i heftet ang mønsteret bak har jeg oppdaget enda ett problem, jeg får ikke antallet masker etter økningen på str L til å stemme med det som skal være før man tar av maskene til ermet. Etter å ha regnet på økningene kommer jeg fremdeles fram til at man skal stå igjen med 348 masker på pinnen og ikke 338 som det står i oppskriften, hvordan løser jeg dette?
16.03.2015 - 22:12DROPS Design answered:
Hej Jeanette, Jo men opskriften stemmer. Du har 154 m, tager 16 m ud 2 gange, og så tager du 8 m ud totalt 19 gange = 338 m. God fornøjelse!
21.05.2015 - 09:40
![]() Happy Knitter wrote:
Happy Knitter wrote:
Kære drops, Jeg er godt i gang med at strikke denne superb kjole, men ifølge tegningen er rygstykket 6 cm højere end forstykket. Jeg kan ikke se hvor i opskriften det er beskrevet. Kan i hjælpe mig ? mvh Happy knitter
16.03.2015 - 18:27DROPS Design answered:
Hej Happy Knitter, de 6 cm er målet fra starten af raglanovergangen og op til skulderen og det er ens både foran og bagpå, så dem får du automatisk når du følger opskriften. God fornøjesel!
18.05.2015 - 12:28
![]() Elizabeth Knudsen wrote:
Elizabeth Knudsen wrote:
Jeg synes det blir for mye mønster med det store hullmønstret bak på ryggen i tillegg til den store hullmønsterborden nede på skjørtet. Enten eller, etter min smak. Men jeg skulle gjerne strikket kjolen og kun ha det lille hullmønstret som er oppe på forstykket, både foran og bak.
16.03.2015 - 11:44
![]() Hina wrote:
Hina wrote:
Ser at Nina har skrevet at det er str for lite i avsnittet om bærestykke. Jeg får samme problem, mønstret mitt kommer ikke på midten bak. Strikker i str xl, og lurer nå på hvor mange masker jeg må strikke rett etter 3.merke slik at mønstret bak på ryggen havner midten??
12.03.2015 - 20:35DROPS Design answered:
Hej Hina, opskriften er rettet, skriv gerne en ny ud med rettelserne. God fornøjelse!
21.05.2015 - 14:02
![]() Aurora wrote:
Aurora wrote:
Buongiorno a tutti, vi ringrazio molto per i consigli e l'attenzione,provo cosi' poi vi faro' sapere. Cordiali saluti. Aurora.
11.03.2015 - 08:21
![]() Aurora wrote:
Aurora wrote:
Buongiorno a tutti, volevo gentilmente sapere se questo modello lo posso eseguire anche dal basso verso l'alto,( perche' mi piace molto ma proprio non riesco a lavorare top down),e se si, potreste darmi qualche indicazione? In attesa di un riscontro porgo cordiali saluti. Aurora.
10.03.2015 - 11:05DROPS Design answered:
Buonasera Aurora. In base alla sua esperienza, potrebbe provare a modificare le istruzioni partendo dalla fine e procedendo passo passo verso l’inizio, con le opportune modifiche (p.es diminuzioni al posto di aumenti). Purtroppo non ci è possibile fornirle le spiegazioni dettagliate per la lavorazione dal basso verso l’alto. Buon lavoro!
10.03.2015 - 22:50
![]() Maren Hasenkopf wrote:
Maren Hasenkopf wrote:
Please explain when to slip the marker at raglan increases. Do I slip the marker on the first and third marker before or after the yarn over?
08.03.2015 - 16:00DROPS Design answered:
Dear Mrs Hasenkopf, raglan and yoke have been rephrased - it may be better to print pattern once again with corrections. Happy knitting!
01.06.2015 - 16:02
![]() Elin wrote:
Elin wrote:
Jeg tror jeg har funnet ut av det, Nina. Hvis du lar det første kastet på den første raglanøkningen være på forstykkesiden av merketråden din vil maskeantallet på forstykket øke. Når du kommer til det andre merket blir det omvendt, da blir det kastet ETTER de tre raglanmaskene som blir økningen på bakstykket. Så gjentar du når du kommer til det andre ermet. Oppskriften er litt kronglete skrevet, men hvis du gjør det sånn blir det riktig! :)
07.03.2015 - 21:24
![]() Nina Skaug wrote:
Nina Skaug wrote:
Strikker står S og det blir kun øking på ermene mellom ermemarkørene og ikke noe økning på for og bakstykket. Dette bli feil!!!!!
07.03.2015 - 13:45
|
|||||||||||||||||||
Summer Feeling#summerfeelingdress |
|||||||||||||||||||
 |
 |
||||||||||||||||||
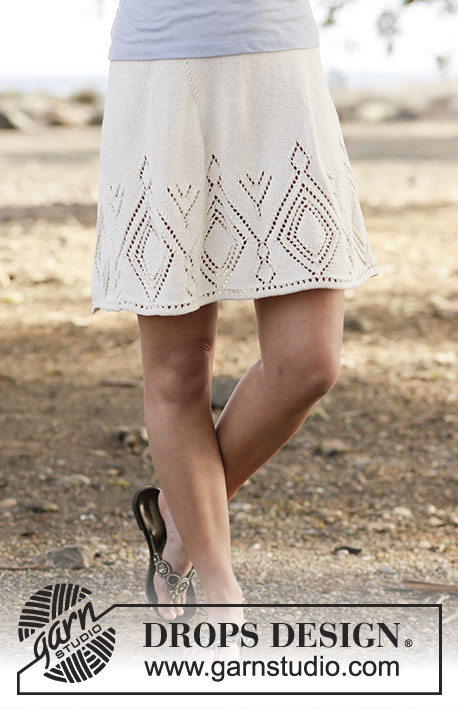
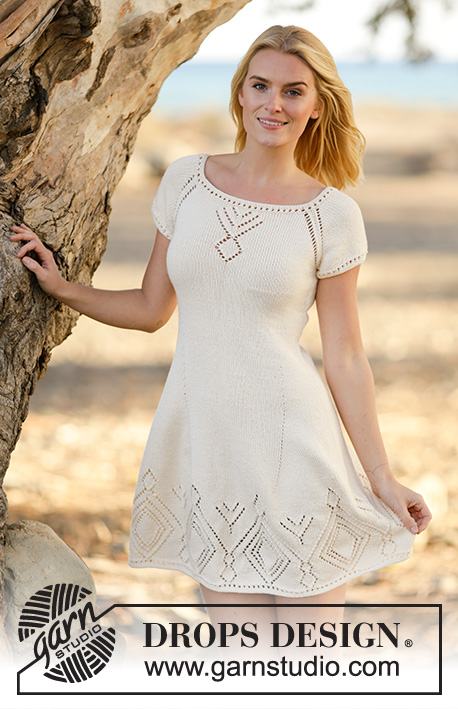
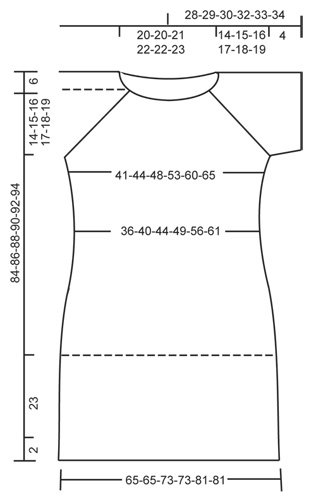
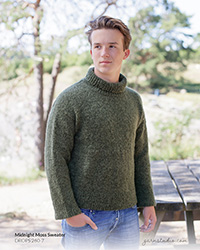
Knitted DROPS dress with lace pattern and raglan in ”Muskat” or "Belle". Worked top down. Size: S - XXXL.
DROPS 160-1 |
|||||||||||||||||||
|
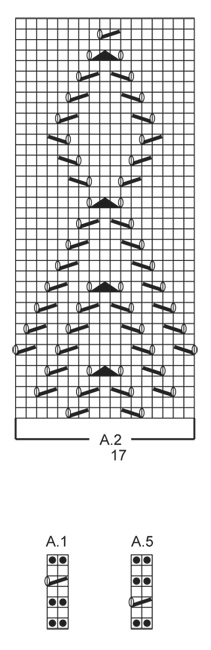
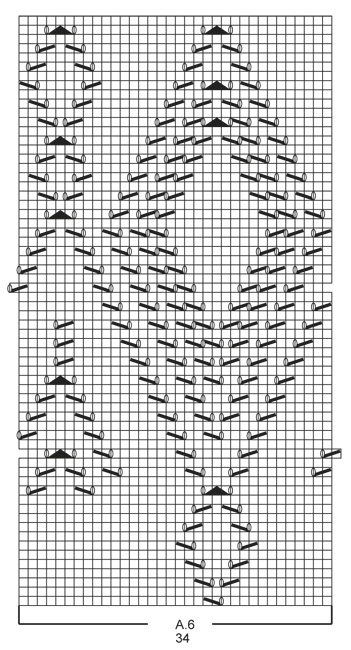
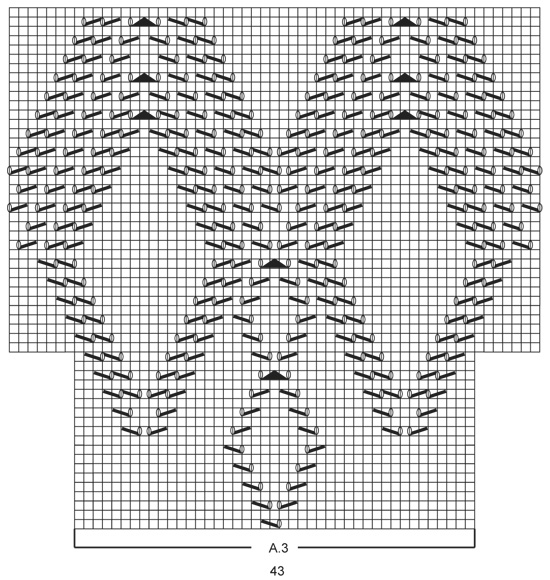
PATTERN: See diagrams A.1 to A.6. DECREASE TIP: Dec 1 st before marker as follows: Work until 2 sts remain before marker, slip 1 st as if to K, K 1, psso. Dec 1 st after marker as follows: K 2 tog. RAGLAN: Inc differently for raglan in the different sizes: SIZE S-M: Inc 1 sts on each side of each marker (= 8 sts inc in total) as follows: 1 YO, K 1 twisted, K 1 (= st with marker), K 1 twisted, 1 YO. NOTE: The inc on each sides of 1st marker (= in the last st on round) is worked as follows: at beginning of round, K 1 twisted, 1 YO. At the end of round: 1 YO, K 1 twisted, K.1 (= st with marker) Do not work YOs twisted on next round, they should make holes, repeat inc every other round 17-19 more times. SIZE L-XL-XXL-XXXL: Inc 2 sts on each side of each marker (= 16 sts inc in total each round) as follows: 1 YO, K 1, 1 YO, K 1 twisted, K 1(= st with marker), K 1 twisted, 1 YO, K 1, 1 YO (first and last YO is worked twisted on next round, it should not make a hole but, the 2 midle YO should be K as normal and make a hole). Repeat inc on every other round 1-1-1-3 more times. NOTE: The inc on eich side of 1st marker(= in the last st on round) is worked as follows: at beginning of round, K 1 twisted, 1 YO, K 1, 1 YO. At the end of round: 1 YO, K 1, 1 YO, K 1 twisted, K.1 (= st with marker) Then inc like as follows: Inc 1 sts at each side of each marker (= 8 sts inc in total) as follows: 1 YO, K 1 twisted, K 1(= st with marker), K 1 twisted, 1 YO. Do not K YOs twisted on next round, they should make holes. Repeat inc every other round 19-20-22-21 more times in total. INCREASE TIP: Inc 1 st by making a YO. On next round K YO twisted to avoid holes. ---------------------------------------------------------- YOKE: Worked in the round on circular needle, top down. Cast on 134-134-140-144-144-148 sts on circular needle size 3.5 mm with Muskat. Work A.1 (= 2 sts) over all sts. When A.1 has been worked 1 time vertically, switch to circular needle size 4 mm. On next round K all sts and inc 16-20-14-22-42-46 sts evenly = 150-154-154-166-186-194 sts. On next round insert 4 markers in the midle st of each raglan as follows: Insert 1st in last st on round, K 45-47-49-55-65-71 sts (= front piece), K 1 sts and insert 2nd marker in this st, K 28-28-26-26-26-24 sts (= sleeve), K 1 sts and insert 3rd marker in this st, K 45-47-49-55-65-71 sts (= back piece), K 1 st and insert 4th marker in this st, K 28-28-26-26-26-24 sts (= sleeve), K 1 sts (1st marker is placed in this st). REMEMBER THE KNITTING TENSION Then work as follows - AT THE SAME TIME inc for RAGLAN - see explanation above. Work half the raglan inc for 1st marker (see explanation above) K 13-14-14-17-22-25 sts, A.2 (= 17 sts), K until 1-1-2-2-2-2 st remains before 2nd marker, work RAGLAN - see explanation above, K until 1-1-2-2-2-2 sts remain before 3rd marker, work raglan, K 0-1-1-4-9-12 sts, A.3 (= 43 sts), K until 1-1-2-2-2-2 st remains before 4th marker, work raglan, K until 1-1-2-2-2-2 sts remain before 1st marker, work raglan. Work the inc sts in stocking st until they can be worked in pattern as shown in A.3. When A.2 has been worked 1 time vertically, work in stocking st over all these sts. When A.3 has been worked 1 time vertically, work A.4 (= 57 sts) over A.3. After all inc are done there are 294-314-338-358-394-426 sts on needle. Piece measures approx. 14-15-16-17-18-19 cm. Continue with pattern and stocking st as before AT THE SAME TIME work as follows: Work the first 81-87-95-103-117-129 sts (= front piece), slip the next 66-70-74-76-80-84 sts on a stitch holder for sleeve, cast on 6-6-6-8-8-8 sts under sleeve (insert a marker in the middle of the new sts), work the next 81-87-95-103-117-129 sts (= back piece), slip the next 66-70-74-76-80-84 sts on a stitch holder for sleeve, cast on 6-6-6-8-8-8 sts under sleeve (insert a marker in the middle of the new sts) = 174-186-202-222-250-274 sts remain on needle. Insert 1 marker in piece, NOW MEASURE PIECE FROM HERE. Continue to work A.4 and stocking st over the remaining sts. When piece measures 3 cm, dec 1 st on each side of each markers in the sides (= 4 sts dec) - READ DECREASE TIP! Repeat dec every 2½-4-4-4-4-4 cm 5-3-3-3-3-3 more times = 150-170-186-206-234-258 sts. When A.4 has been worked 1 time vertically, work in stocking st over all sts. When piece measures 18-19-20-21-22-23 cm insert 4 markers as follows: Work 15-17-19-21-25-27 sts, insert 1st marker, work 45-51-55-61-67-75 sts, insert 2nd marker, work 30-34-38-42-50-54 sts, insert 3rd marker, work 45-51-55-61-67-75 sts, insert 4th marker, work the remaining 15-17-19-21-25-27 sts. 1st and 2nd marker are on front piece, and 3rd and 4th marker are on back piece. Move the markers upwards when working. On next round inc 1 st before 1st and 3rd marker and 1 st after 2nd and 4th marker (= 4 sts inc) - READ INCREASE TIP. NOTE: No of sts mid front and mid back is the same, inc in side sts. Repeat inc every 6th round 1 more time, then every 4th round 6-5-6-5-6-10 times, then every other round 22-18-22-18-18-8 times = 270-270-306-306-338-338 sts. On next round, inc 2-2-0-0-2-2 sts evenly = 272-272-306-306-340-340 sts. Work in stocking st until piece measures 45-46-47-48-49-50 cm (or desired length, approx. 25 cm remain). Then work A.6 (= 34 sts) 8-8-9-9-10-10 times in total in width. When A.6 has been worked 1 time vertically, switch to circular needle size 3.5 mm. Work A.5 over all sts. Cast off. SLEEVE: Worked in the round on double pointed needles. Slip sts from stitch holder back on double pointed needles size 4 mm and cast on 6-6-6-8-8-8 sts under sleeve = 72-76-80-84-88-92 sts. Work in stocking st for 2 cm, on next round dec 8 sts evenly = 64-68-72-76-80-84 sts. Switch to double pointed needles size 3.5 mm. Work A.5 over all sts. Cast off. Work the other sleeve the same way. |
|||||||||||||||||||
Diagram explanations |
|||||||||||||||||||
|
|||||||||||||||||||
 |
|||||||||||||||||||
 |
|||||||||||||||||||
 |
|||||||||||||||||||
 |
|||||||||||||||||||
 |
|||||||||||||||||||
Have you finished this pattern?Tag your pictures with #dropspattern #summerfeelingdress or submit them to the #dropsfan gallery. Do you need help with this pattern?You'll find 24 tutorial videos, a Comments/Questions area and more by visiting the pattern on garnstudio.com. © 1982-2026 DROPS Design A/S. We reserve all rights. This document, including all its sub-sections, has copyrights. Read more about what you can do with our patterns at the bottom of each pattern on our site. |
|||||||||||||||||||


With over 40 years in knitting and crochet design, DROPS Design offers one of the most extensive collections of free patterns on the internet - translated to 17 languages. As of today we count 320 catalogues and 12120 patterns translated into English (UK/cm).
We work hard to bring you the best knitting and crochet have to offer, inspiration and advice as well as great quality yarns at incredible prices! Would you like to use our patterns for other than personal use? You can read what you are allowed to do in the Copyright text at the bottom of all our patterns. Happy crafting!
Post a comment to pattern DROPS 160-1
We would love to hear what you have to say about this pattern!
If you want to leave a question, please make sure you select the correct category in the form below, to speed up the answering process. Required fields are marked *.