
Popular categories
Looking for a yarn?


Comments / Questions (23)
![]() Tytti åberg wrote:
Tytti åberg wrote:
Ennen teidän sivuilla oli virkkausohjeet eikä piirrustuksia. En ymmärrä eroa 9 p samaan kjs:aan tai 9 p saman kjs:n ympäri. En muutenkaan ymmärrä juurikaan kuin ensimmäisen rivin ohjeesta. Harmittaa kun odotin taas virkkaamiseen aloitusta pitkästä aikaa.
29.11.2017 - 17:49
![]() Tina Petersen wrote:
Tina Petersen wrote:
Hvordan læser jeg opskriften, linie 2 og linie 5? vh tina
30.10.2017 - 11:35DROPS Design answered:
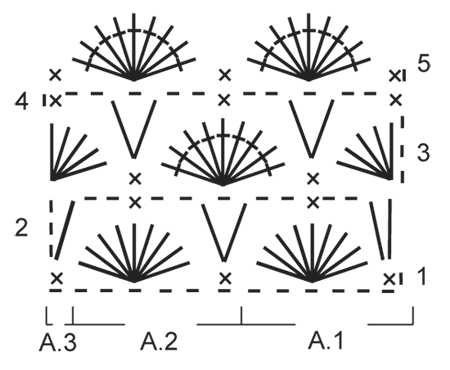
Hei Tina. Husk å lese diagramforklaringen som vises over diagrammet. 2. RAD: 3 luftmasker, 1 stav i siste fastmaske på 1.rad, * 2 luftmasker, 1 fastmaske i 5. stav ( i stav-gruppen), 2 luftmasker, 1 stav i fastmaske i 1.rad, 1 luftmaske, 1 stav i samme fastmaske *, gjenta *-* 4 ganger totalt, 2 luftmasker, 1 fastmaske i 5. stav ( i stav-gruppen), 2 luftmasker og 2 staver i siste fastmaske på raden. 5. RAD: 1 luftmasker, 1 fastmaske i 1.fastmaske, hopp over 2 luftmasker, 9 staver om luftmaske, hopp over 2 luftmasker, * 1 fastmaske i fastmaske, hopp over 2 luftmasker, 9 staver om luftmaske, hopp over 2 luftmasker *, gjenta *-* 4 ganger totalt. 1 fastmaske i fastmaske. God Fornøyelse!
31.10.2017 - 10:04
![]() Natouchkaya wrote:
Natouchkaya wrote:
Il y a une erreur dans le diagramme. Il y a 5 brides seulement et non 6 dans la demie coquille du début de rang Cordialement
06.03.2017 - 11:51
![]() Sara wrote:
Sara wrote:
Hej! Jag älskar det här mönstret, men har precis lärt mig virka och kan inte klura ut skillnaden mellan "9 st i lm" och "9 st OM lm". Vad menas när det är "om lm"?
10.12.2016 - 22:50DROPS Design answered:
Hej Sara. Du skal simpelthen hekle OMKRING lm i stedet for i den. Jeg ved vi har en video med det, men kunne ikke finde den lige nu. Sorry, haaber du forstaar hvad jeg mener nu
12.12.2016 - 15:02Mie wrote:
Hej. Jeg har forsøgt at hækle muslingemønster kluden på mønster 162-37, men når jeg har lavet a1x1 og a2x3 har jeg kun 2 luftmasker tilbage - det svarer så til den fm i a3, samt en i overskud - dvs. at jeg synes at der mangler 5 lm før at det passer med 5 muslinger i den færdige 1. række... Passer mønsteret længere oppe i rækkerne, hvis jeg starter ud med 37 lm istedet for de 32 lm ? Jeg er kun nået til a2x3, og har derfor ikk hæklet andre rækker end det. Mvh. Mie
12.08.2016 - 20:14DROPS Design answered:
Hej Mie. Du har 32 lm, du vender med 1 lm (31 lm) og haekler A.1 = 6 lm, gentager A.2 4 gange (4 x 6 m) = 24 lm og afslutter med A.3 = 1 lm: 1+6+24+1 = 32 i alt.
15.09.2016 - 13:14
![]() Johanna wrote:
Johanna wrote:
Skulle bli glad om ni ville visa med ett filmklipp! Tycker det är så bra att se på era klipp och man lär sig mycket genom att bara titta! 😊
18.02.2016 - 15:27
![]() Ingunn wrote:
Ingunn wrote:
Hei, har forsøkt meg på disse, men forstår ikke hvordan 32 løse luftmasker er nok til å få en pen kant i starten. Har forsøkt flere ganger nå og uten hell. Høyere opp i rad 2 og 4 blir det 41 masker i raden. Er de ikke lettere å begynne med noe tilsvarende i bunn?
27.01.2016 - 12:10DROPS Design answered:
Hej Ingunn, Med 32 lm får du plads til 5 rapporter af diagrammet og så 1 kantm i hver side. Hækle et par rækker og se om du synes de er store nok, ellers må du lave dem større med 6 lm, (hver rapport hækles over 6 lm. God fornøjelse!
09.03.2016 - 16:02
![]() Iacopinelli Christiane wrote:
Iacopinelli Christiane wrote:
À quoi servent ces lavettes ?
11.10.2015 - 16:56DROPS Design answered:
Bonjour Mme Iacopinelli, elles peuvent être utilisées comme gant de toilette, ou pour nettoyer (tables, meubles, etc..) - en fonction de l'usage que vous souhaitez. Bon crochet!
12.10.2015 - 09:58
![]() Laurie wrote:
Laurie wrote:
I cannot follow the diagram either. Is there a written pattern? It would be so helpful because I really like the pattern but after many attempts, my washcloth just is not turning out like the picture. Please help. Thank you.
11.10.2015 - 04:57DROPS Design answered:
Dear Laurie, there is no written pattern to this diagram. Start reading diagram from the bottom corner on the right side and read from the right towards the left from RS and from the left towards the right from WS. Each symbol represents 1 st/group of st as written under diagram text. For any individual assistance, you are welcome to contact your DROPS store. Happy crocheting!
12.10.2015 - 09:45
![]() Annika wrote:
Annika wrote:
Hei, tämä on tosi kiva ohje, mutta en ymmärrä mitä tarkoittaa yhdeksän pylvästä samojen ketjusilmukoiden ympäri?
18.09.2015 - 23:52DROPS Design answered:
Hei! Ohje on nyt korjattu. Eli virkkaat 9 p saman kjs:n ympäri.
22.09.2015 - 16:13
|
||||||||||||||||
Warm And Soothing#warmandsoothingcloth |
||||||||||||||||
|
|
||||||||||||||||
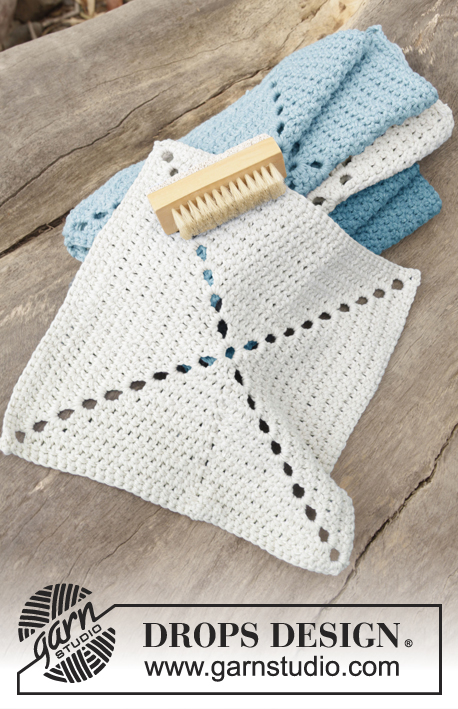
Crochet DROPS cloth with shell pattern in ”Cotton Light”.
DROPS 162-37 |
||||||||||||||||
|
PATTERN: See diagrams A.1, A.2 and A.3. ---------------------------------------------------------- CLOTH: Work 32 loose ch with hook size 3.5 mm and Cotton Light (incl 1 ch to turn with). Then work PATTERN - see diagram as follows: Work A.1, repeat A.2 4 times in total, finish with A.3. When diagram has been worked 1 time vertically, repeat row 2-5 onwards. Work until cloth measures approx. 22 cm vertically, adjust so that last row is row 2 in diagram. EDGE: Turn piece and work an edge in the round, beg along last row as follows: 1 ch and 1 dc in first tr, * 2 dc in next ch-space (with 2 ch), 1 dc in next dc, 2 dc in next ch-space (with 2 ch), 1 dc in next ch-space (with 1 ch) *, repeat from *-* the entire row and finish by working 1 dc, 1 ch and 1 dc in last tr (= corner). Rotate the piece and work down along the side. Work 1 dc in same tr as corner, * 1 dc in next dc, 1 ch, 2 dc in each of the next 2 tr *, repeat from *-* and finish with 1 dc, 1 ch and 1 dc in last st (= corner). Rotate the piece and work along ch-row from beg of piece as follows: * 2 dc in next ch-space (with 2 ch), 1 dc in next dc, 1 ch, 2 dc in next ch-space (= with 2 ch) *, repeat from *-* the entire row and finish with 1 dc, 1 ch and 1 dc in last dc. Rotate the piece again and work up the side the same way as the other side. Finish with 1 dc, 1 ch and 1 sl st in first dc from beg of round. Fasten off. |
||||||||||||||||
Diagram explanations |
||||||||||||||||
|
||||||||||||||||
 |
||||||||||||||||
Have you finished this pattern?Tag your pictures with #dropspattern #warmandsoothingcloth or submit them to the #dropsfan gallery. Do you need help with this pattern?You'll find 4 tutorial videos, a Comments/Questions area and more by visiting the pattern on garnstudio.com. © 1982-2026 DROPS Design A/S. We reserve all rights. This document, including all its sub-sections, has copyrights. Read more about what you can do with our patterns at the bottom of each pattern on our site. |
||||||||||||||||


With over 40 years in knitting and crochet design, DROPS Design offers one of the most extensive collections of free patterns on the internet - translated to 17 languages. As of today we count 324 catalogues and 12290 patterns translated into English (UK/cm).
We work hard to bring you the best knitting and crochet have to offer, inspiration and advice as well as great quality yarns at incredible prices! Would you like to use our patterns for other than personal use? You can read what you are allowed to do in the Copyright text at the bottom of all our patterns. Happy crafting!
Post a comment to pattern DROPS 162-37
We would love to hear what you have to say about this pattern!
If you want to leave a question, please make sure you select the correct category in the form below, to speed up the answering process. Required fields are marked *.