
Popular categories
Looking for a yarn?


Comments / Questions (56)
![]() Bodil wrote:
Bodil wrote:
Sendte en melding den 11/4-2015 ang. toppen. Er det noen som kan hjelpe meg? Ivrig etter å komme videre 😏
14.04.2015 - 18:58DROPS Design answered:
Hej Bodil. Se mit svar herunder.
16.04.2015 - 16:08
![]() Bodil wrote:
Bodil wrote:
Flott topp å strikke, men når jeg kommer til omgang 28 skjønner jeg ingenting. Skal det strikkes 8 vrang og 20 rett masker etter det, og hva skal repeteres? Får det ikke til å gå opp i antall masker. Og hvor fortsetter jeg deretter, på omgang 9 igjen? Når skal det felles til ermer? Litt vanskelig å tyde mønsteret.
11.04.2015 - 18:43DROPS Design answered:
Hej Bodil. Ja, du skal her strikke 8 vrang og derefter rettmasker over resten af maskerne. I omgang 9 strikker du 6 vrang 3 rett sammen 1 kast, 1 r, 1 kast, og derefter rett over resten af maskerne. Ved 38-39-40-42-43 cm strikkes det 2 RILLER over de midterste 8-8-8-10-10 m i hver side (de øvrige m strikkes som før). På neste omg etter de 2 rillene felles de midterste 4-4-4-6-6 m i hver side av til ermhull og for- og bakstk strikkes ferdig for seg = her deler du til ermhul. Der felles ikke videre.
16.04.2015 - 16:07
![]() Anita Rabbersvik Jensen wrote:
Anita Rabbersvik Jensen wrote:
Hei Hva er stikkefastheten på denne oppskriften? Vennlig hilsen Anita R. Jensen
08.04.2015 - 21:36DROPS Design answered:
Hej Anita: DROPS RUNDP (80 cm) NR 5 – eller det p.nr du må bruke for å få 17 m x 22 p glstrikk på 10 x 10 cm.
09.04.2015 - 11:40
![]() Simone Verweij wrote:
Simone Verweij wrote:
Is dit patroon ook met breinaalden te maken? Dus zonder rondbreinaald en is daar een beschrijving van?
31.03.2015 - 21:13DROPS Design answered:
Dat kan deels. U kunt de panden los breien, deel dan de steken tussen de markeerders voor de zijkanten op en voeg aan weerskanten 1 st toe voor kantsteken omdat u de panden nu in elkaar moet naaien. De hals wordt in de rondte gebreid, maar dit kunt u ook op sokkennaalden doen.
01.04.2015 - 09:33
![]() Sandra Jones wrote:
Sandra Jones wrote:
Can we get the questions/answers in English. Maybe this would help in completing this pattern. Others may have my answers.
23.03.2015 - 21:05DROPS Design answered:
Dear Mrs Jones, you can get help from an online translator. If you have any question about that pattern, you are welcome to ask here and/or to contact your DROPS store, they will give you tips & advices even per mail or telephone. Happy knitting!
24.03.2015 - 09:20
![]() Sandy Jones wrote:
Sandy Jones wrote:
Where do I go on the chart after row 32 of A.2? Don't know how to repeat the chart. Do I start again at row 9?
11.03.2015 - 18:50DROPS Design answered:
Dear Mrs Jones, continue A.2 as before over the remaining sts with eyelet rows until all sts have been worked into stocking sts. Happy knitting!
12.03.2015 - 08:52Pat Bacon wrote:
The directions to not say when to decrease for armholes or how many sts. to decrease.
04.03.2015 - 22:17DROPS Design answered:
Dear Mrs Bacon, you cast off for armholes the 4-6 sts in each side of the body, then continue each piece separately without any further decreases for armholes/sleeve, only with 2 sts in garter st each side for sleeve edge. Happy knitting!
05.03.2015 - 10:49
![]() Christie Savor wrote:
Christie Savor wrote:
On A-2 diagram of Bris I am on row 28 from bottom and I am not sure it is meant to purl 8 and knit the rest of the row knit?? Also once I get to 32 from bottom do I start again at row 1 from bottom???
01.03.2015 - 22:47DROPS Design answered:
Dear Mrs Savor, A.2 show how eyelet rows goes into stocking st, ie when working row 28, you will end the eyelet rows with P8 and K remaining sts, then continue A.2 as before ie the eyelet rows should be replaced by stocking st as you made before until all sts are worked in st st. Happy knitting!
02.03.2015 - 10:50
![]() Segers Annie wrote:
Segers Annie wrote:
Dankjewel voor antwoord....volgende vraag...er zijn bij patroon 2 - 32 rijen - 9de rij begin je, ok, dan zijn er nog 23 rijen, niet genoeg om al je av.steken om te zetten en gaatjesrand af te werken, welke zijn de rijen die herhaald moeten worden en vanaf welke rij begin je ?? In instructievideo word er een deel van patroon 2 aangeduid, doch zonder geluid kom je er niet achter wat ze bedoeld. Ik heb een heel stuk gebreidt en het is perfect, maar ik krijg teveel steken erbij......groetjes
28.02.2015 - 11:31DROPS Design answered:
Hoi Annie. Je gaat door op dezelfde manier tot alle av st zijn omgezet, Dvz, steeds 2 av st minder breien, 3 r samen, omslag, r, omslag en de nld uitbreien enzovoort. Je zou niet meer st krijgen.
03.03.2015 - 13:42
![]() Jess wrote:
Jess wrote:
Why is this sweater named after a Jewish circumcision ritual?
28.02.2015 - 01:30DROPS Design answered:
Dear Jess, "Bris" is Norwegian for breeze. Happy knitting!
02.03.2015 - 08:44
|
|||||||||||||||||||
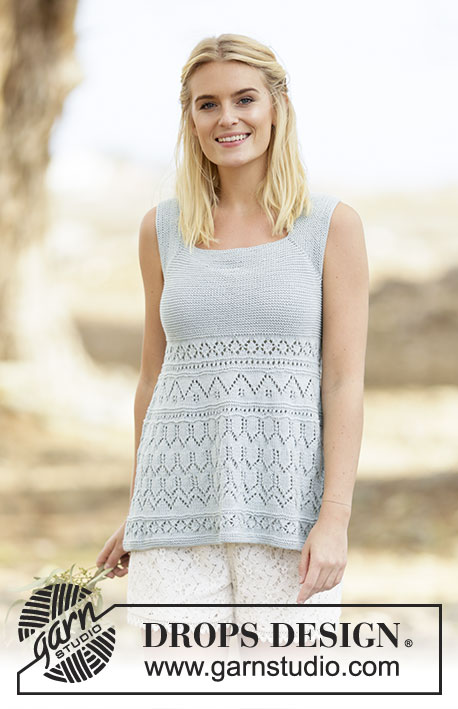
Light Breeze#lightbreezetop |
|||||||||||||||||||
 |
 |
||||||||||||||||||
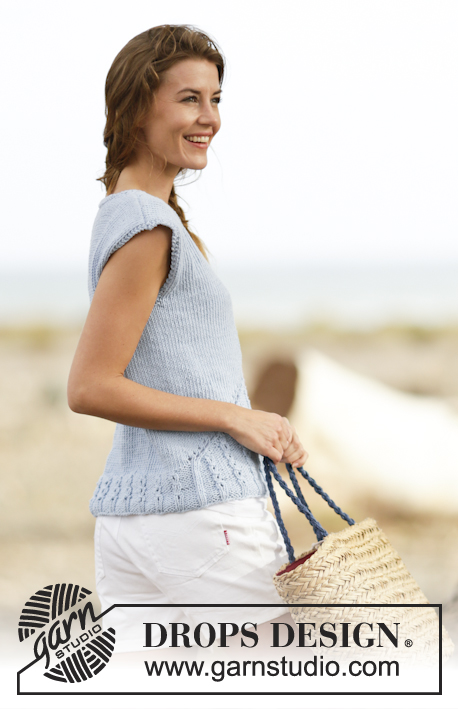
Knitted DROPS top with lace pattern and diagonal line in ”Paris”. Size: S - XXXL.
DROPS 161-28 |
|||||||||||||||||||
|
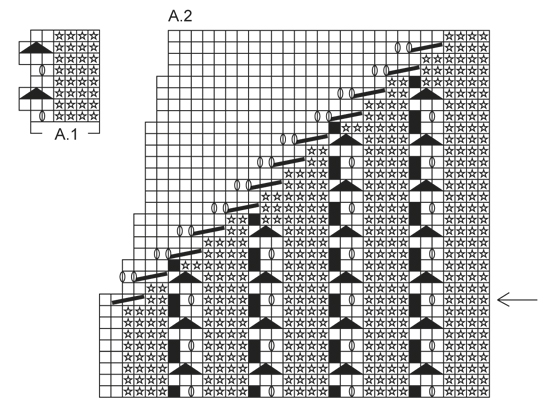
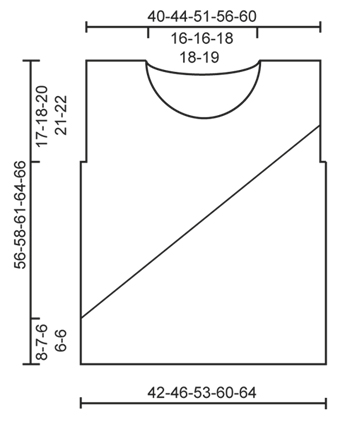
GARTER ST (worked in the round): * K 1 round and P 1 round *, repeat from *-*. 1 ridge = 2 rounds. GARTER ST (back and forth): K all rows. 1 ridge = 2 rows K. RIB: * P 4, K 2 *, repeat from *-*. PATTERN: See diagrams A.1 and A.2. The diagrams show all rows in pattern seen from RS. ---------------------------------------------------------- BODY: Worked in the round on circular needle. Cast on 144-156-180-204-216 sts on circular needle size 4.5 mm with Paris. K 1 round. Then work RIB - see explanation above. When rib measures 2 cm, switch to circular needle size 5 mm. Insert 1 marker at beg of round and 1 marker after 72-78-90-102-108 sts (= the sides). Then work pattern in the round according to diagram A.1 (pattern should fit over rib) BUT K the last 2 sts before both markers on every round onwards. REMEMBER THE KNITTING TENSION When piece measures approx. 8-7-6-6-6 cm (finish after 4th or 8th round in A.1), continue as follows: Beg on round marked with arrow in A.2 and work pattern according to diagram A.2 until 2nd marker (= front piece – NOTE: Diagram shows how eyelet rows goes over into stocking st), then work in stocking st over the remaining sts (= back piece). After 1st round in A.2 there are now 2 sts less on front piece than on back piece. Continue pattern according to A.2 on front piece and stocking st on back piece until all P sts and eyelet row sts have been worked into stocking st (pattern will finish approx. 2-2-6-9-11 cm after cast off for armholes). AT THE SAME TIME when piece measures 38-39-40-42-43 cm, work 2 ridges over the middle 8-8-8-10-10 sts in each side (work the other sts as before). On next round after the 2 ridges, cast off the middle 4-4-4-6-6 sts in each side for armhole and finish front and back piece separately. BACK PIECE: = 68-74-86-96-102 sts. Continue in stocking st but work the outermost 2 sts in each side in garter st (= sleeve edge). When piece measures 54-56-59-62-64 cm, cast off the middle 26-26-28-28-30 sts for neck and finish each shoulder separately. Then cast off 1 st on next row from neck = 20-23-28-33-35 sts remain on shoulder. Cast off when piece measures 56-58-61-64-66 cm. Repeat on the other shoulder. FRONT PIECE: = 66-72-84-94-100 sts. Continue in stocking st and A.2 as before but work the outermost 2 sts in each side in garter st (= sleeve edge). After A.2 continue in stocking st with 2 sts in garter st in each side. When piece measures 46-48-49-51-53 cm, slip the middle 10-10-12-12-14 sts on 1 stitch holder for neck and finish each shoulder separately. Then cast off at beg of every row from neck as follows: Cast off 2 sts 3 times and 1 st 2 times = 20-23-28-33-35 sts remain on shoulder. Cast off when piece measures 56-58-61-64-66 cm. Repeat on the other shoulder. ASSEMBLY: Sew the shoulder seams. NECK EDGE: Pick up approx. 74 to 92 sts around the neck (incl sts on stitch holder at the front) on circular needle size 4.5 mm with Paris. P 1 round, K 1 round and P 1 round, then loosely cast off with K. |
|||||||||||||||||||
Diagram explanations |
|||||||||||||||||||
|
|||||||||||||||||||
 |
|||||||||||||||||||
 |
|||||||||||||||||||
Have you finished this pattern?Tag your pictures with #dropspattern #lightbreezetop or submit them to the #dropsfan gallery. Do you need help with this pattern?You'll find 26 tutorial videos, a Comments/Questions area and more by visiting the pattern on garnstudio.com. © 1982-2026 DROPS Design A/S. We reserve all rights. This document, including all its sub-sections, has copyrights. Read more about what you can do with our patterns at the bottom of each pattern on our site. |
|||||||||||||||||||


With over 40 years in knitting and crochet design, DROPS Design offers one of the most extensive collections of free patterns on the internet - translated to 17 languages. As of today we count 324 catalogues and 12290 patterns translated into English (UK/cm).
We work hard to bring you the best knitting and crochet have to offer, inspiration and advice as well as great quality yarns at incredible prices! Would you like to use our patterns for other than personal use? You can read what you are allowed to do in the Copyright text at the bottom of all our patterns. Happy crafting!
Post a comment to pattern DROPS 161-28
We would love to hear what you have to say about this pattern!
If you want to leave a question, please make sure you select the correct category in the form below, to speed up the answering process. Required fields are marked *.