
Popular categories
Looking for a yarn?


Comments / Questions (116)
![]() Birgit wrote:
Birgit wrote:
Wie stricke ich A6 ABC? Z. B. Komme ich in Reihe 3 nicht weiter. Danke für Ihre Hilfe.
09.09.2015 - 10:47DROPS Design answered:
Es ist am einfachsten, wenn Sie im Musterrhythmus bleiben und gar nicht genau auf die Übergänge zwischen den Abschnitten schauen. Die 3. beginnt mit 3 M re, dann folgt immer * 1 Umschlag, 3 M zusammenstricken, 1 Umschlag, 3 M re *, Sie wiederholen, von *-* und beenden den ganzen A.6 mit 1 Umschlag, 3 M zusammenstricken,1 Umschlag und 3 M re. Die 3. R von A.6 beginnt und endet, kurz gesagt, mit 3 M re.
18.09.2015 - 21:06
![]() Gill wrote:
Gill wrote:
Can you explain how in the edge pattern row 6 would be on the right side. Surely it would be on the wrong side?
08.07.2015 - 10:23DROPS Design answered:
Dear Gill, you can work the holes in the edge every 3rd ridge (= 6 rows) to make the holes from RS. Happy knitting!
08.07.2015 - 17:37
![]() Chely wrote:
Chely wrote:
Hello, I'm trying to figure out chart A-2, I'm doing it size L/XL which is 16 stitches. If I'm correct the first row (rs) is as follows: k 2 tog, yo, k1, k 2 tog, yo, k1, k 2 tog, yo, k1, k 2 tog, yo, k1. Now, it seems the pattern in this chart is per 3 stitches, how would I continue the pattern for the next 4 stitches, k 2 tog, yo, k1, but what should I do with extra stitch?
01.07.2015 - 21:09DROPS Design answered:
Dear Chely, when working A.2 over 16 sts, work first the whole diagram = 12 sts then work the first 4 sts = 16 sts in total. In rows like row 1 where 1 st remains and you should K this st tog with the next one, just finish with K1 instead. Happy knitting!
02.07.2015 - 09:59
![]() Sabine wrote:
Sabine wrote:
Sooo, ich habe das Oberteil nun fertig, ist auch hübsch geworden. Allerdings habe ich ein bisschen die Seiten zugenäht, sonst weht das gute Stück ja um einen herum.... ;-) Eine kleine Anmerkung zur Anleitung: dort steht bei Fransen: "3 Fäden der einen Franse mit 3 Fäden der anderen.....usw." Es muß heißen 6 Fäden .... mit 6 Fäden........ Ansonsten vielen Dank für die schöne Anleitung! Grüße von Sabine
11.06.2015 - 12:26DROPS Design answered:
Liebe Sabine, stimmt, Sie haben Recht, das wird gleich korrigiert. Viel Spaß beim Tragen!
16.06.2015 - 11:54
![]() Marita wrote:
Marita wrote:
Ska det verkligen vara 45 maskor efter mönster A9 , mellan markörerna? Då får jag inte mönstret efter att stämma när du går över till A 1 varv 8 blir de 1 maska för mycket? / Marita
06.06.2015 - 23:43DROPS Design answered:
Hej Marita, Skriv gärna ut en ny beskrivning så du får rättelserna med. Lycka till!
05.08.2015 - 16:00
![]() Ana wrote:
Ana wrote:
Hola. En la foto se ve que hay dos líneas verticales que coinciden con los marcapuntos en donde parece que hay un punto del derecho y un agujero a cada lado del marcapuntos. Sin embargo, al tejer el patrón me quedan dos puntos del derecho de cada lado del marcapuntos (en total 4 puntos del derecho). ¿Puedes decirme si hay algo que deba hacer que no esté dibujado en los diagramas? Muchas gracias.
06.06.2015 - 13:57DROPS Design answered:
Hola Ana, creo que las líneas a las que te refieres son las de los patrones A.4 y A.5. Los MP van antes o después de estos diagramas. Tienen que quedar los pts como te quedan, me parece que lo estás haciendo correctamente.
07.06.2015 - 10:55
![]() Franca wrote:
Franca wrote:
Ik maak de poncho in maat l/xl. In de 39e toer van motief a9 heb je in het midden eerst 2 st rechts samenbreien, dan omslag, 1 rechtse overhaling, 2 st rechts samenbreien, 1 omslag en dan 1 rechtse overhaling. Je komt dan in toer 41 van het vlindermotief 2 steken tekort, dus is mijn vraag moet niet aan beide zijden ipv 1 omslag er 2 komen? Gr Franca
26.05.2015 - 15:28DROPS Design answered:
Hoi Franca. In rij 41 moet je 2 st minder hebben = 42 st ipv 44, het telpatroon heeft vanaf rij 40 ook twee steken minder. In rij 49 meerder je weer naar 44 st.
26.05.2015 - 16:59
![]() Franca wrote:
Franca wrote:
Ik maak de poncho in maat l/xl. In de 39e toer van motief a9 heb je in het midden eerst 2 st rechts samenbreien, dan omslag, 1 rechtse overhaling, 2 st rechts samenbreien, 1 omslag en dan 1 rechtse overhaling. Je komt dan in toer 41 van het vlindermotief 2 steken tekort, dus is mijn vraag moet niet aan beide zijden ipv 1 omslag er 2 komen? Gr Franca
26.05.2015 - 15:26
![]() Franca wrote:
Franca wrote:
Hallo,ik ben bezig met de vlinder te breien, en kom niet uit in het midden. Ik heb 4 x het kabelpatroontje gehad en ben nu bij het dakje. Is het de bedoeling dat ik 2 omslagen maak aan beide zijde van het dakje? De volgende toer heb ik nl aan beide zijde een steek te weinig. Gr. Franca
15.05.2015 - 14:14DROPS Design answered:
Hoi Franca. Welk telpatroon hebben wij het over en zou je kunnen vertellen welke maat je maakt? Dan kan ik veel makkelijker meekijken. Bvd
21.05.2015 - 16:06
![]() Karin Evers wrote:
Karin Evers wrote:
Hallo, kan je dit ook met gewone naalden breien ipv met rondbreinaalden?
09.05.2015 - 13:52DROPS Design answered:
Hoi Karin. Ja, als je de steken kwijt kan op de rechte naalden is dat geen probleem.
11.05.2015 - 13:24
|
||||||||||||||||||||||||||||
Riviera Maya#rivieramayaponcho |
||||||||||||||||||||||||||||
 |
 |
|||||||||||||||||||||||||||
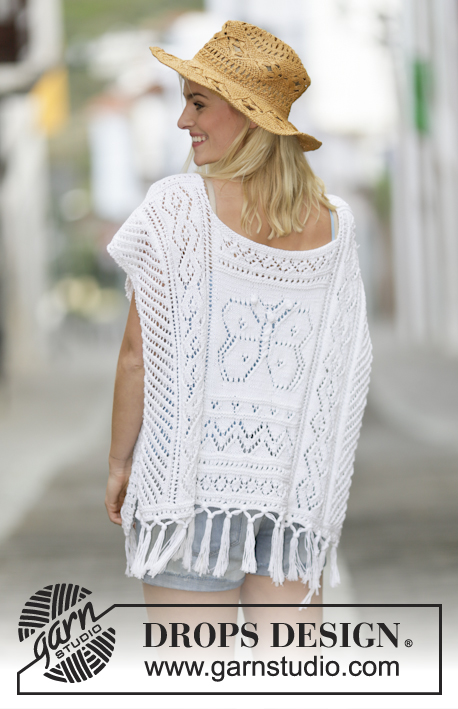
Knitted DROPS poncho with lace pattern and fringes in ”Cotton Light” or "Belle". Size: S - XXXL.
DROPS 159-1 |
||||||||||||||||||||||||||||
|
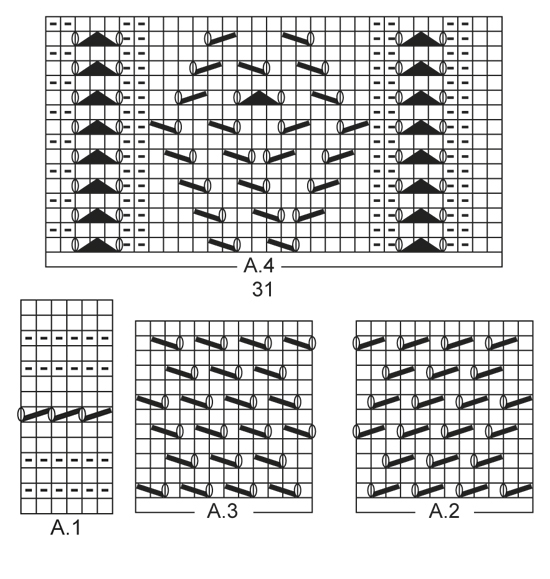
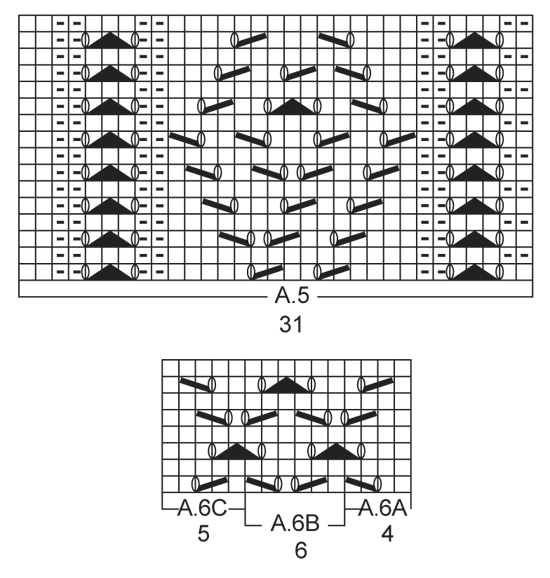
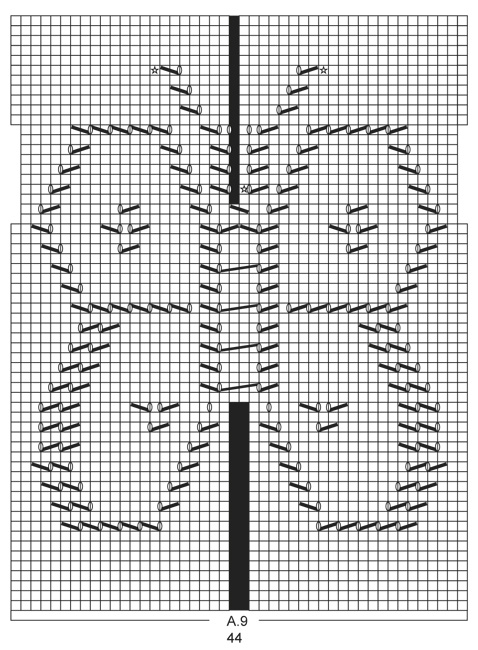
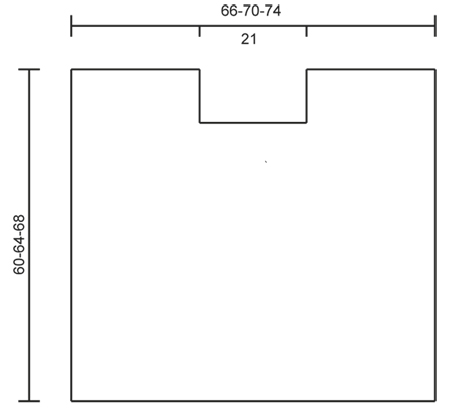
GARTER ST (back and forth): K all rows. 1 ridge = 2 rows K. PATTERN: See diagrams A.1 to A.9. The diagrams show all rows in pattern seen from RS. EDGE STS: Work the outermost 4 sts in each side in garter st but on every 6th row (always from RS) work holes as follows: At beg of row: K 2 tog, 1 YO, K 2 tog, 1 YO. At end of row: 1 YO, K 2 tog, 1 YO, K 2 tog. ---------------------------------------------------------- PONCHO: Worked in 2 parts that are sewn tog on the shoulders. FRONT PIECE: The piece is worked back and forth on circular needle because of no of sts. Cast on 139-147-155 sts on circular needle size 3 mm with Cotton Light or Belle. Work first row as follows from RS: 4 EDGE STS - see explanation above, work pattern according to diagram A.1 until 5 sts remain on row, work 1st st in A.1 and finish with 4 EDGE STS. Continue the pattern like this - NOTE: On 7th row in A.1 K last st before edge sts. When A.1 has been worked, switch to circular needle size 3.5 mm. Insert 1 marker after the first 47-51-55 sts on needle and 1 marker after the next 45 sts (= 47-51-55 sts after last marker at the end of row). ALL SIZES: Work next row as follows from RS: 4 edge sts as before, work A.2 over the next 12-16-20 sts, work A.4 (= 31 sts), 1st marker, A.6A (= 4 sts), work pattern according to diagram A.6B until 5 sts remain before 2nd marker, A.6C (= 5 sts), A.5 (= 31 sts), work A.3 over the next 12-16-20 sts and finish with 4 edge sts as before. Continue pattern like this. There will be lanes with lace pattern upwards on each side of markers and work borders with lace pattern between the 2 markers. REMEMBER THE KNITTING TENSION. Size S/M and L/XL: Continue to ALL SIZES. Size XXL/XXXL: When A.6 has been worked one time vertically, work 3 ridges between markers (work the other sts as before), then work A.6 one more time between markers (continue the other sts as before). ALL SIZES: When A.6 has been worked, work pattern according to diagram A.1 between the 2 markers mid front (continue the other sts as before) AT THE SAME TIME on next to last row in diagram (= RS) dec 4 sts evenly (= 41 sts between markers and 135-143-151 sts on row). After A.1 work A.7 between the 2 markers as follows (continue the other sts as before): Work A.7A (= 5 sts), work A.7B until 6 sts remain before marker and finish with A.7C (= 6 sts). When A.7 has been worked, work pattern according to diagram A.8 between the 2 markers (continue the other sts as before). AT THE SAME TIME on last row in diagram (= RS), inc 3 sts evenly (= 44 sts between markers and 138-146-154 sts in total on needle). After A.8 work pattern according to diagram A.9 between the 2 markers. When entire A.9 has been worked (piece measures approx. 39-39-43 cm), there are 45 sts between markers. Then work pattern according to diagram A.1 between markers (continue the other sts as before). After A.1 work A.6 between markers as follows: A.6A (= 4 sts), work A.6B until 5 sts remain before marker and finish with A.6C (= 5 sts). SIZE S/M: Continue to ALL SIZES. SIZE L/XL + XXL/XXXL: When A.6 has been worked one time vertically, work 3 ridges between markers (work the other sts as before), then work A.6 one more time between markers (continue the other sts as before). ALL SIZES: After A.6 work 3 ridges between markers (work the other sts as before), then cast off the 45 sts between markers for neck and finish each part separately. Continue pattern back and forth as before over the 47-51-55 sts on shoulder - NOTE: Continue the outermost 2 sts towards the neck in garter st. When 4 cm remain before piece measures 60-64-68 cm (adjust so that next row is worked from RS), switch to circular needle size 3 mm. Continue with pattern according to diagram A.1 before loosely casting off. Repeat in the other side. BACK PIECE: Cast on and work as front piece. ASSEMBLY: Sew the shoulder seams. The poncho should be open in each side. FRINGES: Fasten fringes along the bottom edge of poncho both front and back. Fasten fringes in holes in A.1. 1 fringe = cut 6 lengths of 35 cm each. Fold them double, pull the loops true the holes and pull the yarn ends true the loops. Fasten each fringe approx. 3 cm apart. Then split the fringes in 2 and tie tog with next fringe. Continue like this with all fringes. |
||||||||||||||||||||||||||||
Diagram explanations |
||||||||||||||||||||||||||||
|
||||||||||||||||||||||||||||
 |
||||||||||||||||||||||||||||
 |
||||||||||||||||||||||||||||
 |
||||||||||||||||||||||||||||
 |
||||||||||||||||||||||||||||
 |
||||||||||||||||||||||||||||
Have you finished this pattern?Tag your pictures with #dropspattern #rivieramayaponcho or submit them to the #dropsfan gallery. Do you need help with this pattern?You'll find 22 tutorial videos, a Comments/Questions area and more by visiting the pattern on garnstudio.com. © 1982-2026 DROPS Design A/S. We reserve all rights. This document, including all its sub-sections, has copyrights. Read more about what you can do with our patterns at the bottom of each pattern on our site. |
||||||||||||||||||||||||||||


With over 40 years in knitting and crochet design, DROPS Design offers one of the most extensive collections of free patterns on the internet - translated to 17 languages. As of today we count 324 catalogues and 12291 patterns translated into English (UK/cm).
We work hard to bring you the best knitting and crochet have to offer, inspiration and advice as well as great quality yarns at incredible prices! Would you like to use our patterns for other than personal use? You can read what you are allowed to do in the Copyright text at the bottom of all our patterns. Happy crafting!
Post a comment to pattern DROPS 159-1
We would love to hear what you have to say about this pattern!
If you want to leave a question, please make sure you select the correct category in the form below, to speed up the answering process. Required fields are marked *.