
Popular categories
Looking for a yarn?


Comments / Questions (116)
![]() Vera Lundin wrote:
Vera Lundin wrote:
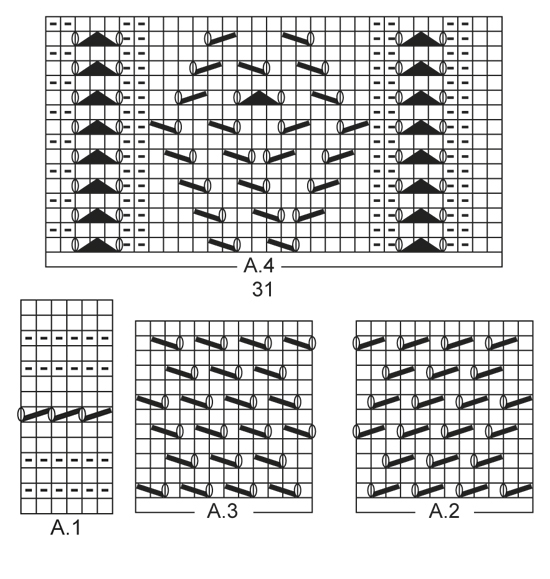
A9 hur hoppar man över 2 maskor?
12.08.2017 - 17:29DROPS Design answered:
Dessa två svarta rutor är inga maskor, dvs. du ska bara ignorera dem i diagrammet. Det hoppas alltså inte över några maskor i själva arbetet.
14.08.2017 - 13:44Sharon Zeiler wrote:
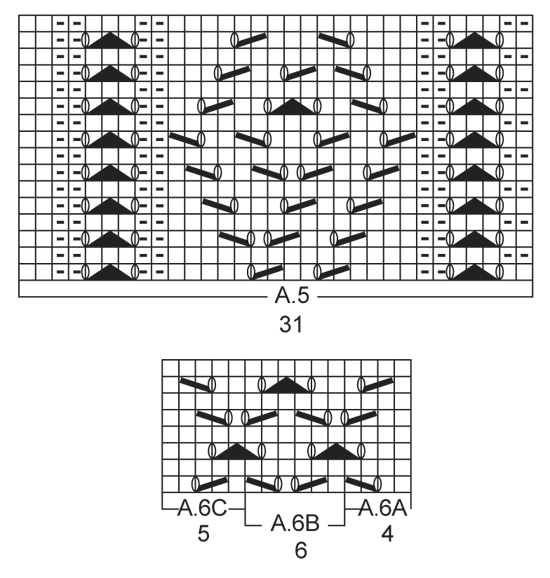
Pattern says "when A.6 has been worked" does that include A.6.A, A.6.B and A.6.C equalling 15 stitches
27.03.2017 - 18:42DROPS Design answered:
Dear Sharon, thank you for your question. It means, when you finsihed knitting the rows of pattern A.6 (which consists of A.6A, A.6B, and A.6C. I hope this helps. Happy knitting!
28.03.2017 - 01:10
![]() Katja Juranek wrote:
Katja Juranek wrote:
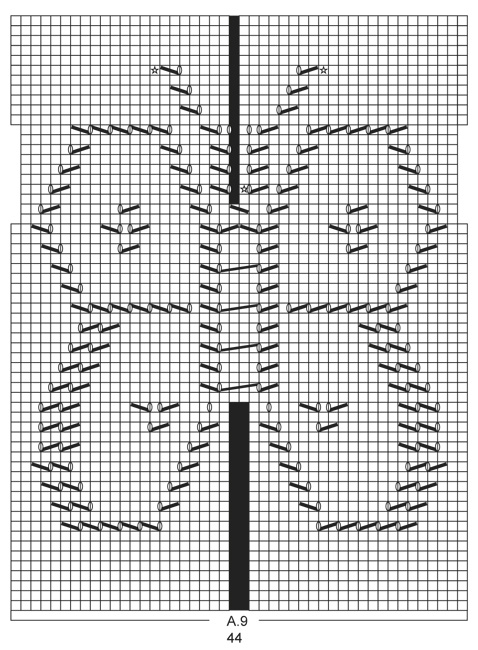
In der Strickschrift für den Schmetterling wurde ja bereits der Fehler entdeckt. Gibt es da ein Update für die Anleitung?
19.03.2016 - 16:29DROPS Design answered:
Liebe Katja, die Korrektur von Diagramm A.9 wurde bereits am 10.4.15 vorgenommen.
21.03.2016 - 10:59
![]() Hélène wrote:
Hélène wrote:
Bonjour, J'ai bien lu votre réponse mais je ne vois toujours pas : toutes les 3 côtes mousse veut donc dire que je tricote les jetés de la bordure au début du 7 rang ? Merci.
24.01.2016 - 00:31DROPS Design answered:
Bonjour Hélène, c'est exact, les jours de la bordure se font au début et à la fin du rang (de chaque côté). Bon tricot!
25.01.2016 - 12:07
![]() Hélène wrote:
Hélène wrote:
Bonjour, Je vous embête de nouveau mais me retrouve face à un petit souci. Pr la bordure, il est dit de faire un point différent ts les 6 rgs, donc rgs 6, 12, 18.... Il est dit que c'est sur l'end, or, si on suit A1, le rg 1 est sur l'end donc le 6 est sur l'env, non? Ou je lis mal A1 et il ne montre pas les rgs env... Mais du coup, je ne suis pas sûre de comprendre comment tricoter les rgs env... Merci!
17.01.2016 - 18:20DROPS Design answered:
Bonjour Hélène, on va tricoter les jours sur les mailles de bordure tous les 6 rangs = toutes les 3 côtes mousse. Bon tricot!
18.01.2016 - 14:55
![]() Hélène wrote:
Hélène wrote:
Bonjour, Comment doit-on tricoter les jetés ? Car dans la vidéo, on nous montre deux façons de les tricoter, avec pour effet soit un gros trou, soit un petit trou. Merci.
14.01.2016 - 21:27DROPS Design answered:
Bonjour Hélène, quand on augmente, on tricote le jeté torse (= dans le brin arrière) pour faire un trou plus petit, dans un motif ajouré, comme ici les différents diagrammes, on tricote les jetés "normalement", à l'envers, au rang suivant. Bon tricot!
15.01.2016 - 09:09
![]() Kathleen wrote:
Kathleen wrote:
Can I use ordinary needles as I find it very hard using circla needles thanks
23.11.2015 - 10:15DROPS Design answered:
Dear Kathleen, the poncho is worked back and forth on circular needle to get enough room for all sts - you can use straight needle but your sts will be more tight, make sure you keep correct tension. Read more about this here. Happy knitting!
23.11.2015 - 11:06
![]() Sabine wrote:
Sabine wrote:
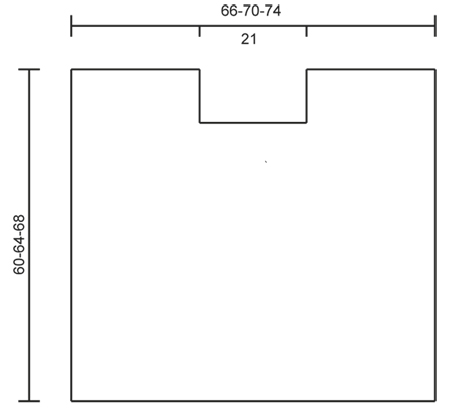
Können Sie mir bitte sagen wie hoch der Halsausschnitt in cm ist bei Größe XL?
19.10.2015 - 22:28DROPS Design answered:
Liebe Sabine, leider habe ich das Modell nicht zum Nachmessen zur Hand. Aber wie auf dem Foto erkennbar ist, hat dieser Sommerponcho einen recht tiefen Ausschnitt.
20.11.2015 - 09:26Oksana wrote:
I beg your pardon for my dullness - I tried to figure out the right understanding but, alas, not able )). Need you support therefore. The description says: S/M: Continue to ALL SIZES. Does that mean to repeat previous "all sizes" one more time or to continue according to the next paragraph "all sizes"? Tnx in advance!
14.09.2015 - 16:45DROPS Design answered:
Dear Oksana, in size S/M, skip to next paragraph called "ALL SIZES" to continue while larger size will have to work something extra. Happy knitting!
15.09.2015 - 09:40
![]() Mapau wrote:
Mapau wrote:
Concernant le dessin A.9, qu'entendez-vous par "pas de mailles, sauter cette case" ?, il y a 44 mailles on les tricote donc normalement sans tenir compte de ces 2 cases noires. Merci d'avance pour votre réponse.
11.09.2015 - 19:26DROPS Design answered:
Bonjour Mme Mapau, c'est exact, les 2 m au milieu de A.9 seront augmentées plus tard, à la fin de des ailes du bas (2 jetés). Bon tricot!
14.09.2015 - 08:47
|
||||||||||||||||||||||||||||
Riviera Maya#rivieramayaponcho |
||||||||||||||||||||||||||||
 |
 |
|||||||||||||||||||||||||||
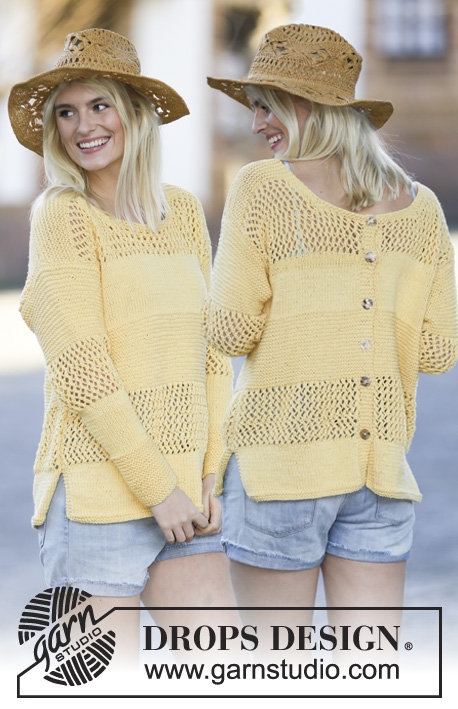
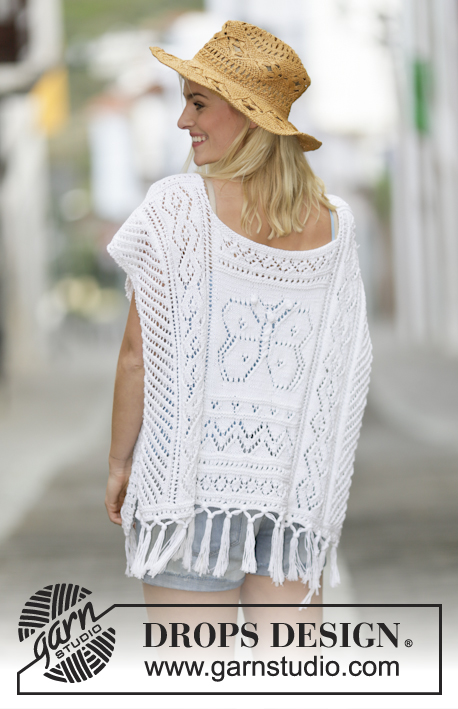
Knitted DROPS poncho with lace pattern and fringes in ”Cotton Light” or "Belle". Size: S - XXXL.
DROPS 159-1 |
||||||||||||||||||||||||||||
|
GARTER ST (back and forth): K all rows. 1 ridge = 2 rows K. PATTERN: See diagrams A.1 to A.9. The diagrams show all rows in pattern seen from RS. EDGE STS: Work the outermost 4 sts in each side in garter st but on every 6th row (always from RS) work holes as follows: At beg of row: K 2 tog, 1 YO, K 2 tog, 1 YO. At end of row: 1 YO, K 2 tog, 1 YO, K 2 tog. ---------------------------------------------------------- PONCHO: Worked in 2 parts that are sewn tog on the shoulders. FRONT PIECE: The piece is worked back and forth on circular needle because of no of sts. Cast on 139-147-155 sts on circular needle size 3 mm with Cotton Light or Belle. Work first row as follows from RS: 4 EDGE STS - see explanation above, work pattern according to diagram A.1 until 5 sts remain on row, work 1st st in A.1 and finish with 4 EDGE STS. Continue the pattern like this - NOTE: On 7th row in A.1 K last st before edge sts. When A.1 has been worked, switch to circular needle size 3.5 mm. Insert 1 marker after the first 47-51-55 sts on needle and 1 marker after the next 45 sts (= 47-51-55 sts after last marker at the end of row). ALL SIZES: Work next row as follows from RS: 4 edge sts as before, work A.2 over the next 12-16-20 sts, work A.4 (= 31 sts), 1st marker, A.6A (= 4 sts), work pattern according to diagram A.6B until 5 sts remain before 2nd marker, A.6C (= 5 sts), A.5 (= 31 sts), work A.3 over the next 12-16-20 sts and finish with 4 edge sts as before. Continue pattern like this. There will be lanes with lace pattern upwards on each side of markers and work borders with lace pattern between the 2 markers. REMEMBER THE KNITTING TENSION. Size S/M and L/XL: Continue to ALL SIZES. Size XXL/XXXL: When A.6 has been worked one time vertically, work 3 ridges between markers (work the other sts as before), then work A.6 one more time between markers (continue the other sts as before). ALL SIZES: When A.6 has been worked, work pattern according to diagram A.1 between the 2 markers mid front (continue the other sts as before) AT THE SAME TIME on next to last row in diagram (= RS) dec 4 sts evenly (= 41 sts between markers and 135-143-151 sts on row). After A.1 work A.7 between the 2 markers as follows (continue the other sts as before): Work A.7A (= 5 sts), work A.7B until 6 sts remain before marker and finish with A.7C (= 6 sts). When A.7 has been worked, work pattern according to diagram A.8 between the 2 markers (continue the other sts as before). AT THE SAME TIME on last row in diagram (= RS), inc 3 sts evenly (= 44 sts between markers and 138-146-154 sts in total on needle). After A.8 work pattern according to diagram A.9 between the 2 markers. When entire A.9 has been worked (piece measures approx. 39-39-43 cm), there are 45 sts between markers. Then work pattern according to diagram A.1 between markers (continue the other sts as before). After A.1 work A.6 between markers as follows: A.6A (= 4 sts), work A.6B until 5 sts remain before marker and finish with A.6C (= 5 sts). SIZE S/M: Continue to ALL SIZES. SIZE L/XL + XXL/XXXL: When A.6 has been worked one time vertically, work 3 ridges between markers (work the other sts as before), then work A.6 one more time between markers (continue the other sts as before). ALL SIZES: After A.6 work 3 ridges between markers (work the other sts as before), then cast off the 45 sts between markers for neck and finish each part separately. Continue pattern back and forth as before over the 47-51-55 sts on shoulder - NOTE: Continue the outermost 2 sts towards the neck in garter st. When 4 cm remain before piece measures 60-64-68 cm (adjust so that next row is worked from RS), switch to circular needle size 3 mm. Continue with pattern according to diagram A.1 before loosely casting off. Repeat in the other side. BACK PIECE: Cast on and work as front piece. ASSEMBLY: Sew the shoulder seams. The poncho should be open in each side. FRINGES: Fasten fringes along the bottom edge of poncho both front and back. Fasten fringes in holes in A.1. 1 fringe = cut 6 lengths of 35 cm each. Fold them double, pull the loops true the holes and pull the yarn ends true the loops. Fasten each fringe approx. 3 cm apart. Then split the fringes in 2 and tie tog with next fringe. Continue like this with all fringes. |
||||||||||||||||||||||||||||
Diagram explanations |
||||||||||||||||||||||||||||
|
||||||||||||||||||||||||||||
 |
||||||||||||||||||||||||||||
 |
||||||||||||||||||||||||||||
 |
||||||||||||||||||||||||||||
 |
||||||||||||||||||||||||||||
 |
||||||||||||||||||||||||||||
Have you finished this pattern?Tag your pictures with #dropspattern #rivieramayaponcho or submit them to the #dropsfan gallery. Do you need help with this pattern?You'll find 22 tutorial videos, a Comments/Questions area and more by visiting the pattern on garnstudio.com. © 1982-2026 DROPS Design A/S. We reserve all rights. This document, including all its sub-sections, has copyrights. Read more about what you can do with our patterns at the bottom of each pattern on our site. |
||||||||||||||||||||||||||||


With over 40 years in knitting and crochet design, DROPS Design offers one of the most extensive collections of free patterns on the internet - translated to 17 languages. As of today we count 324 catalogues and 12291 patterns translated into English (UK/cm).
We work hard to bring you the best knitting and crochet have to offer, inspiration and advice as well as great quality yarns at incredible prices! Would you like to use our patterns for other than personal use? You can read what you are allowed to do in the Copyright text at the bottom of all our patterns. Happy crafting!
Post a comment to pattern DROPS 159-1
We would love to hear what you have to say about this pattern!
If you want to leave a question, please make sure you select the correct category in the form below, to speed up the answering process. Required fields are marked *.