
Popular categories
Looking for a yarn?


Comments / Questions (186)
![]() Linda wrote:
Linda wrote:
Det är lite lurigt vad gäller A:z efter som det sträcker sig över 3 varv och man skulle behöva upprepa över 4 varv...
20.04.2015 - 13:53
![]() Linda wrote:
Linda wrote:
Goedemiddag, Ik ben begonnen met deze trui en heb 'm al 4 keer uitgehaald. De onderrand gaat bij mij nl een beetje bobbelen, is dit gewoon en trekt dit later weer bij? Ben zelfs al een keer tot het armsgat gekomen en weer uitgehaald. Verschillende manieren opgezet, dacht dat het misschien daar aan lag. Kunt u mij misschien vertellen hoe dit nu zit? mvg. Linda
17.04.2015 - 17:40DROPS Design answered:
Hoi Linda. Zorg ervoor dat de eerste rij van lm niet te strak zijn en vaak zal een "bobbelig" rand ook strakker worden na het wassen de eerste keer. Je kan ook altijd het randje lichtjes persen met een strijkijzer (leg een theedoek ertussen).
20.04.2015 - 13:24Alexandra wrote:
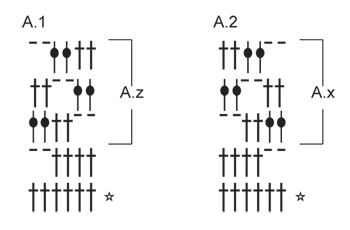
It's me again! Thank you very much. I understood! I have 2 more questions:) . 1. The * is the first row, the second row is the one in the bottom of A1 = 6 triples. The third row goes from right to left or from left to right? Which is considered the RS (the first * row is worked on RS, second WR, third RS or the opposite?) 2. could you please explain in the back piece "Now work pattern as before over the middle 68-98 sts (= 6-6-6-12-12-12 sts in each side for armhole)? Thank you so much!
17.04.2015 - 11:05DROPS Design answered:
Dear Alexandra, 1)from RS, read diagram from the right towards the left, and from WS, read from the left towards the right (see also here). 2) this mean you will skip the first 6-12 sts each side (= armholes) and work in pattern as before on the middle 68-98 sts only. Happy crocheting!
17.04.2015 - 13:40
![]() Marimar wrote:
Marimar wrote:
Bonjour, Je ne comprends pas pourquoi il faut faire une maille en l air sauter une bride et à nouveau une maille serrée pour crocheter les épaules, et que l on doit faire 1 maille serrée 3 mailles en l'air et sauter un rang pour les autres parties. Pourquoi ne peux t'on pas coudre les parties du vêtement ? Merci
13.04.2015 - 19:51DROPS Design answered:
Bonjour Mme Marimar, pour les épaules on saute 1 m, remplacée par 1 ml, pour la couture le long des manches, on saute 1 rang que l'on remplace par 3 ml. On conserve ainsi l'esprit ajouré du motif du pull. Vous pouvez tout à fait coudre chaque pièce si vous préférez. Bon crochet!
14.04.2015 - 09:39
![]() Miriam Keulers wrote:
Miriam Keulers wrote:
Ik heb probleem bij de hals: je moet 34 stk haken dan aan het einde 3stk samen haken. Dat 7x hethalen en dan 20 steken overhouden voor de schouder. Maar als ik 7x3 stokjes samenhaak zijn dat toch 21 stk geminderd dan kan ik toch geen 20 overhouden. Graag hulp! Alvast bedankt
04.04.2015 - 22:09DROPS Design answered:
U geeft de aantallen van twee verschillende maten, dus we weten niet wat u haakt. 34 stk horen bij maat M en 20 bij maat S. Maar voor het antwoord maakt het niet uit, u haakt stokjes samen over alle steken, omdat u in patroon haakt hebt u zowel lossen als stokjes, om te minderen hoeft u geen steken in patroon over te slaan.
05.04.2015 - 09:28
![]() Marimar wrote:
Marimar wrote:
Bonjour, je souhaite racheter ce joli pull. Pour lire le diagramme doit on commencer de droite à gauche pour le premier rang et de gauche à droite pour le deuxième rang et ainsi de suite ?.. Merci pour votre reponse
26.03.2015 - 14:15DROPS Design answered:
Bonjour Mme Marimar, c'est exact, les diagrammes se lisent de droite à gauche sur l'endroit (en commençant en bas à droite) et de gauche à droite sur l'envers. Bon crochet!
30.03.2015 - 13:51
![]() Eva wrote:
Eva wrote:
Hej igen! Räknade fel i förra inlägget.. Jag har 12 maskor kvar i mitten av framstycket om jag virkar över 31 plus 3 st ihop på varje sida. Ska det vara så? Tack igen på förhand!
25.03.2015 - 20:20
![]() Eva wrote:
Eva wrote:
Hej igen! Räknade fel i förra inlägget.. Jag har 12 maskor kvar i mitten av framstycket om jag virkar över 31 plus 3 st ihop på varje sida. Ska det vara så? Tack igen på förhand!
25.03.2015 - 20:19
![]() Eva wrote:
Eva wrote:
Hej igen! Räknade fel i förra inlägget.. Jag har 12 maskor kvar i mitten av framstycket om jag virkar över 31 plus 3 st ihop på varje sida. Ska det vara så? Tack igen på förhand!
25.03.2015 - 20:19
![]() Eva wrote:
Eva wrote:
Hej! Så fin! Jag har dock bekymmer med avmaskningen för halsen på framstycket. Det står virka över 31 st, men då kommer jag inte in till mitten. Om jag virkar lika på andra sidan så blir det en glapp på 12 maskor mitt fram. Är det rätt? Eller löser det sig när man virkar halskanten? Tacksam för hjälp :-)
25.03.2015 - 20:02DROPS Design answered:
Hej Eva, Ja men är det inte de m i mitten som skall bli till hals, så det är därför du bara virkar över de 31 st i sidan?
22.05.2015 - 15:33
|
|||||||||||||
Just Me#justmesweater |
|||||||||||||
 |
 |
||||||||||||
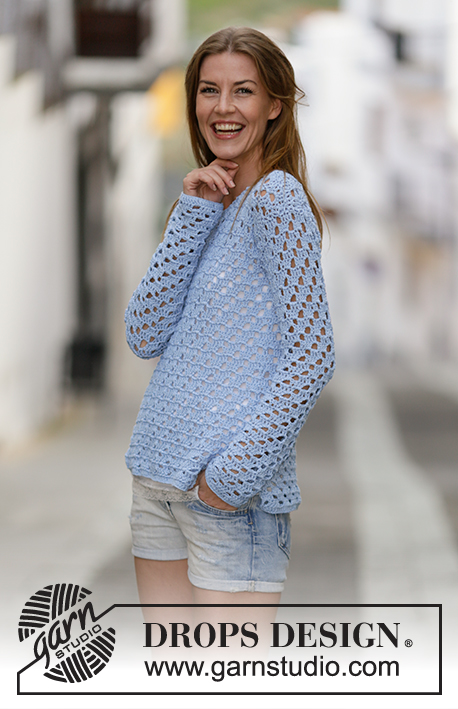
Crochet DROPS jumper with lace pattern in ”Cotton Light”. Size: S - XXXL.
DROPS 162-3 |
|||||||||||||
|
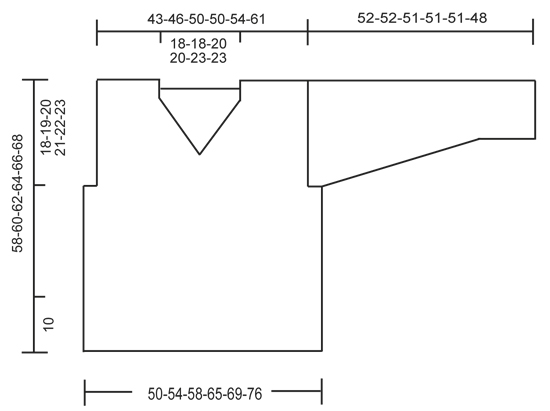
PATTERN: See diagrams A.1-A.2. CROCHET INFO: Replace first tr at beg of every tr row with 3 ch. 3 TR TOG: Work 3 tr into 1 tr as follows: * Work 1 tr but wait with last pull through (= 2 strands on hook) *, repeat from *-* 1 more time, then work next tr but on last pull through, pull yarn through all sts on hook. ---------------------------------------------------------- BACK PIECE: Work back and forth. Work 94-101-108-122-129-143 ch on hook size 4.5 mm with Cotton Light. Work 1 tr in 4th ch from hook (= 2 tr), 1 tr in each of the next 5 ch, * 1 tr in each of the next 6 ch, skip 1 ch *, repeat from *-* until 1 ch remains, 1 tr in last ch = 80-86-92-104-110-122 tr. Then work as follows: 3 ch - READ CROCHET INFO, skip 1 tr (replaced by the 3 ch), A.1 (= 6 sts) 13-14-15-17-18-20 times in total, finish with 1 tr in last tr. Continue pattern like this. Eyelet holes in A.1 goes diagonally towards the left 2 sts on every row (seen from RS) until hole meets the one tr in left side of piece. REMEMBER THE CROCHET TENSION! When A.1 has been worked 1 time vertically, repeat A.z until finished measurements. Fasten off when piece measures 40-41-42-43-44-45 cm. Now work pattern as before over the middle 68-74-80-80-86-98 sts (= 6-6-6-12-12-12 sts in each side for armhole). When piece measures 54-56-58-60-62-64 cm, adjust so that next row is from RS. Work over the first 20-23-24-24-24-31 sts (= shoulder) as follows: Work 1 tr in every tr and 2 tr in every ch-space = 20-23-24-24-24-31 tr. Work 2 rows with 1 tr in every tr. Fasten off. Do the same on the other shoulder FRONT PIECE: Work as back piece but work A.2 instead of A.1, i.e. eyelet holes goes diagonally towards the right (seen from RS). Repeat A.x until finished measurements. When piece measures 45-47-48-50-51-53 cm, adjust after a whole repetition of A.x dec for neck (next row is from WS) as follows: Work as before over the first 31-34-37-37-40-46 tr, work 3 TR TOG - see explanation above. Turn piece. Repeat this dec on every row toward mid-front 7-7-8-8-9-9 times in total = 20-23-24-24-25-31 sts remain for shoulder. Then work 1 row with 1 tr in every tr and 2 tr in every ch-space. Work 2 rows with 1 tr in every tr. Fasten off. Do the same on the other shoulder SLEEVE: Work back and forth. Work 45-45-49-49-52-52 ch on hook size 4.5 mm with Cotton Light. Work 1 tr in 4th ch from hook (= 2 tr), 1 tr in each of the next 5-5-7-7-5-5 ch, * 1 tr in each of the next 6 ch, skip 1 ch *, repeat from *-* until 1-1-3-3-1-1 ch remains, 1 tr in the last 1-1-3-3-1-1 ch = 38-38-42-42-44-44 tr. Work 1 tr in each of the first 1-1-3-3-1-1 tr, A.2 until 1-1-3-3-1-1 tr remain, (= 6-6-6-6-7-7 times in width), 1 tr in each of the last 1-1-3-3-1-1 tr. When A.2 has been worked 1 time vertically, repeat A.x until finished measurements. When piece measures 8-8-8-10-10-10 cm, inc 1 tr by working 2 tr in first and last tr on row (= 2 tr inc). Repeat inc every 4½-4-4-3-3-2½ cm 9-10-10-12-12-14 more times = 58-60-64-68-70-74 sts. Work the inc sts in pattern. NOTE: There is always 1 tr (or 3 ch = 1 tr) in each side of piece. Fasten off when piece measures 52-52-51-51-51-48 cm (shorter measurements in the larger sizes because of wider shoulders). Work another sleeve the same way. ASSEMBLY: Work the shoulder seams tog from WS as follows through both layers: 1 dc in first tr, * 1 ch, skip 1 tr, 1 dc in next tr *, repeat from *-*. Sew in sleeves. Work the under arm seams and side seams tog from WS as follows through both layers: * 1 dc in outer loop, 3 ch, skip 1 row *, repeat from *-* until approx. 10 cm remain on body for vent in each side. Fasten off. NECK EDGE: Work an edge around the neck as follows from mid on top of shoulder: 1 dc, * 3 ch, skip approx. 1 cm, 1 dc *, repeat from *-* around the entire neck and finish with 1 sl st in first dc on round. Fasten off. |
|||||||||||||
Diagram explanations |
|||||||||||||
|
|||||||||||||
 |
|||||||||||||
 |
|||||||||||||
Have you finished this pattern?Tag your pictures with #dropspattern #justmesweater or submit them to the #dropsfan gallery. Do you need help with this pattern?You'll find 5 tutorial videos, a Comments/Questions area and more by visiting the pattern on garnstudio.com. © 1982-2026 DROPS Design A/S. We reserve all rights. This document, including all its sub-sections, has copyrights. Read more about what you can do with our patterns at the bottom of each pattern on our site. |
|||||||||||||


With over 40 years in knitting and crochet design, DROPS Design offers one of the most extensive collections of free patterns on the internet - translated to 17 languages. As of today we count 324 catalogues and 12290 patterns translated into English (UK/cm).
We work hard to bring you the best knitting and crochet have to offer, inspiration and advice as well as great quality yarns at incredible prices! Would you like to use our patterns for other than personal use? You can read what you are allowed to do in the Copyright text at the bottom of all our patterns. Happy crafting!
Post a comment to pattern DROPS 162-3
We would love to hear what you have to say about this pattern!
If you want to leave a question, please make sure you select the correct category in the form below, to speed up the answering process. Required fields are marked *.