
Popular categories
Looking for a yarn?


Comments / Questions (90)
![]() Susanne wrote:
Susanne wrote:
Zählt die Randmasche mit und wie wird sie gestrickt?
13.01.2026 - 16:54DROPS Design answered:
Liebe Susanne, Sie stricken hier keine zusätzliche Rand-Masche, sofern es nicht angegeben ist. Bei den Ärmeln ist diese genannt. Grundsätzlich sind die Rand-Maschen in unseren Anleitungen genannt, sie kommen nicht noch zusätzlich hinzu. Viel Spaß beim Stricken!
30.01.2026 - 10:08
![]() Birgit Jørgensen wrote:
Birgit Jørgensen wrote:
Hvad er ret siden? Jeg slå masker op strikker en omgang vrang og en omgang ret med indtagninger til dominoruder. Når jeg så skal starte dominorækken hvad skal jeg så starte med ? Hvis jeg starter med ret som 1. Pind i dominoruden får jeg 2 pinde glatstrikning og den side af arbejdet der vender ud mod mig på rundpinde bliver vrangsiden. Forstår ikke hvordan jeg skal fortsætte efter omgangen hvor jeg har taget ind.
13.05.2023 - 09:28DROPS Design answered:
Hei Birgit. Husk du legger opp og så strikker du 1 omgang vrang, deretter strikker du dominorutene frem og tilbake med rettmasker. Du vil da ikke få 2 pinner glattstrikk. mvh DROPS Design
15.05.2023 - 14:10
![]() Gemma wrote:
Gemma wrote:
Which cast on approach should I use for this? Cast on with loops? Old Norwegian way? Or basic cast on like the one shown in “ How to start knitting for a beginner”
13.12.2021 - 14:06DROPS Design answered:
Dear Gemma, you can use your favorite technique to cast on stitches, we generally use the continental cast on. Happy knitting!
14.12.2021 - 07:29
![]() Ute Wybiralla wrote:
Ute Wybiralla wrote:
Wird der Pullover in Hin-und Rückreihen gestrickt? Wenn ich die erforderliche Maschenzahl für meine Größe anschlage(Gr.XL) und in HIn-und Rückreihen stricke ist das Teil viel zu groß. Selbst wenn ich um 2 Größen verkleiner. Woran liegt das?
30.10.2020 - 14:24DROPS Design answered:
Liebe Frau Wybiralla, sollte Ihre Maschenprobe stimmen, dann stimmt die Maschenanzahl und so bekommen Sie die Massenangaben von der Skizze - am Anfang schlagen Sie alle Maschen von den unteren Rand, aber dann nehmen Sie Maschen (= 430 M zu 410 M abgenommen), und vergessen Sie nicht, diese Maschen sind die von jedem Quadrat (= die 1. Reihe von Quadrate werden je über 41 M gestrickt) also nicht gerade von einer Seite bis zur anderen sondern mit dem V von jedem Domino (deshalb brauch man mehr Maschne). Viel Spaß beim stricken!
30.10.2020 - 15:21
![]() Sonia wrote:
Sonia wrote:
Grazie! Conosco la lavorazione domino, ma non mi avete risposto... Domani inizierò la lavorazione senza aver capito! Mi dite almeno se è lavorato in tondo?
04.08.2019 - 21:21DROPS Design answered:
Buongiorno Sonia. Lavora in tondo, dal basso verso l’alto, fino agli scalfi. Qui il lavoro viene separato e procede avanti e indietro, separatamente, per il dietro e per il davanti. Buon lavoro!
04.08.2019 - 21:34
![]() Sonia wrote:
Sonia wrote:
Ho già acquistato il filato e vorrei iniziare il progetto, ma, leggendo le spiegazioni, non riesco a capire se sia lavorato in tondo ( nella spiegazione dice avanti e indietro), dove eventualmente si troverebbe la separazione del lavoro (laterale? Dietro?) e soprattutto perché non compaiono i mezzi quadrati domino fino alla separazione del lavoro? Bisogna cucirlo a zig-zag? 🤔 Vi ringrazio se vorrete darmi delucidazioni.
04.08.2019 - 18:35DROPS Design answered:
Buonasera Sonia, questo modello ha una costruzione particolare, non è lavorato con le solite geometrie, ma costruito riprendendo di volta in volta le maglie per i diversi quadrati. Leggendo il modello è difficile capire la costruzione, deve iniziare a lavorarlo per capire come si sviluppa. Buon lavoro!
04.08.2019 - 20:40
![]() émilie wrote:
émilie wrote:
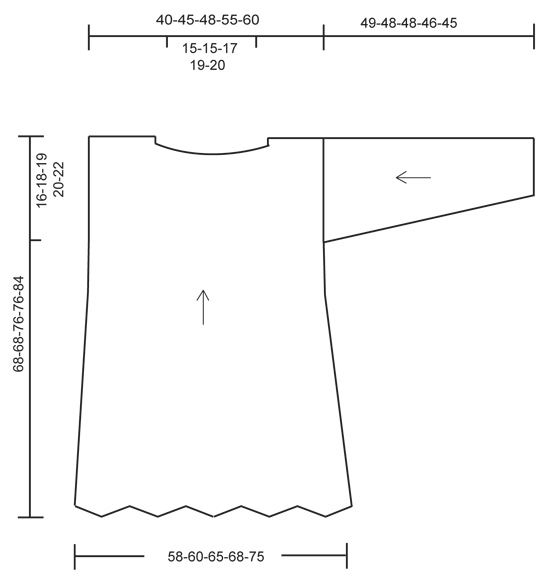
Bonjour, Je tricote le modèle158-11 mais j'aimerai savoir les mesures au niveau de la poitrine car j'hésite entre la taille M et L. Le bas m' à l' air très large par rapport aux épaules. Merci
04.12.2017 - 08:12DROPS Design answered:
Bonjour, au niveau de la poitrine vous avez plus ou moins 40-45-48-55-60 cm (dans la taille M est 45, et en L 48 cm). Bon travail!
04.12.2017 - 08:30Janice wrote:
I've finally got to the top and I agree with an earlier comment that the transition row from diagonal squares to flat knitting is messy and it's made worse by the thinness of yarn and big needles. I too will be taking a darning needle to that transition and tidying it up a lot.
01.10.2017 - 15:40Janice wrote:
2nd error - 1st ROW WITH DONINO SQUARES: line reads - over the first 35 sts on needle. However if you do this the first row is WS over RS. You need to turn the work before knitting over those first 35 sts to keep the WR & RS correct!!
01.08.2017 - 10:22DROPS Design answered:
Dear Janice, the first round is worked from RS, then when working the 1st row with domino squares, you work the first 35 sts on round from RS, then turn to work the domino back and forth. Happy knitting!
01.08.2017 - 12:26Jan wrote:
I have found a couple of errors you should amend. First paragraph of Jumper:- The line reads - Work next round as follows: K 17 etc., slip 1 stitch as if to K, K2 tog, psso, *K34 etc., (slip 1 stitch as if to K), K2 tog, psso* The bit in brackets is missing from that line!!
01.08.2017 - 10:21DROPS Design answered:
Thanks Jan, this will be fixed.
01.08.2017 - 12:25
|
||||
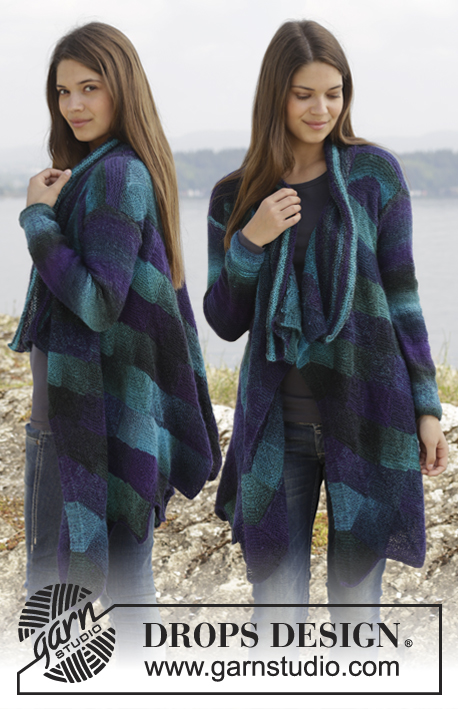
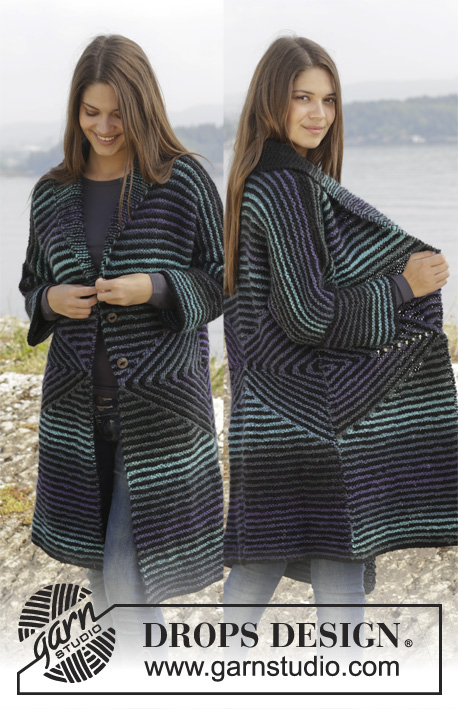
Harlequin Dreams#harlequindreamssweater |
||||
|
|
||||
Knitted DROPS jumper with domino squares in ”Delight”. Size: S - XXXL.
DROPS 158-11 |
||||
|
GARTER ST (back and forth on needle): K all rows. 1 ridge = 2 rows K KNITTING TIP 1: To avoid all yarn fastenings every square can be worked with their own ball on 1st row. Instead of cutting the yarn the balls can follow the squares upwards in the rows with domino squares. KNITTING TIP 2: Always pick up sts from RS. DECREASE TIP (applies to whole domino squares): When dec evenly on whole domino squares, dec the same no of sts on each side of marker. HALF DOMINO SQUARE (vertical): Row 1 (= WS): K all sts. Row 2 (= RS): K until 2 sts remain, K 2 tog. Work opposite on square in the other side of piece. Repeat 1st and 2nd row, i.e. dec 1 st on square on every other row until 1 st remains. Cut the yarn and pull it through this st. WHOLE DOMINO SQUARE: Insert 1 marker in the middle st. Row 1 (= WS): K all sts. Row 2 (= RS): K until 1 st remains before marker, slip 1 st as if to K, K 2 tog, psso, K rest of row. Repeat 1st and 2nd row, i.e. dec 2 sts in the middle of the square on every other row until 1 st remains, cut the yarn and pull it through remaining st. HALF/WHOLE DOMINO SQUARE (horizontal): Work as half/whole domino square but in addition to dec in the middle/side of square, slip last st at the end of every row on 1 stitch holder. Continue like this until 4-3-4-4-4 sts remain on needle. SIZE S-L-XL-XXL/XXXL: Work next row (= RS) as follows: Slip 1 st as if to K, K 2 tog, psso, slip last st on row on the stitch holder in the side (6-7-8-9 sts on stitch holder in each side of the whole and 6-7-8-9 sts on stitch holder on the half). Cut the yarn and pull it through the remaining sts. SIZE M: 3 sts remain on row (6 sts on stitch holder in each side).K 1 row from WS over the 3 sts. Work next row (= RS) as follows: Slip 1 st as if to K, K 2 tog, psso (6 sts on stitch holder in each side of the whole and 6 sts on stitch holder on the half). Cut the yarn and pull it through the remaining sts. ---------------------------------------------------------- JUMPER: Beg by casting on sts the entire width of garment, then work one and one square back and forth in GARTER ST - see explanation above. Cast on 370-390-410-430-470 sts on circular needle size 4 mm with Delight. P 1 round. READ KNITTING TIP 1! Work next round as follows: K 17-18-19-20-22, slip 1 st as if to K, K 2 tog, psso, * K 34-36-38-40-44, slip 1 st as if to K, K 2 tog, psso *, repeat from *-* 9 times in total and finish with K 17-18-19-20-22 = 350-370-390-410-450 sts. 1ST ROW WITH DOMINO SQUARES: Work WHOLE DOMINO SQUARE - see explanation above - over the first 35-37-39-41-45 sts on needle. When Domino square has been worked, work the next 35-37-39-41-45 sts the same way. Continue like this until 10 domino squares have been worked on 1st row. REMEMBER THE KNITTING TENSION! 2ND ROW WITH DOMINO SQUARES: Pick up 17-18-19-20-22 sts along the edge of the next square - READ KNITTING TIP 2. Then pick up 1 st between the square and next square from 1st row. Pick up 17-18-19-20-22 sts along the side of next square = 35-37-39-41-45 sts on needle. Work whole Domino square as before. When Domino square has been worked, pick up 35-37-39-41-45 sts between 2 and 2 squares from 1st row until 10 Domino squares have been worked on 2nd row. 3RD ROW WITH DOMINO SQUARES: Work as follows: * Pick up 17-18-19-20-22 sts from RS along the edge on each of the next 2 squares from 2nd row and 1 st between squares = 35-37-39-41-45 sts on needle. K 1 row from WS while AT THE SAME TIME dec 6 sts evenly - READ DECREASE TIP = 29-31-33-35-39 sts. Then work whole Domino square, beg on 2nd row *, repeat from *-* until 10 domino squares have been worked on 3rd row. 4TH ROW WITH DOMINO SQUARES: Pick up 14-15-16-17-19 sts along the edge of the next square. Then pick up 1 st between the square and next square from 3rd row. Pick up 14-15-16-17-19 sts along the side of next square = 29-31-33-35-39 sts on needle. Work whole Domino square as before. When Domino square has been worked, pick up 29-31-33-35-39 sts between 2 and 2 squares from 3rd row. Continue like this until 10 domino squares have been worked on 4th row. 5TH and 6TH ROW WITH DOMINO SQUARES: Work as 4th row. 7TH ROW WITH DOMINO SQUARES: * Pick up 14-15-16-17-19 sts along the edge on each of the next 2 squares from 6th row and 1 st between squares = 29-31-33-35-39 sts on needle. K 1 row from WS while AT THE SAME TIME dec 4-4-4-2-2 sts evenly = 25-27-29-33-37 sts. Then work whole Domino square, beg on 2nd row *, repeat from *-* until 10 domino squares have been worked on 7th row. 8TH ROW WITH DOMINO SQUARES: Pick up 12-13-14-16-18 sts along the edge of the next square. Then pick up 1 st between the square and next square from 7th row. Pick up 12-13-14-16-18 sts along the side of next square = 25-27-29-33-37 sts on needle. Work whole Domino square as before. When Domino square has been worked, pick up 25-27-29-33-37 sts between 2 and 2 squares from 7th row. Continue like this until 10 domino squares have been worked on 8th row. Now continue the piece differently in the different sizes: Size L-XL-XXL/XXXL: 9TH and 10TH ROW WITH DOMINO SQUARES: Work as 8th row. All sizes: Now divide the piece and finish front and back piece separately. BACK PIECE: 1ST ROW WITH DOMINO SQUARES ON BACK PIECE: Pick up 12-13-14-16-18 sts along the edges on each of the next 2 squares from previous row and 1 st between squares = 25-27-29-33-37 sts on needle. Work whole Domino square as before. When Domino square has been worked, pick up 25-27-29-33-37 sts between 2 and 2 squares. Continue like this until 5 domino squares have been worked. 2ND ROW WITH DOMINO SQUARES ON BACK PIECE: Pick up 13-14-15-17-19 sts along the edge on the first square worked on 1st row. Work HALF DOMINO SQUARE (vertical) - see explanation above. When the half square has been worked, work as follows: * Pick up 12-13-14-16-18 sts along the edges on each of the next 2 squares from 1st row and 1 st between squares = 25-27-29-33-37 sts on needle. Work whole Domino square as before *, repeat from *-* until 4 whole domino squares and 1 half domino square have been worked. Now pick up 13-14-15-17-19 sts along the edge on the last square. Work half domino square (vertical). When the half square has been worked, there are 4 whole and 2 half Domino squares. Repeat these 2 rows with domino squares 1 more time. Then repeat 1st row 1 more time. Then work as follows: LAST ROW WITH DOMINO SQUARES: Pick up 13-14-15-17-19 sts along the edge on the first square worked on back piece on last row. Work a half domino square (horizontal) – READ HALF/WHOLE DOMINO SQUARE (HORIZONTAL) . When the half square has been worked, work as follows: * Pick up 12-13-14-16-18 sts along the edges on each of the next 2 squares from last row and 1 st between squares = 25-27-29-33-37 sts on needle. Work whole Domino square (horizontal) *, repeat from *-* until 4 whole domino squares and 1 half domino square have been worked. Now pick up 13-14-15-17-19 sts along the edge on the last square. Work half domino square (horizontal). When the half square has been worked, there are 4 whole and 2 half Domino squares (horizontal). Then work from RS as follows: Work the first 6 sts from stitch holder, pick up 1 st between squares, * work sts from stitch holder (= 6-6-7-8-9 sts) back on needle, pick up 3 sts between stitch holders, work sts from stitch holder (= 6-6-7-8-9 sts) back on needle, pick up 1 st between squares *, repeat from *-* until 6-6-7-8-9 sts remain on stitch holder, work sts on stitch holder back on needle = 77-77-87-97-107 sts. Work 2 ridges in garter st over all sts. Then cast off the middle 31-31-35-39-43 sts = 23-23-26-29-32 sts remain on each shoulder. Work in garter st over shoulder for 2.5 cm. Cast off. Work the other shoulder the same way. FRONT PIECE: Work as on back piece. SLEEVES: The sleeve is worked back and forth on circular needle. Cast on 50-52-54-56-58 sts (incl 1 edge st in each side) on circular needle size 4 mm with Delight. K 6 rows over all sts. Then continue in stocking st until finished measurements. When piece measures 8-5-5-5-5 cm, inc 1 st in each side of piece. Repeat inc every 4-3½-3-2½-2 cm 9-11-13-15-17 more times = 70-76-82-88-94 sts. When piece measures 49-48-48-46-45 cm (NOTE! Shorter measurements in the larger sizes because of wider shoulders), cast off. Knit another sleeve the same way. ASSEMBLY: Sew the shoulder seams. Sew in sleeves with WS outwards. Sew arm seams and underarm seams from where front piece and back piece were divided and up to sleeve. |
||||
Diagram explanations |
||||
|
||||
 |
||||
Have you finished this pattern?Tag your pictures with #dropspattern #harlequindreamssweater or submit them to the #dropsfan gallery. Do you need help with this pattern?You'll find 21 tutorial videos, a Comments/Questions area and more by visiting the pattern on garnstudio.com. © 1982-2026 DROPS Design A/S. We reserve all rights. This document, including all its sub-sections, has copyrights. Read more about what you can do with our patterns at the bottom of each pattern on our site. |
||||


With over 40 years in knitting and crochet design, DROPS Design offers one of the most extensive collections of free patterns on the internet - translated to 17 languages. As of today we count 324 catalogues and 12290 patterns translated into English (UK/cm).
We work hard to bring you the best knitting and crochet have to offer, inspiration and advice as well as great quality yarns at incredible prices! Would you like to use our patterns for other than personal use? You can read what you are allowed to do in the Copyright text at the bottom of all our patterns. Happy crafting!
Post a comment to pattern DROPS 158-11
We would love to hear what you have to say about this pattern!
If you want to leave a question, please make sure you select the correct category in the form below, to speed up the answering process. Required fields are marked *.