
Popular categories
Looking for a yarn?


Comments / Questions (39)
![]() Paula wrote:
Paula wrote:
Jag vill gärna få ett förtydligande på minskningen på oket och minsknings tips 3.
05.03.2026 - 15:13DROPS Design answered:
Hei Paula. Øverst i oppskriften står det 3 felletips, les disse og samtidig ta en titt på hjelpevideoene. De finner du til høyre for /eller under bildet. mvh DROPS Design
23.03.2026 - 11:16
![]() Merethe wrote:
Merethe wrote:
Jeg er nået til at jeg skal "strikke 1 pind tilbage over venstre forstykke fra vrangen. Vend arb og strik således over venstre forstk: 5 m retstrik (mod ærmegabet), tag 1 m ind – læs INDTAGNINGSTIPS 2 - glatstrik og retstrik over de 12 kantm som før. Fortsæt således til der er taget totalt 4 m ind indenfor de 5 m retstrik mod ærmegabet = 49-54-58-63-70-77 m. " Jeg forstår det bare ikke helt🤔
13.06.2025 - 18:06DROPS Design answered:
Hei Merethe. Jo, nå skal du bare strikke over venstre forstykke. Du er midt foran, snu og strikk 1 pinne over venstre forstykket (vrangen). De 5 siste maskene strikkes retstrik. Du er da ved ermhullet. Snu og strikk 5 masker retstrik, fell 1 maske, strikk glattstrikk, men de 12 kantmaskene midt foran strikkes som før. Fortsett å strikk slik (frem og tilbake) til det er taget totalt 4 masker ind indenfor de 5 masker retstrik mod ærmegabet (du strikker da 10 pinner og tager inn 5 gangger). mvh DROPS Design
16.06.2025 - 11:17
![]() Kelly Wright wrote:
Kelly Wright wrote:
Thank you for answering my question, however, that's not quite what I was asking. I understand the decreases but was wondering do the decreases happen on every other row (RS) or do you knit a certain number of cms in height between decrease rows?
08.07.2024 - 14:27DROPS Design answered:
Dear Kelly , the patterns always tell you if you need to decrease (or increase) at every Xth row/round or every Y cm... In this case the pattern specifically says "Repeat the same dec every cm" (for the side of the body). Then later for the yoke, first decrease every cm, then every other row. Happy Knitting.
08.07.2024 - 19:46
![]() Kelly Wright wrote:
Kelly Wright wrote:
The armhole size seems really small. Starting where the pattern says Decrease Tip #2, do you decrease the 4 sts on every other row? That doesn’t create enough of a space before casting on the 100 sts above each armhole when you start the yoke?
06.07.2024 - 13:54DROPS Design answered:
Dear Kelly, in each row you decrease only 1 stitch. However, the stitch is decreased differently depending on the side you are working on; in the left front piece you decrease after the 5 sts in garter stitch but in the right front piece you will decrease before them. That's why there are 2 different instructions. You need to decrease 4 stitches in total for each armhole (you can see that the total number of stitches after the decrease is only 4 less than before) and each side. In the back piece you will decrease on both sides but 1 each time 4 times in total. Happy knitting!
07.07.2024 - 22:40
![]() Anneli Storm wrote:
Anneli Storm wrote:
Vad menas med minskningarnas 3? Ska man ena varvet minska före markeringen och andra rätsida varvet efter markeringen?
30.06.2024 - 13:34DROPS Design answered:
Hej Anneli, ja det stemmer :)
02.07.2024 - 13:28
![]() Yellah wrote:
Yellah wrote:
In Größe S müssen für die Passe viel weniger Maschen aufgenommen werden, ansonsten entstehen Flügelärmel. Ich hab statt 86 Maschen nur 66 aufgenommen. Dann aber mit den Abnahmen laut Anleitung weitergearbeitet. So passt alles perfekt.
01.04.2024 - 14:36
![]() Anne wrote:
Anne wrote:
Att lägga upp 2 x 110 maskor löst för oket i XXL är alldeles för mycket. Även efter blockning är ärmhålen och ringningen enorma. Stickfastheten stämmer precis... Garnet är inget man lätt river upp så får nog betrakta arbete och garnkostnad som bortkastade.
16.03.2023 - 20:33
![]() Renata wrote:
Renata wrote:
Dzień dobry, chciałabym zrobić ten model z włóczki Lace ale zastanawiam się czy nie jest ona zbyt wiotka, "lejąca się"? Nie znalazłam wzoru na sweter z Lace stąd moje wątpliwości.
19.12.2019 - 13:42DROPS Design answered:
Witaj Renato! Lace jest bardzo cienka, idealna na szale, które są wykonywane na nieco grubszych drutach, wtedy wzór ażurowy jest dobrze widoczny po zblokowaniu. Na sweterek możesz jej użyć, będzie bardzo cienki, przezroczysty i delikatny. Ja bym jej użyła w połączeniu z włóczką DROPS Kid-Silk, wtedy sweterek nie będzie prześwitujący. Powodzenia!
30.12.2019 - 00:50
![]() Francesca wrote:
Francesca wrote:
Buongiorno, sto eseguendo la taglia M di questo modello; se volessi aggiungerci le maniche lunghe, come dovrei regolarmi? Grazie, saluti cordiali. Francesca
13.11.2019 - 11:23DROPS Design answered:
Buonasera Francesca, per un aiuto così personalizzato può rivolgersi al suo rivenditore DROPS di fiducia. Buon lavoro!
19.11.2019 - 22:50
![]() Jacqueline wrote:
Jacqueline wrote:
Bonjour, J\'aimerai une explication pour poursuivre mon tricot, je suis arrivée à : \"Tricoter ensuite le dos de la même façon mais avec 5 m point mousse et 4 diminutions de chaque côté (emmanchures) = 84-94-104-114-128-142 m.\" Si je comprend bien je dois couper le fil après avoir tricoter les 4 diminutions du côté gauche, pour poursuivre les diminutions du dos, et recouper le fil de nouveau pour reprendre le côté droit .
22.07.2018 - 13:42DROPS Design answered:
Bonjour Jacqueline, tout à fait, après avoir rabattu les mailles des emmanchures, vous tricotez quelques rangs sur les mailles du devant gauche seulement, puis coupez le fil et tricotez le dos en diminuant de chaque côté (= 8 m diminuées),coupez le fil et tricotez le devant droit (= 4 diminutions). À la fin du devant droit, ne coupez pas le fil, vous continuez l'empiècement à partir du devant droit (sur l'endroit). Bon tricot!
23.07.2018 - 08:07
|
|
No One But Me#noonebutmecardigan |
|
|
|
|
Knitted DROPS jacket with round yoke in ”Kid-Silk”. Size: S - XXXL.
DROPS 155-27 |
|
|
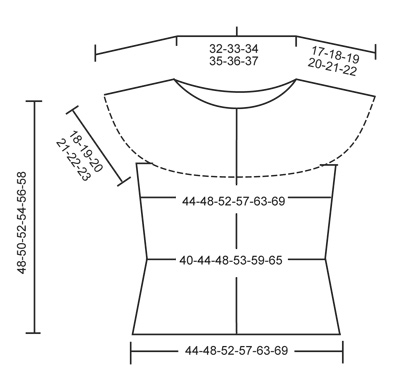
GARTER ST (back and forth on needle): K all rows. 1 ridge = 2 rows K. DECREASE TIP 1: All dec are done from RS! Dec as follows 3 sts before marker: K 2 tog. Dec as follows 1 st after marker: Slip 1 st as if to K, K 1, psso. DECREASE TIP 2: All dec are done from RS! Dec as follows after 5 sts in garter st: Slip 1 st as if to K, K 1, psso = 1 st dec. Dec as follows 2 sts before 5 sts in garter st: K 2 tog = 1 st dec. DECREASE TIP 3: All dec are done from RS! Dec alternately before and after markers. Dec as follows before marker: Beg 2 sts before marker. Dec 1 st by K 2 sts tog. Dec as follows after marker: K 2 tog. INCREASE TIP: Inc 1 st by getting yarn between 2 sts from previous row - K this st twisted, i.e. work in back loop of st instead of front to avoid holes. BUTTONHOLES: Dec for buttonholes on right band. 1 buttonhole = K tog third and fourth st from edge and make 1 YO. Measure from beg of yoke and dec for buttonholes when piece measures: SIZE S: 2, 9 and 16 cm SIZE M: 1, 9 and 17 cm SIZE L: 2, 10 and 18 cm SIZE XL: 1, 10 and 19 cm SIZE XXL: 2, 11 and 20 cm SIZE XXXL: 1, 11 and 21 cm ---------------------------------------------------------- JACKET: Worked back and forth on circular needle. Cast on 218-238-256-276-304-332 sts on circular needle size 3 mm with Kid-Silk. Work ridges in GARTER ST – see explanation above – back and forth until piece measures 3 cm. Switch to circular needle size 3.5 mm and continue with stocking st with 12 band sts in garter st in each side of piece. REMEMBER THE KNITTING TENSION! Continue like this back and forth AT THE SAME TIME when piece measures 6 cm, insert 1 marker in each side of piece as follows: 12 band sts in garter st, 46-51-55-60-67-74 sts in stocking st, insert a marker here, 102-112-122-132-146-160 sts in stocking st, insert a marker here, 46-51-55-60-67-74 sts in stocking st, 12 band sts in garter st. On next row from RS, dec 1 st on each side of both markers - READ DECREASE TIP 1. Repeat the same dec every cm 4 more times (= 5 times in total) = 198-218-236-256-284-312 sts. Then when piece measures 16-16-16-17-17-17 cm, inc 1 st on each side of marker in each side – see INCREASE TIP. Repeat the same inc approx. every 3-3½-3½-4-4-4 cm 4 more times (= 5 times in total) = 218-238-256-276-304-332 sts. When piece measures 30-31-32-33-34-35 cm, work in garter st over 20 sts in each side (i.e. work in garter st over 10 sts on each side of markers in each side). When piece measures 31-32-33-34-35-36 cm, work as follows from RS: 12 band sts in garter st, * stocking st until 10 sts remain before marker in the side, 5 sts in garter st, cast off 10 sts for armhole (i.e. 5 sts on each side of marker), 5 sts in garter st *, repeat from *-* 1 more time. Work the rest of row. There are now 92-102-112-122-136-150 sts on back piece and 53-58-62-67-74-81 sts (incl band sts) on each front piece. Work 1 row over left front piece from WS. Turn piece and work as follows over left front piece: 5 sts in garter st (towards armhole), dec 1 st – READ DECREASE TIP 2 - stocking st and garter st over the 12 band sts as before. Continue like this until 4 sts have been dec in total inside the 5 sts in garter st towards armhole = 49-54-58-63-70-77 sts. Then work back piece the same way but with 5 sts in garter st and 4 dec towards armholes in each side = 84-94-104-114-128-142 sts. Work right front piece the same way as left front piece but reversed = 49-54-58-63-70-77 sts. YOKE: Work yoke in garter st. Switch to circular needle size 3 mm and work as follows from RS: Work over all sts on right front piece, loosely cast on 86-92-96-100-106-110 new sts over right armhole, work over all sts on back piece, loosely cast on 86-92-96-100-106-110 new sts over left armhole and work the rest of row = 354-386-412-440-480-516 sts. On next row insert 8 markers in the piece as follows: 49-55-58-63-71-78 sts in garter st, insert a marker here, 26-27-28-29-31-32 sts in garter st, insert a marker here, 33-36-38-39-42-45 sts in garter st, insert a marker here, 26-27-28-29-31-32 sts in garter st, insert a marker here, 86-96-108-120-130-142 sts in garter st, insert a marker here, 26-27-28-29-31-32 sts in garter st, insert a marker here, 33-36-38-39-42-45 sts in garter st, insert a marker here, 26-27-28-29-31-32 sts in garter st, insert a marker here, 49-55-58-63-71-78 sts in garter st. Then on next row from RS beg dec – READ DECREASE TIP 3, AT THE SAME TIME dec for BUTTONHOLES on right band – see explanation above. Dec as follows: 1 st every 1 cm 9-10-10-11-11-12 times, then dec every 4th row 7-5-6-4-2-0 times and every other row 1-6-7-11-17-21 times. When all dec are done, 218-218-228-232-240-252 sts remain on needle. On next row from RS, dec 42-38-42-42-42-52 sts evenly on needle = 176-180-186-190-198-200 sts. Loosely cast off with K from WS when piece measures 48-50-52-54-56-58 cm in total. ASSEMBLY: Fasten off and sew buttons on to left front piece. |
|
 |
|
Have you finished this pattern?Tag your pictures with #dropspattern #noonebutmecardigan or submit them to the #dropsfan gallery. Do you need help with this pattern?You'll find 17 tutorial videos, a Comments/Questions area and more by visiting the pattern on garnstudio.com. © 1982-2026 DROPS Design A/S. We reserve all rights. This document, including all its sub-sections, has copyrights. Read more about what you can do with our patterns at the bottom of each pattern on our site. |


With over 40 years in knitting and crochet design, DROPS Design offers one of the most extensive collections of free patterns on the internet - translated to 17 languages. As of today we count 324 catalogues and 12290 patterns translated into English (UK/cm).
We work hard to bring you the best knitting and crochet have to offer, inspiration and advice as well as great quality yarns at incredible prices! Would you like to use our patterns for other than personal use? You can read what you are allowed to do in the Copyright text at the bottom of all our patterns. Happy crafting!
Post a comment to pattern DROPS 155-27
We would love to hear what you have to say about this pattern!
If you want to leave a question, please make sure you select the correct category in the form below, to speed up the answering process. Required fields are marked *.