
Popular categories
Looking for a yarn?


Comments / Questions (208)
Cornelia wrote:
Bonjour, très beau modèle. Je peux très bien l'imaginer en noir avec des boutons recouvert de tissu japonais. Et j'adore l'alpaca silk. Je viens de terminer un châle avec, une merveille cette matière. Mais je l'ai pris en double fil pour un effet plus "dense". J'aimerais tricoter pareil avec deux fils pour ce poncho. Quelles aiguilles pensez-vous devrais je prendre pour avoir les mêmes dimensions du poncho avec deux fils alpaca silk ? Merci.
18.02.2014 - 22:05DROPS Design answered:
Bonjour Cornelia, ce modèle se tricote sur la base de 14 m = 10 cm. Faites un échantillon avec 2 fils pour recalculer comment adapter les explications comme vous le souhaitez. Bon tricot!
19.02.2014 - 09:34
![]() Annette wrote:
Annette wrote:
Hallo zusammen, kann mir jemand sagen, wann man die Knopflöcher einarbeitet?
12.02.2014 - 18:34DROPS Design answered:
Liebe Annette, die Maße, bei denen die Knopflöcher eingearbeitet werden, finden Sie über der eigentlichen Anleitung unter "Knopfloch". Die Halskante ist gleichzeitig die Anschlagkante, Sie messen also ganz einfach die cm ab der Anschlagkante. Viel Spaß beim Stricken!
14.02.2014 - 09:44
![]() Ivy wrote:
Ivy wrote:
Het staat niet aangegeven in pagroonbeschrijving; maar wordt het patroon gebreid in 2 draden A (of 1 draad C categorie)?
08.02.2014 - 08:51DROPS Design answered:
Hoi Ivy. Het gebruikte garen staat bovenaan het patroon (DROPS Alpaca Silk) en aan het begin van het patroon staat: "Zet losjes 106-111-115-119-123-126 st op met Alpaca Silk en rondbreinld 7 mm." Dus je breit met 1 draad van Alpaca Silk (categorie C) maar je kan ook 2 draden van categorie A gebruiken. Zie ook begin van het patroon: Garengroep C of A en A
12.02.2014 - 13:54
![]() Marie wrote:
Marie wrote:
V návodu je chyba . Začíná se na strašně moc ok. Podle zkušebního vzorku neodpovídají oka na začátek práce a i přidávání ok je nějak v nepořádku.Neshodují se počet ok a míry na střihu.Vypletla jsem 50 gr. než jsem na to přišla bohužel.
07.02.2014 - 23:32DROPS Design answered:
Milá Marie, děkujeme za připomínku. Počáteční počet ok odpovídá zkušebnímu vzorku i uvedeným rozměrům - pončo začínáme jako jeden celistvý díl, dlouhý 2x 38 cm (viz údaje pro vel.S) = 76 cm. Podle zkušebního vzorku vychází na 1 cm cca 1,4 oka (14 ok : 10 cm), proto nahazujeme 76 x 1,4 = 106 ok. Je-li Váš úplet příliš široký, zvolte užší jehlice, ppř. upravte počet ok dle potřeby. Hodně zdaru!
08.02.2014 - 00:39
![]() Charo wrote:
Charo wrote:
Delicado,y tierno
07.02.2014 - 00:17
![]() Agata wrote:
Agata wrote:
Io non sono molto brava faccio fatica a capire le spiegazioni e il disegno del modello non mi aiuta molto si possono avere spiegazioni più semplici per i principianti?grazie
05.02.2014 - 17:40DROPS Design answered:
Buonasera Agata, i modelli DROPS sono solitamente spiegati in modo molto dettagliato. In particolare questo modello si lavora avanti e indietro sui f, non in tondo; deve iniziare montando il n° di m indicato, lavorare 2 f a m legaccio e sul f successivo aumentare in modo uniforme come indicato, poi proseguire a m legaccio seguendo le istruzioni per gli aumenti e le asole. Ci riscriva se ha bisogno per un particolare passaggio. Buon lavoro!!
05.02.2014 - 21:31
![]() Simona wrote:
Simona wrote:
Ho già scritto ma probabilmente sbagliando dato che è la prima volta. sto avviando il lavoro per realizzare questo poncho che mi sembra semplice ma molto carino. non ho dimestichezza con i ferri circolari ma leggo che il lavoro si comincia lavorando "avanti e indietro". Posso quindi utilizzare ferri dritti e eventualmente se necessario successivamente passare ai circolari? quando si uniscono le maglie a cerchio? Ho letto più volte le istruzioni ma non mi è chiaro. Grazie
04.02.2014 - 16:52DROPS Design answered:
Buongiorno Simona. Si lavora sempre avanti e indietro sui ferri, non si unisce mai in cerchio. Viene consigliato di usare i ferri circolari per via del numero elevato di m. Il capo non ha cuciture, ma viene semplicemente abbottonato su un lato. Ci riscriva se ha altri dubbi. Buon lavoro!
04.02.2014 - 17:43
![]() Simona wrote:
Simona wrote:
Buongiorno, mi accingo ad iniziare il lavoro. premetto che ho scelto questo modello per il mio primo capo top-down con ferri circolari. Vi chiedo scusa per la domanda forse banale. leggo che gran parte del lavoro di fa "lavorando avanti e indietro" con ferri circolari. Ma dunque posso utilizzare anche ferri dritti e poi cambiare quando e se necessario? Il lavoro non si unisce mai?
04.02.2014 - 16:29DROPS Design answered:
Buongiorno Simona. Si lavora sempre avanti e indietro sui ferri, non si unisce mai in cerchio. Viene consigliato di usare i ferri circolari per via del numero elevato di m. Il capo non ha cuciture, ma viene semplicemente abbottonato su un lato. Ci riscriva se ha altri dubbi. Buon lavoro!
04.02.2014 - 17:43
![]() Maryline DESCLAUD wrote:
Maryline DESCLAUD wrote:
Simple mais chic
01.02.2014 - 20:25
![]() Marja wrote:
Marja wrote:
Wat een enig patroon. Ik ga het meteen maken.
01.02.2014 - 09:57
|
|
First date#firstdateponcho |
|
|
|
|
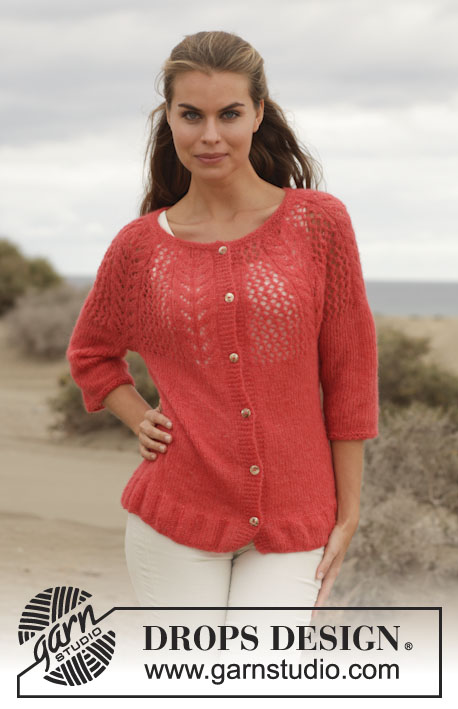
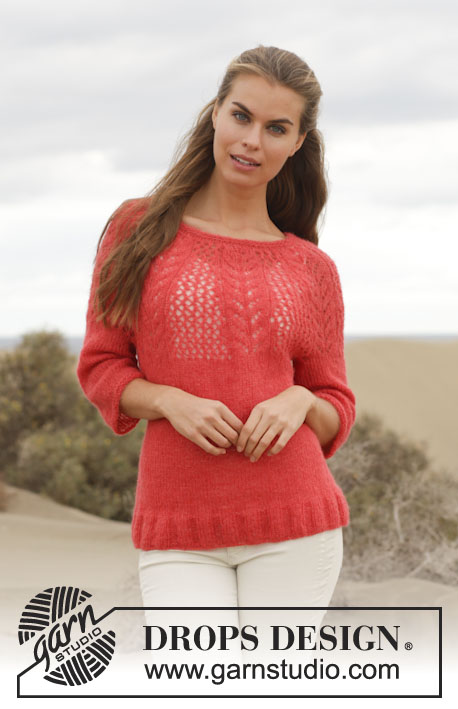
Knitted DROPS poncho in garter st with vent in ”Brushed Alpaca Silk”. Size S-XXXL.
DROPS 154-4 |
|
|
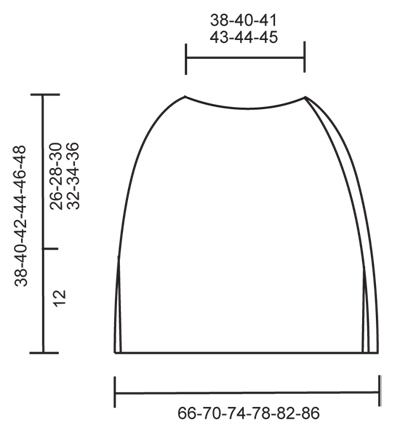
GARTER ST (back and forth on needle): K all rows. 1 ridge = 2 rows K. INCREASE TIP: Inc 1 st by getting yarn between 2 sts from previous row - K this st twisted, i.e. work in back loop of st instead of front to avoid holes. BUTTONHOLES: Dec for buttonholes in right side of piece, seen from RS. 1 buttonhole = K tog third and fourth st from edge and make 1 YO. Measure from neck edge and dec for buttonholes when piece measures: SIZE S: 2, 10, 18 and 26 cm SIZE M: 2, 10, 18 and 26 cm SIZE L: 2, 10, 18 and 26 cm SIZE XL: 2, 11, 20 and 29 cm SIZE XXL: 2, 11, 20 and 29 cm SIZE XXXL: 2, 11, 20 and 29 cm ---------------------------------------------------------- PONCHO: Worked back and forth on circular needle, top down. Loosely cast on 106-111-115-119-123-126 sts with Brushed Alpaca Silk on circular needle size 7 mm. Work 1 ridge in GARTER ST - see explanation above. On next row from RS, inc 20-21-23-23-25-24 sts evenly = 126-132-138-142-148-150 sts - READ INCREASE TIP. Continue back and forth in garter st until finished measurements. AT THE SAME TIME dec for BUTTONHOLE and inc evenly as follows: Inc 8-9-10-10-10-10 sts every 2 cm 5-5-6-6-6-7 times in total, 8-8-6-7-9-9 sts every 4 cm 2 times in total for all sizes and 8-7-0-6-8-8 sts after another 5 cm 1 time (= 64-68-72-80-86-96 sts inc) = 190-200-210-222-234-246 sts. Continue to work until piece measures 26-28-30-32-34-36 cm in total. Then insert a marker in the side for vent so that there are 95-100-105-111-117-123 sts on each side of marker. Then finish front and back piece separately. FRONT PIECE: Continue back and forth in garter st over the 95-100-105-111-117-123 sts on front piece. Loosely cast off all sts from WS when piece measures 38-40-42-44-46-48 cm in total. BACK PIECE: Work as front piece and loosely cast off from WS. ASSEMBLY: Fasten all strands and sew buttons on to left band, i.e. in left side of piece seen from RS. |
|
 |
|
Have you finished this pattern?Tag your pictures with #dropspattern #firstdateponcho or submit them to the #dropsfan gallery. Do you need help with this pattern?You'll find 12 tutorial videos, a Comments/Questions area and more by visiting the pattern on garnstudio.com. © 1982-2026 DROPS Design A/S. We reserve all rights. This document, including all its sub-sections, has copyrights. Read more about what you can do with our patterns at the bottom of each pattern on our site. |


With over 40 years in knitting and crochet design, DROPS Design offers one of the most extensive collections of free patterns on the internet - translated to 17 languages. As of today we count 324 catalogues and 12290 patterns translated into English (UK/cm).
We work hard to bring you the best knitting and crochet have to offer, inspiration and advice as well as great quality yarns at incredible prices! Would you like to use our patterns for other than personal use? You can read what you are allowed to do in the Copyright text at the bottom of all our patterns. Happy crafting!
Post a comment to pattern DROPS 154-4
We would love to hear what you have to say about this pattern!
If you want to leave a question, please make sure you select the correct category in the form below, to speed up the answering process. Required fields are marked *.