
Popular categories
Looking for a yarn?


Comments / Questions (70)
![]() Lucilla wrote:
Lucilla wrote:
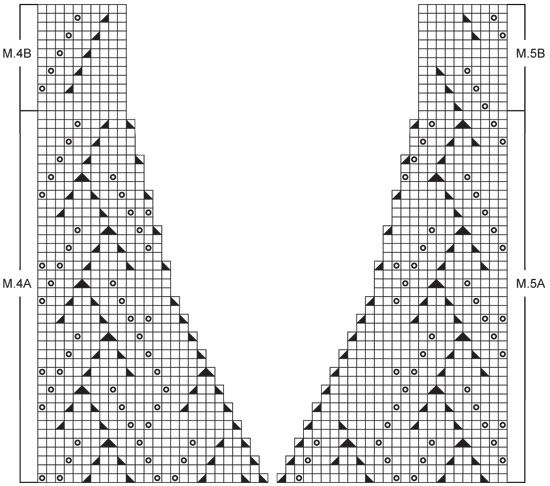
Buonasera, sto lavorando il davanti destro e sto iniziando lo schema M4A. Il problema è che il primo ferro di tale schema è lavorato su 27 maglie mentre io, arrivando dallo schema M1, ho 26 maglie disponibili... Come è possibile? Si può avere uno schema corretto? (Ho già visto che anche lo schema M5A parte da 27 maglie!).
26.04.2023 - 23:25DROPS Design answered:
Buonasera Lucilla, inoltreremo la sua segnalazione al settore design. Buon lavoro!
03.05.2023 - 22:16
![]() Michèle wrote:
Michèle wrote:
Merci
24.04.2023 - 11:33
![]() Michele wrote:
Michele wrote:
Rebonjour, j'ai oublié de vous préciser taille S. merci encore
23.04.2023 - 19:31
![]() Michèle wrote:
Michèle wrote:
Bonjour, j'ai tricoté le dos , le coté droit mais je n'arrive pas à tricoter l'encolure gauche. j'ai 3mailles point mousse emmanchure+7mailles jersey+26mailles de dentelle+3mailles mousse bordure du devant=39mailles. J'ai fait le motif M1 entier le 1er rang sur M5 se fait sur 27 mailles et je n'en ai que 26? pouvez vous m'aider merci
23.04.2023 - 18:54DROPS Design answered:
Bonjour Michèle, le 1er rang de M.5A se tricote sur 26 mailles (le même nombre de mailles que M.1 auparavant). M.5A doit s'aligner au-dessus de M.1 comme M.4 au-dessus de M.1 pour le devant droit. Bon tricot!
24.04.2023 - 10:15
![]() Myriam wrote:
Myriam wrote:
Bonjour, pour le devant droit je suis à 19cm de hauteur totale, je n'ai donc pas fait la dernière boutonnière ni commencer les diminution de l'emmanchure mais j'ai terminé un motif entier de M1, pouvez m'expliquer pour la suite comment ajuster et commencer M4 A ? Merci
17.04.2023 - 17:12DROPS Design answered:
Bonjour Myriam, au rang suivant sur l'endroit, tricotez 3 m de bordure devant au point mousse comme avant, puis tricotez les mailles du diagramme M.4 (= 26 mailles au 1er rang), et terminez le rang comme avant par les mailles jersey et 1 m lisière. Bon tricot!
18.04.2023 - 09:58
![]() Myriam wrote:
Myriam wrote:
Bonjour, quand je dois tricoter les 4 rangs au point mousse sur les 32 mailles centrales (Dos), je ne comprends pas comment faire pour continuer le motif sur les mailles avant et aprés ces 32 mailles. Soit mon motif se décale soit je termine les 4 rangs avec un total de mailles inférieur car déséquilibre entre diminutions et jetés. Pouvez-vous m'aider? Merci
06.04.2023 - 10:55DROPS Design answered:
Bonjour Myriam, tricotez les autres mailles exactement comme avant, notez si besoin dans le diagramme quelle est la dernière maille/la première maille de l'épaule pour bien continuer à tricoter le point ajouré comme avant. Si vous n'avez pas suffisamment de mailles pour tricoter 1 jeté et sa diminution (ou 1 diminution et son jeté), tricotez les mailles en jersey, sans diminuer ni augmenter, ainsi, vous conserverez le bon nombre de mailles requis. Bon tricot!
11.04.2023 - 11:34
![]() Myriam Gaubert wrote:
Myriam Gaubert wrote:
Bonjour, Sur les rangs envers, toutes les mailles se tricotent a l'envers ? Car dans la légende il est mentionné: m endroit seulement hors souvent il est marqué : m endroit sur endroit et m envers sur envers. Pouvez vous m'expliquer plus clairement ? Merci
26.03.2023 - 20:33DROPS Design answered:
Bonjour Mme Gaubert, une case blanche correspond à une maille jersey endroit que l'on va tricoter à l'endroit sur l'endroit et à l'envers sur l'envers, autrement dit, tous les rangs des diagrammes se tricotent ici à l'envers. Bon tricot!
27.03.2023 - 09:35
![]() Eef wrote:
Eef wrote:
When there is a yarn over in the chart. Do i make the yarn over first or knit the stitch first and then do the yarn over ?
28.12.2022 - 21:48
![]() Carmen-Gabriela wrote:
Carmen-Gabriela wrote:
Hallo, warum werden die Blendenmaschen bei der Jacke ab Bündchen separat gestrickt und später angenäht? Man kann doch gleich mit dem Muster die Blendenmaschen anstricken. Gibt es einen tieferen Sinn bei besagter Technik? Evtl. verkürzte Reihen fürs Anstricken? Ich werde mir ein Jäckchen in Brushed Alpaca Silk stricken + freue mich bereits.
06.12.2022 - 18:42DROPS Design answered:
Liebe Carmen-Gabriela, die Blendemaschen werden später mit den kleineren Nadeln gestrickt und dann an dem Vorderteil angenäht. So bleibt die Textur gleich. Viel Spaß beim stricken!
07.12.2022 - 08:01
![]() Linda Huetinck wrote:
Linda Huetinck wrote:
Where is Pattern 5 A and 5 B? I only have patterns M.1, M.3B and A (for all sizes) and M.4 A and B , but no 5 A and 5 B. Linda
26.06.2022 - 08:45DROPS Design answered:
Dear Linda, Pattern 5A and 5B are situated symmetrically to M4A and M4B on the right, just above the measurements schematic. Happy knitting!
26.06.2022 - 12:56
|
|||||||||||||
Summer Vines Vest#summervinesvest |
|||||||||||||
|
|
|||||||||||||
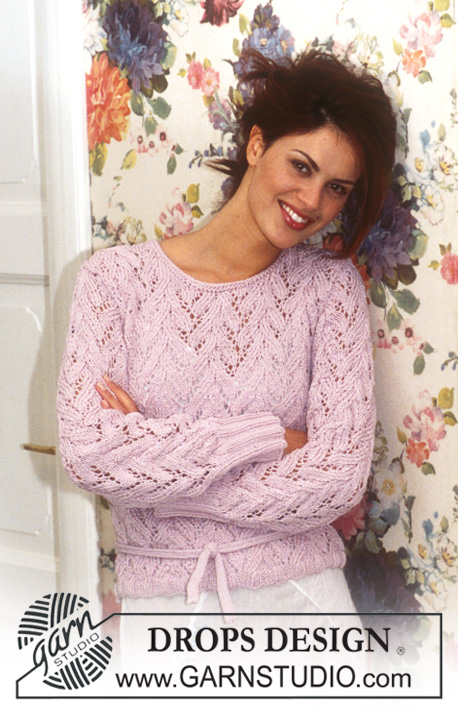
DROPS Top in Muskat
DROPS 73-6 |
|||||||||||||
|
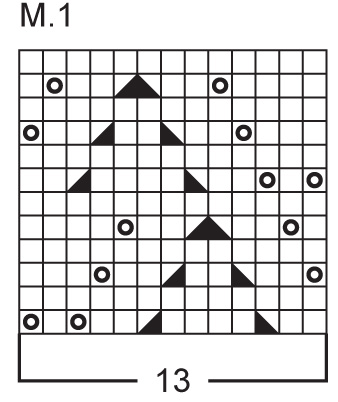
Gauge: 20 sts x 26 rows = 10 x 10 cm on larger needles in pattern. 1 repeat of Pattern 1 = 7 cm wide. Garter st, when knitting flat: Knit all sts, all rows. Pattern: See diagrams M.1, M.4 and M.5. The pattern is seen from the right side. NB: On the garment, the lace pattern (by mistake) is shown with a couple of holes too small, but follow the diagram and possibly see DROPS Design Model no. 73-5 to see how the pattern will look when the diagram is worked. Knitting tips (for armhole): All decs are made on right side rows. Dec 1 st inside 3 edge sts knit in garter st as follows: After 3 sts: Slip 1 as if to knit, K 1, psso. Before 3 sts: K 2 tog. Buttonhole: Make buttonholes along right button band. 1 buttonhole = bind off the center st of buttonband and yo over the bound off st on the next row. Make buttonhole when the piece measures (for all sizes): 2 cm, 6.5 cm, 11 cm, 15.5 cm and 20 cm. ---------------------------------------------------------------------- Back: Cast on 72-80-88-96 sts on smaller needles. Knit 6 rows garter st. Change to larger needles and continue as follows: K 1 (edge st), 9-13-17-21 sts stockinette st, Pattern 1 over 52 sts (4 repeats), 9-13-17-21 sts stockinette st, K 1 (edge st). When the piece measures 5 cm inc 1 st at each side every 2 cm a total of 5 times = 82-90-98-106 sts - knit the increased sts in stockinette st. When the piece measures 17 cm knit 4 rows garter st over 6-6-7-8 sts at each side (knit the remaining sts as before). On the next row bind off the outermost 3-3-4-5 sts at each side for armhole. Then dec 1 st at armholes inside 3 garter st edge sts every other row 2-5-7-9 times - see knitting tips = 72-74-76-78 sts remain. Continue with 3 sts garter st and 7-8-9-10 sts stockinette st at each side of Pattern 1. When the piece measures 35-36-37-38 cm knit 4 rows garter st over the center 32 sts - knit the remaining sts as before. Then bind off the center 26 sts for the neck = 23-24-25-26 sts remain on each shoulder. Knit pattern as before with 3 sts in garter st at each neck edge. Bind off when the piece measures approx. 37-38-39-40 cm. Right front: Cast on 39-43-47-51 sts on smaller needles. Knit 6 rows garter st, change to larger needles and knit the next row as follows from center front edge: K 3 (buttonband sts knit in garter st throughout), Pattern 1 over 26 sts (2 repeats), 9-13-17-21 sts stockinette st and K 1 (edge st). Make buttonholes along buttonband - see instructions above. When the piece measures 5 cm inc at the side as on back = 44-48-52-56 sts (knit the increased sts in stockinette st). When the piece measures 17 cm knit 4 rows garter st over 6-6-7-8 sts at the side (knit the remaining sts as before). On the next row bind off the outermost 3-3-4-5 sts at the side for armhole. Then shape armhole as on back. At the same time when the piece measures approx. 20 cm - adjust to end after a complete repeat of Pattern 1 - knit and bind off for the neck following Pattern 4A - dec for neck inside 3 button band sts knit in garter st. Knit the remaining sts in each row as before. After all armhole and neck shaping is complete 23-24-25-26 sts remain on shoulder. Continue with Pattern 4B and remaining sts in stockinette st and garter st until piece measures approx. 37-38-39-40 (match back). Bind off. Left front: Cast on as right front and knit 6 rows garter st, change to larger needles. Knit the next row as follows from side: K 1 (edge st), 9-13-17-21 sts stockinette st, Pattern 1 over 26 sts (2 repeats) and 3 sts in garter st (buttonband). Inc at the side and shape armhole as on right front. For neck shaping follow Pattern 5A, then continue with Pattern 5B. Bind off when piece matches right front. Assembly: Sew shoulder- and side seams using edge sts as seam allowance. Sew on buttons. |
|||||||||||||
Diagram explanations |
|||||||||||||
|
|||||||||||||
 |
|||||||||||||
 |
|||||||||||||
 |
|||||||||||||
Have you finished this pattern?Tag your pictures with #dropspattern #summervinesvest or submit them to the #dropsfan gallery. Do you need help with this pattern?You'll find 14 tutorial videos, a Comments/Questions area and more by visiting the pattern on garnstudio.com. © 1982-2026 DROPS Design A/S. We reserve all rights. This document, including all its sub-sections, has copyrights. Read more about what you can do with our patterns at the bottom of each pattern on our site. |
|||||||||||||


With over 40 years in knitting and crochet design, DROPS Design offers one of the most extensive collections of free patterns on the internet - translated to 17 languages. As of today we count 324 catalogues and 12290 patterns translated into English (UK/cm).
We work hard to bring you the best knitting and crochet have to offer, inspiration and advice as well as great quality yarns at incredible prices! Would you like to use our patterns for other than personal use? You can read what you are allowed to do in the Copyright text at the bottom of all our patterns. Happy crafting!
Post a comment to pattern DROPS 73-6
We would love to hear what you have to say about this pattern!
If you want to leave a question, please make sure you select the correct category in the form below, to speed up the answering process. Required fields are marked *.