
Popular categories
Looking for a yarn?


Comments / Questions (189)
![]() Veru wrote:
Veru wrote:
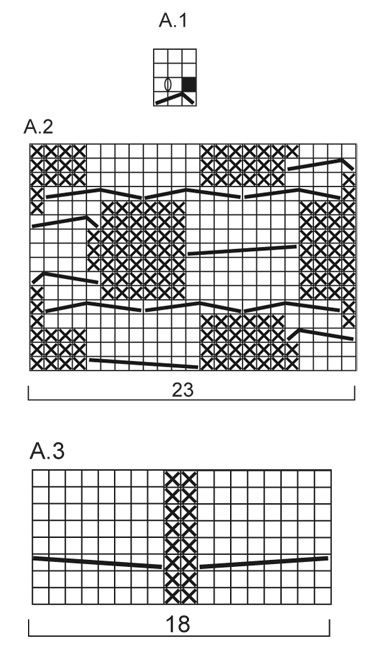
Pozor u páté značky ve vysvětlivkách, je tam chybka... 2 oka nesplétáme, ale pleteme. Tedy popsek ke značce "=1 oko sejmeme hladce, 2 oka Upleteme hladce a sejmuté přes ně přetáhneme"
01.04.2022 - 18:47DROPS Design answered:
Dobrý den, děkujeme za upozornění - opraveno!
04.04.2022 - 10:34
![]() Magdalena Ryšicová wrote:
Magdalena Ryšicová wrote:
Prosím o radu ohledně návodu na tento krásný svetr a to ke schématu A1 kde tápu nad přidáváním ok. Začínám na třech ocích, ujmu jedno a spletu a přetáhnu, zůstává jedno a potom jedno přidám a mám pořád dvě oka. děkuji za odpověď
01.04.2022 - 18:33DROPS Design answered:
Dobrý den, Magdaleno, v popisku vzorku byla chyba, proto vám počet ok neseděl. Nyní je opraveno - oka nesplétáme, pouze upleteme; po nahození tedy budeme mít opět 3 oka. Hodně zdaru! Hana
04.04.2022 - 10:36
![]() Sandra wrote:
Sandra wrote:
I am struggling with diagram A2 I've worked from left to rite and from rite to left my pattern don't look the way it should I've also tried from bottom up and top to bottom
03.10.2021 - 13:50DROPS Design answered:
Dear Sandra, you can find a lesson about reading diagrams HERE. Happy stitching!
03.10.2021 - 22:45
![]() Jeanne Fitzgerald wrote:
Jeanne Fitzgerald wrote:
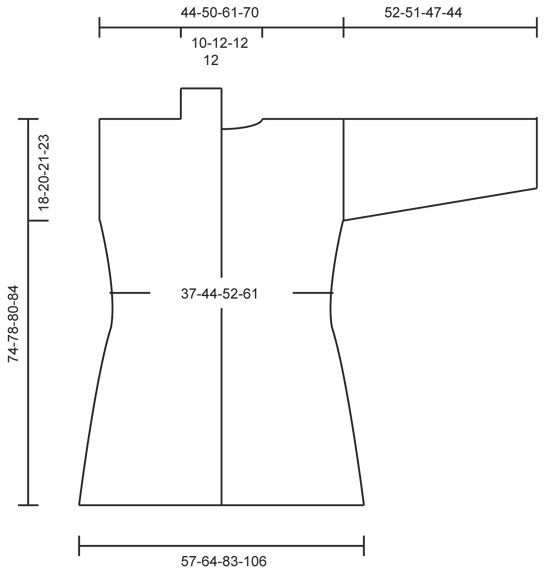
I am trying to start this sweater , but cannot get past the third row. I’m making size M/L, so I have cast on 290 stars, knit across first row and knit and inc 40 sets on the second row for a total of 330 sets. On the hind row I end up with not enough sets to finish the row. Have frogged nd started over twice now and still end up 12 stitches short. Could there be mistake in this pattern? Has there been an update or revision made to the pattern?
15.01.2021 - 01:03DROPS Design answered:
Dear Mrs Fitzgerald, work the 330 sts as follows: 18 sts in garter st, P 8, A.1 (= 3 sts), P 12, A.2 (= 23 sts), P12, * A.1, P12*, repeat from *-* 2 times in total (= over the next 30 sts), A.2, P12, A.1, P 12, A.3 (= 18 sts), P12, A.1, P12, A.2, P12, * A.1, P12*, repeat from *-* 2 times in total (= over the next 30 sts), A.2, P12, A.1, P8, 18 sts in garter st = 18+8+3+12+23 +12+30+23+12+3+12+18+12+3+12+23+12+30+23+12+3+8+18= 330 sts. Happy knitting!
15.01.2021 - 07:30
![]() Nancy Anne Kalista wrote:
Nancy Anne Kalista wrote:
My daughter would like this jacket and I'm willing to make it for her. However, her bust size in 53". Can you advise how to adjust the pattern to fit her? Thank you so much!
18.12.2020 - 19:20DROPS Design answered:
Dear Nancy, unfortunately we are not able to adjust our patterns to particular personal needs. Should you need any individual assistance, please contact the store where you bought the yarn, even per mail or telephone. Happy knitting!
18.12.2020 - 21:09
![]() Mieke Kokkelink wrote:
Mieke Kokkelink wrote:
Ik ben patroon 151-1 aan het breien. Ik heb de derdenaald al 5 keer gebreid maar blijf steken te kort komen😟 Ik maak maat M/L heb tussen de bies 330 steken( ook al 5keer geteld) ik kom er niet uit!! Wat gaat verkeerd?
17.05.2020 - 17:04DROPS Design answered:
Dag Mieke,
Het is de bedoeling dat je 330 steken in totaal op de naald hebt op het moment dat je de derde naald gaat breien, dus inclusief de steken van de biezen.
19.05.2020 - 13:30
![]() Melanie wrote:
Melanie wrote:
Bonjour j aimerai faire ce superbe gilet mais, comme beaucoup de vos models, il est a faire avec des aiguilles circulaire car fait d un seul tenant pour eviter les longues coutures cependant, je suis plus a l aise avec des aiguilles droites aussi aimerai je savoir si il y a une methode pour " decouper" ce tricot en 1 dos et deux devants afin de le faire sur des aiguilles droites et l'assembler de maniere classique apres? merci pour votre reponse et bon tricot a tout(e)s
06.09.2019 - 19:48DROPS Design answered:
Bonjour Mélanie, dans ce modèle, seules les manches se tricotent en rond, le bas du gilet se tricote en allers et retours sur aiguille circulaire; vous trouverez ici comment adapter un modèle sur aiguilles droites. Bon tricot!
09.09.2019 - 07:59
![]() Mary-Alice Varrin wrote:
Mary-Alice Varrin wrote:
Thank you so much for your quick and clearly explained reply! I so appreciate it! I will now be happily knitting!
03.04.2019 - 15:51
![]() Mary-Alice Varrin wrote:
Mary-Alice Varrin wrote:
Further to my last email, in approaching the 8cm of the sweater, it requests dec at beg of every p-section then requests "alternately" at beg and end of p-sections 5 more times - does that mean dec from RS THEN next dec from WS? Is this what the directions mean by "alternately"? or do I decrease from RS only but still alternate sides of p-section?
03.04.2019 - 03:40DROPS Design answered:
Dear Mrs Varrin, when you have to decrease alternately at the beg and at the end of each P section you will work the first row with decrease decreasing 1 st at the beginning of each P section (as explained), on the next decrease row, decrease the last 2 sts in the P section (= P2 tog the last 2 sts in the P section) and repeat these decrease, ie next time you will dec by P tog the first 2 sts then on next decrease row you P tog the last 2 sts. Happy knitting!
03.04.2019 - 09:42
![]() Mary-Alice Varrin wrote:
Mary-Alice Varrin wrote:
I am about to decrease for the "waistline" and wondered if I am increasing on two rows; one being at 40cm and the next at 50cm? Do I increase at the RS of row 1 and then WS of the next increase row thus making the increases at the same vertical spot?
02.04.2019 - 20:42DROPS Design answered:
Dear Mrs Varrin, when piece measures 40 cm, increase from RS 1 st at the beginning of each P-section = 14 sts increased = 236 sts. When piece measures 50 cm, increase from RS 1 stitch at the end of each P-section = 14 sts increased = 236+14 = 250 sts. Happy knitting!
03.04.2019 - 09:28
|
||||||||||||||||||||||||||||||||||
Gwendolen#gwendolencardigan |
||||||||||||||||||||||||||||||||||
 |
 |
|||||||||||||||||||||||||||||||||
Knitted DROPS jacket with cables and shawl collar in ”Karisma”. Size: S - XXXL.
DROPS 151-1 |
||||||||||||||||||||||||||||||||||
|
GARTER ST (back and forth on needle): K all rows. 1 ridge = 2 rows K. PATTERN: See diagrams A.1 to A.3. Diagrams show all rows in pattern from RS. SHORT ROWS IN BAND: Work short rows over sts in band to avoid it contracting vertically. Work like this every 10th row – from RS: Work 18 sts (= right band), turn and work back. Work 1 row over all sts as before. Turn and work 18 sts (= left band), turn and work back. Turn and work 1 row over all sts as before. BUTTONHOLES: Dec for buttonholes on right band. 1 buttonhole = K tog 3rd and 4th st from mid front, make 1 YO, K 8, K tog 13th and 14th st from mid front, make 1 YO (= 2 buttonholes). Dec for buttonholes when piece measures: SIZE S: 29 and 37 cm. SIZE M/L: 30 and 38 cm. SIZE XL: 31 and 39 cm. SIZE XXL/XXXL: 33 and 41 cm. ---------------------------------------------------------- BODY: Worked back and forth on circular needle to make room for all the sts. Cast on 266-290-350-386 sts (incl 18 band sts in each side towards mid front) on circular needle size 4 mm with Karisma. Work 2 RIDGES in garter st - see explanation above AT THE SAME TIME on last row inc 40 sts evenly = 306-330-390-426 sts. Then work as follows from RS: 18 sts in garter st (= band), P 8-8-8-10, * A.1 (= 3 sts), P 10-12-12-14 *, repeat from *-* 1-1-2-2 times in total, A.2 (= 23 sts), P 10-12-12-14, * A.1, P 10-12-12-14 *, repeat from *-* 2-2-2-2 times in total, A.2, * P 10-12-12-14, A.1 *, repeat from *-* 1-1-2-2 times in total, P 10-12-12-14, A.3 (= 18 sts), P 10-12-12-14, * A.1, P 10-12-12-14 *, repeat from *-* 1-1-2-2 times in total, A.2, P 10-12-12-14, * A.1, P 10-12-12-14 *, repeat from *-* 2 times in total, A.2, * P 10-12-12-14, A.1 *, repeat from *-* 1-1-2-2 times in total, P 8-8-8-10, 18 sts in garter st (= band). Continue this pattern AT THE SAME TIME work short rows over sts in band – see explanation above. AT THE SAME TIME when piece measures 8 cm, dec 1 st at beg of every P-section, P the first 2 sts tog (= 14-14-18-18 dec sts). Repeat dec every 5-5½-5½-6 cm, dec alternately at beg and end of all P-sections 5 more times (= 6 dec in total) = 222-246-282-318 sts. Remember to dec for BUTTONHOLES on right band - see explanation above. When piece measures 40-41-42-44 cm, on next RS row inc 1 st at beg of every P-section, inc with a YO and K yo twisted on next row from WS (= 14-14-18-18 inc sts). Repeat inc but at the end of every P-section when piece measures 50-52-53-55 cm = 250-274-318-354 sts. When piece measures 56-58-59-61 cm, divide the piece, finish front and back piece separately as follows: Slip the first and last 66-71-82-91 sts on a stitch holder for front piece, cut the yarn, then work only over the middle 118-132-154-172 sts (= back piece). BACK PIECE: = 118-132-154-172 sts. Continue pattern as before. When piece measures 72-76-78-82 cm, cast off the middle 22-26-26-26 sts for neck = 48-53-64-73 sts remain on each shoulder. Finish each part separately. Continue with pattern until piece measures 74-78-80-84 cm, cast off. RIGHT FRONT PIECE: Slip the first 66-71-82-91 sts back on needle. Continue pattern as before. When piece measures 74-78-80-84 cm, cast off the first 48-53-64-73 sts from WS for shoulder = 18 sts remain on needle. Work the rest of row. Then work short rows over the 18 sts as follows - beg from RS: * Work 2 rows back and forth over the first 9 sts, work 2 rows over all sts *, repeat from *-* until neck edge measures 7-8-8-8 cm at the shortest. Cast off. LEFT FRONT PIECE: Work as right but reversed. Cast off for shoulder from RS and beg short rows from WS. SLEEVE: Worked in the round on double pointed needles. Cast on 56-60-64-68 sts on double pointed needles size 3.5 mm with Karisma. Work rib = K 2/P 2. When piece measures 16-16-16-14 cm, switch to double pointed needles size 4 mm, continue in stocking st AT THE SAME TIME on 1st round dec 8-8-10-10 sts evenly = 48-52-54-58 sts. Insert 1 marker at the beg of round. AT THE SAME TIME inc 1 st on each side of marker, repeat inc every 2½-2-1½-1½ cm 13-15-16-18 more times (14-16-17-19 inc in total) = 76-84-88-96 sts. When piece measures 52-51-47-44 cm (shorter measurements in the larger sizes because of wider shoulders), cast off all sts. Knit another sleeve. ASSEMBLY: Sew the shoulder seams. Sew in sleeves. Sew the collar tog mid back and sew it to the neckline. Sew the buttons on to left band. |
||||||||||||||||||||||||||||||||||
Diagram explanations |
||||||||||||||||||||||||||||||||||
|
||||||||||||||||||||||||||||||||||
 |
||||||||||||||||||||||||||||||||||
 |
||||||||||||||||||||||||||||||||||
Have you finished this pattern?Tag your pictures with #dropspattern #gwendolencardigan or submit them to the #dropsfan gallery. Do you need help with this pattern?You'll find 25 tutorial videos, a Comments/Questions area and more by visiting the pattern on garnstudio.com. © 1982-2026 DROPS Design A/S. We reserve all rights. This document, including all its sub-sections, has copyrights. Read more about what you can do with our patterns at the bottom of each pattern on our site. |
||||||||||||||||||||||||||||||||||


With over 40 years in knitting and crochet design, DROPS Design offers one of the most extensive collections of free patterns on the internet - translated to 17 languages. As of today we count 324 catalogues and 12290 patterns translated into English (UK/cm).
We work hard to bring you the best knitting and crochet have to offer, inspiration and advice as well as great quality yarns at incredible prices! Would you like to use our patterns for other than personal use? You can read what you are allowed to do in the Copyright text at the bottom of all our patterns. Happy crafting!
Post a comment to pattern DROPS 151-1
We would love to hear what you have to say about this pattern!
If you want to leave a question, please make sure you select the correct category in the form below, to speed up the answering process. Required fields are marked *.