
Popular categories
Looking for a yarn?


Comments / Questions (64)
![]() Alicja wrote:
Alicja wrote:
A już wiem, gdzie robiłam błąd :) bo dalej robiłam 8 oczek obszycia ściegiem francuskim plus schemat A2A. Wzór jest ok, robię dalej :)
08.09.2024 - 17:48
![]() Alicja wrote:
Alicja wrote:
Witam, czy z tymi wzorami jest wszystko w porządku? Bo zrobiłam już 34 cm swetra, i mam przerabiać wzory A2A itd. Gdy robię według schematu, wychodzi jakoś dziwnie, romby są przesunięte,. Tak ma być?
07.09.2024 - 18:44DROPS Design answered:
Już widzę, że wszystko się wyjaśniło. Miłej pracy :)
08.09.2024 - 22:38
![]() Elly wrote:
Elly wrote:
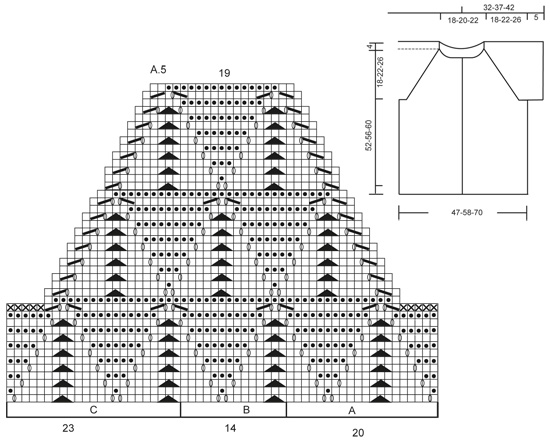
Hallo, voor het vestje in maat L/XL heb ik 70 nld van A.2-A.5 gebreid. Nu wil ik verder met A.6 en A.7. Hierdoor krijg ik echter dezelfde herhaling van patroon A.3 en A.5 boven elkaar. Laatste 14 nld van die patronen brei ik daardoor opnieuw, terwijl voor mijn gevoel de middelse 14 nld weer aan de beurt zouden moeten zijn om ruitjes te krijgen. Klopt het wat ik doe of doe ik iets fout? Alvast bedankt voor het antwoord.
06.01.2024 - 18:55DROPS Design answered:
Dag Elly,
Als je A.6/A.7 boven A.3/A.5 breit, dan loopt het patroon mooi door. De laatste 19 steken van A.3/A.6 sluiten qua patroon precies aan. De zwarte driehoekjes komen precies boven de zwarte driehoekjes van de middelste 14 naalden.
07.01.2024 - 14:06
![]() Maddie wrote:
Maddie wrote:
Hello, how can I knit the band edge so neat like the sample in those pictures? it's not garter edge . Thank you very much!
08.08.2023 - 03:07DROPS Design answered:
Dear Maddie, you can try this technique for the edge stitches towards mid front. Happy knitting!
08.08.2023 - 09:23
![]() Ula wrote:
Ula wrote:
Dzien dobry! Na poczatku rzedu 29? Dziekuje
19.01.2021 - 13:01DROPS Design answered:
Dziękuję Ulu, sprawdzimy i jeśli będzie potrzebna korekta zostanie dodana na stronie. Pozdrawiamy!
20.01.2021 - 09:42
![]() Ula wrote:
Ula wrote:
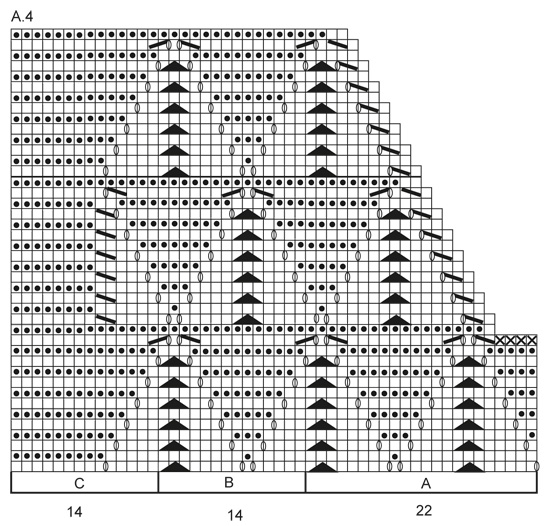
Odkrylam dlaczego. Otoż na poczatku schematu A5 w rzedzie 27 brakuje pierwszego pojedynczego prawego oczka ktore kazdorazowo zaczyna i konczy sekwencje oczek karczku. Przerabiajac to pierwsze oczko przed grupą dwoch z przelożeniem wszystko sie zgadza. Nalezy dopisac jeden kwadracik na poczatku 27 rzedu w A5. Pozdrawiam serdecznie i dziekuje za pomoc 🤗
18.01.2021 - 19:02DROPS Design answered:
Witaj Ulu, teraz to ja nie rozumiem :( W schemacie A.5 na początku rzędu jest 1 oczko prawe przed grupą dwóch oczek z przełożeniem. Do korekty pozostała kwestia narzutu na końcu rzędu 27 schematu A.5. Pozdrawiamy!
19.01.2021 - 08:38
![]() Ula wrote:
Ula wrote:
Bardzo dziekuje niemniej jednak nadal jest problem poniewaz przerabiajac schemat A5 od prawej ku lewej przed srodkowymi narzutami wzoru A5 mam 1 o.za duzo...
18.01.2021 - 18:16DROPS Design answered:
Witaj ponownie Ulu, nie powinno tak być. Spójrz na schemat A.3, w schemacie A.5 powinno być tak samo z narzutami jak jest w A.3. Czy w schemacie A.3 też masz o 1 o. więcej? Pozdrawiamy!
18.01.2021 - 18:46
![]() Ula wrote:
Ula wrote:
Dzien dobry. Jest pewien blad w rzedzie 27 schematow A2 A3 A4 A5 gdzie narzuty raz sa a raz ich nie ma. Rzad 27 robilam na wdechu a w 29 wyszlo ze jednak jest cos nie tak. Otorz robiac jak w schemacie wypada mi jedno oczko za duzo przed kolejnym narzutem. Pomozcie prosze
18.01.2021 - 17:49DROPS Design answered:
Witaj Ulu, w 27-mym rzędzie schematów A.2, A.3 i A.4 te braki narzutu są w miejscu, gdzie ma być skos i to jest ok. Za to w schemacie A.5 ewidentnie jest błąd - na końcu po lewej stronie schematu powinien być tylko 1 narzut, a nie 2 (podobnie jak w schemacie A.3). Zgłoszę korektę. Dziękuję bardzo za zwrócenie uwagi. Pozdrawiamy!
18.01.2021 - 18:06
![]() Delaporte wrote:
Delaporte wrote:
Bonjour, c'est au sujet des diagrammes A.2 A et A.4 C, sur les rangs impairs ,du 15 au 25. Les mailles 5 et 6 (sur 14) de A.4 C et les mailles 9 et 10 de A.2 A ne devraient-elles pas se tricoter comme précédemment; '2 mailles ensemble' pour A.4 C (comme dans A.1 C) et '1 maille glissée à l'endroit, 1 maille endroit, passer la maille glissée par dessus' pour A.2 A (comme A.1 A) au lieu du contraire? Merci pour ce joli modèle.
18.12.2020 - 17:47DROPS Design answered:
Bonjour Mme Delaporte, effectivement, vous pouvez tricoter ainsi pour que les mailles après la bordure devant continuent comme avant, votre commentaire va être transmis à nos stylistes, merci pour votre retour. Bonne continuation!
21.12.2020 - 06:52
![]() Siv Milsten wrote:
Siv Milsten wrote:
Vid hals står man ska sätta tillbaka maskor från tråden men finns ingen upplysning om vilka maskor o hur många som ska sättas på tråd. verkar väldigt ofullständig beskrivning. väntar ivrigt på svar så jag kan bli klar med tröjan. tack
14.09.2019 - 18:00DROPS Design answered:
Hei Siv. Om du ser på diagram A.6 og A.7 er det tegnet inn hvor du skal sette masker på en tråd / og under diagramikon tekstene (1. rad på diagrammene). God Fornøyelse!
16.09.2019 - 14:12
|
|||||||||||||||||||||||||
Alvira#alviracardigan |
|||||||||||||||||||||||||
 |
 |
||||||||||||||||||||||||
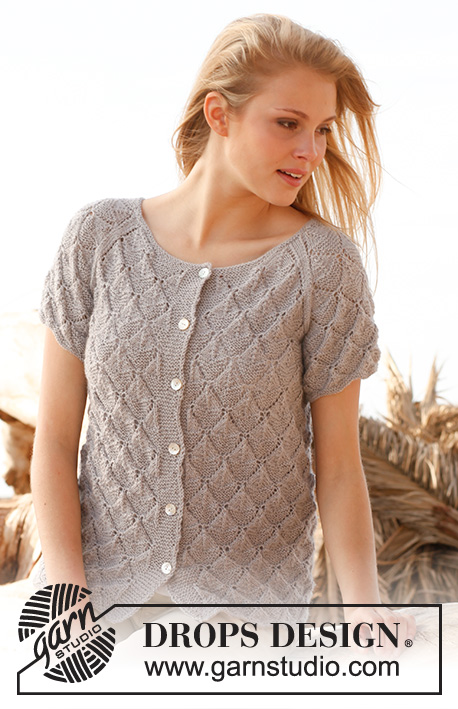
Knitted DROPS jacket with lace pattern and raglan in ”BabyAlpaca Silk”. Size: S - XXXL.
DROPS 146-5 |
|||||||||||||||||||||||||
|
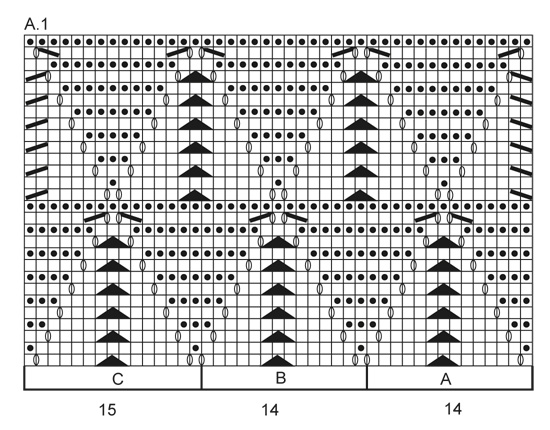
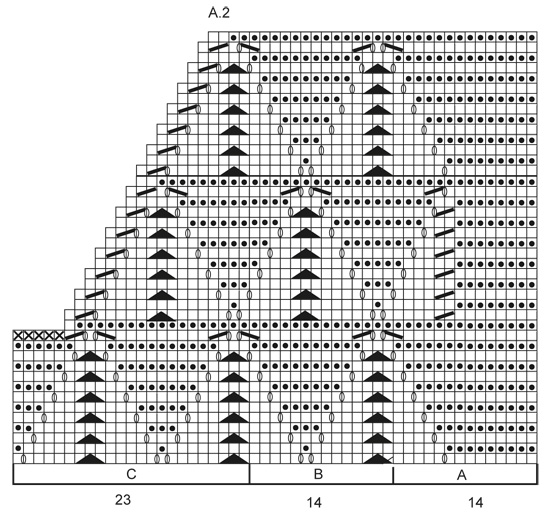
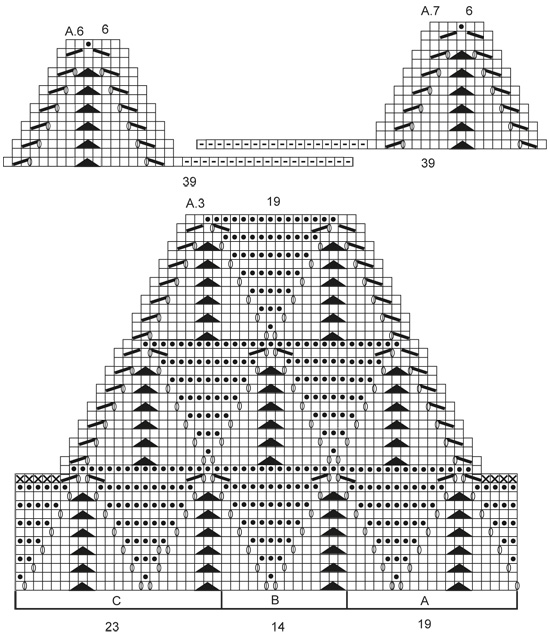
GARTER ST (back and forth on needle): K all rows. 1 ridge = 2 rows K. PATTERN: See diagrams A.1 to A.7. Diagrams show all rows in pattern seen from RS. BUTTONHOLE: Dec for buttonholes on right band from RS. 1 buttonhole = K tog 3rd and 4th st from mid front, then make 1 YO. Dec for buttonholes when piece measures: SIZE S/M: 9, 16, 23, 31, 39 and 47 cm. SIZE L/XL: 9, 18, 27, 35, 43 and 51 cm. SIZE XXL/XXXL: 9, 16, 23, 31, 39, 47 and 55 cm. ---------------------------------------------------------- BODY: Worked back and forth on circular needle from mid front. Cast on 241-297-353 sts on circular needle size 3 mm with BabyAlpaca Silk. Work 2 ridges in GARTER ST over all sts – see explanation above, then work as follows - from RS: 8 sts in garter st (= band): A.1A (= 14 sts), A.1B over the next 196-252-308 sts, finish with A.1C (= 15 sts) and 8 sts in garter st (= band). Continue this pattern, work bands in garter st until finished measurements. When piece measures 9 cm, beg dec for BUTTONHOLES – see explanation above. When piece measures 34 cm, work as follows – from RS: A.2A (= 14 sts), A.2B over the next 28-42-56 sts, A.2C (= 23 sts), A.3A (= 19 sts), A.3B over the next 70-98-126 sts, A.3C (= 23 sts), A.4A (= 22 sts), A.4B over the next 28-42-56 sts, A.4C (= 14 sts). When the first 13 rows in A.2, A.3 and A.4 have been worked, put piece aside. 9 sts have now been dec in each side, and 223-279-335 sts remain on needle. SLEEVES: Worked back and forth on needle. Cast on 87-101-115 sts on circular needle size 3 mm with BabyAlpaca Silk. Work 2 ridges, then work as follows: - from RS: 1 edge st in garter st, A.1A (= 14 sts), A.1 B over the next 56-70-84 sts, finish with A.1 C (= 15 sts) and 1 edge st in garter st. When A.1 has been worked 1 time vertically, continue as follows - from RS: 1 edge st, A.5 A (= 20 sts), A.5B over the next 42-56-70 sts, A.5C (= 23 sts), finish with 1 edge st. When the first 13 rows in A.5 have been worked, put piece aside (also cast off 1 edge st in each side). There are now 75-89-103 sts on needle. YOKE: Slip sleeves on to same circular needle size 3 mm as body = 373-457-541 sts. Work as follows – beg on 14th row (= from WS): A.4C (= 14 sts), A.4B over the next 28-42-56 sts, A.4A (= 18 sts), A.5C (= 18 sts), A.5B over the next 42-56-70 sts, A.5 A (= 15 sts), A.3C (= 18 sts), A.3B over the next 70-98-126 sts, A.3A (= 15 sts), A.5C (= 18 sts), A.5B over the next 42-56-70 sts, A.5 A (= 15 sts), A.2C (= 18 sts), A.2B over the next 28-42-56 sts, finish with A.2A (= 14 sts). Continue this pattern while AT THE SAME TIME working and dec according to pattern. Every time 14 rows of A.3/A.5 have been worked, work 1 B less between A and C. Work until pattern A.2-A.5 have been worked 1 time vertically. Now repeat the 28 last rows in all patterns. Continue until 56-70-84 rows with pattern A.2–A.5 have been worked. Then continue with A.6 over sts from A.2 and A.7 over sts from A.4. Work the other sts as before. When A.6 and A.7 have been worked 1 time vertically, there are 97-125-153 sts on needle. Slip sts from stitch holders back on needle, knit up approx. 14 sts along the side on A.6/A.7. Work 2 ridges over all sts, AT THE SAME TIME on 1st row dec evenly so that there are 93-111-129 sts on needle. Cast off. ASSEMBLY: Sew the openings under the sleeves. Sew the buttons on to left front piece. |
|||||||||||||||||||||||||
Diagram explanations |
|||||||||||||||||||||||||
|
|||||||||||||||||||||||||
 |
|||||||||||||||||||||||||
 |
|||||||||||||||||||||||||
 |
|||||||||||||||||||||||||
 |
|||||||||||||||||||||||||
 |
|||||||||||||||||||||||||
Have you finished this pattern?Tag your pictures with #dropspattern #alviracardigan or submit them to the #dropsfan gallery. Do you need help with this pattern?You'll find 21 tutorial videos, a Comments/Questions area and more by visiting the pattern on garnstudio.com. © 1982-2026 DROPS Design A/S. We reserve all rights. This document, including all its sub-sections, has copyrights. Read more about what you can do with our patterns at the bottom of each pattern on our site. |
|||||||||||||||||||||||||


With over 40 years in knitting and crochet design, DROPS Design offers one of the most extensive collections of free patterns on the internet - translated to 17 languages. As of today we count 324 catalogues and 12290 patterns translated into English (UK/cm).
We work hard to bring you the best knitting and crochet have to offer, inspiration and advice as well as great quality yarns at incredible prices! Would you like to use our patterns for other than personal use? You can read what you are allowed to do in the Copyright text at the bottom of all our patterns. Happy crafting!
Post a comment to pattern DROPS 146-5
We would love to hear what you have to say about this pattern!
If you want to leave a question, please make sure you select the correct category in the form below, to speed up the answering process. Required fields are marked *.