
Popular categories
Looking for a yarn?


Comments / Questions (289)
![]() Barbara wrote:
Barbara wrote:
Hallo, ich stricke die Jacke mit einem anderen Garn. Dir Maschenprobe kam knapp hin. Jetzt kommt mir der Kreis mit dem Stern etwas klein vor. Mit der Zeichnung mit den Maßen kann ich nicht viel anfangen. Verstehe ich es richtig, dass der Durchmesser 37-38-39 cm sein muss? Ich danke sehr für die Hilfe Viele Grüße Barbara
05.08.2019 - 19:06DROPS Design answered:
Liebe Barbara, die 37-38-39 cm in der Maßskizze sind zwischen den beiden Armlöchern (oben am Rückenteil) flach gemessen. Viel Spaß beim stricken!
07.08.2019 - 11:11
![]() Simone wrote:
Simone wrote:
Hallo, können sie mir bitte sagen,ob in der Strickschrift Hin- und Rückreihen angegeben sind!
26.04.2019 - 07:38DROPS Design answered:
Liebe Simone, die Diagramme zeigen alle Reihen, dh da Sie in Runden Stricken, lesen Sie jede Reihe rechts nach links. Mehr über Diagramme lesen Sie hier. Viel Spaß beim stricken!
26.04.2019 - 09:28
![]() Anne Margrethe Cortsen wrote:
Anne Margrethe Cortsen wrote:
Hei, Kan jeg felle av med I-cord bind off? Passer denne type felling på så tynt garn?
14.09.2018 - 09:22
![]() Anne Margrethe Cortsen wrote:
Anne Margrethe Cortsen wrote:
Hei, strikker oppskrift 148-1 Daybreak og var ferdig med diagram A1, men fortsettelsen stemmer ikke med antall fra diagrammet og antall masker etter økningen for str L/XL rett etter diagrammet. Her er det ikke mulig å få bilder og nytt diagram. Har prøvd finne litt informasjon om bildene på FB som ikke vises, men kunne ikke finne noe. Så her står jeg fast. Har dere ikke mulighet å sende på mail til meg diagram A1 og A2. Teksten for endringene har jeg fått ut.
10.09.2018 - 13:48DROPS Design answered:
Hei Anne Margrethe. Vi har for øyeblikket tekniske problemer med siden vår, dette medfører at diagrammer og bilder dessverre ikke lastes ordentlig. Vi jobber med å løse problemet, og siden vil være tilbake som normalt så snart som mulig. Du kan følge med på vår twitter eller facebookside for oppdateringer. Beklager dette
10.09.2018 - 14:53
![]() Kaiser wrote:
Kaiser wrote:
Da ich mit dünnerer Wolle stricke habe ich folgende Frage: wie groß ist das Strickstück ungefähr in Grösse L bis ich zu dem Abschnitt komme, wo man zwischen 2.und 4.Markierer die Maschen auf der Nadel behalten soll, und die restlichen Maschen still legen? Danke!
19.04.2018 - 10:02DROPS Design answered:
Lieber Kaiser, leider können wir nicht jede Anleitung nach jeder Geschmack anpassen, gerne können Sie nach der Anleitung bzw Maßskizze, oder Kontakt mit dem Laden aufnehmen, wo Sie Ihre Wolle gekauft haben. Viel Spaß beim stricken!
19.04.2018 - 10:40
![]() Margreet wrote:
Margreet wrote:
Goedemiddag. Ik wil graag het vest Daybreak maken maar ik begrijp het patroon niet helemaal. Is er ook een instructievideo (misschien YouTube) die ik kan volgen? Zou fijn zijn. Vast hartelijk dank.
12.04.2018 - 12:40DROPS Design answered:
Hallo Margreet, Bij het patroon staan een aantal video's voor verschillende technieken, die je kunt raadplegen. Als je specifieke vragen hebt, ben je altijd welkom om die hier op het forum te stellen. Verder kun je ook hulp vragen bij de winkel waar je het garen hebt gekocht.
16.04.2018 - 10:27
![]() Aina Erga wrote:
Aina Erga wrote:
Som det tidligere er kommentert; Det er feil i dia.A.1. I siste omg med mønsterstrikk er maskeantallet mellom kastene ulike på hver side av midten. I beg. 1 r, 1 kast, 4 r, 1 kast osv tilsv. På slutten av omg. 1 kast 3 r, 1 kast og 2 rm. Skal ikke det rettes?
31.03.2018 - 13:59DROPS Design answered:
Hej Aina, nej det betyder ikke noget, om du har 3 eller 4 masker mellem udtagningerne her, eller i overgangen mellem diagrammerne, et af stederne vil du altid få 4 masker (istedet for 3) imellem. Du er naturligvis velkommen til at selv flytte dem :) God fornøjelse!
04.04.2018 - 13:56
![]() Dea wrote:
Dea wrote:
Grazie, ora mi dice di lavorare avanti e indietro trasferendo 4 m sul fermamaglie ad ogni ferro (ferri accorciati). Devo farlo fin dal primo ferro a diritto?
16.02.2018 - 14:34DROPS Design answered:
Buonasera Dea. Sì, inizia a trasferire le 4 maglie già dal primo ferro. Buon lavoro!
16.02.2018 - 17:43
![]() Dea wrote:
Dea wrote:
Devo lavorare dove dice "tenere sui ferri le maglie tra il 2° e il 4° segno, 125 m e mettere le altre in attesa"...devo usare un filo nuovo?
15.02.2018 - 17:35DROPS Design answered:
Buonasera Dea, meglio usare un nuovo filo per lavorare su quelle maglie. Buon lavoro!
15.02.2018 - 21:44
![]() Dea wrote:
Dea wrote:
Ho lavorato tutto lo schema A1 ed ho trovato un altro problema alla riga (giro) 45. Qualche riga sotto si iniziano i rombi con gettati, ma alla riga 45 qualcosa non quadra e il lavoro viene spostato. Ci vuole un controllo sullo schema. Ho risolto il problema, ma da spiegare è lungo. Spero che controllino in sede. ^_^ Il lavoro procede.
11.02.2018 - 17:34
|
|||||||||||||||||||||||||||||||
Daybreak#daybreakjacket |
|||||||||||||||||||||||||||||||
 |
 |
||||||||||||||||||||||||||||||
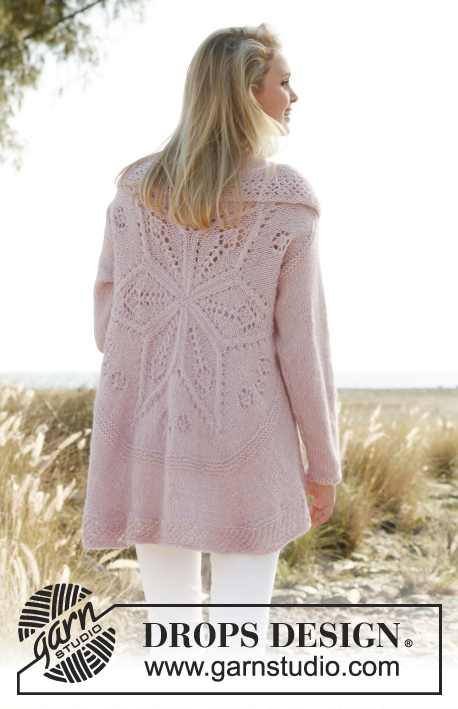
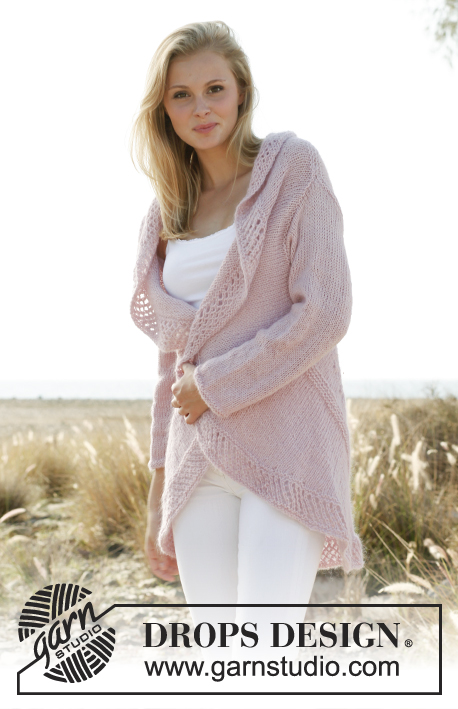
Knitted DROPS jacket worked in a circle with lace pattern in "Alpaca" and "Kid-Silk". Size: S - XXXL.
DROPS 148-1 |
|||||||||||||||||||||||||||||||
|
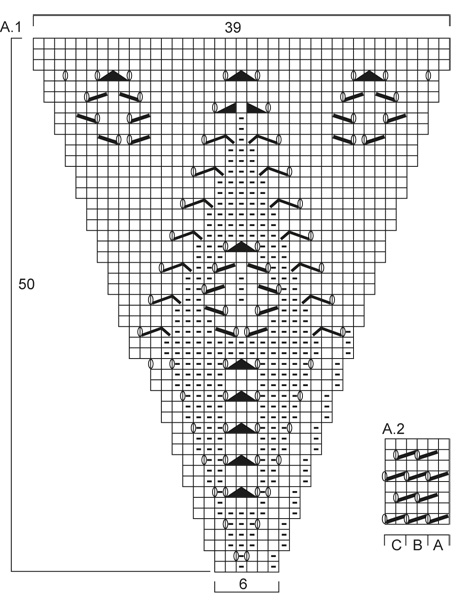
GARTER ST (in the round on circular needle): 1 ridge = * K 1 round and P 1 round *, repeat from *-*. PATTERN: See diagram A.1. Diagram shows all rows in pattern seen from RS. ---------------------------------------------------------- JACKET WORKED IN A CIRCLE: Worked in the round in a circle from mid back. First work on double pointed needles, then switch to circular needle when needed. Cast on 12 sts with 1 thread of each yarn and distribute them on 4 double pointed needles size 6 mm. K 1 round while AT THE SAME TIME working 2 sts in all sts = 24 sts. K 1 round without inc. On next round, work as follows: * K 1, K 2 in next st *, repeat from *-* = 36 sts. Then work according to diagram A.1 (= 6 repetitions in the round). REMEMBER THE KNITTING TENSION! Switch to circular needle when needed. When A.1 has been worked, there are 234 sts on needle. Insert 1 marker in each of the tips on the star (in the middle st in every repetition) = 6 markers in total. Work in stocking st AT THE SAME TIME inc 1 st on each side of markers. Inc with 1 YO on each side of sts with marker – on next round K yo twisted to avoid holes = 12 inc sts per round. Repeat inc every other round 1-2-3 more times (24-36-48 inc sts in total) = 258-270-282 sts (42-44-46 sts between every st with marker). Then work 2 ridges in GARTER ST – see explanation above - over all sts, without inc. On next round K while AT THE SAME TIME cast off all sts between 1st and 2nd marker, cast off the middle 32-34-36 sts between 2nd and 3rd marker and the middle 32-34-36 sts between 6th and 1st marker for armhole. P next round, AT THE SAME TIME knit up 1 new st in every cast off st between 1st and 2nd marker, and cast on 32-34-36 new sts over the cast off sts between 2nd and 3rd marker and 6th and 1st marker. (Sts between 1st and 2nd marker is equivalent to the shoulder width at the top. To avoid the shoulder width being to wide, cast off these sts and knit them up again on next row. This will stop the piece from being to long over the shoulder.) When all sts have been cast on/knitted up, there are 258-270-282 sts on needle. Work 1 ridge. Piece measures approx. 31-32-33 cm from centre. Then work in stocking st, AT THE SAME TIME inc 1 st each side of sts with markers (= 12 inc). Inc with YO (work twisted on next round to avoid holes). Repeat inc every other round 9-11-13 more times (10-12-14 inc in total) = 378-414-450 sts. Keep sts between 2nd and 4th marker on needle, slip the other sts on a stitch holder = 125-137-149 sts on needle. Then work in stocking st back and forth over sts on needle, AT THE SAME TIME at the end of every row slip the last 4 sts on stitch holder (do not work them, turn), continue until 37-49-61 sts remain on row. Slip the last 37-49-61 sts on stitch holder. Slip sts between 5th and 1st marker on circular needle size 6 mm, work the same way as in the other side. Then K all sts from RS back on to circular needle size 6 mm - between every time sts where slipped on stitch holders in each side, get the thread and twist it before slipping it on needle (i.e. between every 4th st, to avoid holes in the transitions), in addition inc evenly so that there are 452-496-540 sts in total on needle. Work 2 ridges. Then work according to A.2. Work A.2 A, repeat A.2 B until 2 sts remain and end with A.2 C. Work A.2 for 6 cm, work 1 ridge and cast off. SLEEVE: Worked in the round on double pointed needles. Cast on 36-38-40 sts on double pointed needles size 6 mm with 1 thread of each yarn. Insert 1 marker at beg of round = mid under sleeve. Work 2 ridges. Continue in stocking st. When piece measures 8 cm, inc 1 st on each side of marker mid under. Repeat inc every 4-3½-3 cm 10-11-13 more times (11-12-14 inc in total) = 58-62-68 sts. When piece measures 53-54-56 cm, cast off 6 sts mid under sleeve and work back and forth until finished measurements. Then cast off for sleeve cap at beg of every row in each side: 3 sts 3 times = 34-38-44 sts. Cast off the remaining sts, sleeve measures approx. 56-57-59 cm. Sew in sleeves. |
|||||||||||||||||||||||||||||||
Diagram explanations |
|||||||||||||||||||||||||||||||
|
|||||||||||||||||||||||||||||||
 |
|||||||||||||||||||||||||||||||
 |
|||||||||||||||||||||||||||||||
Have you finished this pattern?Tag your pictures with #dropspattern #daybreakjacket or submit them to the #dropsfan gallery. Do you need help with this pattern?You'll find 24 tutorial videos, a Comments/Questions area and more by visiting the pattern on garnstudio.com. © 1982-2026 DROPS Design A/S. We reserve all rights. This document, including all its sub-sections, has copyrights. Read more about what you can do with our patterns at the bottom of each pattern on our site. |
|||||||||||||||||||||||||||||||


With over 40 years in knitting and crochet design, DROPS Design offers one of the most extensive collections of free patterns on the internet - translated to 17 languages. As of today we count 324 catalogues and 12290 patterns translated into English (UK/cm).
We work hard to bring you the best knitting and crochet have to offer, inspiration and advice as well as great quality yarns at incredible prices! Would you like to use our patterns for other than personal use? You can read what you are allowed to do in the Copyright text at the bottom of all our patterns. Happy crafting!
Post a comment to pattern DROPS 148-1
We would love to hear what you have to say about this pattern!
If you want to leave a question, please make sure you select the correct category in the form below, to speed up the answering process. Required fields are marked *.