
Popular categories
Looking for a yarn?


Comments / Questions (86)
![]() Sandra wrote:
Sandra wrote:
Lese ich unter den Abschnitt Jacke (Größe S/M) nach dem Muster A1 gestrickt wurde richtig: 3 R glatt re, 1 Rd mit Zunahmen plus 28 M Abketten+Marker, 32 M abketten, 109 M stricken, 32 M abketten+Marker, 27 M abketten. D.h. in diesem Fall wäre es nur eine Runde mit Zunahmen incl. Abketten?
15.10.2013 - 16:26DROPS Design answered:
Liebe Sandra, es wird für Armloch und hinteren Halsausschnitt abgekettet, aber es muss weiterhin für die Form des wachsenden Kreises aufgenommen werden.
16.10.2013 - 07:38
![]() Eva wrote:
Eva wrote:
I am confused regarding explanation in edging; work short rows in one side towards mid back for collar. Work as follows (work and inc as before with seed st and stockinette st - beg mid back. please help. Should I started from the middle or beginning of the edging for short rows?
17.09.2013 - 05:03DROPS Design answered:
Dear Eva, Edge is worked back and forth. You will tje, work short rows on each side of the edge, starting on one side: Work as before (with inc, seed st and st st as you did for the previous 13-15-17 cm) on the first 36-38-40 sts (see size) and continue short rows as stated, then work 1 row over all sts to work short rows on the other side. Happy knitting!
17.09.2013 - 09:58
![]() Maria Terkelsen wrote:
Maria Terkelsen wrote:
Maria Terkelsen 28.08.2013 kl. 16:33: Nu er jeg nået til kanten, men har et problem med at strikke maskerne fra tråden ind uden at der bliver huller. Forstår ikke hvad der menes her: "mellem hver gang der blev sat m på trådene i hver side hentes tråden op og snos før den sættes på p " det er vel maskerne der skal strikkes tilbage ind på pinden? Hvordan undgår jeg så hullet?-:)
28.08.2013 - 16:57DROPS Design answered:
Jo der hvor du oplever der bliver hul, samler du en ekstra m op, snoer den engang og sætter på pinden så der ikke bliver hul.
18.09.2013 - 13:53
![]() Joan wrote:
Joan wrote:
Is the increase on the EDGE worked on both sides of the very first and very last markers or only on the seed stitch side? Thank you
21.05.2013 - 19:42DROPS Design answered:
Dear Joan, on edge piece, you inc 1 st on each side of the last and first 4 markers. Happy knitting!
22.05.2013 - 08:22
![]() Annetta Floydd wrote:
Annetta Floydd wrote:
Very proud of myself so far - but like Christina Sondergaard at this point I'm not quite sure what the shape of the main piece should be as I am struggling to relate the instructions to the diagram, as the sections are not labelled. Help! Also - could you tell me what size the finished piece in the photo is knitted to - it looks like its not small/medium, but the model does not look like a large/xlarge person.
14.05.2013 - 09:49DROPS Design answered:
Dear Mrs Floydd, could you please explain what part you cannot understand, where you need help ? Thank you. The jacket in the picture is a size S/M. Happy knitting!
14.05.2013 - 12:57
![]() Christina Søndergaard wrote:
Christina Søndergaard wrote:
Rigtig fed bluse men måtte stoppe og pille op da jeg nåede til "Fortsæt udtagningen ved hvert mærke på hver 3.p som før – SAMTIDIG sættes 2 m i slutningen af hver p på 1 tråd uden at strikke dem først. Når arb måler ca 26-29-32 cm fra midten og ud, sættes de midterste 67-71-77 m på 1 tråd (= nederste på rygstk). HERFRA MÅLES ARB VIDERE! Hvert forstk strikkes færdig for sig!. Syntes selv jeg er en habil og dygtig strikker men opskriften blev uforstålig og det så helt forkert ud.
17.03.2013 - 18:53DROPS Design answered:
Det er for at du skal få en runding øverst ved skulderen i hver side først og så nederst når du har nået den længde du skal have. Bare følg opskriften!
03.04.2013 - 11:51
![]() Reimer wrote:
Reimer wrote:
Hallo, hab mich arg gequält mit dem Strickmuster, da man als Anfänger nicht so viel Erfahrung mit dem Lesen dieser hat. Hab die Jacke nun fertig und freu mich darüber. Ihr habt einen kleinen Dreher in der Erklärung zum Diagramm A1. Und zwar sind die Beschreibungen von den Symolben 4 und 5 sowie 6 und 7 vertauscht. Trotzdem bin ich begeistert von Eurer Internetseite. Schöne Grüße Reimer
20.02.2013 - 12:40DROPS Design answered:
Liebe Frau Reimer, wir haben die Symbole überprüft: sie sind korrekt.
21.02.2013 - 09:13
![]() Sosnowicz wrote:
Sosnowicz wrote:
Danke für die Antwort. Meine Frage zum Vorderteil war, ob dort auch - wie beim Rückenteil - in jeder 3. Reihe an den Markierungen Maschen zugenommen werden? Ich nehme an ja, oder?
11.02.2013 - 21:52DROPS Design answered:
Liebe Frau Sosnowicz, ja an den Zunahmen ändert sich nichts.
12.02.2013 - 11:45
![]() Sosnowicz wrote:
Sosnowicz wrote:
Anleitung Jacke letzter Absatz: am Ende jeder Reihe je 2 M stilllegen, ohne sie zuerst zu stricken. Frage: wann werden die M gestrickt? Vorderteil - werden da auch jede 3 R Maschen zugenommen?
08.02.2013 - 20:36DROPS Design answered:
Liebe Frau Sosnowicz, die Antwort zu den stillgelegten M finden Sie weiter unten in der Anleitung unter „Rand“. Zu den Vorderteilen finden Sie : „Glatt re mit den Zunahmen über die verbleibenden M weiterstricken“. Ich hoffe, ich hatte Ihre Fragen richtig verstanden.
11.02.2013 - 07:43
![]() Jean wrote:
Jean wrote:
I have never done anything so structurally complicated! Pattern could be clearer and give more guidance. Latest problem short row shaping on edge. Even though I have used the wrap method I cannot get rid of holes. Any suggestions?
25.01.2013 - 09:31DROPS Design answered:
Dear Jean, maybe you could sew some sts if you still have some holes at transitions. Happy knitting!
25.01.2013 - 14:03
|
|||||||||||||||||||||||||
Mint Star#mintstarcardigan |
|||||||||||||||||||||||||
|
|
|||||||||||||||||||||||||
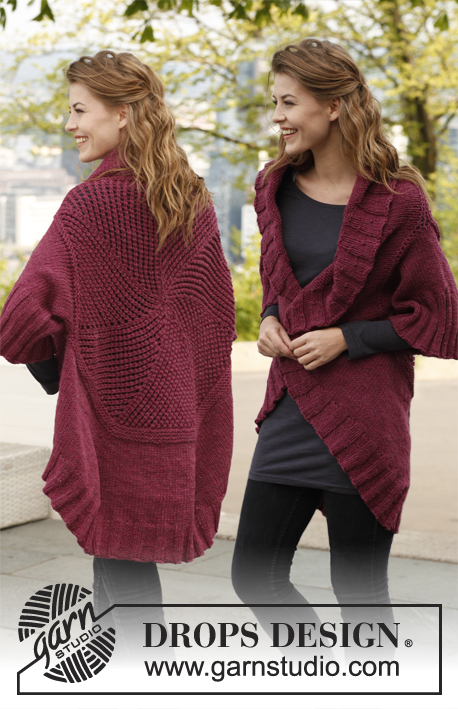
Knitted DROPS jacket worked in a circle in ”Nepal”. Size: S - XXXL.
DROPS 142-15 |
|||||||||||||||||||||||||
|
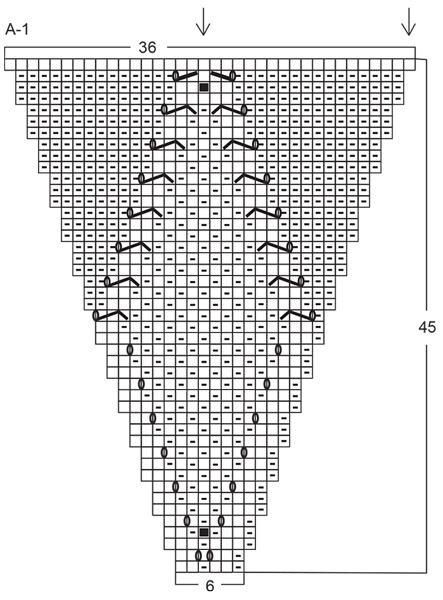
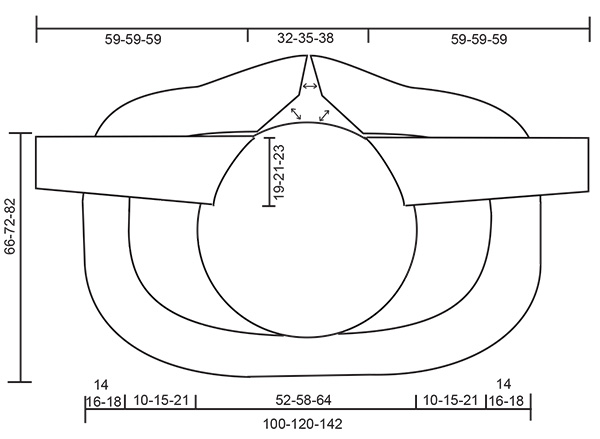
PATTERN: See diagram A-1. Diagram shows all rows in pattern from RS. MOSS ST: ROUND 1: * K 1, P 1 *, repeat from *-*. ROUND 2: K over P and P over K. Repeat 2nd round. GARTER ST (back and forth on needle): K all rows. 1 ridge = 2 rows K. INCREASE TIP (applies when diagram A-1 has been worked): Inc 1 st at every marker on every inc (i.e. 12 sts inc per round) – inc before all markers the first time, second time after all markers etc. alternately upwards - inc by making 1 YO - on next round work YO twisted to avoid holes. ---------------------------------------------------------- JACKET: Worked in the round in a circle from mid back. Work on double pointed needles when inc, switch to a longer circular needle when needed. Cast on 12 sts with Nepal and distribute them on 4 double pointed needles size 5 mm. Insert 1 marker in first st on round = mid up towards neck. K 1 round while at the same time working 2 sts in all sts = 24 sts. K 1 round without inc. On next round, work as follows: * K 1, K 2 in next st *, repeat from *-* = 36 sts. Then work according to diagram A-1 (= 6 repetitions in the round). REMEMBER THE KNITTING TENSION! When A-1 has been worked, there are 216 sts on needle and piece measures approx. 20 cm from the centre and outwards. Insert 1 marker in first st (= mid up towards to neck), and then 1 marker in every 18th st the entire round (see arrows in diagram for where markers are placed) = 12 markers 17 sts apart. READ ALL OF THE FOLLOWING SECTION BEFORE CONTINUING! Continue in stocking st over all sts – AT THE SAME TIME on 3rd round, inc 1 st at all markers – SEE INCREASE TIP! Repeat inc every 3rd round. AT THE SAME TIME when inc have been done 1-3-5 times (= 228-252-276 sts on round), cast off for shoulders and armholes on next round as follows: Cast off the first 28-30-33 sts for neck/shoulder, insert 1 marker (use another colour than the other inc markers in piece, these markers are only used when collar is sewn to shoulder), cast off the next 32-35-39 sts for armhole, work 109-123-133 sts (= down the back), cast off the next 32-35-39 sts for armhole, insert 1 marker and cast off the last 27-29-32 sts for shoulder/neck, cut the thread. Cast on 32-35-39 sts on circular needle size 5 mm, then work on the 109-123-133 sts on needle from WS and finally cast on 32-35-39 sts in the other side = 173-193-211 sts. Then work piece back and forth on needle in stocking st – insert markers for inc in the new sts cast on to match the markers in the sts cast off for armholes. Continue inc at every marker every 3rd row as before – AT THE SAME TIME slip 2 sts at end of every row on a stitch holder without working them first. When piece measures approx. 26-29-32 cm from the centre and outwards, slip the middle 67-71-77 sts on a stitch holder (= at the bottom of back piece). NOW MEASURE PIECE FROM HERE! Finish each front piece separately. FRONT PIECE: Continue in stocking st and with inc as before over the remaining sts on needle – at the same time slip 2 sts at end of every row on to stitch holders in each side (towards bottom edge slip sts on to same stitch holder as where the 67-71-77 sts at the bottom of back piece are) until 10-15-21 cm have been worked on front piece. Slip the remaining sts on to 1 of the stitch holders. Work the other front piece the same way. EDGE: K all sts from RS back on to circular needle size 5 mm - between every time sts where slipped on stitch holders in each side get the thread and twist it before slipping it on needle (i.e. between every other st, to avoid holes in the transitions), in addition inc evenly so that there are 308-356-404 sts in total on needle. K 1 row from WS at the same time insert 17 markers in the piece as follows: Work 2 sts, insert 1 marker, * work 19-22-25 sts, insert 1 marker *, repeat from *-* until 2 sts remain after last marker, work these. K 1 row from RS. Work next row as follows (from WS): 1 st in GARTER ST – see explanation above, * K 2 (i.e. 1 st on each side of marker is worked K), 17-20-23 sts in moss st *, repeat from *-* 3 more times, ** P 2 (i.e. 1 st on each side of marker is worked P), 17-20-23 sts in moss st **, repeat from **-** 7 more times, P 2, *** 17-20-23 sts in moss st, K 2 ***, repeat from ***-*** 3 more times, finish with 1 st in garter st. On next row from RS P 1 st on each side of the first 4 and last 4 markers, and K 1 st on each side of the other 9 markers – AT THE SAME TIME on this row, inc 1 st on each side of the last 4 and first 4 markers – inc on each side of the 2 P sts by making 1 YO which is worked twisted in moss st on next row. Continue inc every 6th row until finished measurements. When edge measures 13-15-17 cm, work short rows in one side towards mid back for collar. Work as follows (work and inc as before with moss st and stocking st - beg mid back): Work 36-38-40 sts, turn and work back, work 34-36-38 sts, turn and work back, work 32-34-36 sts, turn and work back, continue like this by working 2 sts less a total of 10-11-12 times, then work 3 sts less a total of 5 times, cut the thread and work the same way in the other side. Then K 1 row over all sts before loosely casting off with K. SLEEVE: Worked in the round on double pointed needles. Cast on 42-44-48 sts on double pointed needles size 5 mm with Nepal. Insert 1 marker at beg of round = mid under sleeve. P 1 round and K 1 round. Continue with MOSS ST - see explanation above. When piece measures 12 cm, K 1 round and P 1 round, continue in stocking st until finished measurements. At the same time when piece measures 15 cm, inc 1 st on each side of marker mid under sleeve. Repeat inc every 5-4-3 cm 6-8-10 more times = 56-62-70 sts. When piece measures 49 cm, cast off 6 sts mid under sleeve and work back and forth until finished measurements. Then cast off for sleeve cap at beg of every row in each side: 2 sts 2 times and 1 st 5 times, then cast off 2 sts in each side until piece measures 58 cm, then cast off 3 sts 1 time in each side. Cast off the remaining sts, sleeve measures approx. 59 cm. ASSEMBLY: Sew one collar part to half the shoulder/neck at the back and sew the other collar part to the other half of the shoulder/neck – beg at the marker inserted between armhole and shoulder and pull the collar somewhat when sewing it on, use what is needed of the collar vertically to make the collar parts come tog mid back, then sew the rest of the 2 collar parts tog edge to edge towards each other – see arrows in measurement chart. Sew in sleeves. Close the jacket with a pin or brooch. |
|||||||||||||||||||||||||
Diagram explanations |
|||||||||||||||||||||||||
|
|||||||||||||||||||||||||
 |
|||||||||||||||||||||||||
 |
|||||||||||||||||||||||||
Have you finished this pattern?Tag your pictures with #dropspattern #mintstarcardigan or submit them to the #dropsfan gallery. Do you need help with this pattern?You'll find 17 tutorial videos, a Comments/Questions area and more by visiting the pattern on garnstudio.com. © 1982-2026 DROPS Design A/S. We reserve all rights. This document, including all its sub-sections, has copyrights. Read more about what you can do with our patterns at the bottom of each pattern on our site. |
|||||||||||||||||||||||||


With over 40 years in knitting and crochet design, DROPS Design offers one of the most extensive collections of free patterns on the internet - translated to 17 languages. As of today we count 324 catalogues and 12290 patterns translated into English (UK/cm).
We work hard to bring you the best knitting and crochet have to offer, inspiration and advice as well as great quality yarns at incredible prices! Would you like to use our patterns for other than personal use? You can read what you are allowed to do in the Copyright text at the bottom of all our patterns. Happy crafting!
Post a comment to pattern DROPS 142-15
We would love to hear what you have to say about this pattern!
If you want to leave a question, please make sure you select the correct category in the form below, to speed up the answering process. Required fields are marked *.