
Popular categories
Looking for a yarn?


Comments / Questions (161)
![]() Kirsten wrote:
Kirsten wrote:
Hvor mange garn nøgler skal man bruge for at lave halsterklædet?
27.08.2012 - 15:00DROPS Design answered:
Du skal bruke 300g vilket er 6 nøgler.
28.08.2012 - 02:16
![]() Maryjean Hochberg wrote:
Maryjean Hochberg wrote:
Love the colors
22.08.2012 - 03:41
![]() Marianne wrote:
Marianne wrote:
Hej. Håber nogen kan hjælpe for tørklædet er superfedt! Når man skifter farve, skal man så klippe tråden over og springe til næste farve på tråden? Synes ikke rigtig opskriften er så tydelig på det punkt :-)
17.08.2012 - 21:39DROPS Design answered:
Helt riktig, når du skifter farve, så må tråden klippes og så start med neste farve på nöylet. Slik far hver omg en ny farve.
25.08.2012 - 01:00
![]() Marianne wrote:
Marianne wrote:
Hej. Håber nogen kan hjælpe for tørklædet er superfedt! Når man skifter farve, skal man så klippe tråden over og springe til næste farve på tråden? Synes ikke rigtig opskriften er så tydelig på det punkt :-)
17.08.2012 - 21:39
![]() Françoise wrote:
Françoise wrote:
Bonjour, J'ai très envie de réaliser ce modèle.Je suis un peu inquiète à propos de la torsion à effectuer au moment de fermer l'anneau.Est-ce vraiment nécessaire? quel est son utilité? sinon j'en profite pour vous remercier de tous ces beaux modèles que vous nous offrez.
17.08.2012 - 11:50DROPS Design answered:
Bonjour Françoise, et merci. La torsion est ici nécessaire pour obtenir un effet "möbius" = on forme ainsi une sorte de huit, un anneau vrillé. Bon crochet !
21.08.2012 - 14:41
![]() Sofie wrote:
Sofie wrote:
Lijkt me een supermooi patroon, maar hoe zit dat nu precies met dat "van kleur wisselen"? Het garen verandert toch vanzelf van kleur? Of zie ik dat helemaal fout?!
07.08.2012 - 20:44DROPS Design answered:
Ja, de draad veranderd zelf van kleur, maar voor dit patroon moet je zorgen om bij een nieuwe kleur te beginnen binnen de bol zelf per toer
24.08.2012 - 13:05Graciela Beatriz wrote:
Hermosos!!! Diseños super originales !
04.08.2012 - 06:15
![]() Laura wrote:
Laura wrote:
Grazie!!!!!
30.07.2012 - 12:05
![]() Candau wrote:
Candau wrote:
Superbe modéle mais faut-il casser le fil à chaque rg pour obtenir une nouvelle couleur
29.07.2012 - 12:17DROPS Design answered:
Oui Candeau, comme indiqué, on coupe le fil et on change pour une nouvelle couleur de la même pelote pour avoir une nouvelle couleur à chaque tour. Bon crochet !
30.07.2012 - 09:14
![]() Laura wrote:
Laura wrote:
Bellissimo modello! ma non riesco a capire come si lavora il collo dopo aver completato la striscia. che significa "girare la fascia 1 volta per formare una torsione sulla striscia (si cuce i 2 lati opposti nel senso contrario)."...non riesco a capire...potete spiegarlo? il cappello "viaggia facile" ma la sciarpa non è chiaro. grazie
24.07.2012 - 13:28DROPS Design answered:
Ho provato a modificare un po' (ved. il mod.). Praticamente, la striscia di piccoli quadrati viene alla fine unita per formare un anello, ma questo anello deve essere attorcigliato 1 volta prima di cucire le 2 estremità formando l'anello. Questo viene fatto perché indossando lo scaldacollo, facendolo girare intorno al collo 2 volte, non fa la "piega"/torsione.
25.07.2012 - 11:02
|
|
Magic#magicset |
|
 |
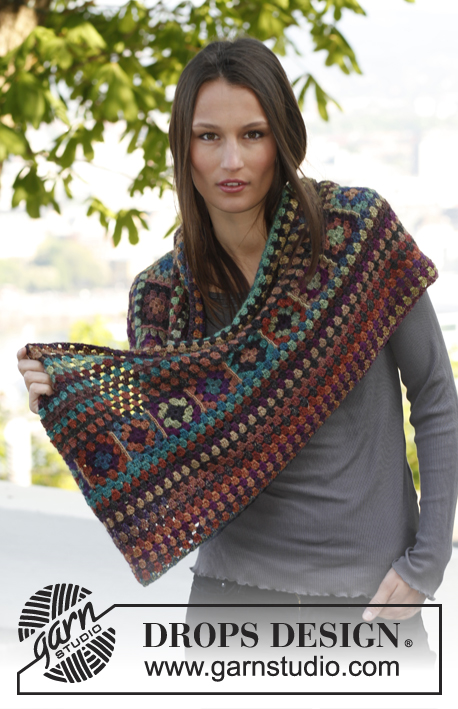 |
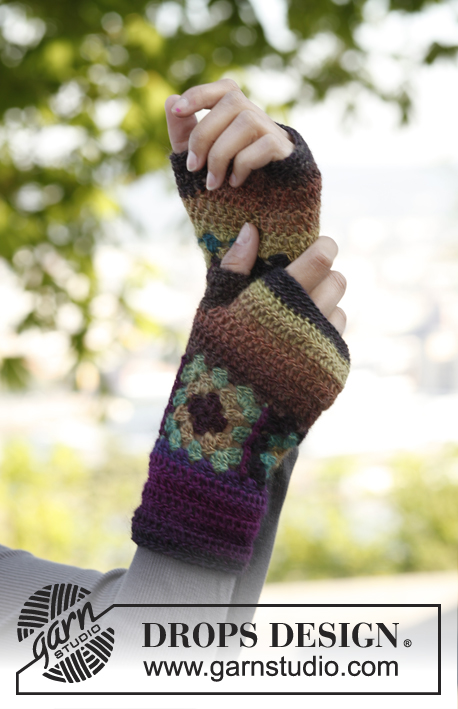
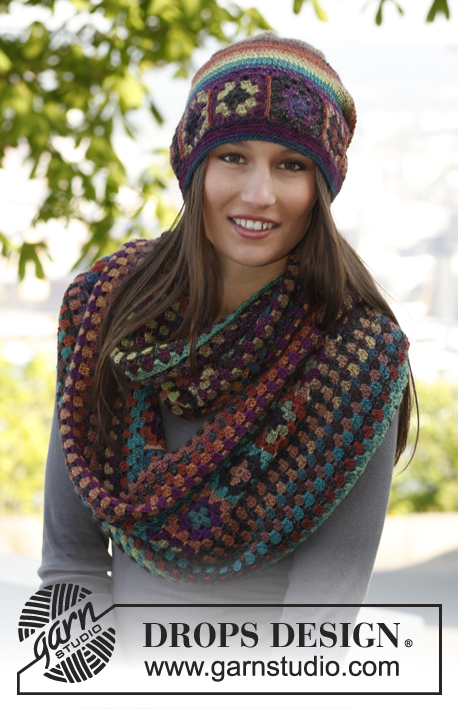
Crochet DROPS moebius neck warmer and hat with squares in ”Delight”.
DROPS 143-40 |
|
|
NECK WARMER: ROUNDS WITH TR: Beg every round with tr with 3 ch (= 1st tr), finish round with 1 sl st in 3rd ch from beg of round. COLOUR CHANGE: To get a nice colour change work last sl st on round with the new thread. Continue on to next round with the new thread. -------------------------------------------------------- SQUARE: Work 6 ch with Delight on hook size 3.5 mm and form a ring with 1 sl st in 1st ch. Read ROUNDS WITH TR. ROUND 1: * Work 3 tr in ch-ring, 3 ch *, repeat from *-* a total of 4 times = 12 tr and 4 ch-loops. Sl sts until next ch-loop, cut the thread and switch to another colour of the same ball (= new colour each round) - READ COLOUR CHANGE. ROUND 2: In every ch-loop work as follows: 3 tr, 3 ch and 3 tr, 1 ch = 24 tr and 8 ch-loops. Sl sts until next ch-loop, cut the thread and switch to another colour of the same ball. ROUND 3: * In next ch-loop work as follows: 3 tr, 3 ch and 3 tr (= corner), 1 ch, in next ch-loop work 3 tr, 1 ch *, repeat from *-* the entire round = 36 tr and 12 ch-loops. Cut and fasten the thread. Work a total of 25 squares. Work squares tog into 1 strip as follows: Place 2 and 2 squares on top of each other, insert hook through ch-loop in the corner on both squares, work 1 ch and 1 dc, * 3 ch, 1 dc in next ch-loop on both squares *, repeat from *-*, cut and fasten the thread. Work the ends of the strip tog the same way to form a ring – NOTE: twist the strip 1 time to form a twisted ring, before working the ends tog. NECK WARMER: Worked from middle of piece = the twisted ring and out towards the outer edges - i.e. work upwards and downwards at the same time. NOTE! Beg every round with 3 ch (= 1st tr). Work 1st round along the strip as follows: In each of the 4 ch-loops on every square work 3 tr and 1 ch, finish round with 1 sl st in 3rd ch from beg of round (= 1st tr), sl st until next ch-loop. Continue to work as follows: In every ch-loop work 3 tr, 1 ch, finish round with 1 sl st in 3rd ch from beg of round (= 1st tr), sl st until next ch-loop. Continue like this until neck warmer measures approx. 36 cm vertically (the entire piece, not just from the middle and outwards). Cut and fasten the thread. -------------------------------------------------------- HAT: ROUNDS WITH TR: Beg every round with tr with 3 ch (= 1st tr), finish round with 1 sl st in 3rd ch from beg of round. DECREASE TIP 1: Dec 1 tr by working the next 2 tr tog as follows: Work 1 tr but wait with last pull through (= 2 sts on hook), work next tr but on last pull through, pull thread through all 3 sts on hook. ROUNDS WITH DC: Beg every round with dc with 1 ch (not counted as 1st dc) - NOTE! Work dc in back loop of every dc, finish with 1 sl st in 1st dc. DECREASE TIP 2: Dec 1 dc by working 2 dc tog as follows: * Insert hook in back loop of next dc, get thread *, repeat from *-* one more time, make 1 YO and pull thread through all 3 sts on hook. COLOUR CHANGE: To get a nice colour change work last sl st on round with the new thread. Continue on to next round with the new thread. -------------------------------------------------------- SQUARE: Work 6 ch with Delight on hook size 3.5 mm and form a ring with 1 sl st in 1st ch. Read ROUNDS WITH TR. ROUND 1: * Work 3 tr in ch-ring, 3 ch *, repeat from *-* a total of 4 times = 12 tr and 4 ch-loops. Sl sts until next ch-loop, cut the thread and switch to another colour of the same ball (= new colour each round) - READ COLOUR CHANGE. ROUND 2: In every ch-loop work as follows: 3 tr, 3 ch and 3 tr, 1 ch = 24 tr and 8 ch-loops. Sl sts until next ch-loop, cut the thread and switch to another colour of the same ball. ROUND 3: * In next ch-loop work as follows: 3 tr, 3 ch and 3 tr (= corner), 1 ch, in next ch-loop work 3 tr, 1 ch *, repeat from *-* the entire round = 36 tr and 12 ch-loops. Cut and fasten the thread. Work a total of 8-9 squares. Work squares tog into 1 strip as follows: Place 2 and 2 squares on top of each other, insert hook through ch-loop in the corner on both squares, work 1 ch and 1 dc, * 3 ch, 1 dc in next ch-loop on both squares *, repeat from *-*, cut and fasten the thread. Work the ends of the strip tog the same way to form a ring. HAT: Worked in the round. Work along one side of strip as follows: In each of the 4 ch-loops on every square work 3 tr, finish with 1 sl st in 3rd ch (= 1st tr) from beg of round = 96-108 tr. Then work ROUNDS WITH TR - read explanation above - as follows: 3 ch (= 1st tr), skip 1st tr from previous round, 1 tr in every tr, finish round with 1 sl st in 3rd ch from beg of round. Continue until hat measures approx. 16 cm from bottom edge. Then dec as follows: ROUND 1: * 1 tr in each of the next 6-7 tr, dec 1 tr - READ DECREASE TIP 1 *, repeat from *-* the entire round = 84-96 tr (= 12 sts dec). ROUND 2: * 1 tr in each of the next 5-6 tr, dec 1 tr *, repeat from *-* the entire round = 72-84 tr. ROUND 3: * 1 tr in each of the next 4-5 tr, dec 1 tr *, repeat from *-* the entire round = 60-72 tr. ROUND 4: * 1 tr in each of the next 3-4 tr, dec 1 tr *, repeat from *-* the entire round = 48-60 tr. ROUND 5: * 1 tr in each of the next 2-3 tr, dec 1 tr *, repeat from *-* the entire round = 36-48 tr. ROUND 6: * 1 tr in each of the next 1-2 tr, dec 1 tr *, repeat from *-* the entire round = 24-36 tr. SIZE S/M: Work all tr on round tog 2 by 2 = 12 tr, cut the thread and sew the last tr tog with thread end. SIZE L/XL: ROUND 7: * 1 tr in next tr, dec 1 tr *, repeat from *-* the entire round = 24 tr. ROUND 8: Work all tr on round tog 2 by 2 = 12 tr, cut the thread and sew the last tr tog with thread end. EDGE: Work an edge along bottom edge of hat (along the other side of strip with squares) as follows: Work 1 ch, in each of the 4 ch-loops on every square work 4 dc = 128-144 dc, finish with 1 sl st in 1st dc from beg of round. Then work ROUNDS WITH DC - read explanation above. When edge measures approx. 1 cm, dec 16-20 dc evenly on round - READ DECREASE TIP 2 = 112-124 dc. Continue until edge measures approx. 2 cm, cut and fasten the thread. The hat measures approx. 24-25 cm vertically. |
|
Have you finished this pattern?Tag your pictures with #dropspattern #magicset or submit them to the #dropsfan gallery. Do you need help with this pattern?You'll find 8 tutorial videos, a Comments/Questions area and more by visiting the pattern on garnstudio.com. © 1982-2026 DROPS Design A/S. We reserve all rights. This document, including all its sub-sections, has copyrights. Read more about what you can do with our patterns at the bottom of each pattern on our site. |
|


With over 40 years in knitting and crochet design, DROPS Design offers one of the most extensive collections of free patterns on the internet - translated to 17 languages. As of today we count 325 catalogues and 12298 patterns translated into English (UK/cm).
We work hard to bring you the best knitting and crochet have to offer, inspiration and advice as well as great quality yarns at incredible prices! Would you like to use our patterns for other than personal use? You can read what you are allowed to do in the Copyright text at the bottom of all our patterns. Happy crafting!
Post a comment to pattern DROPS 143-40
We would love to hear what you have to say about this pattern!
If you want to leave a question, please make sure you select the correct category in the form below, to speed up the answering process. Required fields are marked *.