
Popular categories
Looking for a yarn?


Comments / Questions (161)
![]() Marie wrote:
Marie wrote:
Der Faden ist viel dünner, als man von den Bildern erwartet - bin mal gespannt, ob die Sachen warm sind. Bei mir hat die Maschenprobe mit Nadel 2,5 gepaßt.
10.11.2012 - 08:43
![]() Agneta Markström wrote:
Agneta Markström wrote:
Lägg rutorna 2och2 påvarandra, stick in nålen genom lm-bågen i hörnet på båda rutorna, virka 1 lm och 1 fm, * 3 lm, 1 fm om nästa lm-båge på båda rutorna * JAG FÖRSTÅR INTE VAR DEN FÖRSTA LM SKA FÄSTAS OCH VARFÖR DEN SKA VARA DÄR?
08.11.2012 - 21:11DROPS Design answered:
Hej, 1:a lm i första hörnet på rutorna. Lycka till!
12.11.2012 - 15:42
![]() Kathrin wrote:
Kathrin wrote:
So ein tolles Set. Habe mir die Wolle bestellt und nun kann es losgehen. Eine Frage habe ich jedoch zum Farbwechsel. Da der Faden nach jeder Runde abgeschnitten wird, kann ich doch beim Quadrat direkt wieder mit Stäbchen beginnen ohne den Weg mit den Kettmaschen, oder verpasse ich dann einen Effekt?danke schon für Hilfe zum Farbwechsel und die ganzen tollen Anleitungen! Kathrin
05.11.2012 - 19:37DROPS Design answered:
Liebe Kathrin, ich würde es an einem Quadrat ausprobieren, Dann können Sie die Methode wählen, die Ihnen am besten gefällt.
07.11.2012 - 07:31
![]() Johanna wrote:
Johanna wrote:
Ich habe eine Frage zu dieser Anleitung. Könnte mir bitte jemand nochmal genau (Schritt-für-Schritt) erklären wie ich das Quadrat häkeln soll? Ich wäre wirklich sehr dankbar weil ich diese Anleitung wirklich sehr schön finde ;-)
18.10.2012 - 20:41DROPS Design answered:
Liebe Johanna, dafür wenden Sie sich bitte an den Laden, in dem Sie die Wolle gekauft haben. Dort hilft man Ihnen gerne weiter. Vielleicht reicht Ihnen aber auch schon unser Instruktionsvideo (Häkelquadrat) - dort wird es ausfühlich erklärt.
19.10.2012 - 13:18
![]() Elena wrote:
Elena wrote:
Très joli modèle, mais je ne comprends pas trop quelles laines sont nécessaires. Pour l'ensemble de l'ouvrage la laine delight,mais pour les carrés, il fut changer de couleur on coupe la pelote pour changer de couleur ?
17.10.2012 - 16:28DROPS Design answered:
Bonjour Elena, 300 g de Delight sont nécessaire pour le tour de cou et 100 g pour le bonnet. Pour réaliser les carrés, on choisit des sections de couleurs différentes et on crochète 1 tour dans chaque couleur. Vous pouvez couper le fil ou commencer plusieurs pelotes différentes. Bon crochet !
17.10.2012 - 16:54
![]() Tanja wrote:
Tanja wrote:
Hej! Jag tycker att den här färgkombinationen är helt fantastisk så jag skulle gärna vilja ha beskrivningen så min halsvärmare och mössa blir lika fina! vänligen, Tanja
02.10.2012 - 12:38DROPS Design answered:
Det är garnet i beskrivningen som gör färgkombinationen!
04.10.2012 - 09:36
![]() Stefania wrote:
Stefania wrote:
Chiarissimo, grazie ancora!
10.09.2012 - 15:39
![]() Stefania wrote:
Stefania wrote:
Bellissimo! grazie! mi lascia solo perplessa l'alternanza precisa dei colori nelle righe e nei quadrati, viene fatto solo con quel gomitolo di colori misto o bisogna usare colori diversi? Spero di essere riuscita a farmi capire, sono una frana...grazie!
06.09.2012 - 11:44DROPS Design answered:
Buongiorno. Quel colore di DROPS Delight è un po' particolare avendo dei contrasti molto chiari. Può tranquillamente utilizzare uno degli altri colori di Delight oppure scegliere un'altra qualità dello stesso gruppo filati, p.es una tinta unita. Può trovare i vari gruppi di filati nel menu PRODOTTI-Gruppi di filati. Spero di aver risposto alla domanda...
10.09.2012 - 10:36
![]() Tessa wrote:
Tessa wrote:
Prachtig! Maar hoe kan het dat de kleurwisseling in de lange sjaal lijkt te verlopen per toer en dat het ook het geval is per toer op de muts? Je gaat dan telkens over naar de nieuwe kleur dat 'kost' toch heel veel draad die je weggooit?
28.08.2012 - 21:30DROPS Design answered:
Het model is ontworpen op deze manier en het zou meevallen met "restdraadjes". Je kan natuurlijk ervoor kiezen om niet te wisselen van kleur per toer.
31.08.2012 - 16:28
![]() Kirsten wrote:
Kirsten wrote:
Bare glem det, blev forvirret over sætningen, har fundet ud af det ;)
27.08.2012 - 15:01
|
|
Magic#magicset |
|
 |
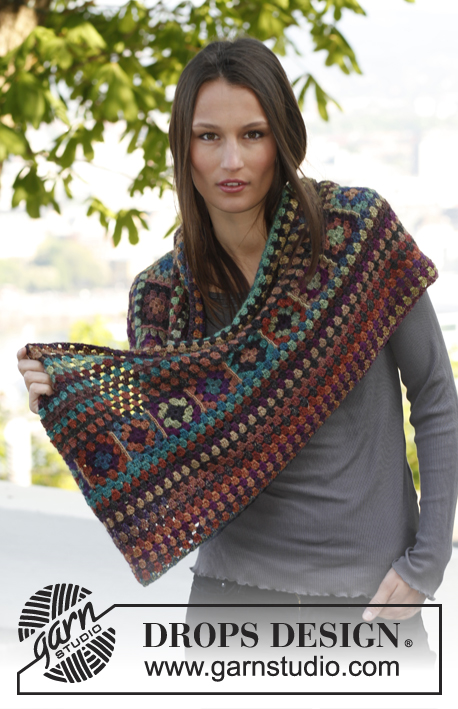 |
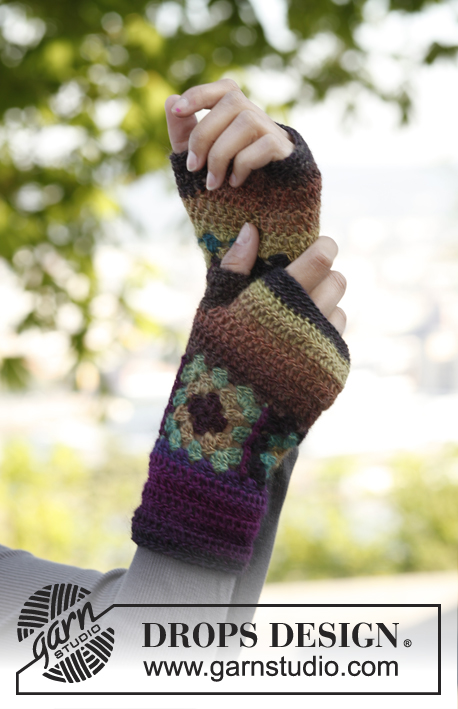
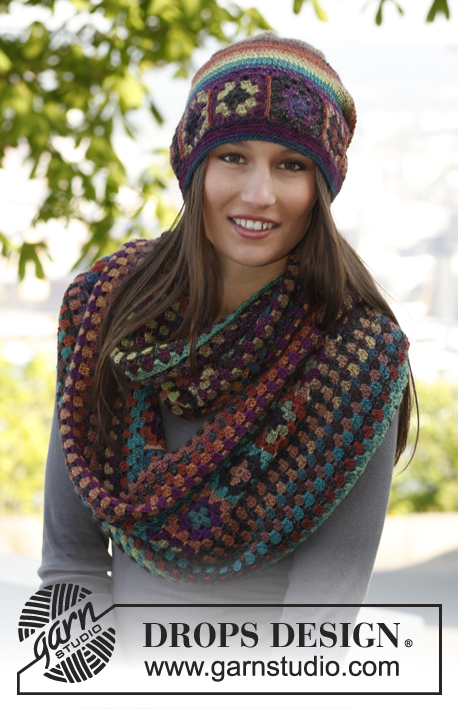
Crochet DROPS moebius neck warmer and hat with squares in ”Delight”.
DROPS 143-40 |
|
|
NECK WARMER: ROUNDS WITH TR: Beg every round with tr with 3 ch (= 1st tr), finish round with 1 sl st in 3rd ch from beg of round. COLOUR CHANGE: To get a nice colour change work last sl st on round with the new thread. Continue on to next round with the new thread. -------------------------------------------------------- SQUARE: Work 6 ch with Delight on hook size 3.5 mm and form a ring with 1 sl st in 1st ch. Read ROUNDS WITH TR. ROUND 1: * Work 3 tr in ch-ring, 3 ch *, repeat from *-* a total of 4 times = 12 tr and 4 ch-loops. Sl sts until next ch-loop, cut the thread and switch to another colour of the same ball (= new colour each round) - READ COLOUR CHANGE. ROUND 2: In every ch-loop work as follows: 3 tr, 3 ch and 3 tr, 1 ch = 24 tr and 8 ch-loops. Sl sts until next ch-loop, cut the thread and switch to another colour of the same ball. ROUND 3: * In next ch-loop work as follows: 3 tr, 3 ch and 3 tr (= corner), 1 ch, in next ch-loop work 3 tr, 1 ch *, repeat from *-* the entire round = 36 tr and 12 ch-loops. Cut and fasten the thread. Work a total of 25 squares. Work squares tog into 1 strip as follows: Place 2 and 2 squares on top of each other, insert hook through ch-loop in the corner on both squares, work 1 ch and 1 dc, * 3 ch, 1 dc in next ch-loop on both squares *, repeat from *-*, cut and fasten the thread. Work the ends of the strip tog the same way to form a ring – NOTE: twist the strip 1 time to form a twisted ring, before working the ends tog. NECK WARMER: Worked from middle of piece = the twisted ring and out towards the outer edges - i.e. work upwards and downwards at the same time. NOTE! Beg every round with 3 ch (= 1st tr). Work 1st round along the strip as follows: In each of the 4 ch-loops on every square work 3 tr and 1 ch, finish round with 1 sl st in 3rd ch from beg of round (= 1st tr), sl st until next ch-loop. Continue to work as follows: In every ch-loop work 3 tr, 1 ch, finish round with 1 sl st in 3rd ch from beg of round (= 1st tr), sl st until next ch-loop. Continue like this until neck warmer measures approx. 36 cm vertically (the entire piece, not just from the middle and outwards). Cut and fasten the thread. -------------------------------------------------------- HAT: ROUNDS WITH TR: Beg every round with tr with 3 ch (= 1st tr), finish round with 1 sl st in 3rd ch from beg of round. DECREASE TIP 1: Dec 1 tr by working the next 2 tr tog as follows: Work 1 tr but wait with last pull through (= 2 sts on hook), work next tr but on last pull through, pull thread through all 3 sts on hook. ROUNDS WITH DC: Beg every round with dc with 1 ch (not counted as 1st dc) - NOTE! Work dc in back loop of every dc, finish with 1 sl st in 1st dc. DECREASE TIP 2: Dec 1 dc by working 2 dc tog as follows: * Insert hook in back loop of next dc, get thread *, repeat from *-* one more time, make 1 YO and pull thread through all 3 sts on hook. COLOUR CHANGE: To get a nice colour change work last sl st on round with the new thread. Continue on to next round with the new thread. -------------------------------------------------------- SQUARE: Work 6 ch with Delight on hook size 3.5 mm and form a ring with 1 sl st in 1st ch. Read ROUNDS WITH TR. ROUND 1: * Work 3 tr in ch-ring, 3 ch *, repeat from *-* a total of 4 times = 12 tr and 4 ch-loops. Sl sts until next ch-loop, cut the thread and switch to another colour of the same ball (= new colour each round) - READ COLOUR CHANGE. ROUND 2: In every ch-loop work as follows: 3 tr, 3 ch and 3 tr, 1 ch = 24 tr and 8 ch-loops. Sl sts until next ch-loop, cut the thread and switch to another colour of the same ball. ROUND 3: * In next ch-loop work as follows: 3 tr, 3 ch and 3 tr (= corner), 1 ch, in next ch-loop work 3 tr, 1 ch *, repeat from *-* the entire round = 36 tr and 12 ch-loops. Cut and fasten the thread. Work a total of 8-9 squares. Work squares tog into 1 strip as follows: Place 2 and 2 squares on top of each other, insert hook through ch-loop in the corner on both squares, work 1 ch and 1 dc, * 3 ch, 1 dc in next ch-loop on both squares *, repeat from *-*, cut and fasten the thread. Work the ends of the strip tog the same way to form a ring. HAT: Worked in the round. Work along one side of strip as follows: In each of the 4 ch-loops on every square work 3 tr, finish with 1 sl st in 3rd ch (= 1st tr) from beg of round = 96-108 tr. Then work ROUNDS WITH TR - read explanation above - as follows: 3 ch (= 1st tr), skip 1st tr from previous round, 1 tr in every tr, finish round with 1 sl st in 3rd ch from beg of round. Continue until hat measures approx. 16 cm from bottom edge. Then dec as follows: ROUND 1: * 1 tr in each of the next 6-7 tr, dec 1 tr - READ DECREASE TIP 1 *, repeat from *-* the entire round = 84-96 tr (= 12 sts dec). ROUND 2: * 1 tr in each of the next 5-6 tr, dec 1 tr *, repeat from *-* the entire round = 72-84 tr. ROUND 3: * 1 tr in each of the next 4-5 tr, dec 1 tr *, repeat from *-* the entire round = 60-72 tr. ROUND 4: * 1 tr in each of the next 3-4 tr, dec 1 tr *, repeat from *-* the entire round = 48-60 tr. ROUND 5: * 1 tr in each of the next 2-3 tr, dec 1 tr *, repeat from *-* the entire round = 36-48 tr. ROUND 6: * 1 tr in each of the next 1-2 tr, dec 1 tr *, repeat from *-* the entire round = 24-36 tr. SIZE S/M: Work all tr on round tog 2 by 2 = 12 tr, cut the thread and sew the last tr tog with thread end. SIZE L/XL: ROUND 7: * 1 tr in next tr, dec 1 tr *, repeat from *-* the entire round = 24 tr. ROUND 8: Work all tr on round tog 2 by 2 = 12 tr, cut the thread and sew the last tr tog with thread end. EDGE: Work an edge along bottom edge of hat (along the other side of strip with squares) as follows: Work 1 ch, in each of the 4 ch-loops on every square work 4 dc = 128-144 dc, finish with 1 sl st in 1st dc from beg of round. Then work ROUNDS WITH DC - read explanation above. When edge measures approx. 1 cm, dec 16-20 dc evenly on round - READ DECREASE TIP 2 = 112-124 dc. Continue until edge measures approx. 2 cm, cut and fasten the thread. The hat measures approx. 24-25 cm vertically. |
|
Have you finished this pattern?Tag your pictures with #dropspattern #magicset or submit them to the #dropsfan gallery. Do you need help with this pattern?You'll find 8 tutorial videos, a Comments/Questions area and more by visiting the pattern on garnstudio.com. © 1982-2026 DROPS Design A/S. We reserve all rights. This document, including all its sub-sections, has copyrights. Read more about what you can do with our patterns at the bottom of each pattern on our site. |
|


With over 40 years in knitting and crochet design, DROPS Design offers one of the most extensive collections of free patterns on the internet - translated to 17 languages. As of today we count 325 catalogues and 12298 patterns translated into English (UK/cm).
We work hard to bring you the best knitting and crochet have to offer, inspiration and advice as well as great quality yarns at incredible prices! Would you like to use our patterns for other than personal use? You can read what you are allowed to do in the Copyright text at the bottom of all our patterns. Happy crafting!
Post a comment to pattern DROPS 143-40
We would love to hear what you have to say about this pattern!
If you want to leave a question, please make sure you select the correct category in the form below, to speed up the answering process. Required fields are marked *.