
Popular categories
Looking for a yarn?


Comments / Questions (161)
![]() Ilona wrote:
Ilona wrote:
Håller på med denna fina mössa nu men undrar över en sak i mönstret. Är det från den påvirkade kanten under rutorna som det ska räknas 16 cm, eller är det från nedre kanten på rutorna?
04.06.2013 - 09:06Sandra answered:
Det står ju tydligt "från den nedersta kanten" ; därefter virkas den extra randen.
06.06.2013 - 09:32
![]() R.van De Velde wrote:
R.van De Velde wrote:
Ik kan deze niet afdrukken.
15.04.2013 - 13:22DROPS Design answered:
Je moet drukken op AFDRUKKEN: PATROON en volg de instructies verder. We hebben hier geen fouten kunnen ontdekken. Probeer het nog een keer.
15.04.2013 - 19:35
![]() Haydee wrote:
Haydee wrote:
I finished all my squares and they are put together but on the part where it says NOTE: twist the strip 1 time to form a twisted ring, before working the ends tog. I did that and I started the neck warmer rounds and I don't get to the beg 3dc (3rd ch from beg of round) Am I reading the pattern wrong? if I put the 2 edges together and flip the one on top once, is that twisting it 1 time? or do I have to flip it 2 times (one complete turn)? Did I make any sense?
22.02.2013 - 13:43DROPS Design answered:
Dear Haydee, when you start crocheting in dc around the squares, you replace 1st dc with 3ch at the beg of each round, and then crochet 3 dc in each of the 4 ch-loops on each squares, with ch 1 between each group of 3 dc. When you will have finished your first round, you will have worked on both sides of the squares and can join to the first dc (=3rd ch from beg of round). The video "Moebius in crochet" could maybe help you to visualize (see index). Happy crocheting !
22.02.2013 - 15:49
![]() Ulla Pedersen wrote:
Ulla Pedersen wrote:
The yarn is mostly too thin and some few places it's too thick, so the work gets very uneven :-(So so disappointed I could cry, because I fell in love with the colors and the "moebius concept" but now I feel like I've wasted time and money.
29.01.2013 - 12:16
![]() Ulla Pedersen wrote:
Ulla Pedersen wrote:
I am SO disappointed with this model and this yarn. Has been working with it for too much time, because the recipe says nothing about the color changes in the yarn is NOT at all long enough for an entire round. To get the colors somewhat equal you have to use 3 balls at the same time. And a lot af yarn goes to wast, because the color is too mixed. Also, I think the model looks very soft and cosy in the picture and IRL it is NOT at ALL!
29.01.2013 - 12:14
![]() Ulla Pedersen wrote:
Ulla Pedersen wrote:
Jeg er SÅ skuffet over denne model og dette garn. Har nu arbejdet med det i en rum tid, for der står intet i opskriften om at farveskiftene i garnet SLET ikke er lange nok til en hel omgang på arbejdet. Dvs for at få omgangene nogenlunde ensfarvede, skal man have gang i 3 nøgler på én gang. Desuden synes jeg at modellen ser vamset og blød ud på billedet og det er det bare slet IKKE. Garnet kradser og er MEGA tyndt, men nogen få steder er det tykt, så arbejdet bliver ret ujævnt :-(
29.01.2013 - 11:19Alejandra wrote:
Hola,soy una fanatica del tejido de crochet,me interesaria saber si me podrias enviar el patron de este genial conjunto.desde ya muchisimas gracias son geniales todos los diseños.
26.01.2013 - 18:04DROPS Design answered:
Querida Alejandra, para acceder a la traducción en español de este modelo, utiliza la "Búsqueda directa de patrones" en el margen izquierdo de la página de inicio, o bien elige el idioma en el menú desplegable debajo de la fotografía de la modelo.
27.01.2013 - 10:04
![]() Estelle L. wrote:
Estelle L. wrote:
Bonjour, je viens à nouveau vous questionner en regardant des bonnets crochetés par d'autres, je me suis apercue que le rendu n'était pas le même que pour le mien. En fait comme pour le tour de cou après le 1er tour de brides qui suit les carrés j'ai continué à crocheter 3 brides par arceau. En relisant les explications je pense avoir fait une erreur pouvez vous me la confirmer. Etant novice je crois que me suis trop précipitée... Cordialement Estelle
17.01.2013 - 16:17DROPS Design answered:
Bonjour Estelle, le 1er tour du bonnet se compose ainsi : 3 B dans chaque arceau des carrés, mais il se continue ensuite tout en brides = 1 B dans chaque B, d'un côté (haut du bonnet), puis en ms en bas du bonnet (bordure autour de la tête). Bon crochet !
17.01.2013 - 17:31
![]() Estelle L. wrote:
Estelle L. wrote:
Bonjour, nouvelle difficulté pour le bonnet. J'ai effectué le 1er tour de diminutions et j'ai bien obtenue 96 brides Pour le 2ème tour j'ai crocheté 6 brides et fais ensuite une diminution ce qui me donne deux brides... Mais à la fin de mon tour au lieu de n'avoir plus que 84 brides j'en ai toujours 96... Quand vous indiquez "1 B dans chacune des 5-6 B suiv" que faut il réellement faire? Merci pour votre aide et désolé du dérangement mais je débute en crochet. Cordialement Estelle
17.01.2013 - 08:00DROPS Design answered:
Bonjour Estelle, le bonnet est expliqué en 2 tailles, pour le 2ème tour de diminution, vous devez crocheter ainsi : *5 B (L/XL), 2 B écoulées ens *, répétez 12 fois au total de *-* sur les 7 B suivantes tout le tour = vous avez diminué 12 B et il reste 84 B. Bon crochet !
17.01.2013 - 09:39
![]() Estelle L. wrote:
Estelle L. wrote:
Bonjour Je suis en train de faire le bonnet et j'ai une question sur à ce sujet: il est indiqué de continuer les tours de brides jusqu'à ce que le bonnet mesure 16 cm de hauteur totale. Lorsque vous parlez de 16 cm de hauteur totale c'est en partant de la base d'un carré sans la bordure du bas? Merci d'avance pour votre réponse... Cordialement Estelle
15.01.2013 - 08:15DROPS Design answered:
Bonjour Estelle, vous avez raison, les 16 cm sont comptés à partir de la base d'un carré (la bordure du bas n'est pas encore faite), donc la hauteur d'un carré + les tours en brides. Bon crochet !
15.01.2013 - 09:18
|
|
Magic#magicset |
|
 |
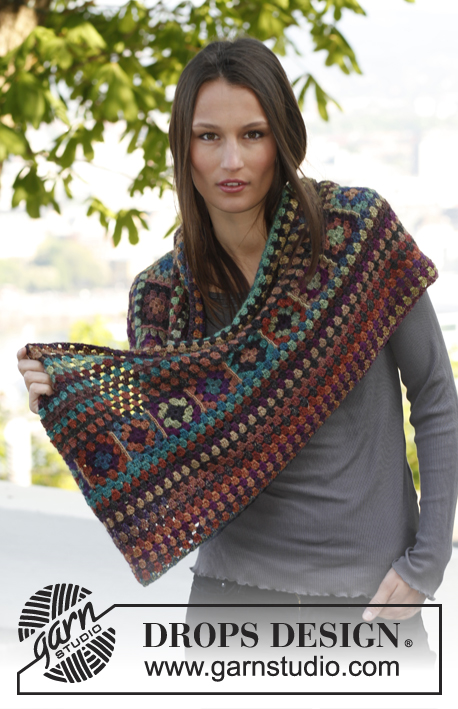 |
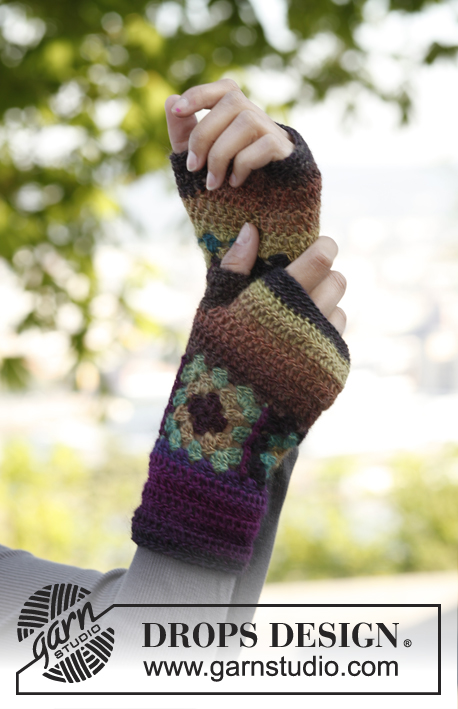
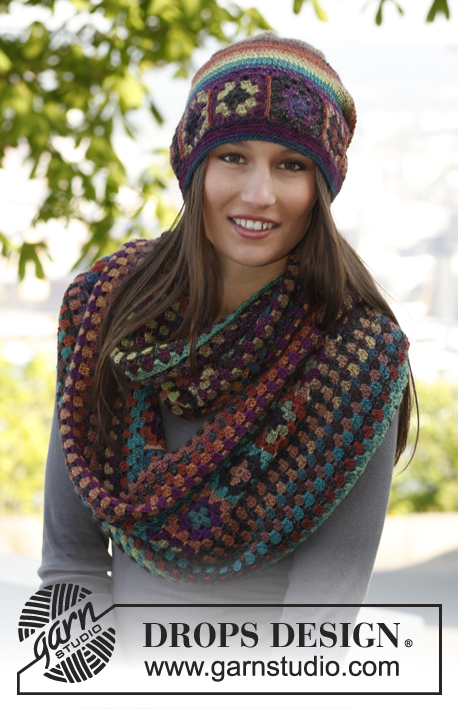
Crochet DROPS moebius neck warmer and hat with squares in ”Delight”.
DROPS 143-40 |
|
|
NECK WARMER: ROUNDS WITH TR: Beg every round with tr with 3 ch (= 1st tr), finish round with 1 sl st in 3rd ch from beg of round. COLOUR CHANGE: To get a nice colour change work last sl st on round with the new thread. Continue on to next round with the new thread. -------------------------------------------------------- SQUARE: Work 6 ch with Delight on hook size 3.5 mm and form a ring with 1 sl st in 1st ch. Read ROUNDS WITH TR. ROUND 1: * Work 3 tr in ch-ring, 3 ch *, repeat from *-* a total of 4 times = 12 tr and 4 ch-loops. Sl sts until next ch-loop, cut the thread and switch to another colour of the same ball (= new colour each round) - READ COLOUR CHANGE. ROUND 2: In every ch-loop work as follows: 3 tr, 3 ch and 3 tr, 1 ch = 24 tr and 8 ch-loops. Sl sts until next ch-loop, cut the thread and switch to another colour of the same ball. ROUND 3: * In next ch-loop work as follows: 3 tr, 3 ch and 3 tr (= corner), 1 ch, in next ch-loop work 3 tr, 1 ch *, repeat from *-* the entire round = 36 tr and 12 ch-loops. Cut and fasten the thread. Work a total of 25 squares. Work squares tog into 1 strip as follows: Place 2 and 2 squares on top of each other, insert hook through ch-loop in the corner on both squares, work 1 ch and 1 dc, * 3 ch, 1 dc in next ch-loop on both squares *, repeat from *-*, cut and fasten the thread. Work the ends of the strip tog the same way to form a ring – NOTE: twist the strip 1 time to form a twisted ring, before working the ends tog. NECK WARMER: Worked from middle of piece = the twisted ring and out towards the outer edges - i.e. work upwards and downwards at the same time. NOTE! Beg every round with 3 ch (= 1st tr). Work 1st round along the strip as follows: In each of the 4 ch-loops on every square work 3 tr and 1 ch, finish round with 1 sl st in 3rd ch from beg of round (= 1st tr), sl st until next ch-loop. Continue to work as follows: In every ch-loop work 3 tr, 1 ch, finish round with 1 sl st in 3rd ch from beg of round (= 1st tr), sl st until next ch-loop. Continue like this until neck warmer measures approx. 36 cm vertically (the entire piece, not just from the middle and outwards). Cut and fasten the thread. -------------------------------------------------------- HAT: ROUNDS WITH TR: Beg every round with tr with 3 ch (= 1st tr), finish round with 1 sl st in 3rd ch from beg of round. DECREASE TIP 1: Dec 1 tr by working the next 2 tr tog as follows: Work 1 tr but wait with last pull through (= 2 sts on hook), work next tr but on last pull through, pull thread through all 3 sts on hook. ROUNDS WITH DC: Beg every round with dc with 1 ch (not counted as 1st dc) - NOTE! Work dc in back loop of every dc, finish with 1 sl st in 1st dc. DECREASE TIP 2: Dec 1 dc by working 2 dc tog as follows: * Insert hook in back loop of next dc, get thread *, repeat from *-* one more time, make 1 YO and pull thread through all 3 sts on hook. COLOUR CHANGE: To get a nice colour change work last sl st on round with the new thread. Continue on to next round with the new thread. -------------------------------------------------------- SQUARE: Work 6 ch with Delight on hook size 3.5 mm and form a ring with 1 sl st in 1st ch. Read ROUNDS WITH TR. ROUND 1: * Work 3 tr in ch-ring, 3 ch *, repeat from *-* a total of 4 times = 12 tr and 4 ch-loops. Sl sts until next ch-loop, cut the thread and switch to another colour of the same ball (= new colour each round) - READ COLOUR CHANGE. ROUND 2: In every ch-loop work as follows: 3 tr, 3 ch and 3 tr, 1 ch = 24 tr and 8 ch-loops. Sl sts until next ch-loop, cut the thread and switch to another colour of the same ball. ROUND 3: * In next ch-loop work as follows: 3 tr, 3 ch and 3 tr (= corner), 1 ch, in next ch-loop work 3 tr, 1 ch *, repeat from *-* the entire round = 36 tr and 12 ch-loops. Cut and fasten the thread. Work a total of 8-9 squares. Work squares tog into 1 strip as follows: Place 2 and 2 squares on top of each other, insert hook through ch-loop in the corner on both squares, work 1 ch and 1 dc, * 3 ch, 1 dc in next ch-loop on both squares *, repeat from *-*, cut and fasten the thread. Work the ends of the strip tog the same way to form a ring. HAT: Worked in the round. Work along one side of strip as follows: In each of the 4 ch-loops on every square work 3 tr, finish with 1 sl st in 3rd ch (= 1st tr) from beg of round = 96-108 tr. Then work ROUNDS WITH TR - read explanation above - as follows: 3 ch (= 1st tr), skip 1st tr from previous round, 1 tr in every tr, finish round with 1 sl st in 3rd ch from beg of round. Continue until hat measures approx. 16 cm from bottom edge. Then dec as follows: ROUND 1: * 1 tr in each of the next 6-7 tr, dec 1 tr - READ DECREASE TIP 1 *, repeat from *-* the entire round = 84-96 tr (= 12 sts dec). ROUND 2: * 1 tr in each of the next 5-6 tr, dec 1 tr *, repeat from *-* the entire round = 72-84 tr. ROUND 3: * 1 tr in each of the next 4-5 tr, dec 1 tr *, repeat from *-* the entire round = 60-72 tr. ROUND 4: * 1 tr in each of the next 3-4 tr, dec 1 tr *, repeat from *-* the entire round = 48-60 tr. ROUND 5: * 1 tr in each of the next 2-3 tr, dec 1 tr *, repeat from *-* the entire round = 36-48 tr. ROUND 6: * 1 tr in each of the next 1-2 tr, dec 1 tr *, repeat from *-* the entire round = 24-36 tr. SIZE S/M: Work all tr on round tog 2 by 2 = 12 tr, cut the thread and sew the last tr tog with thread end. SIZE L/XL: ROUND 7: * 1 tr in next tr, dec 1 tr *, repeat from *-* the entire round = 24 tr. ROUND 8: Work all tr on round tog 2 by 2 = 12 tr, cut the thread and sew the last tr tog with thread end. EDGE: Work an edge along bottom edge of hat (along the other side of strip with squares) as follows: Work 1 ch, in each of the 4 ch-loops on every square work 4 dc = 128-144 dc, finish with 1 sl st in 1st dc from beg of round. Then work ROUNDS WITH DC - read explanation above. When edge measures approx. 1 cm, dec 16-20 dc evenly on round - READ DECREASE TIP 2 = 112-124 dc. Continue until edge measures approx. 2 cm, cut and fasten the thread. The hat measures approx. 24-25 cm vertically. |
|
Have you finished this pattern?Tag your pictures with #dropspattern #magicset or submit them to the #dropsfan gallery. Do you need help with this pattern?You'll find 8 tutorial videos, a Comments/Questions area and more by visiting the pattern on garnstudio.com. © 1982-2026 DROPS Design A/S. We reserve all rights. This document, including all its sub-sections, has copyrights. Read more about what you can do with our patterns at the bottom of each pattern on our site. |
|


With over 40 years in knitting and crochet design, DROPS Design offers one of the most extensive collections of free patterns on the internet - translated to 17 languages. As of today we count 325 catalogues and 12298 patterns translated into English (UK/cm).
We work hard to bring you the best knitting and crochet have to offer, inspiration and advice as well as great quality yarns at incredible prices! Would you like to use our patterns for other than personal use? You can read what you are allowed to do in the Copyright text at the bottom of all our patterns. Happy crafting!
Post a comment to pattern DROPS 143-40
We would love to hear what you have to say about this pattern!
If you want to leave a question, please make sure you select the correct category in the form below, to speed up the answering process. Required fields are marked *.