
Popular categories
Looking for a yarn?


Comments / Questions (51)
![]() Ann wrote:
Ann wrote:
" bind off 5 sts at beg of every row 2 times in each side". Does this mean you are binding off 5 stitches two times on each side? Thanks
25.10.2018 - 03:13DROPS Design answered:
Hi Ann, Yes 5 stitches at the beginning of the next 4 rows, a total of 20 stitches bound off. Happy knitting!
25.10.2018 - 08:10
![]() Carol wrote:
Carol wrote:
I keep rereading the neck decrease over and over and still don't get it. How can I be binding off stitches 10 stitches from the edge for the neck? Please explain in great detail, as I really can't understand this! Thank you so much!
15.10.2018 - 03:37Carol wrote:
I have a question about the neck decrease. Why are you slipping the outermost 10 sts on the stitch holder. Can't you just keeping working in the pattern while doing the decreases? Also, if i just slip 10 stitches on the stitch holder the pattern is in groups of 3 plus the 4 band stitches. It would cause issues with the pattern. Thanks
15.10.2018 - 00:52DROPS Design answered:
Dear Carole, you slip the 10 outermost st on front piece aside and then cast off to shape neck. Afterwards you will knit these sts back on needle and pick up stitches all around the neck - see NECK EDGE. Happy knitting!
15.10.2018 - 10:49
![]() Katarzyna wrote:
Katarzyna wrote:
Witam Sweterek przepiekny Chcialabym zapytac czy jest mozliwosc modyfikacji tak aby zrobic go wkladanego przez glowe ,bez rozpiecia Ile trzebaby nabrac oczek?
02.08.2018 - 13:50DROPS Design answered:
Witaj Kasiu, trzeba będzie pomniejszyć ogólną liczbę oczek w twoim rozmiarze o 4 oczka obszycia przodu (tylko jednego obszycia). Miłej pracy i pozdrawiam
03.08.2018 - 05:37
![]() Cimarron wrote:
Cimarron wrote:
Exquisite...absolutely gorgeous.
24.07.2016 - 08:43Barbara wrote:
How many balls of each yarn is required to knit this?
21.06.2016 - 04:23DROPS Design answered:
Dear Barbara, you will find the total weight of yarn required in each size under tab "Materials", eg in size XS, you need 250 g Baby Alpaca Silk / 50 g a ball = 5 balls + 125 g Kid-Silk / 25 g a ball = 5 balls. Happy knitting!
21.06.2016 - 08:44Barbara wrote:
I wish the pattern indicated how many balls of each yarn is required
21.06.2016 - 04:22
![]() C. Martin wrote:
C. Martin wrote:
Pour ma taille, on préconise 6 pel. baby alpaca silk soit 1002m de fil, et 3 pel. kid silk soit 600m de fil et tricoter les deux fils ensemble. Quelle prodigieuse équation mathématique permettrait ce miracle ? Fort mécontente.
28.02.2013 - 16:02DROPS Design answered:
Chère Madame Martin, DROPS Kid-Silk est présentée en pelote de 25 g pour environ 200 m, donc 125 g = 5 pelotes soit env 1000 m, et 150 g = 6 pelotes soit env 1200 m. Bon tricot !
28.02.2013 - 16:12
![]() Linda wrote:
Linda wrote:
Delicate and feminine, this would be fun to knit up.
26.01.2012 - 16:05
![]() Kjersti Danielsen wrote:
Kjersti Danielsen wrote:
Virkelig nydelig! som en myk sommerdrøm:)
14.01.2012 - 19:11
|
|||||||||||||
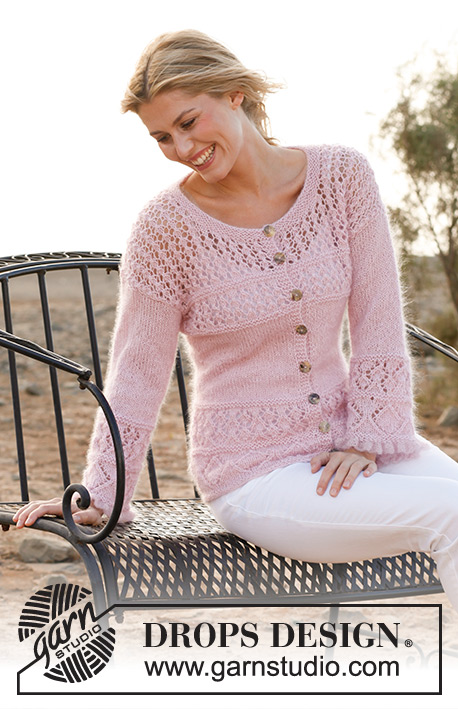
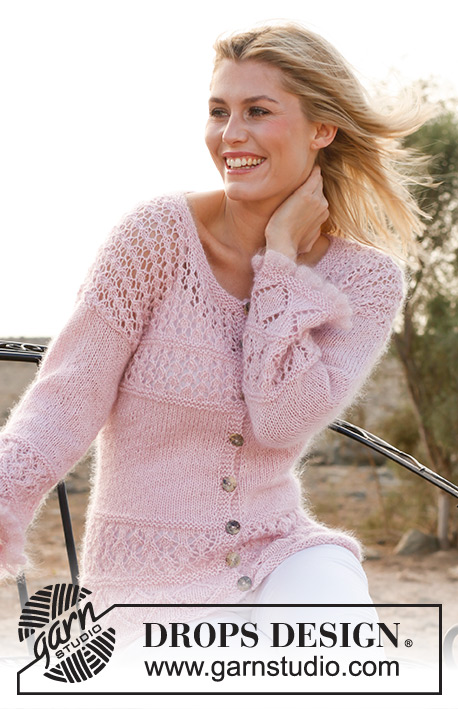
Lacy Dream#lacydreamcardigan |
|||||||||||||
 |
 |
||||||||||||
Knitted DROPS jacket in ”BabyAlpaca Silk” and ”Kid-Silk” with lace pattern. Size: XS - XXXL.
DROPS 137-18 |
|||||||||||||
|
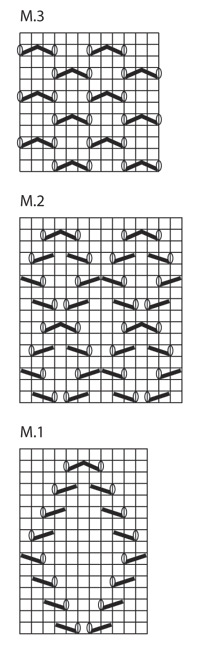
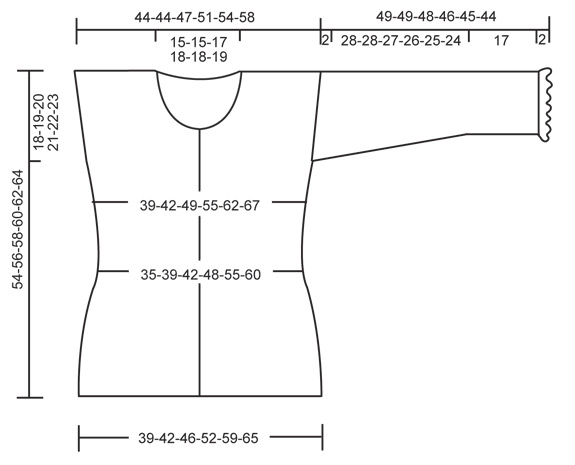
PATTERN: See diagrams M.1, M.2 and M.3. Diagrams show pattern from RS. GARTER ST (back and forth on needle): K all rows. BUTTON HOLES: Cast off for button holes on right band from RS. 1 BUTTON HOLE = K tog second and third st from mid front and make 1 YO. Cast off for button holes when piece measures: SIZE XS: 8, 14, 19, 25, 31 and 37 cm. SIZE S/M: 8, 14, 20, 26, 32 and 38 cm. SIZE L: 8, 15, 21, 27, 33 and 39 cm. SIZE XL: 8, 15, 22, 28, 34 and 40 cm. SIZE XXL: 8, 15, 22, 28, 34 and 41 cm. SIZE XXXL: 8, 15, 22, 29, 36 and 43 cm. NOTE: Also cast off for 1 button hole on neck edge. -------------------------------------------------------- BODY: Worked back and forth on circular needle from mid front. Cast on 140-151-162-184-206-228 sts (incl 4 band sts in each side) on circular needle size 4 mm with 1 thread BabyAlpaca Silk and 1 thread Kid-Silk. K 3 rows (1st row = WS). Switch to circular needle size 5 mm. Work 2 rows in stocking st with 4 band sts in each side worked in GARTER ST until finished measurements – see explanation above. Then work diagram M.1 with 4 band sts in each side. When diagram M.1 has been worked, K 1 row from RS while AT THE SAME TIME dec 6-3-7-8-9-10 sts evenly (do not dec over band sts) = 134-148-155-176-197-218 sts. Then K 3 rows back and forth (= 2 ridges) and 2 rows in stocking st. AT THE SAME TIME when piece measures 8 cm, beg to cast off for BUTTON HOLES – see explanation above! Then work diagram M.2 with 4 band sts in each side. When diagram M.2 has been worked, K 1 row from RS while at the same time dec 6-8-3-6-3-6 sts evenly (do not dec over band sts) = 128-140-152-170-194-212 sts. K 3 rows back and forth over all sts, piece now measures approx. 20 cm. Continue in stocking st. Insert 2 markers in the piece; 34-37-40-44-50-55 sts in from each side (= 60-66-72-82-94-102 sts between markers on back piece). When piece measures 21 cm, inc 1 st on each side of both markers. Repeat inc every 6th-6th-4th-4th-4th-4th row a total of 3-3-6-6-6-6 times = 140-152-176-194-218-236 sts. At the same time when piece measures approx. 28-29-30-31-32-33 cm (adjust so that next row is from WS), K 3 rows back and forth. Then work 2 rows in stocking st before continuing with diagram M.3 with 4 band sts in each side as before. When diagram M.3 has been worked 1 time vertically, K 2 rows back and forth (1st row = RS). Work next row as follows from RS: K 35-38-43-47-52-57 sts, cast off 4-4-6-6-8-8 sts for armhole, K 62-68-78-88-98-106 sts, cast off 4-4-6-6-8-8 sts for armhole and K 35-38-43-47-52-57 sts. Piece now measures approx. 36-37-38-39-40-41 cm. Finish each part separately. LEFT FRONT PIECE: = 35-38-43-47-52-57 sts. READ ALL OF THE FOLLOWING SECTION BEFORE CONTINUING! PATTERN: K 1 row from WS, K 1 row from RS and K 1 row from WS. Continue with diagram M.3 until finished measurements with 1 edge st towards the armhole and 4 band sts towards mid front (work the sts that do not fit diagram M.3 towards armhole in stocking st). ARMHOLES: At the same time on 1st row from the side, dec 1 st for armhole (there are no dec in size S). Repeat dec on every other row 0-0-1-3-4-5 more times = 35-37-41-43-47-51 sts. BROAD SHOULDER: When piece measures 2-3-4-5-6-7 cm (after dividing for armhole, i.e. 2 cm after armhole dec are done), inc 1 st inside edge st towards armhole by making 1 YO. On next row work YOs twisted to avoid holes (i.e. work in back loop of st instead of front). Repeat inc every 2 cm a total of 6-4-3-3-2-2 times – work the inc sts in stocking st until they fit diagram M.3. NECK DEC: At the same time when piece measures 42-44-45-47-48-50 cm, slip the outermost 10-10-11-11-11-13 sts towards mid front on a stitch holder for neck (work them from WS before slipping them on the stitch holder). Then cast off at beg of every row from neck (= WS): 2 sts 2 times and 1 st 3 times (work in stocking st over the sts that do not fit the pattern when dec). After all inc and dec, 24-24-26-28-31-33 sts remain on needle. When piece measures 54-56-58-60-62-64 cm, cast off all sts. RIGHT FRONT PIECE: Work as left front piece but reversed – remember button holes. BACK PIECE: = 62-68-78-88-98-106 sts. Work pattern, cast off for armholes and inc for shoulder in each side as on front piece. After all inc and dec, there are 74-74-80-86-92-98 sts on needle. When piece measures 52-54-56-58-60-62 cm, cast off the middle 24-24-26-28-28-30 sts for neck and finish each shoulder separately. Continue to cast off 1 st on next row towards the neck = 24-24-26-28-31-33 sts remain on the shoulder. Cast off when piece measures 54-56-58-60-62-64 cm. SLEEVE: Worked back and forth on circular needle. Cast on 164-172-184-184-192-200 sts on circular needle size 4 mm with only 1 thread Kid-Silk. K 3 rows back and forth (1st row = WS). On next row K all sts tog 2 by 2 = 82-86-92-92-96-100 sts. P 1 row from WS. Add 1 thread BabyAlpaca Silk (so that there is 1 thread BabyAlpaca Silk and 1 thread Kid-Silk) and K all sts tog 2 by 2 again = 41-43-46-46-48-50 sts. K 3 rows back and forth. Switch to circular needle size 5 mm and work 2 rows in stocking st. Continue as follows: 1 edge st in garter st, 3-4-0-0-1-2 sts in stocking st, work diagram M.1 3-3-4-4-4-4 times, 3-4-0-0-1-2 sts in stocking st and 1 edge st in garter st. When diagram M.1 has been worked 1 time vertically, K 1 row from RS while at the same time inc 3-1-5-5-3-1 sts evenly = 44-44-51-51-51-51 sts. K 3 rows back and forth, then 2 rows in stocking st before working diagram M.2 1 time vertically with 1 edge st in each side in garter st. Continue with K 4 rows back and forth (= 2 ridges), then work in stocking st until finished measurements. AT THE SAME TIME on 1st row in stocking st (piece now measures approx. 19 cm), inc 1 st in each side. Repeat inc every 4-3-3½-3-2-2 cm 7-9-8-9-11-12 times = 58-62-67-69-73-75 sts. When piece measures 47-47-46-45-44-43 cm (shorter measurements in the larger sizes because of broader shoulder width), cast off 5 sts at beg of every row 2 times in each side, then cast off all sts. Piece measures approx. 49-49-48-47-46-45 cm. NECK EDGE: Sew the shoulder seams. Knit up approx. 90 to 110 sts around the neck (incl sts on stitch holders at the front) on circular needle size 4 mm with 1 thread BabyAlpaca Silk + 1 thread Kid-Silk. K 7 rows back and forth – at the same on 4th row cast off for 1 button hole over the others on band. Loosely cast off from RS. ASSEMBLY: Sew sleeve seams inside 1 edge st and sew in the sleeves. Sew on buttons. |
|||||||||||||
Diagram explanations |
|||||||||||||
|
|||||||||||||
 |
|||||||||||||
 |
|||||||||||||
Have you finished this pattern?Tag your pictures with #dropspattern #lacydreamcardigan or submit them to the #dropsfan gallery. Do you need help with this pattern?You'll find 12 tutorial videos, a Comments/Questions area and more by visiting the pattern on garnstudio.com. © 1982-2026 DROPS Design A/S. We reserve all rights. This document, including all its sub-sections, has copyrights. Read more about what you can do with our patterns at the bottom of each pattern on our site. |
|||||||||||||


With over 40 years in knitting and crochet design, DROPS Design offers one of the most extensive collections of free patterns on the internet - translated to 17 languages. As of today we count 324 catalogues and 12290 patterns translated into English (UK/cm).
We work hard to bring you the best knitting and crochet have to offer, inspiration and advice as well as great quality yarns at incredible prices! Would you like to use our patterns for other than personal use? You can read what you are allowed to do in the Copyright text at the bottom of all our patterns. Happy crafting!
Post a comment to pattern DROPS 137-18
We would love to hear what you have to say about this pattern!
If you want to leave a question, please make sure you select the correct category in the form below, to speed up the answering process. Required fields are marked *.