
Popular categories
Looking for a yarn?


Comments / Questions (86)
![]() Ineke Baas wrote:
Ineke Baas wrote:
Klopt het dat er voor dit patroon voor maat M maar 150 gr garen nodig is? Lijkt mij erg weinig.
13.09.2012 - 13:08DROPS Design answered:
Ja, dat klopt. De Kid-Silk is 25gr per bol. 150 gr is ongeveer 1200m.
13.09.2012 - 16:24
![]() Pia wrote:
Pia wrote:
Ang ærme: skal de aflukkede masker v ærmegab (altså under armen) blot syes sammen? Der står at man ikke samler m op der, stemmer det? Vh
10.09.2012 - 12:17DROPS Design answered:
Ja det syr du bare sammen bagefter.
13.12.2012 - 11:11
![]() Francis Bruinsma wrote:
Francis Bruinsma wrote:
Fout bij patroon 138-21 ? Mindering aan de halskant van rechter-en linkervoorpand klopt niet. Er staat 12 keer 4 steken voor maat L.Dat is te veel. Als je 12 keer 1 steek doet krijg je bijna een V-hals.het moet toch rond lopen, die halsuitsnijding. Hoe maak je nu de ronde hals?
19.06.2012 - 20:23DROPS Design answered:
Ik heb het patroon vergeleken met het origineel en het was inderdaad fout. Het moet: 1 keer 8-10-12-12-14-11 st zijn. Het is aangepast.
20.06.2012 - 10:20
![]() Gro wrote:
Gro wrote:
Strikkefastheten står oppgitt som 23m x 10 p i glattstrikk, mens jakken skal strikkes i rillestrikk Stemmer dette?
08.06.2012 - 19:21DROPS Design answered:
Ja, det stemmer.
02.07.2012 - 12:19
![]() BEAUPERE wrote:
BEAUPERE wrote:
Le dos et devant tricoté en même temps apres 6 cm, placer les marqueurs à 46m faut-il les placer côté endroit du travail ? AUGMENTATIONS laisser 1m avant le marqueur ok mais apres avoir dépassé le marqueur je fais une autre augment. mais là je laisse 1m après le marqueur ? = 4 augmenté à chaque fois Merci de m'expliquer bb
02.06.2012 - 00:13DROPS Design answered:
On place 2 marqueurs pour repérer les côtés : "à 42-46-51-56-63-70 m de chaque côté (= 84-92-102-112-126-140 m entre les marqueurs pour le dos". Vous augmentez 1 m de chaque côté des 2 marqueurs= 4 augm. par rang. Pour augmenter, vous faites 1 jeté 1 m avant le marqueur, tricotez 2 m (le marqueur se trouve entre ces 2 m), et encore 1 jeté = vous avez 2 m entre chaque augmentation sur les côtés x 2 côtés = 4 augmentations.
02.06.2012 - 09:39
![]() Liinao wrote:
Liinao wrote:
Just finished knitting this. Good pattern, beautiful one! Just lõpetasin selle mustri järgi kudumise. Muster on hea ja tulemus väga kaunis!
01.06.2012 - 19:14
![]() Anita Højer Bernberg Christensen wrote:
Anita Højer Bernberg Christensen wrote:
Hej! Har ikke den store strikke erfaring, men har dog alligevel kastet mig ud i denne udfordring. Er nået til, hvor jeg i opskriften har lukket af til ærmgab, og jeg skal nu strikke videre på ryggen. Skal jeg så bryde garnet, eller skal jeg bare starte på en ny nøgle...altså, hvordan kommer jeg videre?
08.05.2012 - 23:24DROPS Design answered:
Du kan vaelge at strikke videre på det forstk der du har garnet, eller ta en ny nøgle og strikke bakstk först, vilket du har lyst til.
10.05.2012 - 02:07Susan wrote:
Simplicity and classic in design. LOVE the color!
02.03.2012 - 10:51
![]() Susanna Stalder wrote:
Susanna Stalder wrote:
Einfach und weich...Wolke 7
21.01.2012 - 09:54
![]() Saara wrote:
Saara wrote:
Beautiful! Just what I like to wear at work.
16.01.2012 - 15:30
|
|
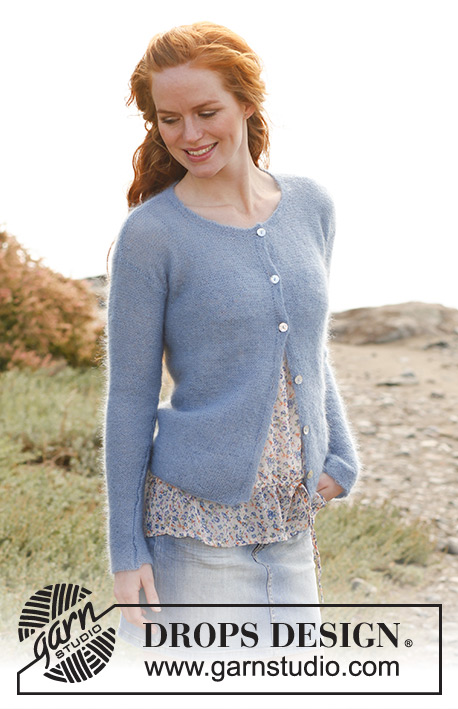
Morning Sky#morningskycardigan |
|
 |
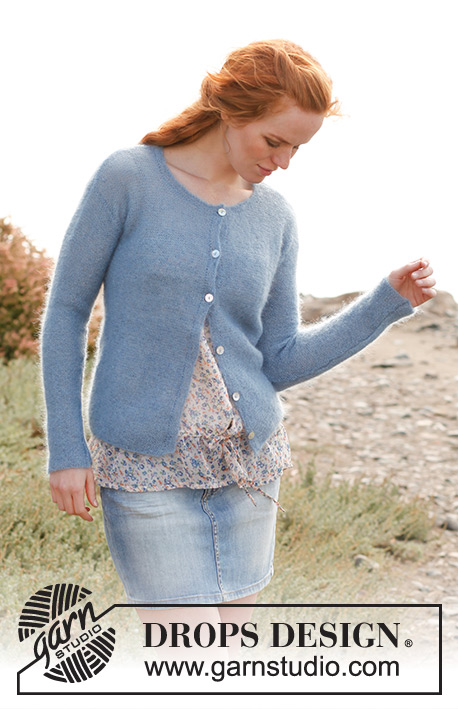 |
Knitted DROPS jacket in garter st in ”Kid-Silk”. Size S-XXXL.
DROPS 138-21 |
|
|
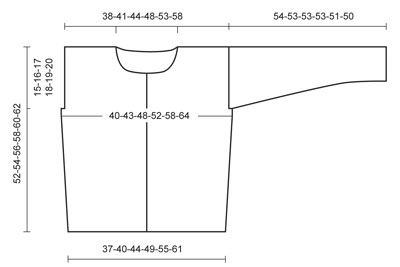
GARTER ST (back and forth on needle): K all rows. INCREASE TIP: Inc 1 st on each side of every marker as follows: Work until 1 st remains before marker, make 1 YO, K 2 (marker is between these sts), make 1 YO. On next row K YOs twisted (i.e. work in back loop of st instead of front) to avoid holes. -------------------------------------------------------- BODY: Worked in garter st - See explanation above - back and forth on circular needle from mid front. Cast on 168-184-204-224-252-280 sts on circular needle size 3 mm with 2 threads Kid-Silk (to avoid a tight cast on edge). Then work back and forth with 1 thread Kid-Silk (1st row = RS). REMEMBER THE KNITTING TENSION! When piece measures 6-6-6-6-7-7 cm, insert 2 markers in the piece; 42-46-51-56-63-70 sts in from each side (= 84-92-102-112-126-140 sts between markers on back piece). Move the markers upwards when working. On next row, inc 1 st on each side of each marker - Read INCREASE TIP above = 4 new sts. Repeat inc every 8-8-8-9-9-9 cm a total of 4 times = 184-200-220-240-268-296 sts. Continue to work until piece measures 37-38-39-40-41-42 cm. On next row cast off 2-3-4-5-6-7 sts for armholes on each side of every marker = 4-6-8-10-12-14 cast off sts in each side. Now divide the piece and finish each part separately. BACK PIECE: = 88-94-102-110-122-134 sts. Remove the markers in the sides and insert new markers at beg and end of row (where to knit up sleeves later). Continue in garter st until piece measures 50-52-54-56-58-60 cm. On next row from RS, cast off the middle 32-36-38-40-42-42 sts for neck and finish each shoulder separately. Continue to cast off 2 sts on next row from neck = 26-27-30-33-38-44 sts remain on the shoulder. Loosely cast off all sts when piece measures 52-54-56-58-60-62 cm. RIGHT FRONT PIECE: = 44-47-51-55-61-67 sts. Insert a marker at end of row (where to knit up sleeves later). Continue in garter st until piece measures 44-46-47-49-50-52 cm. Then cast off for neck at the beg of every row from RS (= every other row) as follows: Cast off 8-10-12-12-14-14 sts 1 time, 3 sts 1 time, and 2 sts 2 times. Then cast off 1 st every other row from RS (= every 4th row) 3-3-2-3-2-2 times = 26-27-30-33-38-44 sts remain on shoulder. Loosely cast off all sts when piece measures 52-54-56-58-60-62 cm. LEFT FRONT PIECE: Work as right front piece but reversed. ASSEMBLY: Sew the shoulder seams tog. SLEEVE: Worked back and forth on needle as follows: Knit up from RS approx. 70 to 100 sts between markers along one armhole (NOTE: Do not knit up sts over the cast off sts for armhole). On next row adjust no of sts to 68-74-78-82-86-92. Then work in garter st. When piece measures 3-3-3-3-4-4 cm, dec 1 st (by K 2 sts tog) in each side of piece. Repeat dec every 4-3½-3-3-2½-2 cm a total of 12-14-15-16-17-19 times = 44-46-48-50-52-54 sts. Continue in garter st until piece measures 54-53-53-53-51-50 cm (shorter measurements in the larger sizes because of broader shoulder width), loosely cast off all sts. Sew sleeve seam inside 1 edge st, NOTE: The top part of the sleeve should be sewn to the cast off edge on each side of back and front piece. Knit up another sleeve in the other side of piece. RIGHT BAND: Worked back and forth on needle as follows: Knit up from RS approx. 100 to 120 sts inside 1 edge st along mid front on right front piece. K 1 row from WS while AT THE SAME TIME adjusting no of sts to 104-109-109-118-118-118. On next row from RS, cast off for 5-5-5-6-6-6 button holes as follows: K 4, * K tog the next 2 sts, make 1 YO, K 18-19-19-17-17-17 *, repeat from *-* a total of 5-5-5-6-6-6 times. On next row K the YOs. Continue in garter st until band measures 2-2-2-3-3-3 cm, loosely cast off all sts. LEFT BAND: Work as right band but without button holes. NECK EDGE: Worked back and forth on needle as follows: Knit up from RS approx. 90 to 110 sts around the neck (also over bands). K 1 row from WS while AT THE SAME TIME adjusting no of sts to 92-96-100-104-108-112. On next row from RS, cast off for the last button hole as follows: K 3-3-3-4-4-4, K tog the next 2 sts, make 1 YO, K the rest of row. On next row K the YO. Continue in garter st until neck edge measures 2 cm, loosely cast off all sts. Sew the buttons on to the left band. |
|
 |
|
Have you finished this pattern?Tag your pictures with #dropspattern #morningskycardigan or submit them to the #dropsfan gallery. Do you need help with this pattern?You'll find 14 tutorial videos, a Comments/Questions area and more by visiting the pattern on garnstudio.com. © 1982-2026 DROPS Design A/S. We reserve all rights. This document, including all its sub-sections, has copyrights. Read more about what you can do with our patterns at the bottom of each pattern on our site. |
|


With over 40 years in knitting and crochet design, DROPS Design offers one of the most extensive collections of free patterns on the internet - translated to 17 languages. As of today we count 324 catalogues and 12290 patterns translated into English (UK/cm).
We work hard to bring you the best knitting and crochet have to offer, inspiration and advice as well as great quality yarns at incredible prices! Would you like to use our patterns for other than personal use? You can read what you are allowed to do in the Copyright text at the bottom of all our patterns. Happy crafting!
Post a comment to pattern DROPS 138-21
We would love to hear what you have to say about this pattern!
If you want to leave a question, please make sure you select the correct category in the form below, to speed up the answering process. Required fields are marked *.