
Popular categories
Looking for a yarn?


Comments / Questions (10)
![]() Nellie Wenker wrote:
Nellie Wenker wrote:
Ik heb het patroon M2 meerdere malen uitgeprobeerd maar als ik er twee samen brei kom ik niet uit. Ik brei ze dus wel gedraaid maar niet samen. Prachtig vestje.
18.05.2025 - 09:24
![]() Hanneke wrote:
Hanneke wrote:
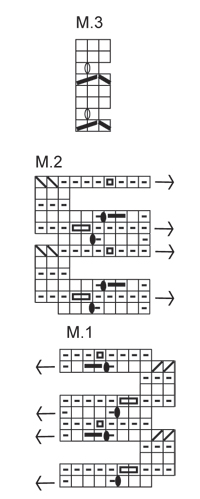
As to M3, you answered to Sheryl that there are short rows and you should turn after M3 at row 3 and 9. But there are no arrows in the pattern, as there are in M1 and M2. So what is the correct way to knit?
25.03.2025 - 11:00
![]() Sheryl wrote:
Sheryl wrote:
I do not understand chart M.3. Are the first 3 stitches only worked for 8 rows? Are these short rows?
29.03.2021 - 17:34DROPS Design answered:
Dear Shery, yes, those rows are short rows, i.e: in row 3 and 9 you turn back after 3 stitches. This is done, so the edging will lie down nicely. Happy Knitting!
30.03.2021 - 11:20
![]() Birgit Wolden wrote:
Birgit Wolden wrote:
Får ikke oppskriften på M2 til å stemme, gjelder kanskje M1 også?
04.07.2013 - 09:19DROPS Design answered:
Hej Birgit. Mönstret skulle stemme, men kan du maaske sige hvor det gaar galt for dig?
04.07.2013 - 11:51
![]() Karen Walker wrote:
Karen Walker wrote:
Drops 137-24. Diagram M.3 does not work for me. Rows 6 and 12 want you to K the first YO and slip the second. However, the YOs are in Rows 3 and 9. Is there an error in the diagram???
19.06.2012 - 22:29DROPS Design answered:
Dear Mrs Walker, you mean M.1 and M.2 ? row 3 has a yo, but then you work 2 shortened rows on the first 3 sts, so that you will work the yo from 3rd row only on 6th row. (same for row 9 and 12) Happy Knitting !
06.12.2012 - 14:36
![]() Ulla Andersson wrote:
Ulla Andersson wrote:
Snygg, snygg!
07.01.2012 - 10:27
![]() Lichterfeld wrote:
Lichterfeld wrote:
Schön!!!
04.01.2012 - 18:04
![]() Christel wrote:
Christel wrote:
Riktigt söt!
02.01.2012 - 19:22
![]() Clausen wrote:
Clausen wrote:
Kedelig
12.12.2011 - 23:25Stéphanie wrote:
Personnellement je n'aime pas les manches trop lousse(trop grande).
08.12.2011 - 19:50
|
||||||||||||||||||||||||||||||||||
Roseanna#roseannacardigan |
||||||||||||||||||||||||||||||||||
 |
 |
|||||||||||||||||||||||||||||||||
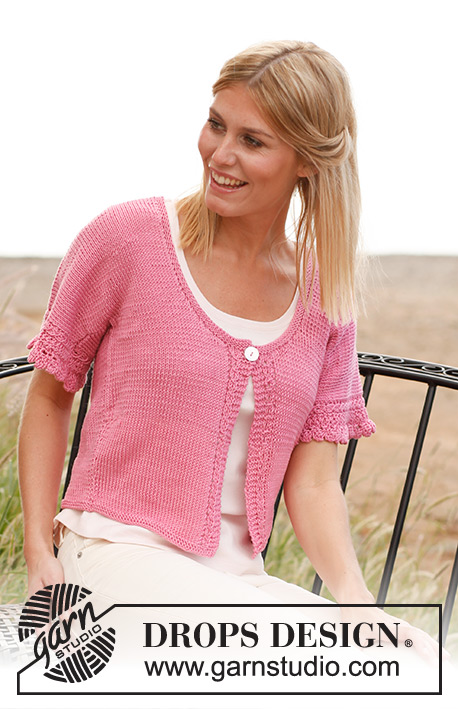
Knitted DROPS jacket with a small ruffle at the end of sleeves in ”Cotton Light”. Size: S - XXXL
DROPS 137-24 |
||||||||||||||||||||||||||||||||||
|
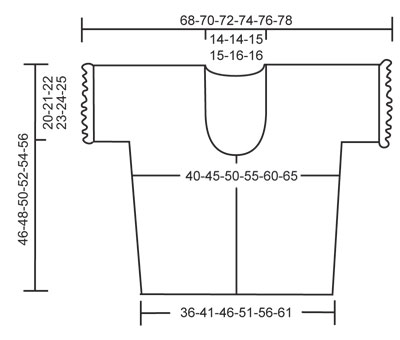
GARTER ST (back and forth on needle): K all rows. 1 ridge = 2 rows K. DECREASE TIP (applies to neck): All dec are done from RS inside 1 st. Dec at beg of row as follows (applies to right shoulder): K 1, K 2 twisted tog (i.e. work in back loop of st instead of front), work the rest of row. Dec at end of row as follows (applies to left shoulder): Work until 3 sts remain, K 2 tog, K 1. PATTERN: See diagrams M.1, M.2 and M.3. Diagrams show pattern from RS. In diagram M.1 and M.2, continue to work the rows marked with an arrow, on the other rows; turn and work back (= short rows). -------------------------------------------------------- JACKET: First work right front piece and inc for sleeve, then work left front piece and sleeve, then slip these tog and work down back piece. Worked back and forth on a circular needle to make room for all the sts. RIGHT FRONT PIECE: Cast on 43-48-53-59-64-69 sts (incl 4 band sts towards mid front and 1 edge st in the side) on circular needle size 3 mm with Cotton Light. Work 6 rows in GARTER ST - see explanation above! Switch to circular needle size 4 mm and continue as follows (1st row = RS): 4 band sts in garter st, diagram M.3 one time, 1 st in garter st, then work in stocking st until 1 edge st which is worked in garter st. REMEMBER THE KNITTING TENSION! When piece measures 10 cm, inc 1 st in the side. Repeat inc every 4-4-4½-4½-5-5 cm a total of 4 times = 47-52-57-63-68-73 sts. READ ALL OF THE FOLLOWING SECTION BEFORE CONTINUING! BUTTON HOLE: When piece measures 21-22-23-24-25-26 cm, cast off for 1 button hole (from RS) on band. This is done by K tog 2nd and 3rd st from mid front tog and then making 1 YO. NECK: When piece measures 22-23-24-25-26-27 cm, slip the 8 sts towards mid front on a stitch holder for neck. Then cast off for neck at the beg of every row from mid front: 3 sts 1 time, 2 sts 2 times and 1 st 4-4-5-5-6-6 times. SLEEVE: At the same time when piece measures 26-27-28-29-30-31 cm, cast on 28-25-23-19-17-15 new sts for sleeve at the end of next row towards the side (fewer sts in the larger sizes because of broader shoulder width). P 1 row. Work next row as follows: Work in stocking st until 12 sts remain, 1 st in garter st, diagram M.3 and then diagram M.2 over the outermost 8 sts (no of sts in diagram M.2 will vary between 8 and 10). Continue the pattern like this. After all cast offs for neck, 56-58-60-62-64-67 sts remain on needle after 1 whole repetition of diagram M.2. When piece measures 46-48-50-52-54-56 cm, insert a marker (= mid on top of shoulder). Work 2 cm, then slip sts on a stitch holder - finish after 1 row from WS (mark where you are in diagram M.2). LEFT FRONT PIECE: Cast on and work as right piece but reversed. Instead of diagram M.2 work diagram M.1 at the end of sleeve. BACK PIECE: 1st row = RS. Work sts from left front piece, cast on 30-30-32-32-34-34 new sts (= back of neck) and work right front piece on to circular needle = a total of 142-146-152-156-162-168 sts (+ maybe 2-4 sts depending on where you are in diagram M.1 and M.2). Work in stocking st with pattern as before at the end in each side. When piece measures 20-21-22-23-24-25 cm from marker on shoulder, cast off sleeve sts in each side, cast off at the beg of the next 2 rows (= 28-25-23-19-17-15 sts + maybe 2), 86-96-106-118-128-138 sts should remain on needle. Work in stocking st with 1 edge st in garter st in each side. When piece measures 4-5-5-6-5-5 cm from where sleeve sts were cast off, dec 1 st in each side. Repeat dec every 4-4-4½-4½-5-5 cm a total of 4 times = 78-88-98-110-120-130 sts. When piece measures 44-46-48-50-52-54 cm from marker on shoulder, switch to circular needle size 3 mm. Work 6 rows in garter st, LOOSELY cast off - use circular needle size 4 mm when casting off. NECK EDGE: Knit up 140 to 190 sts (from RS, incl sts on stitch holders at the front) around the neck on circular needle size 3 mm with Cotton Light. K 5 rows back and forth, then cast off. ASSEMBLY: Sew sleeve and side seams in one inside 1 edge st. Sew on button. |
||||||||||||||||||||||||||||||||||
Diagram explanations |
||||||||||||||||||||||||||||||||||
|
||||||||||||||||||||||||||||||||||
 |
||||||||||||||||||||||||||||||||||
 |
||||||||||||||||||||||||||||||||||
Have you finished this pattern?Tag your pictures with #dropspattern #roseannacardigan or submit them to the #dropsfan gallery. Do you need help with this pattern?You'll find 18 tutorial videos, a Comments/Questions area and more by visiting the pattern on garnstudio.com. © 1982-2026 DROPS Design A/S. We reserve all rights. This document, including all its sub-sections, has copyrights. Read more about what you can do with our patterns at the bottom of each pattern on our site. |
||||||||||||||||||||||||||||||||||


With over 40 years in knitting and crochet design, DROPS Design offers one of the most extensive collections of free patterns on the internet - translated to 17 languages. As of today we count 324 catalogues and 12290 patterns translated into English (UK/cm).
We work hard to bring you the best knitting and crochet have to offer, inspiration and advice as well as great quality yarns at incredible prices! Would you like to use our patterns for other than personal use? You can read what you are allowed to do in the Copyright text at the bottom of all our patterns. Happy crafting!
Post a comment to pattern DROPS 137-24
We would love to hear what you have to say about this pattern!
If you want to leave a question, please make sure you select the correct category in the form below, to speed up the answering process. Required fields are marked *.