
Popular categories
Looking for a yarn?


Comments / Questions (62)
![]() Teresita wrote:
Teresita wrote:
No entiendo el diagrama. Monto los puntos del hombro y voy haciendo los aumentos correspondientes?
23.03.2026 - 11:55DROPS Design answered:
Hola Teresita, el diagrama es solo el esquema de medidas; solo indica las medidas finales de la prenda para las diferentes tallas y no se usa al trabajar el patrón. El top se trabaja por separado, el delantero y la espalda hasta la sisa y se colocan todos los puntos en la aguja y se termina en redondo. Comienzas con las secciones HOMBRO DERECHO e HOMBRO IZQUIERDO y luego los juntas y trabajas el DELANTERO.
30.03.2026 - 00:11
![]() Larissa Hänsel-Saalbach wrote:
Larissa Hänsel-Saalbach wrote:
Ich vermisse in der Anleitung das linke und rechte Vorderteil. Oder hab ich es übersehen?
27.10.2024 - 16:52DROPS Design answered:
Liebe Frau Hänsel-Saalbach, das Vorderteil wird zuerst in 2 Teilen beschrieben: RECHTE SCHULTER dann LINKE SCHULTER die separat gestrickt werden, dann strickt man beide Schulter/Vorderteil zusammen wie unter RÛCKENTEIL beschrieben. Viel Spaß beim Stricken!
28.10.2024 - 09:41
![]() Diana wrote:
Diana wrote:
Hej! Jag undrar om Drop Bomull-Lin eller Drops Belle går bra att använda till detta mönster eftersom Drop Lin har utgått? Tack
12.05.2023 - 20:46DROPS Design answered:
Hei Diana. Du kan bruke DROPS Belle. DROPS Bomull-Lin er litt tykkere. Bruk vår garnkalkulator for å finne ut av hvor mye garn du trenger i den str. du skal strikke. Husk å sjekke strikkefastheten. mvh DROPS Design
15.05.2023 - 11:35
![]() ANNA MARIA GUZZI wrote:
ANNA MARIA GUZZI wrote:
Per favore posso avere il peso e i metri del Lin anche se fuori prodizione ? grazie
09.05.2023 - 07:29DROPS Design answered:
Buonasera Anna Maria, 50 g di Lin corrispondono a 120 m circa. Buon lavoro!
11.05.2023 - 21:37
![]() ANNA MARIA GUZZI wrote:
ANNA MARIA GUZZI wrote:
Per favore cosa consigliate come sostituzione al drops lin di questa scheda ? Grazie mille
06.05.2023 - 18:36DROPS Design answered:
Buonasera Anna Maria, può provare con DROPS Belle, Muskat o Cotton Light. Buon lavoro!
06.05.2023 - 22:19
![]() Ingrid Clarke Kvåle wrote:
Ingrid Clarke Kvåle wrote:
Ja, selfølgelig 😅 tenkte ikke på det. Tusen takk for svar. Mvh Ingrid
10.06.2022 - 15:46
![]() Ingrid Clarke Kvåle wrote:
Ingrid Clarke Kvåle wrote:
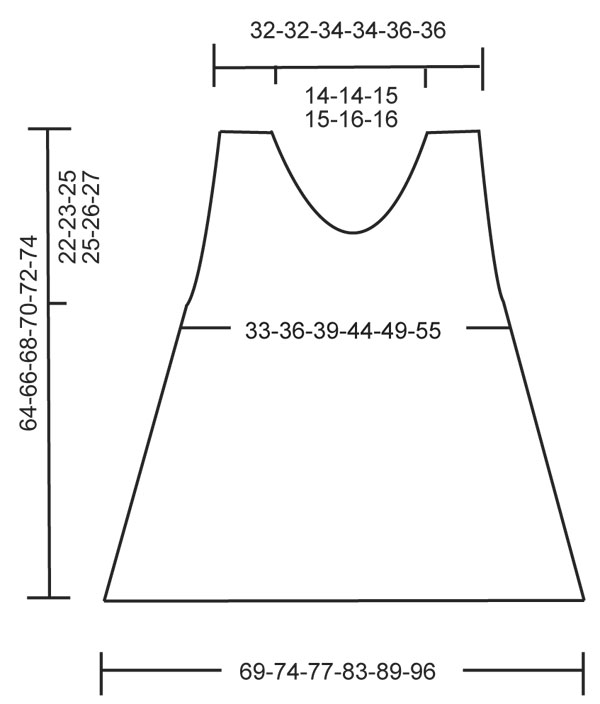
Hei. På bilde vises det at toppen er lenger på sidene, men i oppskriften og mønstertegningen, viser den rett linje. Er det feil bilde til mønster? Mvh Ingrid
08.06.2022 - 22:18DROPS Design answered:
Hej Ingrid, alle udtagninger i hver side er tegnet ind i måleskitsen så det bliver A-form, når du lader spidserne i hver side falde ned vil de automatisk blive længere som du kan se på billedet :)
10.06.2022 - 08:32
![]() Christiane Blaser wrote:
Christiane Blaser wrote:
Merci beaucoup pour la réponse rapide!
08.06.2020 - 13:31
![]() Christiane Blaser wrote:
Christiane Blaser wrote:
Le schéma ne correspond pas à la photo: le modèle photographié montre une tunique asymétrique, or ni le schéma ni les explications ne vont dans ce sens. Est-ce possible de savoir comment reproduire le modèle asymétrique?
06.06.2020 - 16:11DROPS Design answered:
Bonjour Mme Blaser, la forme asymétrique des côtés s'obtient par les augmentations faites sur les côtés (34 à 38 fois tous les 3 tours), on obtient donc une forme trapèze très large en bas, comme le montre le schéma, et ces "pointes" sur les côtés vont retomber comme sur la photo. Bon tricot!
08.06.2020 - 08:30
![]() Edith wrote:
Edith wrote:
Hallo liebes Drops Team, stricke gerne nach euren Anleitungen, normal auch ohne Probleme, das einzigste wo ich immer dran verzweifeln sind. bei jeder 3. Runde wiederholen = 264-280-292-316-340-364 M. Nach ca. 64-66-68-70-72-74 cm locker abk. Heißt das jetzt 1 Rd mit Zunahme, eine Rd ohne Zunahme im Wechsel, oder 1 Rd mit Zunahme, 2 Rd ohne Zunahme im Wechsel Danke für euer bemühen Lg Edith
27.02.2019 - 12:07DROPS Design answered:
Liebe Edith, wenn Sie in jeder 3. Runde zunehmen, stricken Sie 1 Runde mit Zunahmen, 2 Runden ohne Zunahmen, und diese 3 Runden so wiederholen. Viel Spaß beim stricken!
27.02.2019 - 12:21
|
|
Madeline#madelinesinglet |
|
 |
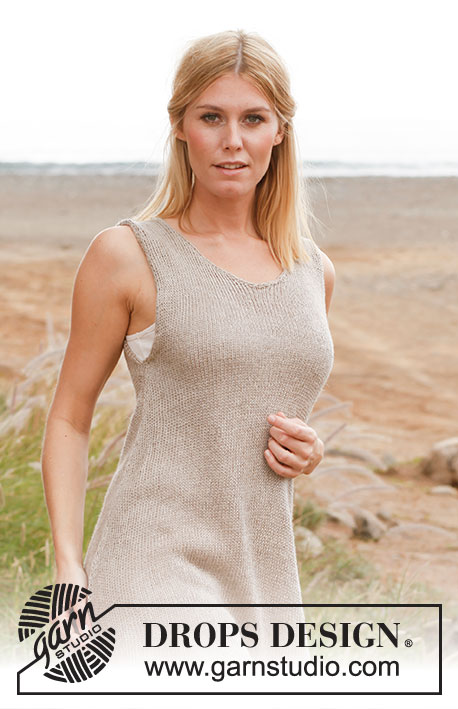 |
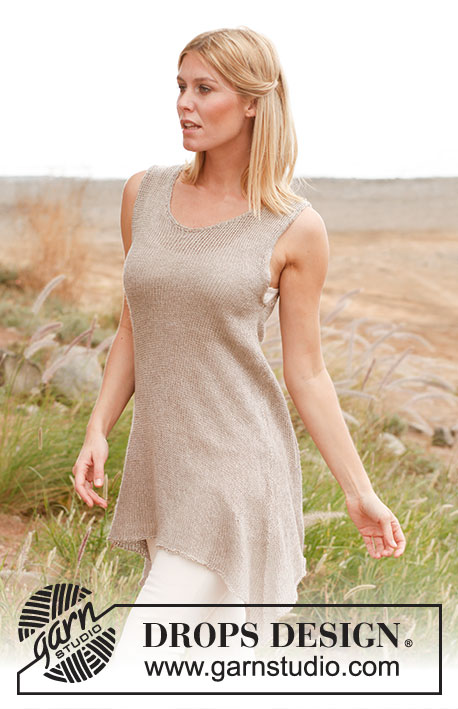
Knitted DROPS singlet in ”Lin”. Size: S - XXXL.
DROPS 136-7 |
|
|
INCREASE TIP 1: All inc are done from RS. Right shoulder: Inc 1 st by working 2 sts in last st. Inc 2 sts by making 1 YO before last st and then work 2 sts in last st. Left shoulder: Inc 1 st by working 2 sts in first st. Inc 2 sts by working 2 sts in first st and then make 1 YO. INCREASE TIP 2: Inc by making 1 YO on each side of st with marker in each side as follows: Work in stocking st until marker, 1 YO, work st with marker in stocking st, 1 YO. K YOs twisted on next row to avoid holes. -------------------------------------------------------- -------------------------------------------------------- SINGLET: The piece is worked top down. Front and back piece is worked back and forth separately down to armhole. Then all sts are slipped on the same circular needle and worked in the round. FRONT PIECE: Worked back and forth on circular needle, work first right shoulder up to and with neck inc. Then work left shoulder as right shoulder but with inc in the opposite side. RIGHT SHOULDER: Cast on 17-17-18-18-21-21 sts on circular needle size 5 mm with Lin. Work in stocking st. REMEMBER THE KNITTING TENSION! When piece measures 4 cm, inc for neck at the end of every row from RS as follows - read INCREASE TIP 1: 1 st 5-5-6-6-7-7 times and 2 sts 4 times = 30-30-32-32-36-36 sts. Put piece aside when all inc are done. LEFT SHOULDER: Work as right shoulder but with inc in the opposite side (i.e. beg of every row from RS). FRONT PIECE: Slip sts from right and left shoulder on to same needle = 60-60-64-64-72-72 sts. Continue back and forth in stocking st. When piece measures 21-19-20-15-15-11 cm, inc 1 st in each side for armholes, repeat inc every cm 0-3-4-9-10-15 more times = 62-68-74-84-94-104 sts. When all inc are done, the piece measures approx. 22-23-25-25-26-27 cm. Cut the thread and slip sts on a stitch holder. BACK PIECE: RIGHT SHOULDER: Cast on 17-17-18-18-21-21 sts on circular needle size 5 mm with Lin. Work 4 rows in stocking st, beg from RS. Cut the thread and put piece aside. LEFT SHOULDER: Cast on 17-17-18-18-21-21 sts on circular needle size 5 mm with Lin. Work 4 rows in stocking st, beg from RS, then cast on 26-26-28-28-30-30 sts at the end of next row from RS = 43-43-46-46-51-51 sts. Work sts from right shoulder on to same needle = 60-60-64-64-72-72 sts. Continue in stocking st. When piece measures 21-19-20-15-15-11 cm, inc for armholes in each side as on front piece = 62-68-74-84-94-104 sts. When all inc are done, the piece measures approx. 22-23-25-25-26-27 cm. BODY: Slip sts from front piece on to same circular needle as back piece = 124-136-148-168-188-208 sts. Now work in the round on circular needle, beg in one side. Insert a marker in a st in each side = 61-67-73-83-93-103 sts between sts with markers. Continue in stocking st, on next round inc 1 st on each side of each st with marker in each side - READ INCREASE TIP 2! Repeat inc every 3rd round 34-35-35-36-37-38 more times = 264-280-292-316-340-364 sts. LOOSELY cast off. The piece now measures approx. 64-66-68-70-72-74 cm, measured straight down from the shoulder. ASSEMBLY: Sew shoulder seams neatly tog with grafting/kitchener sts. CROCHET EDGE: Crochet an edge around the neck on hook size 5 mm as follows: 1 dc in edge mid back of neck, * 1 ch, skip approx. 1 cm, 1 dc *, repeat from *-* and finish with 1 ch and 1 sl st in first dc. Crochet the same way around the armholes. |
|
 |
|
Have you finished this pattern?Tag your pictures with #dropspattern #madelinesinglet or submit them to the #dropsfan gallery. Do you need help with this pattern?You'll find 14 tutorial videos, a Comments/Questions area and more by visiting the pattern on garnstudio.com. © 1982-2026 DROPS Design A/S. We reserve all rights. This document, including all its sub-sections, has copyrights. Read more about what you can do with our patterns at the bottom of each pattern on our site. |
|


With over 40 years in knitting and crochet design, DROPS Design offers one of the most extensive collections of free patterns on the internet - translated to 17 languages. As of today we count 325 catalogues and 12298 patterns translated into English (UK/cm).
We work hard to bring you the best knitting and crochet have to offer, inspiration and advice as well as great quality yarns at incredible prices! Would you like to use our patterns for other than personal use? You can read what you are allowed to do in the Copyright text at the bottom of all our patterns. Happy crafting!
Post a comment to pattern DROPS 136-7
We would love to hear what you have to say about this pattern!
If you want to leave a question, please make sure you select the correct category in the form below, to speed up the answering process. Required fields are marked *.