
Popular categories
Looking for a yarn?


Comments / Questions (232)
Marise wrote:
J'ai fait les augmentations de chaque côté des 39 mailles en attente; est-le bon endroit? Lorsque vous dites : Continuer en jersey, en allers et retours sur les 175 m restantes – EN MÊME TEMPS, continuer les augmentations comme avant aux 2 coins opposés aux mailles en attente (c'est-à-dire augmenter de chaque côté des mailles des coins en faisant 1 jeté tous les 2 rangs).
01.08.2014 - 17:42DROPS Design answered:
Bonjour Marise, les 39 m en attente sont pour l'encolure, on continue en allers et retours (début/fin de rang côté encolure), on continue à augmenter comme avant aux 2 autres coins (côté bas du dos - cf schéma). Bon tricot!
02.08.2014 - 11:18
![]() Martina wrote:
Martina wrote:
Det står ju efter höger framstycke!
11.06.2013 - 20:49
![]() Tarjasjolin wrote:
Tarjasjolin wrote:
Hur stickas framkanterna,på mönstret är det bara halsbanden
11.06.2013 - 20:10
![]() Els Van Leeningen wrote:
Els Van Leeningen wrote:
Ik heb dit vest gebreid en alle boorden gewoon recht gebreid. Het resultaat is veel mooier geworden dan het vest op de foto van het patroon. Echt een aanrader! De mouwinzet is lastig bij dit patroon en vraagt om veel passen, meten en dan pas vast zetten. De alpaca wol zorgt wederom voor een mooi breiwerk!
08.03.2013 - 17:29
![]() Els Van Leeningen wrote:
Els Van Leeningen wrote:
Ik heb dit vest gebreid en alle boorden gewoon recht gebreid. Het resultaat is veel mooier geworden dan het vest op de foto van het patroon. Echt een aanrader! De mouwinzet is lastig bij dit patroon en vraagt om veel passen, meten en dan pas vast zetten. De alpaca wol zorgt wederom voor een mooi breiwerk!
08.03.2013 - 17:28
![]() Tora wrote:
Tora wrote:
Hej! Det står inte "rätstickning" utan "räta maskor", dvs alla varv visas från rätsidan och då måste man ju sticka avigt från avigsidan som vanligt
27.02.2013 - 12:03
![]() Gunnel wrote:
Gunnel wrote:
Diagram:M3A, M3B, M4, Varvet mellan mönstervarven skall stickas aviga, ej rätstickning som det står i mönstret.
27.02.2013 - 08:56Norma Armenta wrote:
Hola, estoy tejiendo este precioso modelo, ya tejí el cuadro siguiendo los esquemas y ya pase los puntos a un gancho auxiliar. Mi pregunta es la siguiente: los aumentos que se siguen realizando en los puntos de esquina con una lazada, se hacen en la vuelta de derecho cada 2 vueltas o cada 4 vueltas (como en el esquema). Muchas gracias y saludos desde México.
13.02.2013 - 02:32DROPS Design answered:
Hola Norma, según el diagrama los aum se trabajan cada 2 filas ( 1 cuadrado = 1 pt x 1 fila).
26.05.2013 - 19:33
![]() Hilda wrote:
Hilda wrote:
Tack! Jag har ju gjort helt bakvänt! Fan. Gör om - gör rätt...
25.07.2012 - 08:15
![]() Hilda wrote:
Hilda wrote:
Hej! Nu har jag kämpat ett tag. Räknat avigt och rätt... Men jag har ändå bara 178 maskor på min sticka. Hur kommer det sig??
23.07.2012 - 20:35Andrea answered:
Hej du ska ha 3 långa sidor (se skissen!) och 1 kort uppåt vid halsen. Alltså 3 x 58 (= 174) och 40 Tillsammans 214!
23.07.2012 - 20:58
|
|||||||||||||||||||
Secret Garden#secretgardencardigan |
|||||||||||||||||||
 |
 |
||||||||||||||||||
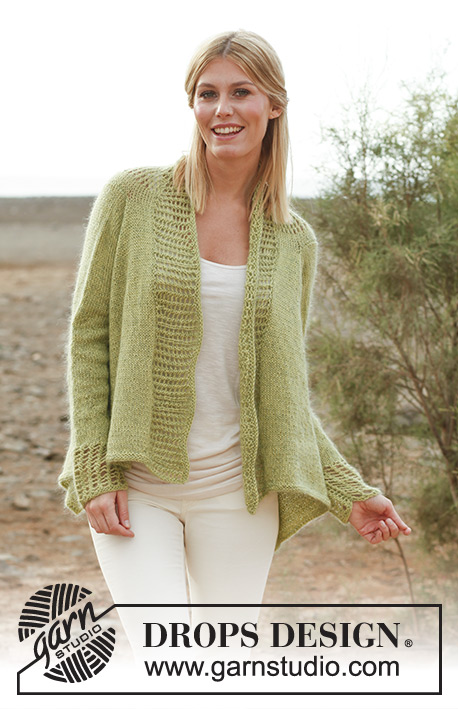
DROPS square knitted jacket with lace pattern on the back, cuffs and bands in ”Alpaca” and ”Kid-Silk”. Size S-XXXL.
DROPS 138-1 |
|||||||||||||||||||
|
PATTERN: See diagrams M.1, M.2, M.3 and M.4. Diagrams show pattern from RS. GARTER ST (back and forth on needle): K all rows. -------------------------------------------------------- JACKET: Worked from mid back in a square, then worked down the back piece and outwards in each side for front piece. Finish by working the sleeves. BACK PIECE: Cast on 8 sts with 1 thread Alpaca and 1 thread Kid-Silk and divide them on 4 double pointed needles size 5 mm (= 2 sts on every needle). Insert a marker in the first, third, fifth and seventh st (= 4 markers). Then work diagram M.2 3 times (i.e. over the first 6 sts), then diagram M.1 over the last 2 sts (= up towards neck). Sts with markers are corner sts, let the markers follow when working outwards. Switch to circular needle when needed. REMEMBER THE KNITTING TENSION! When diagrams M.1 and M.2 have been worked, there are 214 sts on needle. Work next round as follows: K the first 175 sts (all corner sts are here), then K the last 39 sts before slipping them on a stitch holder (= up towards neck). NOW MEASURE PIECE FROM HERE! Continue in stocking st back and forth over the remaining 175 sts – AT THE SAME TIME continue inc as before in the 2 corners in the opposite side of where sts were slipped on a stitch holder (i.e. inc on each side of corner sts by making 1 YO on every other row). When 4-8-12 rows have been worked back and forth (next row = RS), cast off for armholes. This is done as follows: K 10, cast off the next 32-36-39 sts, then work as before with inc until 42-46-49 sts remain, cast off the first 32-36-39 sts and K the last 10 sts. On next row cast on 32-36-39 new sts over the cast off sts. Work and inc until there are 247-263-279 sts on needle (adjust so that next row is worked from WS, approx. 16-20-24 cm in stocking st have been worked). Now K 3 rows over the middle 93-101-109 sts (= bottom of back), work the other sts in stocking st as before and continue inc as before (i.e. there will be 95-103-111 sts which are worked K on next row from WS). Work next row from RS as follows: K the first 79-83-87 sts (incl 1 st which is inc at the corner) and slip them on a stitch holder (= right front piece), LOOSELY cast off the next 97-105-113 sts (incl 2 sts which are inc), and K the last 79-83-87 sts (incl 1 st which is inc at the corner (= left front piece). LEFT FRONT PIECE: Continue in stocking st on circular needle size 5 mm, back and forth over the 79-83-87 sts – but work the bottom 2 sts (in the left side seen from RS) K on all rows (= garter st). When piece measures 41-44-48 cm - measured outwards from where armhole was cast off (adjust so that next row is from WS), K 3 rows back and forth, then LOOSELY cast off. RIGHT FRONT PIECE: Slip sts from stitch holder back on circular needle size 5 mm and work as left front piece but now work the 2 sts at the bottom in the right side (seen from RS) in garter st. NECK EDGE AND BANDS: Worked back and forth on circular needle. Knit up on circular needle size 5 mm with 1 thread Alpaca and 1 thread Kid-Silk: 74-84-94 sts at the top along right front piece, then work the 39 sts from stitch holder in the neck on to needle, then knit up 74-84-94 sts at the top along left front piece (= 187-207-227 sts). K 1 row from WS. Work next row as follows: 2 sts in garter st, diagram M.3A 9-10-11 times, diagram M.3B (= 3 sts), and 2 sts in garter st. Continue like this until edge measures approx. 10-11-12 cm (adjust so that next row is worked from WS). Now K 3 rows over all sts, then LOOSELY cast off – it is very important to avoid a tight cast off edge. SLEEVE: Worked back and forth on circular needle. Cast on 42-46-50 sts (incl 1 edge st in each side) on circular needle size 5 mm with 1 thread Alpaca and 1 thread Kid-Silk. K 3 rows back and forth. Continue with diagram M.4 with 1 edge st in garter st in each side. When piece measures 12 cm, work in stocking st until finished measurements. AT THE SAME TIME when piece measures 15 cm, inc 1 st in each side. Repeat inc every 4-3½-3 cm a total of 9-10-11 times = 60-66-72 sts. When piece measures 50 cm in all sizes, cast off for sleeve cap at beg of every row in each side: 3 sts 1 time, 2 sts 3 times and 1 st 2 times, then cast off 2 sts in each side until piece measures 59 cm, then cast off 3 sts 1 time in each side. Cast off the remaining sts. Piece measures approx. 60 cm. ASSEMBLY: Sew sleeve seams inside 1 edge st and sew in the sleeves. |
|||||||||||||||||||
Diagram explanations |
|||||||||||||||||||
|
|||||||||||||||||||
 |
|||||||||||||||||||
 |
|||||||||||||||||||
Have you finished this pattern?Tag your pictures with #dropspattern #secretgardencardigan or submit them to the #dropsfan gallery. Do you need help with this pattern?You'll find 16 tutorial videos, a Comments/Questions area and more by visiting the pattern on garnstudio.com. © 1982-2026 DROPS Design A/S. We reserve all rights. This document, including all its sub-sections, has copyrights. Read more about what you can do with our patterns at the bottom of each pattern on our site. |
|||||||||||||||||||


With over 40 years in knitting and crochet design, DROPS Design offers one of the most extensive collections of free patterns on the internet - translated to 17 languages. As of today we count 324 catalogues and 12290 patterns translated into English (UK/cm).
We work hard to bring you the best knitting and crochet have to offer, inspiration and advice as well as great quality yarns at incredible prices! Would you like to use our patterns for other than personal use? You can read what you are allowed to do in the Copyright text at the bottom of all our patterns. Happy crafting!
Post a comment to pattern DROPS 138-1
We would love to hear what you have to say about this pattern!
If you want to leave a question, please make sure you select the correct category in the form below, to speed up the answering process. Required fields are marked *.