
Popular categories
Looking for a yarn?


Comments / Questions (232)
![]() Helen wrote:
Helen wrote:
Good evening! I m not sure the meaning of "the 2 corners in the opposite side of where sts were slipped on.." These 2 corners sts are the first and third with markers ("follow when working outwards") at the very begining? Thank you
14.12.2025 - 16:46DROPS Design answered:
Dear Helen, these 2 corners are the 2 at the bottom of the jacket as shown in the chart. Happy knitting!
15.12.2025 - 15:12
![]() Gina wrote:
Gina wrote:
Good evening! I m not sure the meaning of "the 2 corners in the opposite side of where sts were slipped on.." These 2 corners sts are the first and third with markers ("follow when working outwards") at the very begining? Thank you
12.12.2025 - 17:18
![]() Gina wrote:
Gina wrote:
Good evening! help please: After the casting off for armholes, the increase will only be done in one remaining "corner" which is in the middle of the knitting. The other corner was in the stitches that have been closed for armhole. correct? Thank you!
10.12.2025 - 19:43
![]() Debbie wrote:
Debbie wrote:
When do you do inc on bottom 2 corner stitches?
27.11.2025 - 16:26DROPS Design answered:
Dear Debbie, just as before, these increases on the corners should just continue as before. Happy knitting!
27.11.2025 - 17:11
![]() Debbie wrote:
Debbie wrote:
I am sorry but I do not understand the pattern after you split for the neck. There are 214 st before the split. Then put 39 on holder and continue with the 175. Do you increase 1YO on each side of every corner stitch. So after the first row you will have 183 st (for middle size) , and after finishing 8 rows i will have 207 stitches? Then when you cast off for the armholes the pattern says k10, do i not do increase stitches in the first corner stitch or must i include inc in k10?
27.11.2025 - 13:43DROPS Design answered:
Dear Debbie, you increase now only on the bottom 2 corners, so 4 sts each row from RS, you don't increase at the beg/end of the row so that the 10 first stitches do not include the yarn overs as you don' increase now there (see chart, the sts on a thread are at the top of the square and will be worked back afterwards, you work now along the 3 remaining sides). Happy knitting!
27.11.2025 - 16:47
![]() Debbie wrote:
Debbie wrote:
When doing inc on both sides of corner stitch, does the stitch marker stay in corner stitch or does it move with inc?
27.11.2025 - 09:37DROPS Design answered:
Dear Debbie, the markers should stay on each corner stitch to mark where you will have to increase. Happy knitting!
27.11.2025 - 10:08
![]() Mariannina wrote:
Mariannina wrote:
Scusato ma non c'è modo di sostituire i ferri a doppia punta con quelli circolari?
01.12.2021 - 12:28DROPS Design answered:
Buonasera Mariannina, il lavoro inizia con pochi punti, e non è possibile lavorare con i ferri circolari una circonferenza così piccola: può utilizzare però i ferri circolari con un cavo almeno di 80 cm e la tecnica del magic loop se preferisce. Buon lavoro!
07.12.2021 - 21:50
![]() Gee wrote:
Gee wrote:
Please help explain the part “with inc until 42-46-49st” This is done as follows: K 10, bind off the next 32-36-39 sts, then work as before with inc until 42-46-49 sts remain, bind off the first 32-36-39 sts and K the last 10 sts. There are 183 stitches before this row., so no idea where 42 st about.
21.09.2021 - 13:37DROPS Design answered:
Dear Gee, the 42 sts in first size refer to the number of stitches remaining at the end of the round, so that you should work this row like this if you have 183 stitches: K10, bind off 32, K 99, 42 sts remain before the end of the round, work them as follows: K10, K32. Happy knitting!
21.09.2021 - 16:09
![]() Claudia Civera wrote:
Claudia Civera wrote:
Buona sera,mi piace molto questo modello e vorrei farlo tale e quale,ma non vedo nel filato Alpaca il colore 7300. Non lo fate più ?
17.10.2020 - 22:12DROPS Design answered:
Buongiorno Claudia. Il colore 7300 non è più in cartella. Può contattare il suo rivenditore Drops di fidicia che saprà consigliarla sulla scelta di un colore simile. Buon lavoro!
19.10.2020 - 22:15
![]() Monica wrote:
Monica wrote:
Grazie, gentilissimi e rapidissimi!
24.04.2016 - 19:44
|
|||||||||||||||||||
Secret Garden#secretgardencardigan |
|||||||||||||||||||
 |
 |
||||||||||||||||||
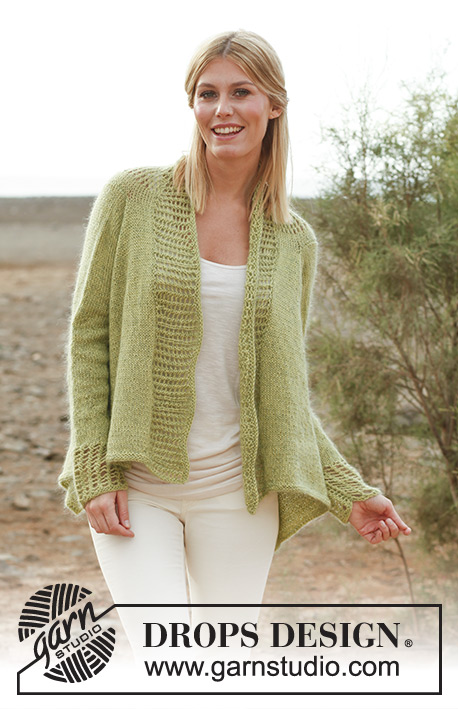
DROPS square knitted jacket with lace pattern on the back, cuffs and bands in ”Alpaca” and ”Kid-Silk”. Size S-XXXL.
DROPS 138-1 |
|||||||||||||||||||
|
PATTERN: See diagrams M.1, M.2, M.3 and M.4. Diagrams show pattern from RS. GARTER ST (back and forth on needle): K all rows. -------------------------------------------------------- JACKET: Worked from mid back in a square, then worked down the back piece and outwards in each side for front piece. Finish by working the sleeves. BACK PIECE: Cast on 8 sts with 1 thread Alpaca and 1 thread Kid-Silk and divide them on 4 double pointed needles size 5 mm (= 2 sts on every needle). Insert a marker in the first, third, fifth and seventh st (= 4 markers). Then work diagram M.2 3 times (i.e. over the first 6 sts), then diagram M.1 over the last 2 sts (= up towards neck). Sts with markers are corner sts, let the markers follow when working outwards. Switch to circular needle when needed. REMEMBER THE KNITTING TENSION! When diagrams M.1 and M.2 have been worked, there are 214 sts on needle. Work next round as follows: K the first 175 sts (all corner sts are here), then K the last 39 sts before slipping them on a stitch holder (= up towards neck). NOW MEASURE PIECE FROM HERE! Continue in stocking st back and forth over the remaining 175 sts – AT THE SAME TIME continue inc as before in the 2 corners in the opposite side of where sts were slipped on a stitch holder (i.e. inc on each side of corner sts by making 1 YO on every other row). When 4-8-12 rows have been worked back and forth (next row = RS), cast off for armholes. This is done as follows: K 10, cast off the next 32-36-39 sts, then work as before with inc until 42-46-49 sts remain, cast off the first 32-36-39 sts and K the last 10 sts. On next row cast on 32-36-39 new sts over the cast off sts. Work and inc until there are 247-263-279 sts on needle (adjust so that next row is worked from WS, approx. 16-20-24 cm in stocking st have been worked). Now K 3 rows over the middle 93-101-109 sts (= bottom of back), work the other sts in stocking st as before and continue inc as before (i.e. there will be 95-103-111 sts which are worked K on next row from WS). Work next row from RS as follows: K the first 79-83-87 sts (incl 1 st which is inc at the corner) and slip them on a stitch holder (= right front piece), LOOSELY cast off the next 97-105-113 sts (incl 2 sts which are inc), and K the last 79-83-87 sts (incl 1 st which is inc at the corner (= left front piece). LEFT FRONT PIECE: Continue in stocking st on circular needle size 5 mm, back and forth over the 79-83-87 sts – but work the bottom 2 sts (in the left side seen from RS) K on all rows (= garter st). When piece measures 41-44-48 cm - measured outwards from where armhole was cast off (adjust so that next row is from WS), K 3 rows back and forth, then LOOSELY cast off. RIGHT FRONT PIECE: Slip sts from stitch holder back on circular needle size 5 mm and work as left front piece but now work the 2 sts at the bottom in the right side (seen from RS) in garter st. NECK EDGE AND BANDS: Worked back and forth on circular needle. Knit up on circular needle size 5 mm with 1 thread Alpaca and 1 thread Kid-Silk: 74-84-94 sts at the top along right front piece, then work the 39 sts from stitch holder in the neck on to needle, then knit up 74-84-94 sts at the top along left front piece (= 187-207-227 sts). K 1 row from WS. Work next row as follows: 2 sts in garter st, diagram M.3A 9-10-11 times, diagram M.3B (= 3 sts), and 2 sts in garter st. Continue like this until edge measures approx. 10-11-12 cm (adjust so that next row is worked from WS). Now K 3 rows over all sts, then LOOSELY cast off – it is very important to avoid a tight cast off edge. SLEEVE: Worked back and forth on circular needle. Cast on 42-46-50 sts (incl 1 edge st in each side) on circular needle size 5 mm with 1 thread Alpaca and 1 thread Kid-Silk. K 3 rows back and forth. Continue with diagram M.4 with 1 edge st in garter st in each side. When piece measures 12 cm, work in stocking st until finished measurements. AT THE SAME TIME when piece measures 15 cm, inc 1 st in each side. Repeat inc every 4-3½-3 cm a total of 9-10-11 times = 60-66-72 sts. When piece measures 50 cm in all sizes, cast off for sleeve cap at beg of every row in each side: 3 sts 1 time, 2 sts 3 times and 1 st 2 times, then cast off 2 sts in each side until piece measures 59 cm, then cast off 3 sts 1 time in each side. Cast off the remaining sts. Piece measures approx. 60 cm. ASSEMBLY: Sew sleeve seams inside 1 edge st and sew in the sleeves. |
|||||||||||||||||||
Diagram explanations |
|||||||||||||||||||
|
|||||||||||||||||||
 |
|||||||||||||||||||
 |
|||||||||||||||||||
Have you finished this pattern?Tag your pictures with #dropspattern #secretgardencardigan or submit them to the #dropsfan gallery. Do you need help with this pattern?You'll find 16 tutorial videos, a Comments/Questions area and more by visiting the pattern on garnstudio.com. © 1982-2026 DROPS Design A/S. We reserve all rights. This document, including all its sub-sections, has copyrights. Read more about what you can do with our patterns at the bottom of each pattern on our site. |
|||||||||||||||||||


With over 40 years in knitting and crochet design, DROPS Design offers one of the most extensive collections of free patterns on the internet - translated to 17 languages. As of today we count 324 catalogues and 12290 patterns translated into English (UK/cm).
We work hard to bring you the best knitting and crochet have to offer, inspiration and advice as well as great quality yarns at incredible prices! Would you like to use our patterns for other than personal use? You can read what you are allowed to do in the Copyright text at the bottom of all our patterns. Happy crafting!
Post a comment to pattern DROPS 138-1
We would love to hear what you have to say about this pattern!
If you want to leave a question, please make sure you select the correct category in the form below, to speed up the answering process. Required fields are marked *.