
Popular categories
Looking for a yarn?


Comments / Questions (254)
![]() Elin wrote:
Elin wrote:
Jeg synes de 17 masker jeg begynder med bare rynker ,det kan passe af de skal være begyndelse af sjal når se på billedet ser det større ud for oven
16.01.2014 - 14:25DROPS Design answered:
Hej Elin. Ja, du begynder ovenfra og strikker nedefter. Sjalet og striberne formes naar du öger i mönstret. Du kan ogsaa se paa billedet hvor sjalet begynder (paa modellens höjre skulder)
17.01.2014 - 17:25
![]() Fritzi wrote:
Fritzi wrote:
Hallo Leute ich nochmal habe das Tuch jetzt nochmal so gestrickt wie unten grade von mir beschrieben und ...siehe da, es funktioniert so warum in aller Welt kann man das nicht so in die Anleitung schreiben? nach dem angegebenen Diagramm gibt das nämlich keine Zacken sondern wirklich kleine Wellen und das Tuch sieht mehr wie ein Rüschenrock aus herzlichen dank an Andrea Lange 18.11.2011 kl. 10:18 die hier den richtigen Tip gab
07.01.2014 - 23:54
![]() Fritzi wrote:
Fritzi wrote:
Und jetzt kommt das, worauf es ankommt und nirgends geschrieben steht: Zwischen den Auf- und Abnahmen erhöhen sich ständig die Mittelmaschen(durch Reihe 6 und 10 von M.1B) D.h. bei jedem neuen Anfang von M.1B werden die MM. zwischen Auf-und Abnahmen um 2M erhöht und einfach rechts gestrickt.D.h.schon bei der 1.Wdh. von M.1B sind es dann 5,4,6,5 MM.Bei der 2.Wiederholumg von M.1B sind es 7,6,8,7 MM usw. stimmt das dann auch so?????
29.12.2013 - 10:40DROPS Design answered:
Wir haben die Anleitung geprüft, sie ist korrekt. Bitte schauen Sie sich zunächst unter Tutorialvideo für dieses Modell an. Wenn Sie weiterhin Schwierigkeiten mit der Anleitung haben, wenden Sie sich bitte an den Laden, in dem Sie die Wolle gekauft haben, dort hilft man Ihnen gerne weiter.
04.01.2014 - 14:28
![]() Fritzi wrote:
Fritzi wrote:
Es liegt wohl daran das mir von sabrina special empfohlen wurde jeweils eine Randmasche zu stricken, deswegen haut das mit dem muster nicht hin ich versuchs jetzt ein drittes mal ohne rm
28.12.2013 - 22:45DROPS Design answered:
Liebe Fritzi, in unserer Anleitung sind alle Maschen angegeben, die gestrickt werden.
04.01.2014 - 14:23
![]() Fritzi wrote:
Fritzi wrote:
Also ich habe dieses Tuch jetzt zum zweiten mal wieder aufgezogen und so langsam kriege ich die Krätze!!!
28.12.2013 - 22:43
![]() Tara wrote:
Tara wrote:
Hoi ben ik weer dus toch lag het aan mij ik vergat uit de omslag 2 steken te maken dom dom bedankt voor dit mooie patroon gr tara
04.12.2013 - 08:49
![]() DROPS NL wrote:
DROPS NL wrote:
Het patroon klopt en is ook al heel vaak met succes gebreid. Als u een vraag hebt, kunt u deze dan duidelijk formuleren zodat wij u een antwoord kunnen geven.
22.10.2013 - 11:28
![]() Tara wrote:
Tara wrote:
Hoi hoi het video filmpje stop waar heel veel mensen vast zitten het klopt gewoon niet of ligt dat aan mij??? en ik wil deze zo graag maken gr tara
22.10.2013 - 09:00
![]() Judi Honsberger wrote:
Judi Honsberger wrote:
AS I understand the previous comments when you are repeating M.1B you add stitches in the middle of the row. In other words row 16 has 12 stitches per section and row 26 would have 18 per section. Row 27 would have 20 per and would be a repeat of row 17.
14.09.2013 - 02:33
![]() Pauliina wrote:
Pauliina wrote:
Kiitos ihanasta ohjeesta. Nopea tehdä. Tarvitsee vain neuloa 5 kerää Delightia ja huivi on valmis. Edullinen ja kaunis itselle tai lahjaksi. Voisitteko tarkistaa, että puuttuuko 7.krs:n tekstiohjeesta 1 langankierto? Kuvassahan se näkyy heti lisäyksen jälkeen. Terkuin Pauliina
07.09.2013 - 16:25DROPS Design answered:
Kiva että pidit ohjeesta! Kiitos huomautuksesta, ohjeen 7. kerrokseen on lisätty langankierto.
10.09.2013 - 16:46
|
||||||||||||||||
Butterfly Dream#butterflydreamshawl |
||||||||||||||||
 |
 |
|||||||||||||||
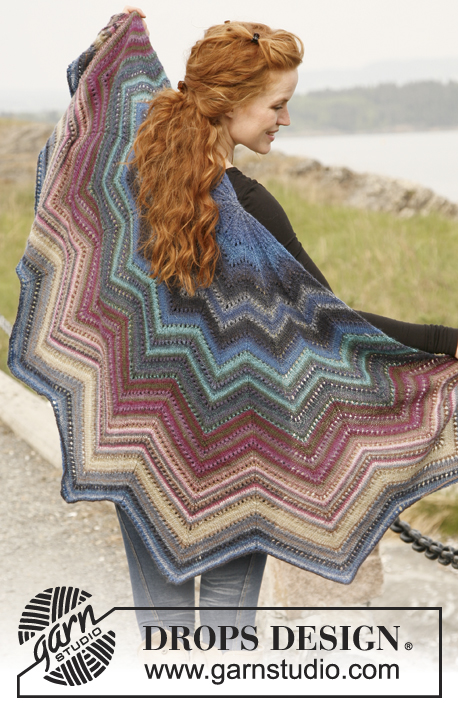
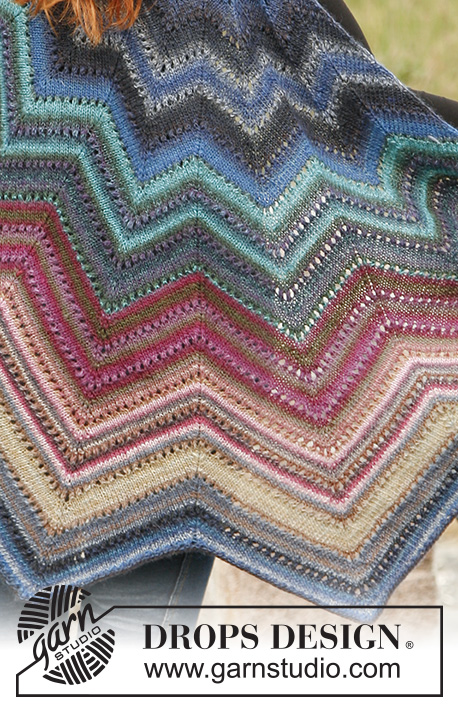
Knitted DROPS shawl in "Delight".
DROPS 133-1 |
||||||||||||||||
|
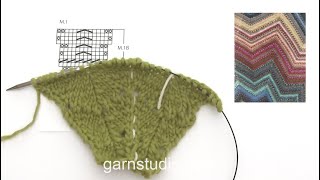
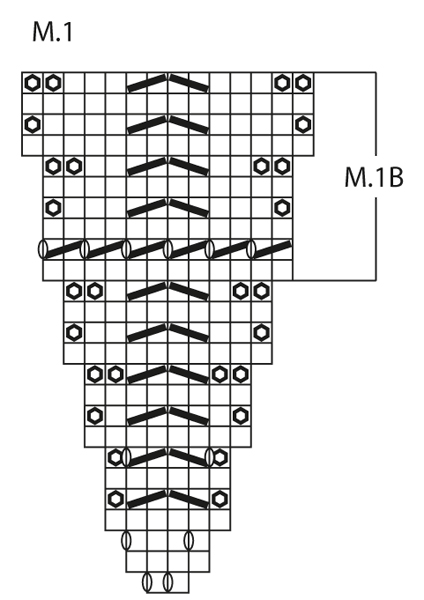
STRIPES: Work 50 g light blue mix, 50 g turquoise/purple mix, 50 g purple/green mix, 50 g beige/grey/pink mix and 50 g beige/blue mix. PATTERN: See diagram M.1. The diagram shows all rows in the pattern seen from RS. --------------------------------------------------------- SHAWL: The shawl is worked back and forth on circular needle to make room for all the sts. Cast on 17 sts on circular needle size 4 mm with Delight. P 1 row from WS while AT THE SAME TIME working STRIPES - see explanation above. Continue to work as follows (1st row = from RS): Diagram M.1 is repeated 8 times and finish with 1 st in stocking st (K from RS, P from WS). Work M.1 as follows: Row 1 (RS): *K1, yo, K1, yo, place marker *, repeat *-* and end row with 1 st in stocking st. There are now 8 markers, one after each repeat of diagram M.1. Row 2 and all rows from WS: P all sts and yo's. Row 3: *K1, yo, K3, yo*, repeat *-* and end row with 1 st in stocking st. Row 5: * K2 in 1 st, slip 1 st as if to K, K1, psso, K2 tog, K2 in 1 st* repeat *-* and end row with 1 st in stocking st. Row 7: *K2 in 1 st, yo, slip 1 st as if to K, K1, psso, K2 tog, yo, K2 in 1 st* repeat *-* and end row with 1 st in stocking st. Continue the 8 repeats of diagram M.1 and 1 st in stocking st at the end of row. Continue like this until diagram M.1 has been worked 1 time vertically = 129 sts. Now continue by repeating M.1B vertically. Continue until piece reaches desired length, finish after a 2nd row in diagram M.1B (i.e. the row with the YOs). K 1 row from WS. Cast off with K from RS. Sew a thread through the 17 sts in the cast on edge, tighten tog and fasten. |
||||||||||||||||
Diagram explanations |
||||||||||||||||
|
||||||||||||||||
 |
||||||||||||||||
Have you finished this pattern?Tag your pictures with #dropspattern #butterflydreamshawl or submit them to the #dropsfan gallery. Do you need help with this pattern?You'll find 6 tutorial videos, a Comments/Questions area and more by visiting the pattern on garnstudio.com. © 1982-2026 DROPS Design A/S. We reserve all rights. This document, including all its sub-sections, has copyrights. Read more about what you can do with our patterns at the bottom of each pattern on our site. |
||||||||||||||||


With over 40 years in knitting and crochet design, DROPS Design offers one of the most extensive collections of free patterns on the internet - translated to 17 languages. As of today we count 325 catalogues and 12298 patterns translated into English (UK/cm).
We work hard to bring you the best knitting and crochet have to offer, inspiration and advice as well as great quality yarns at incredible prices! Would you like to use our patterns for other than personal use? You can read what you are allowed to do in the Copyright text at the bottom of all our patterns. Happy crafting!
Post a comment to pattern DROPS 133-1
We would love to hear what you have to say about this pattern!
If you want to leave a question, please make sure you select the correct category in the form below, to speed up the answering process. Required fields are marked *.