
Popular categories
Looking for a yarn?


Comments / Questions (63)
![]() Nath wrote:
Nath wrote:
Bonjour. Je suis au quatrième rang. J'ai bien compris le rang précédent avec les augmentations et les diminutions. Mais ici je ne sais pas quels points faire où il y a des jetés - tricoter endroit ou envers ? - et où des mailles ont été tricotées ensembles. Faute de photographie en gros plan du point, je ne comprends pas ce que je dois faire. Dois-je garder l'alternance deux m en. / deux m. env.? La vidéo ne m'aide pas. Pouvez-vous m'expliquer ? Un grand merci pour votre très beau site.
24.02.2017 - 19:57DROPS Design answered:
Bonjour Nath, au début du dos et du devant, on tricote les augmentations en côtes, comme on le voit dans la vidéo (voir ici 27.02.2017 - 08:56
![]() Sophie wrote:
Sophie wrote:
Bonjour, J'ai retricoté toute la manche (énorme travail) en faisant les augmentations tous les 6 rangs, et même là , c'est un peu long.. Entretemps , j'ai commencé un autre modèle proposé par votre site et ai un autre problème. La largeur obtenue est ridicule par rapport aux mesures données. Il me semble que vos modèles manquent vraiment d'exactitude car je tricote d'une manière lambda, ni serré , ni lâche. Horrible de devoir tout défaire à chaque fois...
18.12.2016 - 00:28DROPS Design answered:
Bonjour Sophie, pensez toujours à bien vérifier votre échantillon et ensuite à conserver la même tension lors de la réalisation de votre ouvrage, ainsi, votre tricot aura les mesures indiquées pour votre taille dans le schéma des mesures en bas de page. Bon tricot!
19.12.2016 - 10:05
![]() Sophie wrote:
Sophie wrote:
Bonjour, j ai très largement dépassé les 46 cm sous la manche alors que je n ai pas fini le cycle d augmentations, j en suis a 100 au lieu de 104 mailles pour le moment. Merci de bien vouloir me conseiller.
20.11.2016 - 00:50DROPS Design answered:
Bonjour Sophie, pensez à bien vérifier votre échantillon et à bien conserver la même tension quand vous tricotez la manche pour que les mesures soient justes. Bon tricot!
21.11.2016 - 09:52
![]() Bärbel wrote:
Bärbel wrote:
Auf beiden Seiten der 6 Maschen unter dem Ärmel werden je 1 Masche zugenommen. Welche 6 Maschen. Unter dem Ärmel sind doch nur 2 Maschen, wo man auf Boden Seiten eine Masche zunehmen muss.
24.10.2016 - 18:42DROPS Design answered:
Liebe Bärbel, diese Zunahmen werden auf beiden Seiten der 6 M. unter dem Ärmel gestrickt, dh 3 Maschen vor der Markierung (am Ende der Runde) + 3 M. nach der Markierung (am Anfang der Runde).
25.10.2016 - 09:58
![]() Altmann Françoise wrote:
Altmann Françoise wrote:
Pour réaliser ce modèle, j'ai acheté la laine Fabel. Or j'ai tricoté un échantillon, et pour obtenir 10 cm avec des aiguilles n°3, j'ai dû monter 30 mailles. La différence me paraît énorme, est-ce-qu'elle est prévue dans les explications?
18.01.2016 - 21:14DROPS Design answered:
Bonjour Mme Altmann, l'échantillon doit être de 24 m x 32 rangs jersey = 10 x 10 cm, changez pour des aiguilles plus grosses si nécessaire où il vous faudra recalculer le modèle. Il peut être également une bonne idée de laver et faire sécher son échantillon afin d'en vérifier les mesures après lavage. Bon tricot!
19.01.2016 - 09:32
![]() Patricia wrote:
Patricia wrote:
Could you give me some idea of the actual measurements for the different sizes? As there are so many stitches where the garment is worked in the round it could be a lot of knitting time wasted if I decide on the wrong size. Thank you
11.11.2015 - 13:23DROPS Design answered:
Dear Patricia, you will find at the bottom of the pattern a measurement chart with all measurements in cm taken flat from side to side. Compare these to a similar garment you have and like the shape to find out the matching size. Read more about sizing here. Remember to check and keep your tension. Happy knitting!
11.11.2015 - 14:15
![]() Lou Rei wrote:
Lou Rei wrote:
Après le 3e tour où se font la augmentations et diminutions comment faut il comprendre " tricoter les augmentations en côtes au fur et à mesure" ? En effet la régularité 2 endroit 2 envers n existe plus compte tenu du rajout des jetés ? Merci de votre aide.
28.09.2015 - 15:45DROPS Design answered:
Bonjour Mme Rei, les augmentations se font de part et d'autres de 2 m end sur les côtés, tricotez les nouvelles mailles en continuant les côtes avant/après l'augmentation, pour conserver 2 m end/2 m env dans la section en côtes. Bon tricot!
28.09.2015 - 16:08Louise Lévesque wrote:
J'aimerais savoir dans les explications, lorsqu'on demande de tricoter, au tour suivant, les augmentations côtes/point mousse... doit-on les tricoter contraire à ce qu'elles se présentent? voici la description dans le modèle: Augmenter 1 m en faisant 1 jeté, au rang suivant, tricoter les jetés torse pour éviter un trou – tricoter les augmentations en côtes/point mousse au fur et à mesure.
23.09.2014 - 18:37DROPS Design answered:
Bonjour Mme Lévesque, tricoter le jeté torse à l'end/à l'env signifie le tricoter à l'end ou à l'env mais en piquant dans le brin arrière au lieu du brin avant. Si cette m doit être tricotée à l'env, vous la tricoterez torse à l'env, si elle doit être à l'end, vous la tricoterez torse à l'end. (cf vidéo "Augmentations 5 avec jeté" sous l'onglet Vidéos.) Bon tricot!
24.09.2014 - 08:28
![]() Lena Mörk wrote:
Lena Mörk wrote:
Inte en fråga har kommit in från 2014. Alla problem jag har med den trånga ärmen har inte kommit in. Nu ger jag upp!!!
05.04.2014 - 16:09DROPS Design answered:
Hej Lena. Det er vi da kede af at höre. Denne reaktion kommer fint frem, saa maaske kan du pröve igen?
07.04.2014 - 11:53
![]() Grethe wrote:
Grethe wrote:
Desverre så skjønner jeg enda ikke hvordan jeg skal sitte igjen med 64-100 masker. Nå hsr jeg gjort slik det står i oppskriften, men har igjen 166 m. Hvor i felletips 2 skal jeg ikke øke? Skal jeg ikke ta et kast på hver side av tråden? Da blir det jo ikke hullrad..
26.11.2013 - 21:19DROPS Design answered:
Du feller til Raglan ifølge felletips-4 hvilket giver 8 mindre masker på hver felle omgang.
27.11.2013 - 11:26
|
|
Rib Romance#ribromancesweater |
|
|
|
|
Knitted DROPS jumper in rib and garter st in ”Alpaca”. Size S - XXXL.
DROPS 122-18 |
|
|
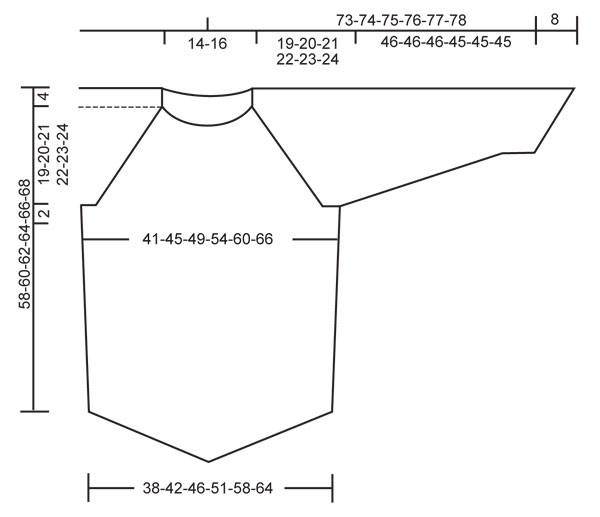
GARTER ST (in the round): K 1 round, P 1 round. MEASUREMENT TIP: Because of the weight of the yarn make all measurements while the garment is hanging. INCREASING TIP: Inc 1 st each side of the 2 K sts each side on body piece and each side of the 2 K sts mid under sleeve. Inc 1 st by making 1 YO, on next row work YO into back of loop to avoid a hole – incorporate inc sts in rib/garter st as you go along. DECREASING TIP-1 (applies to the rib mid front and mid back on body piece): Beg 4 sts before marker and dec as follows: Slip 1 st as if to K, K2 tog, psso, 1 YO, K2 (marker sits mid between these 2 sts), 1 YO, K3 tog. On next round K the middle 6 sts. DECREASING TIP-2 (applies to garter st mid front and mid back on body piece and at top of sleeves – hole pattern): Beg 3 sts before marker and dec as follows: slip 1 st as if to K, K1, psso, 1 YO, K2 (marker sits mid between these 2 sts), 1 YO, K2 tog. On next round work the 6 middle sts as follows: K2, P2, K2. DECREASING TIP-3 (applies to garter st on bottom part of sleeve): Dec as described under DECREASING TIP-1, but work the 6 sts as follows on next round: K2, P2, K2 (instead of K6). DECREASING TIP-4 (applies to raglan): Dec as follows in each transition between body piece and sleeves (beg 3 sts before marker): K2 tog, K2 (marker sits mid between these 2 sts), slip 1 st as if to K, K1, psso. -------------------------------------------------------- JUMPER: Worked in the round. BODY PIECE: Cast on 272-304-336-368-416-464 sts on circular needle size 3 mm with Alpaca. Work 2 rounds rib as follows: K1, * P2, K2 *, repeat from *-* to end and finish with P2 and K1. Now insert 4 markers in piece with 68-76-84-92-104-116 sts between each (insert first marker at beg of round). Continue in rib AT THE SAME TIME inc 1 st each side of 1st and 3rd marker (= at the sides) - See INCREASING TIP - and dec 1 st each side of 2nd and 4th marker (= mid front/mid back) - See DECREASING TIP-1. Continue the inc and dec on every other round (no of sts will be constant). When piece measures 33-34-35-36-37-38 cm - See MEASUREMENT TIP (measured along the side) – K 1 round AT THE SAME TIME dec 76-88-104-112-128-148 sts evenly – NOTE: 19-22-26-28-32-37 sts on left front piece, 19-22-26-28-32-37 sts on right front piece, 19-22-26-28-32-37 sts on right back piece and 19-22-26-28-32-37 sts on left back piece (i.e. 38-44-52-56-64-74 sts in total on front piece and on back piece) – do not dec on the 6 sts mid front and mid back = 196-216-232-256-288-316 sts. Continue in GARTER ST - see above - AT THE SAME TIME continue the hole pattern mid front and mid back - See DECREASING TIP-2 (the side inc are now complete). REMEMBER THE KNITTING TENSION! When piece measures 35-36-37-38-39-40 cm cast off 12-12-12-16-16-16 sts each side for armhole (i.e. 6-6-6-8-8-8 sts each side of marker 1 and 3) = 86-96-104-112-128-142 sts left on front and back piece. Put piece aside and knit the sleeves. SLEEVE: Cast on 64-66-68-68-70-70 sts on double pointed needles size 3 mm with Alpaca. Insert a marker after 32-33-34-34-35-35 sts (= mid upper sleeve), and let the marker follow the piece as you go along. Work first round as follows: K 29-30-31-31-32-32, slip 1 st as if to K, K1, psso, K2 (marker sits mid between these 2 sts), K2 tog and K 29-30-31-31-32-32. P 1 round. Now work next round as follows: K 29-30-31-31-32-32, slip 1 st as if to K, K1, psso, K2 tog and K 29-30-31-31-32-32. There are now 60-62-64-64-66-66 sts on needle. P 1 round and now continue in garter st. AT THE SAME TIME inc 2 sts mid under sleeve - See INCREASING TIP - and dec 1 st each side of marker mid upper sleeve - See DECREASING TIP-3. Continue the inc and dec on every other round (no of sts will be constant). When piece measures 9-8-8-8-6-9 cm inc 2 extra sts mid under sleeve – NOTE: inc these each side of the middle 6 sts under sleeve. Repeat this inc a total of 19-21-22-24-26-28 times in SIZE S: on every 9th round, SIZE M + L: on every 8th round, SIZE XL + XXL: on every 7th round and SIZE XXXL: on every 6th round = 98-104-108-112-118-122 sts. When piece measures 46-46-46-45-45-45 cm, measured mid under sleeve – see MEASUREMENT TIP and adjust to the same no of garter st rows as on body piece – work shortened rows back and forth as follows (NOTE: K every row and continue the hole pattern mid upper sleeve on every row from RS acc to DECREASING TIP-2 – discontinue the inc mid under sleeve): Beg from RS mid under sleeve and work 16-16-18-18-20-20 sts past marker, turn piece, slip first st as if to K, tighten thread and work 32-32-36-36-40-40 sts. Turn piece, slip 1 st as if to K, tighten thread and work 48-48-54-54-60-60 sts, turn piece, slip 1 st as if to K, tighten thread and work 64-64-72-72-80-80 sts. Turn piece, slip first st as if to K, tighten thread and work 80-80-90-90-100-100 sts, turn piece, slip first st as if to K, tighten thread and work row back to mid under sleeve. Now cast off the first 6-6-6-8-8-8 sts at beg of round, work 86-92-96-96-102-106 sts and cast off the remaining 6-6-6-8-8-8 sts. Put piece aside and knit the other sleeve. YOKE: Slip sleeves on the same circular needle as body piece where cast off for armholes = 344-376-400-416-460-496 sts. Insert a marker in each transition between body piece and sleeves (= 4 markers). READ ALL OF THE FOLLOWING SECTION BEFORE CONTINUING! Continue in garter st and hole pattern as before (on sleeves continue hole pattern acc to DECREASING TIP-2 as on body piece, i.e. the hole pattern continues mid front/mid back and mid upper sleeves, but no inc are made). AT THE SAME TIME dec for raglan as follows - See DECREASING TIP-4: Beg on the first K round and then dec on every 4th round (i.e. on every other K-round) a total of 13-13-13-16-15-15 times and then on every other round (i.e. on every K-round) a total of 20-23-25-22-26-28 times. AT THE SAME TIME when piece measures 53-54-56-57-59-60 cm – measured along the side - slip the middle 6-6-10-12-12-24 sts on a stitch holder for neck. Continue back and forth on circular needle from mid front, AT THE SAME TIME cast off for neck at beg of row each side as follows: 2 sts 1-1-2-3-3-4 times and 1 st until piece measures 58-60-62-64-66-68 cm - measured along the side all the way to shoulder - REMEMBER MEASUREMENT TIP. After all dec for raglan and neck there are approx 64 to 100 sts left on needle, cast off loosely. NECKLINE: Pick up approx 80-100 sts round neck (includes sts on stitch holder at front) on small circular needle size 3 mm with Alpaca. K 1 round AT THE SAME TIME dec evenly to 78-82-86-90-94-96 sts. P 1 round. Then K 1 round, AT THE SAME TIME inc evenly to 120-128-132-132-136-140 sts. Work rib, K2/P2 - make sure to have K2 mid front. When rib measures 8-8-9-9-10-10 cm cast off loosely with K over K and P over P. ASSEMBLY: Sew openings under sleeves. |
|
 |
|
Have you finished this pattern?Tag your pictures with #dropspattern #ribromancesweater or submit them to the #dropsfan gallery. Do you need help with this pattern?You'll find 23 tutorial videos, a Comments/Questions area and more by visiting the pattern on garnstudio.com. © 1982-2026 DROPS Design A/S. We reserve all rights. This document, including all its sub-sections, has copyrights. Read more about what you can do with our patterns at the bottom of each pattern on our site. |


With over 40 years in knitting and crochet design, DROPS Design offers one of the most extensive collections of free patterns on the internet - translated to 17 languages. As of today we count 325 catalogues and 12298 patterns translated into English (UK/cm).
We work hard to bring you the best knitting and crochet have to offer, inspiration and advice as well as great quality yarns at incredible prices! Would you like to use our patterns for other than personal use? You can read what you are allowed to do in the Copyright text at the bottom of all our patterns. Happy crafting!
Post a comment to pattern DROPS 122-18
We would love to hear what you have to say about this pattern!
If you want to leave a question, please make sure you select the correct category in the form below, to speed up the answering process. Required fields are marked *.