
Popular categories
Looking for a yarn?


Comments / Questions (29)
Ellie wrote:
"At the same time inc for collar by knitting 2 sts in the outermost st every other row 4 times (= 8 collar sts in reverse stockinette st)." Does this mean that on the first of the 4 collar sts, I'm increasing by making one in the first stitch each time (ie a purl st)? This is not clear.
09.09.2017 - 01:55DROPS Design answered:
Dear Ellie, you are right, it means that you increase one stitch by knitting two stitch into the the first stitch of the row. Happy Knitting!
09.09.2017 - 18:05Ellie wrote:
Re. “Knit the next row as follows (wrong side): K 1, in the next st: K 1, yo, K 1 (these 4 sts = collar sts knit in reverse stockinette st), P the remaining sts (stockinette st).” When you say "K1, in the next st: K1".. does this mean a straight K1, K1, yo, K1?
09.09.2017 - 01:53DROPS Design answered:
Dear Ellie, "K1, in the next st: K 1, yo, K 1 " means that you start with one knit stitch and into the second stitch you knit three stotch (a knit stitch, a yarn over and another knit stitch). This 4 stitch together will form the collar. I hope this helps. Happy Knitting!
09.09.2017 - 18:03Ellie wrote:
What does it mean by "after collar st"? if collar sts are last 4 sts, then is it a dec on the last st in the row, ie the last collar stitch? Where are the sts AFTER the collar st? If I'm knitting on right side, then the collar sts are the last remaining stitches, no?
09.09.2017 - 01:51DROPS Design answered:
Dear Ellie, it means just that, after the stitches you have knitted for the collar (the number varies depending where you are in the pattern). When the collar is at the beginning of the row, it means the stitches right next to the collar. Happy Knitting!
09.09.2017 - 17:59Ellie wrote:
Hello. I'm sorry, but I'm finding this pattern really confusing and space is limited so I will have to split this question up. Re. the tips for decreasing at the neck - what is "inside of the collar sts"? Is this at the end of the K row, before the last 4 sts? Does "Before collar sts: K 2 tog." mean that a K2 occurs BEFORE the 4 collar stitches, ie K to last 4 collar stitches, K2tog? Thanks
09.09.2017 - 01:49DROPS Design answered:
Dear Ellie, inside the collar stitches mean that at the beginning of the row you decrease after the collar stitches (k2tog the forst 2 stitches after the collar) and at the end of the row you decrease just before the collar stitches (k2tog the last 2 stitches just before the collar). I hope this helps. Happy Knitting!
09.09.2017 - 17:56
![]() Claire Bouchard wrote:
Claire Bouchard wrote:
Serait-il possible de mettre une vidéo pour nous aider à effectuer le l'encolure? Merci!
04.03.2016 - 11:38DROPS Design answered:
Bonjour Mme Bouchard, votre demande a été transmise, toutefois, en attendant, pouvez-vous indiquer ce que vous ne comprenez pas? Merci. Bon tricot!
04.03.2016 - 13:33
![]() Lena wrote:
Lena wrote:
14+(6x5,5)=47, as the first inc. is already at 14 cm!
06.08.2015 - 08:27
![]() Anastasia wrote:
Anastasia wrote:
The sleeve directions are confusing. Once the sleeve measures 14 cm I am to inc one stitch at each side every 5.5 cm 7 times. 14+(5.5x7) = 52.5 cm. Yet at 49 cms I am to start binding off for the sleeve cap. This means I am binding off stitches on the same rows that I am increasing stitches? And I should end up with how many stitches left? I will not have the 58 stitches mentioned at the end of the increase rows, as by this point I've already decreased stitches? Thank you.
05.08.2015 - 22:00DROPS Design answered:
Dear Anastasia, Inc for sleeve are done when piece measures 14 cm, 19.5 cm, 25 cm, 30.5 cm, 36 cm, 41.5 cm and 47 cm (= 7 times every 5.5 cm) - so that you can start bind off for sleeve cap when sleeve measures 49 cm, there are 2 cm straight after last inc. Happy knitting!
06.08.2015 - 09:28
![]() DROPS Design NL wrote:
DROPS Design NL wrote:
Misschien tel je per ongeluk de steken voor de kraag mee? Soms vinden mensen het verwarrend dat je tegelijkertijd mindert voor de halsuitsnijding en meerdert voor de kraag. Ik heb het patroon nagekeken en ik kan niets vreemds ontdekken. Het gaat erom dat je een gelijk aantal steken voor de schouders hebt op het voor- en achterpand. Hopelijk kun je nu verder. Groetjes van Diana
26.10.2007 - 17:28
![]() Anne De Lange wrote:
Anne De Lange wrote:
Het voorpand klopt volgens mij niet. Bij het achterp. kant je 16 st. af voor de hals, maar waar zijn die zij het voorpand? Je mindert 2x1 st. en meerdert 4x2 st. voor de kraag dan resteren er volgens mij geen 28 st. maar 36 st. (maat M/L)Gaarne een oplossing zodat ik m'n trui af kan maken.
16.10.2007 - 17:12
|
|
DROPS 79-24 |
|
|
|
|
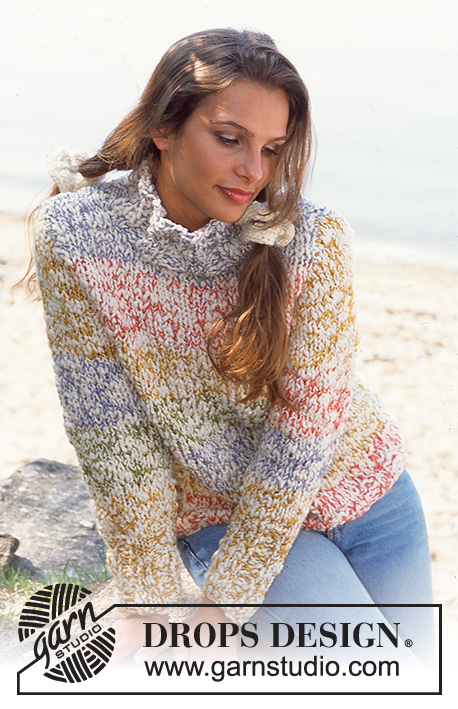
DROPS Pullover in Alaska
DROPS 79-24 |
|
|
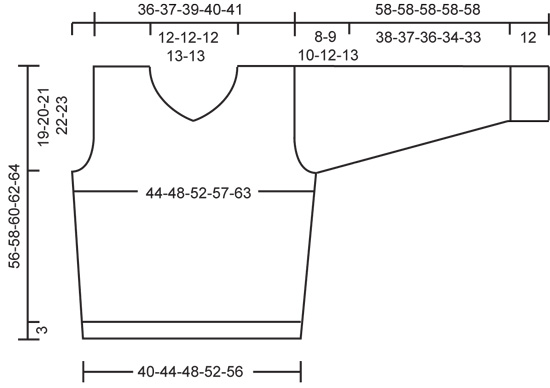
Gauge: 15 sts x 19 rows on larger needles in stockinette st = 10 x 10 cm. Rib: * K 1, P 2 *, repeat from * - *. Knitting tips (for neck): All decs are made from right side. Dec 1 st inside of the increased collar sts as follows: Before collar sts: K 2 tog. After collar sts: Slip 1 st as if to knit, K 1, psso. Front: Cast on 62-68-74-80-86 sts on smaller needles. Knit rib as follows (row 1 = right side): K 1 (edge st), P 1, * K 1, P 2 *, repeat from * - * until 3 sts remain, then K 1, P 1 and K 1 (edge st). When the rib measures 3 cm change to larger needles and stockinette st. Read the rest of the Front section before knitting: Side inc: When the piece measures 10 cm inc 1 st at each side every 8-9-9-6.5-5 cm a total of 3-3-3-4-5 times = 68-74-80-88-96 sts. Pattern: When the piece measures 28-29-30-31-32 cm knit rib over all sts for 15 cm - see that a P 2 is at center front. Then (the piece measures approx. 43-44-45-46-47 cm) knit stockinette st to finished measurements. Armhole: When the piece measures 37-38-39-40-41 cm bind off for armhole at each side every other row: 4 sts 1 time, 3 sts 0-0-1-1-2 times, 2 sts 1-1-1-2-2 times and 1 st 1-3-2-3-3 times = 54-56-58-60-62 sts. V-neck: When the piece measures 44-46-47-49-50 cm put a marker at center front. Knit the next row as follows (right side row): knit until 3 sts remain before the marker, K 2 tog, slip the 2 following sts (1 st at each side of the marker) off needle and put them back on the left needle reversed (twisted) (= a small cable), then knit 2 sts in the next st (in the 1st st of the 2 twisted sts), put the remaining sts on left needle onto a st holder and knit each side separately. 1st side: = 27-28-29-30-31 sts. Knit the next row as follows (wrong side): K 1, in the next st: K 1, yo, K 1 (these 4 sts = collar sts knit in reverse stockinette st), P the remaining sts (stockinette st). Then dec 1 st for the neck every other row - see knitting tips: 7-7-7-8-8 times. At the same time inc for collar by knitting 2 sts in the outermost st every other row 4 times (= 8 collar sts in reverse stockinette st). After all shaping is complete 26-27-28-28-29 sts remain. When the piece measures 56-58-60-62-64 cm bind off the 18-19-20-20-21 shoulder sts. The 8 collar sts remain on needles. Continue in reverse stockinette st ob these sts until the collar measures 6-6-6-7-7 cm, put sts on a st holder. 2nd side: Put sts from st holder on the other side back on needles and knit the same as the 1st side, reversing all shaping - begin row 1 from center front, from right side as follows: P 1, in the next st: P 1, yo, P 1 (= 4 collar sts), slip 1 st as if to knit, K 1, psso, K the remaining sts. Back: Cast on and knit the same as the front. Bind off for armholes as on front and continue until the piece measures 54-56-58-60-62 cm. Now bind off the center 16-16-16-18-18 sts for the neck. On the next row dec 1 st at each neck edge = 18-19-20-20-21 sts remain on each shoulder. Bind off when the piece measures 56-58-60-62-64 cm. Sleeve: Cast on 41-44-44-47-47 sts on smaller needles. Knit rib (keeping 1 edge st at each side) for 12 cm, then continue with stockinette st. When the piece measures 14 cm inc 1 st at each side every 6.5-5.5-4.5-4-3 cm a total of 6-7-8-8-10 times = 53-58-60-63-67 sts. When sleeve measures 50-49-48-46-45 cm bind off for sleeve cap at each side every other row: 4 sts 1 time, 2 sts 2-3-3-3-3 times and 1 st 2-2-3-4-5 times, then bind off 2 sts at each side until the piece measures 57 cm, then bind off 3 sts at each side 1 time. Bind off the remaining sts, the piece measures approx. 58 cm. Assembly: Sew shoulder seams. Sew the collar at center back. Sew the collar to back neckband. The collar will roll. Sew in sleeves. Sew sleeve and side seams using edge sts as a seam allowance. |
|
 |
|
Have you finished this pattern?Tag your pictures with #dropspattern or submit them to the #dropsfan gallery. Do you need help with this pattern?You'll find 21 tutorial videos, a Comments/Questions area and more by visiting the pattern on garnstudio.com. © 1982-2026 DROPS Design A/S. We reserve all rights. This document, including all its sub-sections, has copyrights. Read more about what you can do with our patterns at the bottom of each pattern on our site. |


With over 40 years in knitting and crochet design, DROPS Design offers one of the most extensive collections of free patterns on the internet - translated to 17 languages. As of today we count 324 catalogues and 12290 patterns translated into English (UK/cm).
We work hard to bring you the best knitting and crochet have to offer, inspiration and advice as well as great quality yarns at incredible prices! Would you like to use our patterns for other than personal use? You can read what you are allowed to do in the Copyright text at the bottom of all our patterns. Happy crafting!
Post a comment to pattern DROPS 79-24
We would love to hear what you have to say about this pattern!
If you want to leave a question, please make sure you select the correct category in the form below, to speed up the answering process. Required fields are marked *.