
Popular categories
Looking for a yarn?


Comments / Questions (29)
![]() Brenda wrote:
Brenda wrote:
For got to say the pattern is 79-24. To extend hip size.
02.01.2026 - 20:32DROPS Design answered:
Dear Brenda, the pattern is worked from the bottom up, so you adjust the number of initial stitches for the desired width of the hip. For example, you can make the sweater straight, instead of trapeze shaped, by casting on 96 sts directly (so you skip the side increases). If this is still not enough, you can cast on more stitches and recalculate the pattern from there. Happy knitting!
05.01.2026 - 00:39
![]() Brenda wrote:
Brenda wrote:
My hips are larger than xxl, is there a way of adjusting this pattern. Thanks
02.01.2026 - 20:29
![]() Joanne Healy wrote:
Joanne Healy wrote:
I'm knitting the cap to the sleeve and unclear what the castoff mean 'at every other row'? Is the bind off happening over 18 rows or 36 rows?
10.08.2025 - 22:52DROPS Design answered:
Hi Joanne, For the sleeve cap, you cast off the correct number of stitches at the beginning and end of every 2nd row, so cast off 4 stitches at the beginning and end of the first row, work back, cast off 2 stitches at the beginning and end of the next row, work back (repeat this once or twice depending on the size you are working), etc.. Regards, Drops team.
11.08.2025 - 06:41
![]() Yvonne Abbott wrote:
Yvonne Abbott wrote:
Can you confirm that the sleeves in this pattern are knitted, using 5.5mm knitting needles, entirely ? It does not indicate in the pattern to switch to larger needles after knitting the rib section . Thanks
05.12.2024 - 20:31DROPS Design answered:
Hi Yvonne, The rest of the sleeve, after the rib is worked with needle size 6 mm. Happy knitting!
06.12.2024 - 08:03
![]() Rena M Tolsma wrote:
Rena M Tolsma wrote:
I enjoyed knitting this pattern but I’m not pleased with the collar. I fussed over it but it did not turn out as neat as I would like.
11.03.2024 - 19:45
![]() Rena wrote:
Rena wrote:
Is the collar knitted using an edge stitch? Is the right side of the collar the purl side or the knit side? As you can see, I am thoroughly confused. :(
26.02.2024 - 21:55DROPS Design answered:
Dear Rena, the collar sts are worked in reverse stocking stitch, towards the center of the piece. The increases are worked in the outermost stitch, towards the neck, by knitting 2 sts in one. Since the collar is worked in reverse stocking stitch you will purl from the right side and knit from the wrong side. Happy knitting!
26.02.2024 - 22:55
![]() Rena wrote:
Rena wrote:
I’m sorry, but I don’t understand the directions for the collar. I don’t understand where to make the decreases and increases. Am I decreasing along the neck edge and increasing along the armhole side???
26.02.2024 - 21:51DROPS Design answered:
Dear Rena, you will be working the collar decreases and armhole decreases at the same time. First you start the armhole decreases, then you start the V-neck decreases. You will also increase to 8 collar sts for the collar edge; these increases are worked in the neck side, not the armhole side. Happy knitting!
26.02.2024 - 22:52
![]() Dori wrote:
Dori wrote:
Hola. Tengo una duda con el cuello de este patron. Indica que hay que disminuir 7 veces pero solo aumentar 4 veces. Asi pierdo puntos. O es que hay que aumentar 2 puntos en un punto? I como se hace esto? Gracias.
10.02.2024 - 02:32DROPS Design answered:
Hola Dori, en la primera fila por el lado revés, en el 1º lado, aumentas dos puntos ya que trabajas en el mismo punto: 1 derecho, 1 hebra, 1 derecho. Después disminuyes 7 veces y aumentas 4 veces. En total perderías 1 punto en las tallas más pequeñas (o 2 si has disminuido 8 veces, en las tallas más grandes).
11.02.2024 - 22:44
![]() Dori Roig Perez wrote:
Dori Roig Perez wrote:
Hola,me gustaria que me explicaras que punto es aumentar para el cuello 2 puntos en el punto mas externo en el modelo 79-24.Lo veo unpoco complicado lo de disminuir y aumentar al mismo tiempo.Gracias,un saludo.
23.03.2023 - 23:57DROPS Design answered:
Hola Dori, como se indica en los tips para elaboración del tejido, se disminuye antes o después de los puntos del cuello (los pts trabajados en punto jersey revés). Sin embargo, aumentas puntos dentro de los puntos del cuello (en concreto, el pt orillo hacia el centro del delantero).
26.03.2023 - 22:02
![]() Ilona wrote:
Ilona wrote:
Hallo, ich stricke zur Zeit den Pulli 79-24 in Alaska mit V Hals. Leider komme ich mit der Anleitung für den Hals gar nicht zurecht. Es ist sehr verwirrend. Kann für dieses Projekt auch einen anderen Hals stricken?
03.08.2022 - 15:22DROPS Design answered:
Liebe Ilona, ja gerne können Sie den Hals anpassen, beachten Sie nur, daß Sie die richtige Maschenanzahl für Schulter haben. Viel spaß beim stricken!
03.08.2022 - 17:12
|
|
DROPS 79-24 |
|
|
|
|
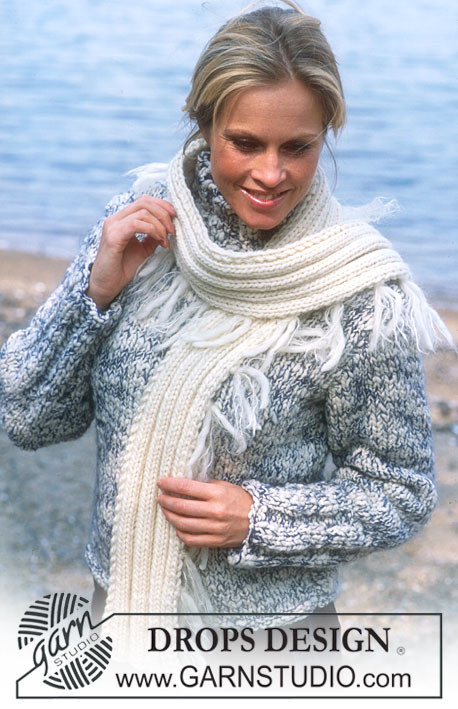
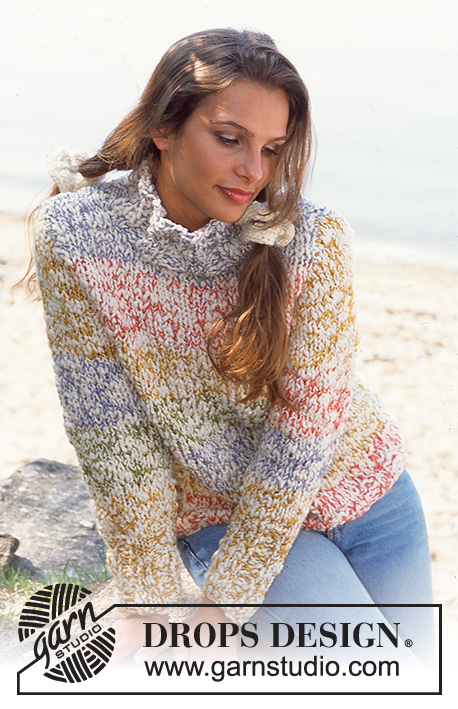
DROPS Pullover in Alaska
DROPS 79-24 |
|
|
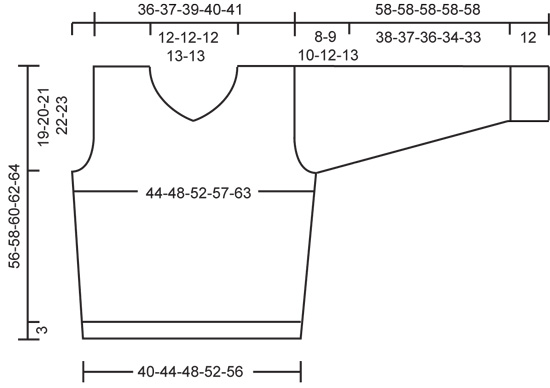
Gauge: 15 sts x 19 rows on larger needles in stockinette st = 10 x 10 cm. Rib: * K 1, P 2 *, repeat from * - *. Knitting tips (for neck): All decs are made from right side. Dec 1 st inside of the increased collar sts as follows: Before collar sts: K 2 tog. After collar sts: Slip 1 st as if to knit, K 1, psso. Front: Cast on 62-68-74-80-86 sts on smaller needles. Knit rib as follows (row 1 = right side): K 1 (edge st), P 1, * K 1, P 2 *, repeat from * - * until 3 sts remain, then K 1, P 1 and K 1 (edge st). When the rib measures 3 cm change to larger needles and stockinette st. Read the rest of the Front section before knitting: Side inc: When the piece measures 10 cm inc 1 st at each side every 8-9-9-6.5-5 cm a total of 3-3-3-4-5 times = 68-74-80-88-96 sts. Pattern: When the piece measures 28-29-30-31-32 cm knit rib over all sts for 15 cm - see that a P 2 is at center front. Then (the piece measures approx. 43-44-45-46-47 cm) knit stockinette st to finished measurements. Armhole: When the piece measures 37-38-39-40-41 cm bind off for armhole at each side every other row: 4 sts 1 time, 3 sts 0-0-1-1-2 times, 2 sts 1-1-1-2-2 times and 1 st 1-3-2-3-3 times = 54-56-58-60-62 sts. V-neck: When the piece measures 44-46-47-49-50 cm put a marker at center front. Knit the next row as follows (right side row): knit until 3 sts remain before the marker, K 2 tog, slip the 2 following sts (1 st at each side of the marker) off needle and put them back on the left needle reversed (twisted) (= a small cable), then knit 2 sts in the next st (in the 1st st of the 2 twisted sts), put the remaining sts on left needle onto a st holder and knit each side separately. 1st side: = 27-28-29-30-31 sts. Knit the next row as follows (wrong side): K 1, in the next st: K 1, yo, K 1 (these 4 sts = collar sts knit in reverse stockinette st), P the remaining sts (stockinette st). Then dec 1 st for the neck every other row - see knitting tips: 7-7-7-8-8 times. At the same time inc for collar by knitting 2 sts in the outermost st every other row 4 times (= 8 collar sts in reverse stockinette st). After all shaping is complete 26-27-28-28-29 sts remain. When the piece measures 56-58-60-62-64 cm bind off the 18-19-20-20-21 shoulder sts. The 8 collar sts remain on needles. Continue in reverse stockinette st ob these sts until the collar measures 6-6-6-7-7 cm, put sts on a st holder. 2nd side: Put sts from st holder on the other side back on needles and knit the same as the 1st side, reversing all shaping - begin row 1 from center front, from right side as follows: P 1, in the next st: P 1, yo, P 1 (= 4 collar sts), slip 1 st as if to knit, K 1, psso, K the remaining sts. Back: Cast on and knit the same as the front. Bind off for armholes as on front and continue until the piece measures 54-56-58-60-62 cm. Now bind off the center 16-16-16-18-18 sts for the neck. On the next row dec 1 st at each neck edge = 18-19-20-20-21 sts remain on each shoulder. Bind off when the piece measures 56-58-60-62-64 cm. Sleeve: Cast on 41-44-44-47-47 sts on smaller needles. Knit rib (keeping 1 edge st at each side) for 12 cm, then continue with stockinette st. When the piece measures 14 cm inc 1 st at each side every 6.5-5.5-4.5-4-3 cm a total of 6-7-8-8-10 times = 53-58-60-63-67 sts. When sleeve measures 50-49-48-46-45 cm bind off for sleeve cap at each side every other row: 4 sts 1 time, 2 sts 2-3-3-3-3 times and 1 st 2-2-3-4-5 times, then bind off 2 sts at each side until the piece measures 57 cm, then bind off 3 sts at each side 1 time. Bind off the remaining sts, the piece measures approx. 58 cm. Assembly: Sew shoulder seams. Sew the collar at center back. Sew the collar to back neckband. The collar will roll. Sew in sleeves. Sew sleeve and side seams using edge sts as a seam allowance. |
|
 |
|
Have you finished this pattern?Tag your pictures with #dropspattern or submit them to the #dropsfan gallery. Do you need help with this pattern?You'll find 21 tutorial videos, a Comments/Questions area and more by visiting the pattern on garnstudio.com. © 1982-2026 DROPS Design A/S. We reserve all rights. This document, including all its sub-sections, has copyrights. Read more about what you can do with our patterns at the bottom of each pattern on our site. |


With over 40 years in knitting and crochet design, DROPS Design offers one of the most extensive collections of free patterns on the internet - translated to 17 languages. As of today we count 324 catalogues and 12290 patterns translated into English (UK/cm).
We work hard to bring you the best knitting and crochet have to offer, inspiration and advice as well as great quality yarns at incredible prices! Would you like to use our patterns for other than personal use? You can read what you are allowed to do in the Copyright text at the bottom of all our patterns. Happy crafting!
Post a comment to pattern DROPS 79-24
We would love to hear what you have to say about this pattern!
If you want to leave a question, please make sure you select the correct category in the form below, to speed up the answering process. Required fields are marked *.