
Popular categories
Looking for a yarn?


Comments / Questions (63)
Kate wrote:
What is meant in the leaf pattern by "1YO"? If I do this I end up with over 100 stitches, as YO is an increase and there s no decrease!! Is this supposed to be a YO K2 together, or what??
21.04.2013 - 11:26DROPS Design answered:
Dear Kate,at the beg of the leaf pattern, you made inc and no dec, then further in the pattern you will dec to reach the indicated amount of sts. Happy knitting!
22.04.2013 - 09:13Kate wrote:
What is meant in the leaf pattern by "1YO"? If I do this I end up with over 100 stitches, as YO is an increase and there s no decrease!! Is this supposed to be a YO K2 together, or what??
21.04.2013 - 08:42Kate wrote:
What is meant in the leaf pattern by "1YO"? If I do this I end up with over 100 stitches, as YO is an increase and there s no decrease!! Is this supposed to be a YO K2 together, or what??
21.04.2013 - 05:55Cretu Catalina wrote:
Please,help me to decipher hat model presented
13.12.2012 - 15:22
![]() Andrea Reinisch wrote:
Andrea Reinisch wrote:
Hallo Drops, kann es sein, dass in Reihe 6 ein Fehler ist und die Zunahmen fehlen? Liebe Grüße
23.09.2012 - 22:00DROPS Design answered:
Liebe Andrea, Sie haben Recht. Die Zunahmen in R 6 wurden nur unten in der Anleitung erwähnt, oben wurde es vergessen. Ich habe nun dort auch noch ergänzt. Vielen Dank für den Hinweis!
24.09.2012 - 16:03
![]() Kristi wrote:
Kristi wrote:
Lehemustri 5.real on viga- seal kus on 1õs, 1õs, 1õs, peaks keskmine olema 1pr!
19.09.2012 - 17:52DROPS Design answered:
Aitáh! Parandatud.
30.10.2012 - 03:14
![]() Drops wrote:
Drops wrote:
Sæt gerne en mærketråd med en anden farve så du ser hvor hver rapport starter. Det forhindrer at du forskubber arbejdet. De første 2 omgange forklarer kun én rapport som gentages. Herefter forklares 2 rapporter som gentages
20.03.2012 - 08:32
![]() Simona wrote:
Simona wrote:
Innan man stickar M.1 en avig rand som inte finns med alls. Sen efter att man stickat klart bladen så står det att man ska sticka räta fast på bilden är aviga maskor hela vägen till slutet. Man vill ju att mössan man stickar ser ut som på bilden. Fick repa upp en hel del pga detta!!! Extremt dåligt måste jag säga!!!! Ni borde se över detta mönster inte mycket som stämmer. Vill ju mössan ser ut som på bilden o det gör den inte!!!
05.02.2012 - 19:54DROPS Design answered:
Det er ingen feil i oppskriften. Det strikkes 1 rille (RÄTST) før man starter med M.1 (der de første 2 runder er rett). Etter bladmønsteret er ferdig strikker man riller (RÄTST)ikke vrang (aviga).
29.02.2012 - 15:14
![]() Anita wrote:
Anita wrote:
Hurra - luen er ferdig !!! Men: Økningen ved merkene kunne beskrives bedre. F.eks. Øk som beskrevet i omgang 1-5-9-13-17-21 (6 ganger) Den økte masken skulle også telles med i neste omgang (uten denne tilleggsteksten)Nå merker en først 2 omg. seinere hvis en har glemt økningen. Her er det en del som fører til feilstrikking som kunne ungås. Ellers takk for fint mønster.
20.09.2010 - 17:01
![]() Anita wrote:
Anita wrote:
Jeg fandt ut av det hele. Istedet for henvisningen i neste omgang, kunne i omgang foran kun bli sagt "omslag" rett foran merkemasken. Jeg blir litt forvirret og trodde det gjald økningen i begynnelsen. Nå håper jeg at luen blir riktig fin for det er et pent mønster.
20.09.2010 - 00:24
|
|||||||||||||
Capricho |
|||||||||||||
|
|
|||||||||||||
Knitted DROPS beret with garter st and leaf pattern in ”Alpaca” and ”Kid-Silk”.
DROPS 123-35 |
|||||||||||||
|
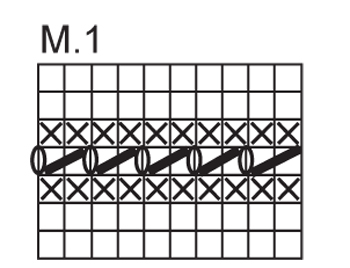
GARTER ST (in the round): K 1 round, P 1 round. INCREASING TIP: Inc on a round with P st between the leaves. Inc 1 st by making 1 YO, on next round K YO into back of loop to avoid a hole. PATTERN: See diagram M.1. Diagram shows the pattern from RS. LEAF PATTERN (in the round): ROUND 1: * 1 YO, K1, 1 YO, K6 *, repeat from *-* to end. ROUND 2: * K3, P6 *, repeat from *-* to end (remember the inc before each marker). ROUND 3: * K1, 1 YO, K1, 1 YO, K1, K7, K1, 1 YO, K1, 1 YO, K1, K6 *, repeat from *-* to end. ROUND 4: * K5, P7, K5, P6 *, repeat from *-* to end. ROUND 5: * K2, 1 YO, K1, 1 YO, K2, K7, K2, 1 YO, K1, 1 YO, K2, K6 *, repeat from *-* to end. ROUND 6: *K7, P7 (remember the inc before each marker), K7, P6 *, repeat from *-* to end. ROUND 7: * K3, 1 YO, K1, 1 YO, K3, K8, K3, 1 YO, K1, 1 YO, K3, K6*, repeat from *-* to end. ROUND 8: * K9, P8, K9, P6 *, repeat from *-* to end. ROUND 9: K all sts. ROUND 10: * K9, P8 (remember the inc before each marker), K9, P6 *, repeat from *-* to end. ROUND 11: * Slip 1 st as if to K, K1, psso, K5, K2 tog, K9, slip 1 st as if to K, K1, psso, K5, K2 tog, K6*, repeat from *-* to end. ROUND 12: K7, P9, K7, P6 *, repeat from *-* to end. ROUND 13: * Slip 1 st as if to K, K1, psso, K3, K2 tog, K9, slip 1 st as if to K, K1, psso, K3, K2 tog, K6 *, repeat from *-* to end. ROUND 14: * K5, P9 (remember the inc before each marker), K5, P6 *, repeat from *-* to end. ROUND 15: * Slip 1 st as if to K, K1, psso, K1, K2 tog, K10, slip 1 st as if to K, K1, psso, K1, K2 tog, K6 *, repeat from *-* to end. ROUND 16: * K3, P10, K3, P6 *, repeat from *-* to end. ROUND 17: * Slip 1 st as if to K, K2 tog, psso, K10, slip 1 st as if to K, K2 tog, psso, K6 *, repeat from *-* to end. ROUND 18: P all sts (remember the inc before each marker). -------------------------------------------------------- Beret: Worked in the round. Cast on 86-90 sts on circular needle size 3 mm with Alpaca and Kid-Silk (= 2 strands). Work 2.5 cm stocking st, P 1 round (= folding edge) and work 2.5 cm stocking st. Now measure piece from here. Change to circular needle size 4 mm and work 2 rounds GARTER ST - see above - AT THE SAME TIME dec 8-6 sts evenly on first round = 78-84 sts. Continue in M.1, AT THE SAME TIME on last round in M.1 dec 8-0 sts evenly = 70-84 sts. After M.1 insert 5-6 markers in piece as follows: marker 1 after 4 sts, then 14 sts between each marker, i.e. 10 sts after the last marker. Continue in LEAF PATTERN - see above. AT THE SAME TIME on round 2 in leaf pattern inc 1 st before each marker - see INCREASING TIP. Repeat the inc on every 4th round until there is a total of 6 inc by each marker - NOTE: 1 inc remain after the leaf pattern has been completed. After leaf pattern continue in garter st (there are 100-120 sts on needle after leaf pattern and the inc by markers). When piece measures approx 9-11 cm from the edge - adjust so that next round is a K round - dec before each marker by K2 tog. Repeat the dec on every other round (i.e. on every K round) a total of 17 times = 15-18 sts left on needle. Change to double pointed needles when sts no longer fit circular needle. K2 tog across next K round, cut the thread, pull it through remaining sts, tighten tog and fasten. Fold edge double towards WS and fasten with neat sts. |
|||||||||||||
Diagram explanations |
|||||||||||||
|
|||||||||||||
 |
|||||||||||||
Have you finished this pattern?Tag your pictures with #dropspattern or submit them to the #dropsfan gallery. Do you need help with this pattern?You'll find 15 tutorial videos, a Comments/Questions area and more by visiting the pattern on garnstudio.com. © 1982-2026 DROPS Design A/S. We reserve all rights. This document, including all its sub-sections, has copyrights. Read more about what you can do with our patterns at the bottom of each pattern on our site. |
|||||||||||||


With over 40 years in knitting and crochet design, DROPS Design offers one of the most extensive collections of free patterns on the internet - translated to 17 languages. As of today we count 325 catalogues and 12298 patterns translated into English (UK/cm).
We work hard to bring you the best knitting and crochet have to offer, inspiration and advice as well as great quality yarns at incredible prices! Would you like to use our patterns for other than personal use? You can read what you are allowed to do in the Copyright text at the bottom of all our patterns. Happy crafting!
Post a comment to pattern DROPS 123-35
We would love to hear what you have to say about this pattern!
If you want to leave a question, please make sure you select the correct category in the form below, to speed up the answering process. Required fields are marked *.