
Popular categories
Looking for a yarn?


Comments / Questions (86)
![]() KUCA wrote:
KUCA wrote:
Bonjour, je souhaiterais tricoter ce modèle avec la laine drops eskimo unie taille XXXL, pouvez vous m indiquer le nombre de pelotes a utiliser (39 pelotes me paraît une trop grande quantité... !!....merci....et bon tricot a toutes
24.02.2016 - 09:38DROPS Design answered:
Bonjour Mme Kuca, il faut bien 39 pelotes en taille XXXL (soit 1950 g) DROPS Eskimo (50 g= 50 m) pour réaliser ce manteau, sur la base de l'échantillon indiqué. Bon tricot!
24.02.2016 - 10:40Y Taylor wrote:
Is it possible to convert the knitting instructions to crochet? I LOVE this jacket but am not a good knitter.....any advice much appreciated :)
21.02.2016 - 02:28DROPS Design answered:
Dear Mrs Taylor, you can also have a try with the help of our knitting videos. Click on video tab to see all related videos to this pattern. Happy knitting!
22.02.2016 - 09:58
![]() Brett wrote:
Brett wrote:
Bij de mouwen staat dat er 6 st gelijkmatig geminderd moeten worden Moet dat op 1 naald verdeeld worden?
11.11.2015 - 15:41DROPS Design answered:
Hoi Brett. Ja, je mindert 6 st gelijkmatig in één naald.
12.11.2015 - 16:09
![]() Silvia Pandale wrote:
Silvia Pandale wrote:
Dear Jeannette, I've just finished this lovely jacket for a warm and nice italian spring. Thank you for your patterns I like very much, regards Silvia
06.03.2015 - 11:23
![]() Laura wrote:
Laura wrote:
Ich verstehe die Vorgehensweise bei den Beiden Vorderteilen nicht ganz. Was genau ist mit:"inkl. 4 Blendenm gegen die Mitte" gemeint?
17.01.2015 - 14:25DROPS Design answered:
Damit sind die Blenden am rechten und linken Vorderteil gemeint, also die beiden senkrechten Ränder an den Vorderteilen. "gegen die Mitte" bedeutet hier immer am Rand, und zwar am vorderen Rand. Die Blenden-M werden in diesem Modell auch kraus re gestrickt, heben sich also vom Rest der Jacke nicht ab. Die äußersten M am Rand stricken Sie mit 2 Fäden wie beschrieben, damit der vordere Rand verstärkt wird.
28.01.2015 - 10:54
![]() Tine wrote:
Tine wrote:
Den masken i fronten som skal felles løst av den skal ikke strikkes med dobbelt garn? Det er de 2 neste som skal det ja? Så man får stolpen med en pen kant? Litt forvirret over hvilke masker jeg skal strikke med dobbel tråd
07.01.2015 - 23:31DROPS Design answered:
Hej Tine. Du skal strikke de 2 förste m midt for med dobbelt traad. Du tager den förste maske av pinden (dvs, du strikker den ikke, men tager den bare over paa din höjre pind). I slutningen af naeste pind strikkes masken ret (med dobbelt traad).
08.01.2015 - 15:22
![]() Jolanda wrote:
Jolanda wrote:
Bedankt :-) het lukt!
24.11.2014 - 10:22
![]() Jolanda wrote:
Jolanda wrote:
Rechtervoorpand, bij de regel van 6 st richting middenvoor op een hulpvraag zetten voor de hals...eerste steek breien om te voorkomen dat de draad geknipt moet woeden....en de rest tot het eind van het stukje. Dit totale stuk begrijp ik niet , kunt u het iets makkelijker uitleggen wat ik moet doen? Bedankt.
14.11.2014 - 18:36DROPS Design answered:
Hoi Jolanda. Brei eerst de 6 st van de voorbies en plaats ze vervolgens op een draad (dan hoef je niet de draad af te knippen om verder te gaan). Je breit nu door en plaatst in elke nld vanaf middenvoor het vermelde aantal st op de draad (je breit ze eerst, plaatst ze vervolgens op de draad). Uiteindelijk heb je 10-11 st over op de schouder (de overige st zijn op de draad). Kant de schoudersteken af en brei het linker voorpand.
20.11.2014 - 15:47
![]() Jolands wrote:
Jolands wrote:
Sorry, maar wat wordt er dan bedoeld met 0x2 steken afkanten? 2 pennen niet afkanten? Alvast bedankt.
28.10.2014 - 19:57DROPS Design answered:
0 keer betekent niet. Dus voor maat S kant u af: 1 x 3 st en 1 x 1 st en voor de grootste maat bijvoorbeeld 1 x 3 st, 3 x 2 st en 4 x 1 st.
28.10.2014 - 20:28
![]() Jolanda wrote:
Jolanda wrote:
Ik bedoel wat er achter staat al die getallen, ik snap het niet, ik doe maat m. Maar wat betekent dan 0 0 ed? En dan weer getallen achter de komma? Begrijp er niets van
24.10.2014 - 12:51DROPS Design answered:
Dat zijn de aantallen voor de verschillende maten, er staat: 1 x 3 st, 0-0-1-1-2-3 x 2 st en 1-2-2-4-4-4 x 1 st. Dus voor alle maten 1 x 3 st en dan voor maat S 0 keer 2 st, voor maat M 0 keer 2 st, voor maat L 1 x 2 st, XL 1 x 2 st, XXL 2 x 2 st, etc.
24.10.2014 - 14:51
|
|
Silver Bright#silverbrightjacket |
|
 |
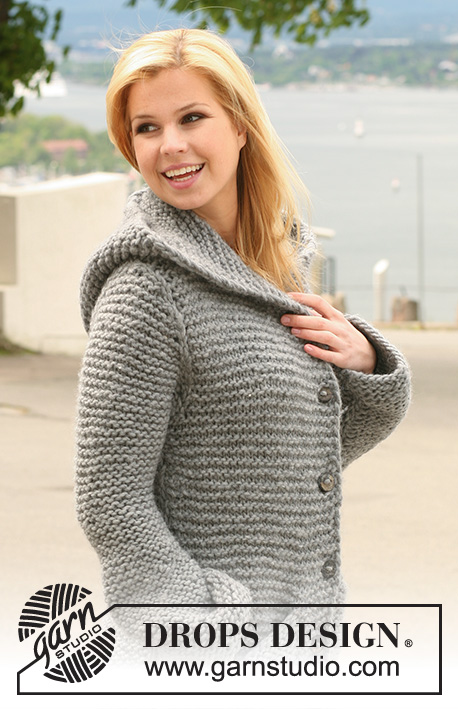 |
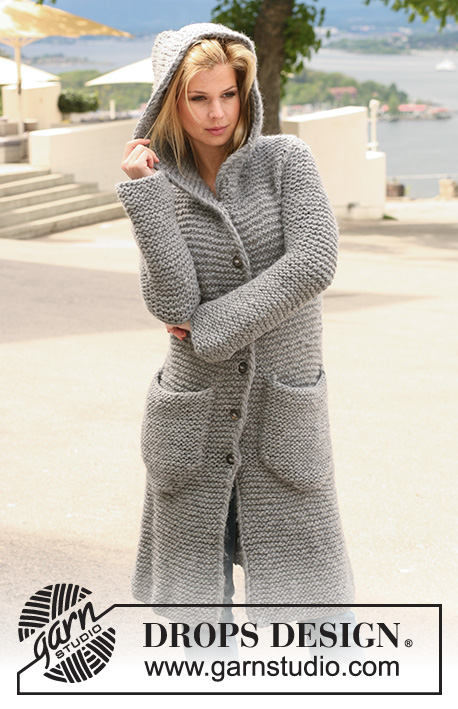
Long DROPS jacket in garter st with hood in ”Snow”. Size S - XXXL.
DROPS 122-40 |
|
|
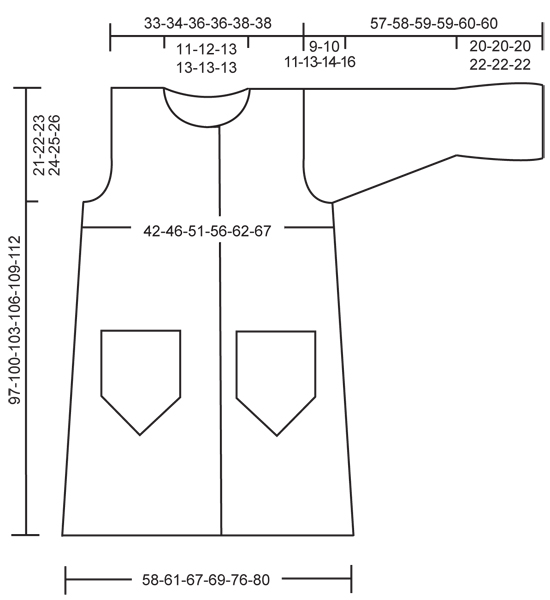
GARTER ST (back and forth on needle): K all rows. MEASUREMENT TIP: Because of the weight of the yarn make all measurements while the garment is hanging otherwise it will be too long when worn. BUTTONHOLES: Make buttonholes on right front piece. 1 BUTTONHOLE = Cast off third st from mid front and cast on 1 new st on next row. Make buttonholes when piece measures: SIZE S: 41, 51, 61, 71, 81 and 91 cm SIZE M: 43, 53, 63, 73, 83 and 93 cm SIZE L: 45, 55, 65, 75, 85 and 95 cm SIZE XL: 43, 52, 61, 70, 79, 88 and 97 cm SIZE XXL: 46, 55, 64, 73, 82, 91 and 100 cm SIZE XXXL: 49, 58, 67, 76, 85, 94 and 103 cm KNITTING TIP (applies to hood): To avoid a hole in each transition when sts are slipped on stitch holder pick up thread between 2 sts and work this tog with first st on needle. INCREASING TIP (applies to pockets): Inc 1 st inside 1 st each side by making 1 YO. On next row K YO into back of loop to avoid a hole. -------------------------------------------------------- JACKET: Worked in parts, back and forth on circular needle. BACK PIECE: Cast on 52-55-60-62-68-72 sts on circular needle size 10 mm with Snow. Work GARTER ST - see above - back and forth on needle. REMEMBER THE KNITTING TENSION! When piece measures 12-12-12-14-14-14 cm - See MEASUREMENT TIP - dec 1 st each side and repeat the dec each side on every 10-10-10-12-12-13 cm a total of 7-7-7-6-6-6 times = 38-41-46-50-56-60 sts. When piece measures 76-78-80-82-84-86 cm - REMEMBER MEASUREMENT TIP – cast off for armhole at the beg of every row each side as follows: 3 sts 1 time, 2 sts 0-0-1-1-2-3 times and 1 st 1-2-2-4-4-4 times = 30-31-32-32-34-34 sts. When piece measures 95-98-101-104-107-110 cm cast off the middle 8-9-10-10-10-10 sts for neck and complete each shoulder separately. Cast off 1 st on neckline on next row = 10-10-10-10-11-11 sts left on shoulder. Cast off when piece measures 97-100-103-106-109-112 cm. RIGHT FRONT PIECE: Cast on 30-32-34-35-38-40 sts (includes 4 front band sts towards front edge) on circular needle size 10 mm with Snow. Work garter st back and forth on needle - NOTE: work the 2 sts towards front edge in 2 strands until finished measurements (use a separate ball) and slip first st from mid front as if to K and K this at the end of next row. When piece measures 12-12-12-14-14-14 cm dec at the side as described for back piece = 23-25-27-29-32-34 sts. AT THE SAME TIME when piece measures 41-43-45-43-46-49 cm - REMEMBER MEASUREMENT TIP – make BUTTONHOLES - see above. When piece measures 76-78-80-82-84-86 cm cast off for armhole at the side as described for back piece – cast off at the beg of every row from the side = 19-20-20-20-21-21 sts. Continue until piece measures 92-94-96-98-101-104 cm. Now slip the 6 sts towards front edge on a stitch holder for neck (work sts first to avoid having to cut the thread). Slip sts at the beg of every row from mid front on the same stitch holder as follows (work sts first): 2 sts 1 time and 1 st 1-2-2-2-2-2 times = 10-10-10-10-11-11 sts left on shoulder. Cast off when piece measures 97-100-103-106-109-112 cm. LEFT FRONT PIECE: Cast on and work like right front piece, but mirrored. NOTE: Do not make buttonholes. SLEEVE: Cast on 30-30-32-32-34-34 sts on circular needle size 10 mm with Snow and work garter st back and forth on needle. When piece measures 20-20-20-22-22-22 cm - REMEMBER MEASUREMENT TIP - dec 6 sts evenly (from RS) = 24-24-26-26-28-28 sts. On next row (= WS) inc 1 st each side and repeat the inc on every 6-5-5-3.5-3-2.5 cm a total of 5-6-6-7-8-9 times = 34-36-38-40-44-46 sts. When piece measures 48-48-48-46-46-44 cm - NOTE! Less for the larger sizes because of longer sleeve cap and wider shoulder- cast off for sleeve cap at the beg of every row each side as follows: 2 sts 1 time and 1 st 5-6-7-8-9-10 times, then 2 sts at the beg of every row each side until piece measures 56-57-58-58-59-59 cm. Now cast off 3 sts at beg of the next 2 rows, cast off remaining sts. Piece measures approx 57-58-59-59-60-60 cm. ASSEMBLY: Sew shoulder seams. Set in sleeves. Sew sleeve and side seams - sew edge to edge in outer loops of sts to avoid a chunky seam. Sew buttons on left front piece. HOOD: Pick up approx 35 to 42 sts round neck (includes sts on stitch holders at front) on circular needle size 10 mm with Snow. K 1 row from WS, AT THE SAME TIME pick up thread between 2 sts to avoid a hole in transitions at front – See KNITTING TIP. Continue in garter st back and forth on needle – NOTE: work the 2 sts each side towards front edge in 2 strands until finished measurement and slip first st from mid front as if to K and K this at the end of next row. After 8 rows garter st inc evenly on next row from RS to 48-50-52-54-56-58 sts - NOTE: do not inc on the 4 sts each side (= front bands). Continue in garter st until hood measures 47-47-48-48-49-49 cm and cast off. Place hood double and sew tog at the top. POCKET: Cast on 3 sts on circular needle size 10 mm with Snow. Work garter st back and forth on needle. AT THE SAME TIME after 2 rows inc 1 st each side – See INCREASING TIP. Repeat the inc each side on every other row a total of 10 times = 23 sts. Continue in garter st until pocket measures 23 cm from cast on row, cast off loosely. Make 2. Place the pockets on each front piece approx 6-8 cm from mid front and approx 26-38 cm from bottom edge (or try on jacket for correct placement) – REMEMBER MEASUREMENT TIP – and sew on. |
|
 |
|
Have you finished this pattern?Tag your pictures with #dropspattern #silverbrightjacket or submit them to the #dropsfan gallery. Do you need help with this pattern?You'll find 15 tutorial videos, a Comments/Questions area and more by visiting the pattern on garnstudio.com. © 1982-2026 DROPS Design A/S. We reserve all rights. This document, including all its sub-sections, has copyrights. Read more about what you can do with our patterns at the bottom of each pattern on our site. |
|


With over 40 years in knitting and crochet design, DROPS Design offers one of the most extensive collections of free patterns on the internet - translated to 17 languages. As of today we count 325 catalogues and 12291 patterns translated into English (UK/cm).
We work hard to bring you the best knitting and crochet have to offer, inspiration and advice as well as great quality yarns at incredible prices! Would you like to use our patterns for other than personal use? You can read what you are allowed to do in the Copyright text at the bottom of all our patterns. Happy crafting!
Post a comment to pattern DROPS 122-40
We would love to hear what you have to say about this pattern!
If you want to leave a question, please make sure you select the correct category in the form below, to speed up the answering process. Required fields are marked *.