
Popular categories
Looking for a yarn?


Comments / Questions (86)
![]() Belindia French wrote:
Belindia French wrote:
Hi, love ur patterns. My question is why is most patterns are over 7 pages? Thanks!
12.03.2026 - 17:20
![]() Lilianne wrote:
Lilianne wrote:
This could BE the right Project for a stashbuster.
15.09.2025 - 13:35
![]() MM wrote:
MM wrote:
I’m thinking of felting this pattern. Can you give me some tips on what size I should knit before felting? I’ve had an accidental felting experience with one of the sweaters I knitted. The felted fabric was so nice, but it shrank so much even my 3 years old daughter couldn’t fit it. Thanks for your previous response!!
09.12.2023 - 15:17DROPS Design answered:
Dear MM, please undertsand that we cannot customise our patterns to each individual request. If you search our database, you will find many patterns that are already designed to be felted. Happy Crafting!
10.12.2023 - 21:25
![]() Peggy wrote:
Peggy wrote:
Bonjour Je ne comprends pour les devants, cette phrase: glisser à l'endroit la première maille à partir du milieu devant et la tricoter à l'endroit en fin de rang Merci
26.08.2023 - 17:48DROPS Design answered:
Bonjour Peggy, Sur l'endroit, glissez la 1ère maille du devant droit comme pour la tricoter à l'endroit (= sans la tricoter), et sur l'envers, tricotez la dernière maille du devant droit à l'endroit. Sur l'endroit, tricotez la dernière maille du devant gauche à l'endroit, et, sur l'envers, glissez la 1ère maille du devant gauche comme pour la tricoter à l'endroit (sans la tricoter). Bon tricot!
28.08.2023 - 13:51
![]() Le Terrier wrote:
Le Terrier wrote:
Bonjour J'ai réalisé cette veste et j'ai constaté quil devenait tres distendu donc il s'est allonge énormément Aussi, pourriez vous me dire si le modèle peut être réalisé au point de riz pour plus de tenu et je souhaiterais le faire a 87 cm de longueur maximale et si le fil drop muskat peut convenir en 2 fils sans que la veste se déforme A quelle hauteur dois je faire les augmentations des devants et dos Merci
08.05.2023 - 17:51DROPS Design answered:
Bonjour Mme Le Terrier, vous trouverez nos modèles de vestes en tension 11-9 mailles ici, vous y trouverez peut-être l'inspiration, la tension en hauteur étant différente au point mousse et point de riz, il peut être préférable de se pencher sur un modèle prévu au point de riz. L'idéal est de réaliser un échantillon avec 2 fils Muskat pour voir si le résultat vous convient en texture et en tension. Votre magasin saura vous renseigner, même par mail ou téléphone. Bon tricot!
09.05.2023 - 07:32
![]() Amy wrote:
Amy wrote:
, then 2 sts at the beg of every row each side until piece measures 56-57-58-58-59-59 cm. Now cast off 3 sts at beg of the next 2 rows, cast off remaining sts. Piece measures approx 57-58-59-59-60-60 cm. It doesn’t tell how many stitches left of sleeve after doing this.it’s confusing plz explain. This question is for sleeves Thanks
11.01.2023 - 23:55DROPS Design answered:
Dear Amy, it doesn't because it will depend on your own tension in height, you have to cast off 2 stitches at the beginning of each row on each side until the sleeve measures 57-60 cm (see size) - make sure that you cast off the same number of stitches on each side so that the sleeve cap will be symmetrical. Then cast off 3 sts at the beginning of next 2 rows. Happy knitting!
12.01.2023 - 09:42
![]() Le Terrier wrote:
Le Terrier wrote:
Je souhaite savoir combien de pelotes j\'ai besoin car je fais 1m60 et je souhaite raccourcir la longueur Je voudrais environ que la veste arrive au dessus des genoux Merci
29.10.2022 - 15:54DROPS Design answered:
Bonjour Mme Le Terrier, nous ne sommes malheureusement pas en mesure de pouvoir adapter chacun de nos modèles à chaque demande, vous pouvez vous inspirer d'un modèle analogue à la longueur souhaitée - n'hésitez pas à contacter votre magasin DROPS, on saura vous aider et vous conseiller, même par mail ou téléphone. Bon tricot!
31.10.2022 - 09:50
![]() Gisela Bongart wrote:
Gisela Bongart wrote:
Verstehe den Stricktipp zur Kapuze nicht: „Damit es in den Übergängen zwischen den M. auf dem Hilfsfaden keine Löcher gibt… “ Was meinen Sie mit Übergängen? Zuletzt: Noch zur Kapuze: Werden die Maschen von der Außenseite („rechte“ Seite) aus aufgenommen oder von der Innenseite („linke“ Seite)? Meinen Sie mit „Vorderseite“ die äußere Seite und mit „Rückseite“ Innenseite?
08.09.2021 - 16:42DROPS Design answered:
Liebe Frau Bongart, beim jedem Vorderteil wurden Maschen in jeder 2. Reihe stillgelegt, um Löcher zu vermeiden wird man hier bei diesen Übergängen zwischen den Maschen auf dem Faden 1 Masche aufnehmen (in diesem dieses Video, Zeit 3:00 z.B. werden 2 Maschen beim Übergang aufgenommen) - die Maschen für die Kapuze sollen auf der Vorderseite = Außenseite aufgenommen werden (= Hinreihen). Viel Spaß beim stricken!
09.09.2021 - 08:28
![]() Lucille Dubois wrote:
Lucille Dubois wrote:
Can I substitute the garter stitch for the moss stitch. Would that complicate or upset the directions too much?
28.11.2020 - 00:57DROPS Design answered:
Dear Lucille, if you substitute garter stitch to moss stitch, you need to make a gauge, to know you're working with the correct tension. Also, there will be some changes, in the number of stitches you have to cast on, for example, since the texture will be different. Happy knitting!
29.11.2020 - 18:01
![]() Kasia wrote:
Kasia wrote:
Nie rozumiem jak jest liczone zamykanie oczek na podkrój rękawów. Zamykając 3 oczka muszę przerobić 4o. naraz? 2o. tzn. 3o. A zamykając 1o. przerabiam 2o. naraz? Bo tylko w ten sposób jestem w stanie z 60 oczek zejść do 34. Pozdrawiam serdecznie
02.11.2020 - 19:43DROPS Design answered:
Witaj Kasiu, odpowiedź na to pytanie już została udzielona, zobacz na dole we wzorze. Pozdrawiamy i miłej pracy!
03.11.2020 - 09:14
|
|
Silver Bright#silverbrightjacket |
|
 |
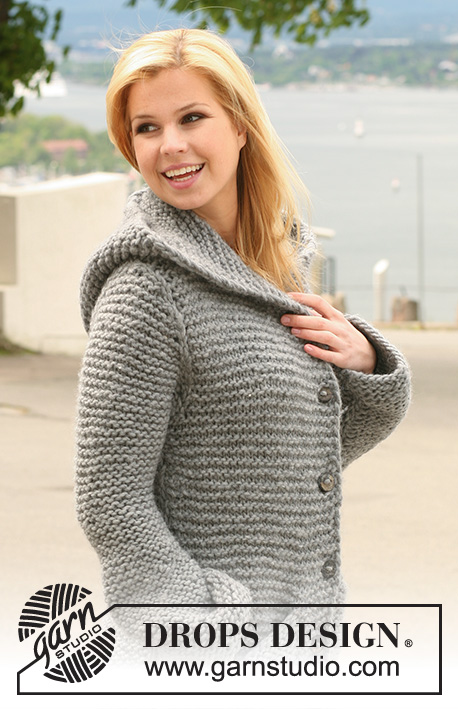 |
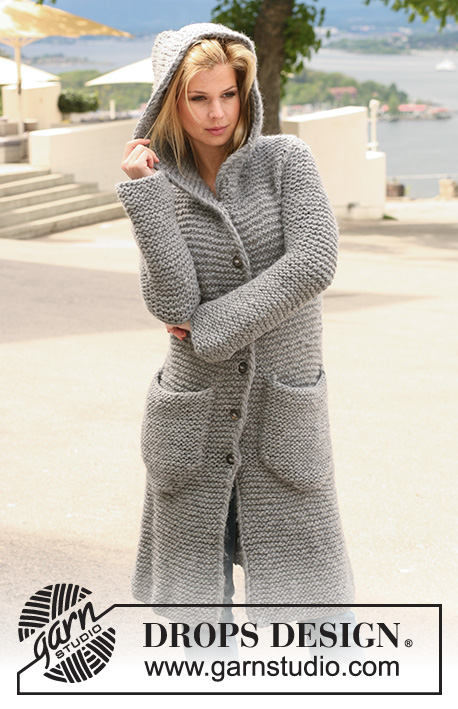
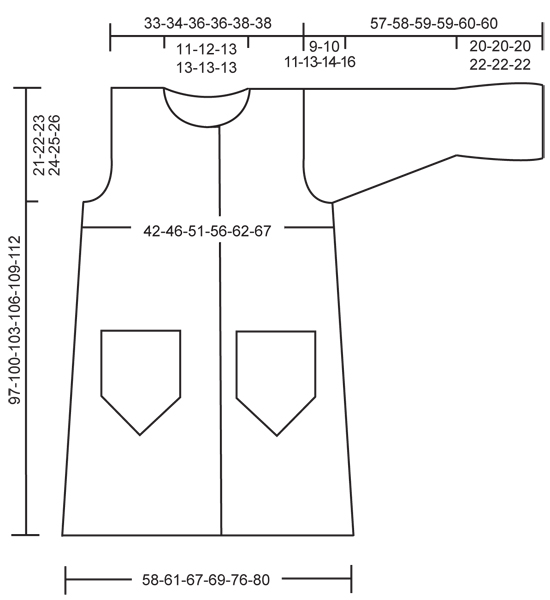
Long DROPS jacket in garter st with hood in ”Snow”. Size S - XXXL.
DROPS 122-40 |
|
|
GARTER ST (back and forth on needle): K all rows. MEASUREMENT TIP: Because of the weight of the yarn make all measurements while the garment is hanging otherwise it will be too long when worn. BUTTONHOLES: Make buttonholes on right front piece. 1 BUTTONHOLE = Cast off third st from mid front and cast on 1 new st on next row. Make buttonholes when piece measures: SIZE S: 41, 51, 61, 71, 81 and 91 cm SIZE M: 43, 53, 63, 73, 83 and 93 cm SIZE L: 45, 55, 65, 75, 85 and 95 cm SIZE XL: 43, 52, 61, 70, 79, 88 and 97 cm SIZE XXL: 46, 55, 64, 73, 82, 91 and 100 cm SIZE XXXL: 49, 58, 67, 76, 85, 94 and 103 cm KNITTING TIP (applies to hood): To avoid a hole in each transition when sts are slipped on stitch holder pick up thread between 2 sts and work this tog with first st on needle. INCREASING TIP (applies to pockets): Inc 1 st inside 1 st each side by making 1 YO. On next row K YO into back of loop to avoid a hole. -------------------------------------------------------- JACKET: Worked in parts, back and forth on circular needle. BACK PIECE: Cast on 52-55-60-62-68-72 sts on circular needle size 10 mm with Snow. Work GARTER ST - see above - back and forth on needle. REMEMBER THE KNITTING TENSION! When piece measures 12-12-12-14-14-14 cm - See MEASUREMENT TIP - dec 1 st each side and repeat the dec each side on every 10-10-10-12-12-13 cm a total of 7-7-7-6-6-6 times = 38-41-46-50-56-60 sts. When piece measures 76-78-80-82-84-86 cm - REMEMBER MEASUREMENT TIP – cast off for armhole at the beg of every row each side as follows: 3 sts 1 time, 2 sts 0-0-1-1-2-3 times and 1 st 1-2-2-4-4-4 times = 30-31-32-32-34-34 sts. When piece measures 95-98-101-104-107-110 cm cast off the middle 8-9-10-10-10-10 sts for neck and complete each shoulder separately. Cast off 1 st on neckline on next row = 10-10-10-10-11-11 sts left on shoulder. Cast off when piece measures 97-100-103-106-109-112 cm. RIGHT FRONT PIECE: Cast on 30-32-34-35-38-40 sts (includes 4 front band sts towards front edge) on circular needle size 10 mm with Snow. Work garter st back and forth on needle - NOTE: work the 2 sts towards front edge in 2 strands until finished measurements (use a separate ball) and slip first st from mid front as if to K and K this at the end of next row. When piece measures 12-12-12-14-14-14 cm dec at the side as described for back piece = 23-25-27-29-32-34 sts. AT THE SAME TIME when piece measures 41-43-45-43-46-49 cm - REMEMBER MEASUREMENT TIP – make BUTTONHOLES - see above. When piece measures 76-78-80-82-84-86 cm cast off for armhole at the side as described for back piece – cast off at the beg of every row from the side = 19-20-20-20-21-21 sts. Continue until piece measures 92-94-96-98-101-104 cm. Now slip the 6 sts towards front edge on a stitch holder for neck (work sts first to avoid having to cut the thread). Slip sts at the beg of every row from mid front on the same stitch holder as follows (work sts first): 2 sts 1 time and 1 st 1-2-2-2-2-2 times = 10-10-10-10-11-11 sts left on shoulder. Cast off when piece measures 97-100-103-106-109-112 cm. LEFT FRONT PIECE: Cast on and work like right front piece, but mirrored. NOTE: Do not make buttonholes. SLEEVE: Cast on 30-30-32-32-34-34 sts on circular needle size 10 mm with Snow and work garter st back and forth on needle. When piece measures 20-20-20-22-22-22 cm - REMEMBER MEASUREMENT TIP - dec 6 sts evenly (from RS) = 24-24-26-26-28-28 sts. On next row (= WS) inc 1 st each side and repeat the inc on every 6-5-5-3.5-3-2.5 cm a total of 5-6-6-7-8-9 times = 34-36-38-40-44-46 sts. When piece measures 48-48-48-46-46-44 cm - NOTE! Less for the larger sizes because of longer sleeve cap and wider shoulder- cast off for sleeve cap at the beg of every row each side as follows: 2 sts 1 time and 1 st 5-6-7-8-9-10 times, then 2 sts at the beg of every row each side until piece measures 56-57-58-58-59-59 cm. Now cast off 3 sts at beg of the next 2 rows, cast off remaining sts. Piece measures approx 57-58-59-59-60-60 cm. ASSEMBLY: Sew shoulder seams. Set in sleeves. Sew sleeve and side seams - sew edge to edge in outer loops of sts to avoid a chunky seam. Sew buttons on left front piece. HOOD: Pick up approx 35 to 42 sts round neck (includes sts on stitch holders at front) on circular needle size 10 mm with Snow. K 1 row from WS, AT THE SAME TIME pick up thread between 2 sts to avoid a hole in transitions at front – See KNITTING TIP. Continue in garter st back and forth on needle – NOTE: work the 2 sts each side towards front edge in 2 strands until finished measurement and slip first st from mid front as if to K and K this at the end of next row. After 8 rows garter st inc evenly on next row from RS to 48-50-52-54-56-58 sts - NOTE: do not inc on the 4 sts each side (= front bands). Continue in garter st until hood measures 47-47-48-48-49-49 cm and cast off. Place hood double and sew tog at the top. POCKET: Cast on 3 sts on circular needle size 10 mm with Snow. Work garter st back and forth on needle. AT THE SAME TIME after 2 rows inc 1 st each side – See INCREASING TIP. Repeat the inc each side on every other row a total of 10 times = 23 sts. Continue in garter st until pocket measures 23 cm from cast on row, cast off loosely. Make 2. Place the pockets on each front piece approx 6-8 cm from mid front and approx 26-38 cm from bottom edge (or try on jacket for correct placement) – REMEMBER MEASUREMENT TIP – and sew on. |
|
 |
|
Have you finished this pattern?Tag your pictures with #dropspattern #silverbrightjacket or submit them to the #dropsfan gallery. Do you need help with this pattern?You'll find 15 tutorial videos, a Comments/Questions area and more by visiting the pattern on garnstudio.com. © 1982-2026 DROPS Design A/S. We reserve all rights. This document, including all its sub-sections, has copyrights. Read more about what you can do with our patterns at the bottom of each pattern on our site. |
|


With over 40 years in knitting and crochet design, DROPS Design offers one of the most extensive collections of free patterns on the internet - translated to 17 languages. As of today we count 325 catalogues and 12291 patterns translated into English (UK/cm).
We work hard to bring you the best knitting and crochet have to offer, inspiration and advice as well as great quality yarns at incredible prices! Would you like to use our patterns for other than personal use? You can read what you are allowed to do in the Copyright text at the bottom of all our patterns. Happy crafting!
Post a comment to pattern DROPS 122-40
We would love to hear what you have to say about this pattern!
If you want to leave a question, please make sure you select the correct category in the form below, to speed up the answering process. Required fields are marked *.