
Popular categories
Looking for a yarn?


Comments / Questions (18)
![]() Andrea wrote:
Andrea wrote:
Wieviele Maschen brauche ich für Kopfumfang 53cm? Die Maschenprobe 24 M = 10 cm passt. Vielen Dank für die Hilfe🙏
03.02.2026 - 18:30DROPS Design answered:
Hi Andrea, you should choose S/M size. You may use smaller needles (2 mm) for the rib. Happy knitting!
07.04.2026 - 10:12
![]() Susanne wrote:
Susanne wrote:
Buonasera, quando lavoro con i ferri a doppia punta, sul lavoro si crea un punto più largo tra i due ferri anche se metto i punti molto vicini e stringo bene il filo. C'è un sistema per risolvere?
09.01.2021 - 22:09DROPS Design answered:
Buongiorno Susanne, abbiamo appena pubblicato un video che può esserle di aiuto: provi a guardare questo link. Buon lavoro!
10.01.2021 - 13:47
![]() Tella wrote:
Tella wrote:
Buongiorno, quando s'incomincia il primo diagramma, bisogna fare i nove rovesci o lavorare tutto a dritto? Grazie
12.12.2018 - 11:58DROPS Design answered:
Buongiorno Tella, entrambi i capi sono lavorati in tondo, per cui deve seguire la legenda così com'è. Sul primo giro deve lavorare tutte le maglie a diritto. Buon lavoro!
12.12.2018 - 12:17
![]() Fr. Neves wrote:
Fr. Neves wrote:
Ich habe zu folgendem Abschnitt der Mützenanleitung eine Frage: "Weiter in jeder li.-Partie je M. abk. und alle 3 cm total 5-6 Mal wiederholen (abwechslungsweise auf der linken und auf der rechten Seite der li.-Partie 2 M. zusammen stricken) = 105-105 M. " Ab wann fang ich nun an wie viele Maschen abzuketten? In dem Bereich, wo im Zopf links gestrickt wird oder in den Bereichen, wo generell links gestrickt wird? Mit bestem Dank und freundlichen Grüßen, C. Neves
08.11.2013 - 15:28DROPS Design answered:
Liebe Frau Neves, mit Linkspartien ist nicht der Zopf gemeint, sondern die "Rippen", in denen nur links gestrickt wird.
11.11.2013 - 07:37
![]() Clawur wrote:
Clawur wrote:
Die Haube ist ganz toll geworden! Werd ich als Weihnachtsgeschenk nochmal machen.
01.10.2013 - 19:15
![]() Christine wrote:
Christine wrote:
Habe eine Frage zu den Abnahmen: wenn ich alle drei Zentimeter abnehme und das fünf mal, dann kommen noch 15 Zentimeter dazu. Ist das nicht zu viel? Mir scheint die Mütze wird so viel zu lang...
09.01.2013 - 22:09DROPS Design answered:
Liebe Christine, ja das ist eine recht lange Mütze, es ist gedacht, dass sie hinten ein wenig „überhängt“. Sie können die Mütze aber auch etwas kürzer stricken (in kürzeren Abständen abn).
10.01.2013 - 12:58
![]() Drops Desing wrote:
Drops Desing wrote:
Du kanst die Arbeit auch auf einem Nadelspiel stricken (das gibt einfach viele Maschen pro Nadel).
30.12.2009 - 18:39
![]() Senay wrote:
Senay wrote:
Hat schon jemand die Mütze gestrickt? Komme nicht wirklich klar mit den Rundstricknadeln :))
29.12.2009 - 22:31
![]() Julia wrote:
Julia wrote:
It's wonderful!!!I'd like to see a pattern)
05.11.2009 - 12:23
![]() Munira wrote:
Munira wrote:
Im love uoy
27.10.2009 - 17:07
|
|||||||||||||
Lola#lolaset |
|||||||||||||
|
|
|||||||||||||
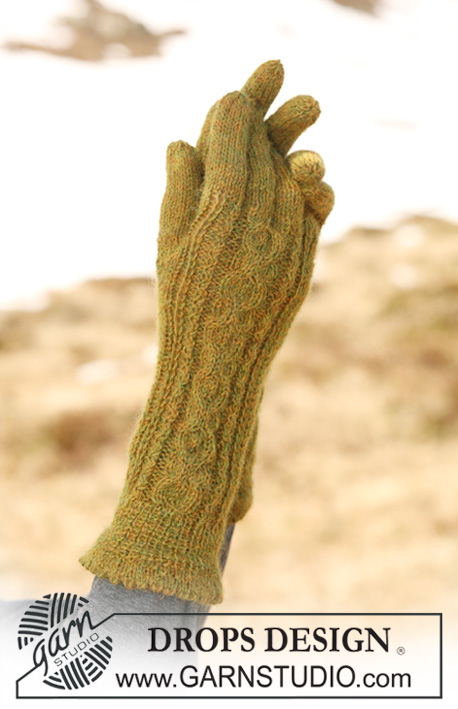
Set comprises: Knitted DROPS hat and gloves with cables in ”Fabel” or "Flora".
DROPS 114-34 |
|||||||||||||
|
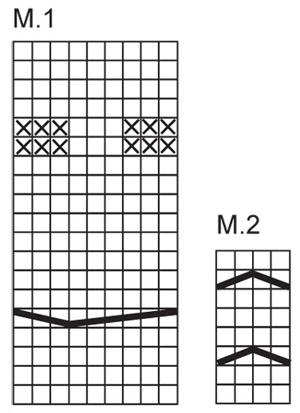
HAT: -------------------------------------------------------- PATTERN: See diagrams M.1 and M.2. Diagrams show the pattern from RS. -------------------------------------------------------- Worked in the round on circular needle. Cast on 168-180 sts on circular needle size 2.5 mm with Fabel or Flora. K 1 round and continue in rib K2/P2. When rib measures 4-5 cm K 1 round, AT THE SAME TIME inc 7-9 sts evenly = 175-189 sts. Change to circular needle size 3 mm. P 1 round and continue as follows: * M.1 (= 9 sts), P 6-7, M.2 (= 4 sts), P 6-7 *, repeat from *-* (= 7 times). Continue like this until piece measures 12 cm. Now dec 1 st in each P-section, and repeat the dec on every 3 cm a total of 5-6 times (dec on the right and left side of P-section alternately by P2 tog) = 105-105 sts. On next round K2 tog all the way round = 53-53 sts. Now continue in the round on double pointed needles. On next round K2 tog all the way round = 27-27 sts. Hat now measures approx 25-28 cm. Cut the thread, pull through remaining sts and fasten. -------------------------------------------------------- GLOVES: -------------------------------------------------------- PATTERN: See diagram M.1. Diagram shows the pattern from RS. -------------------------------------------------------- LEFT GLOVE: Worked in the round on double pointed needles. Cast on 64-72 sts on double pointed needles size 2.5 mm with Fabel or Flora. K 1 round and continue in rib as follows: * K2, P2 *, repeat from *-* for 2 cm. Change to double pointed needles size 3 mm. K 1 round, AT THE SAME TIME dec 11 sts evenly = 53-61 sts. Continue as follows: P 9-11, M.1 (= 9 sts), P 35-41. When piece measures 16-18 cm dec 4 sts evenly on the 35-41 P sts = 49-57 sts. When piece measures 19-20 cm beg inc for thumb: Cast on 1 new st at the end of round, insert a marker in this st and now inc 1 st on each side of st with marker – inc by making 1 YO and P YO into back of loop on next round to avoid a hole. Repeat the inc of every 4th round a total of 5-6 times = 11-13 thumb sts and 60-70 sts in total on round. When piece measures 25-27 cm slip the 11-13 thumb sts on a stitch holder. Cast on 4 new sts behind the thumb = 53-61 sts. Continue until piece measures 30-32 cm. Now slip the first 22-25 sts and the last 21-24 sts on a stitch holder = 10-12 sts left on needle. LITTLE FINGER: Distribute the 10-12 sts on double pointed needles size 3 mm and cast on 2 new sts towards the hand = 12-14 sts. P all sts in the round for approx 5.5-6 cm, then P2 tog all the way round. Cut the thread, pull through remaining sts and fasten. HAND: Slip the 43-49 sts on stitch holder back on needle, cast on 2 sts towards little finger = 45-51 sts. P 1 round on all sts, AT THE SAME TIME dec 5 sts evenly on M.1 = 40-46 sts. P 2 rounds on all sts. Keep the 2 sts cast on towards little finger + 6-7 sts on each side of these on needle. Slip the remaining 26-30 sts on a stitch holder. RING FINGER: In addition to sts on needle cast on 1 new st towards sts on stitch holder = 15-17 sts. P all sts in the round for approx 7-7.5 cm, then P2 tog all the way round. Cut the thread, pull through remaining sts and fasten. MIDDLE FINGER: Slip 6-7 sts from each side back on needle, cast on 2 new sts towards ring finger and 1 new st towards sts on stitch holder = 15-17 sts. P all sts in the round for approx 8-8.5 cm, then P2 tog all the way round. Cut the thread, pull through remaining sts and fasten. INDEX FINGER: Slip the remaining 14-16 sts from stitch holder back on needle and cast on 2 new sts towards middle finger = 16-18 sts. P all sts in the round for approx 7-7.5 cm, then P2 tog all the way round. Cut the thread, pull through remaining sts and fasten. THUMB: Slip sts from stitch holder back on needle and pick up 5-6 sts in the edge over the thumb sts = 16-19 sts. P all sts in the round for approx 5.5-6 cm, then P2 tog all the way round. Cut the thread, pull through remaining sts and fasten. RIGHT GLOVE: Like left glove, but mirrored, i.e: On first round with pattern P 35-41, M.1, P 9-11. Cast on 1 new st for thumb at the beg of round, and when dividing for little finger slip the first 21-24 and the last 22-25 sts on a stitch holder. |
|||||||||||||
Diagram explanations |
|||||||||||||
|
|||||||||||||
 |
|||||||||||||
Have you finished this pattern?Tag your pictures with #dropspattern #lolaset or submit them to the #dropsfan gallery. Do you need help with this pattern?You'll find 17 tutorial videos, a Comments/Questions area and more by visiting the pattern on garnstudio.com. © 1982-2026 DROPS Design A/S. We reserve all rights. This document, including all its sub-sections, has copyrights. Read more about what you can do with our patterns at the bottom of each pattern on our site. |
|||||||||||||


With over 40 years in knitting and crochet design, DROPS Design offers one of the most extensive collections of free patterns on the internet - translated to 17 languages. As of today we count 324 catalogues and 12290 patterns translated into English (UK/cm).
We work hard to bring you the best knitting and crochet have to offer, inspiration and advice as well as great quality yarns at incredible prices! Would you like to use our patterns for other than personal use? You can read what you are allowed to do in the Copyright text at the bottom of all our patterns. Happy crafting!
Post a comment to pattern DROPS 114-34
We would love to hear what you have to say about this pattern!
If you want to leave a question, please make sure you select the correct category in the form below, to speed up the answering process. Required fields are marked *.