
Popular categories
Looking for a yarn?


Comments / Questions (154)
Erlin wrote:
Hi, I'm confused with this part: BACK PIECE: Crochet on the middle 19-19-19-21-21-23 large ch-loops, each armhole = 1-3-5-5-7-7 large loops. Do I have to crochet 19 large ch loops (S size) in the middle of the whole ch loops? And also this one: ASSEMBLY: I find under arms which needs to be crocheted together, not shoulder. Am I right? Please help,Thanks.
14.04.2012 - 10:01DROPS Design answered:
Yes, continuing after armholes only work in the 19 large loops in the middle of the row. At the end crochet shoulder together. If you need further help, we kindly ask you to go to the store where you bought the yarn. When you buy original Garnstudio yarn, you can be sure that you have bought yarn from a store that are specialized on DROPS patterns, and you will get all the help you may need. Our stores are always there to give their customers help, in store, by phone or email.
16.04.2012 - 20:53Hida wrote:
Hi.. thanx for the tutorial. Now, I learn to make one for my sister, wish me luck :D
18.03.2012 - 09:43
![]() Carmen wrote:
Carmen wrote:
I feel you need to re-write this pattern. It is so confusing I've been trying all day with no luck.It's after the repeat on rows that I can't figure it out. I bought the yarn for this pattern and now I'm so desapointed That's my luck
28.02.2012 - 04:15
![]() Alicia wrote:
Alicia wrote:
Can somebody help me with this pattern
28.02.2012 - 02:53
![]() Julie wrote:
Julie wrote:
Regarding the sizes XL-XXL-XXXL What are the bust measurements in inches want to know if I'm crocheting the right size
11.02.2012 - 23:17Drops Design wrote:
Indira, this design does not provide a chart, but describes in text what to do row by row.
28.10.2011 - 17:34Indira Sanjeevi wrote:
Hi, It is beautiful .I want to try to crochet this bolero. If you have diagramatic instructions I can follow and understand. Help .
28.10.2011 - 14:34
![]() DROPS Design wrote:
DROPS Design wrote:
Unfortunately we are not able to answer all individual questions, so if you need help with this pattern please contact the shop that sold you your yarn, or look for help in one of the forums.
15.08.2011 - 09:44Enajar wrote:
Hi, how many rows are there to complete the BOLERO stage of this pattern. I'm working on the medium size. Also, i can't understand the instruction on wer and how to divide for the armholes.. On the RIGHT FRONT PIECE, wer is the 1st 7 large chain-loops located? tnx..
06.08.2011 - 13:15Enajar wrote:
Hi, I'm doing d medium size bolero but I'm confused w/ dis instruction,especialy d last part:(Repeat row 3, i.e. inc 1 loop on every row, until there are 39 large ch-loops on row, finish the last row as follows: 1 sc + 3 ch + 1 sc in 4th ch in last ch-loop). Is d row w/ 39 loops d LAST ROW? will i do d same 4 d last row d instruction for Row 3, coz i can't make 39 loops if i follow d last part of d instruction (1 sc + 3 ch + 1 sc in 4th ch in last ch-loop).pls reply.tnx.
21.07.2011 - 19:23
|
|
Golden Roses#goldenrosesbolero |
|
 |
 |
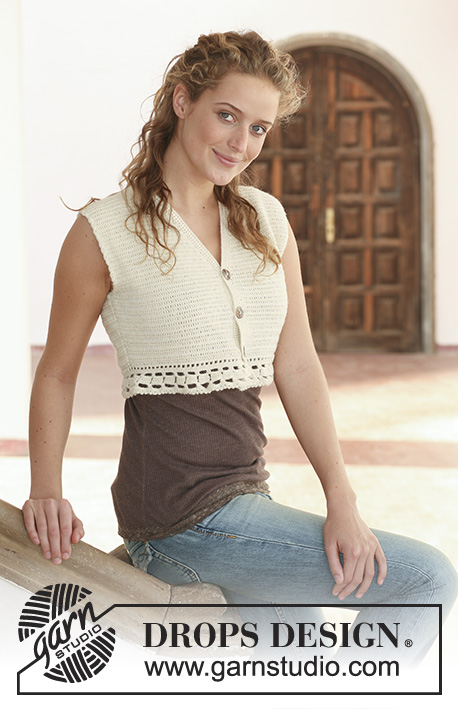
Crochet DROPS bolero in ”Cotton Viscose” with flower border round the opening. Size S - XXXL.
DROPS 111-25 |
|
|
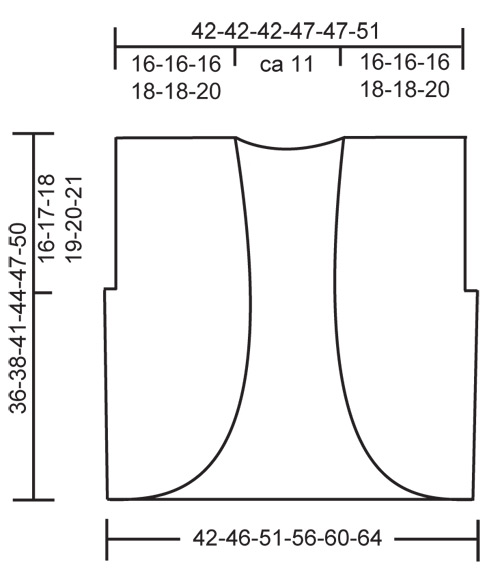
BOLERO: Work 105-115-125-135-145-155 ch with crochet hook size 3 mm and Cotton Viscose. ROW 1: 1 dc in 15th ch from hook, and continue as follows: *7 ch, skip 4 ch, 1 dc in next ch *, repeat from *-* = 19-21-23-25-27-29 ch-loops on row, turn piece. ROW 2: 14 ch, 1 dc in the middle of the 7 ch in first ch-loop from previous row, 3 ch, 1 dc in the same ch, * 7 ch, 1 dc in the middle ch in next ch-loop, 3 ch, 1 dc in the same ch *, repeat from *-*, and finish with: 7 ch, 1 dc in 3rd ch in the last ch-loop, 3 ch, 1 dc in the same ch, 7 ch and 1 dc in 8th ch in the last ch-loop, turn piece. ROW 3: 14 ch, 1 dc in the middle ch in first large loop from previous row, 3 ch, 1 dc in the same ch, * 7 ch, 1 dc in the middle ch in next large ch-loop (skip the small ch-loop), 3 ch, 1 dc in the same ch *, repeat from *-*, and finish with: 7 ch, 1 dc in 3rd ch in last large ch-loop, 3 ch, 1 dc in the same ch, 7 ch and 1 dc in 8th ch in last large ch-loop, turn piece. Repeat row 3, i.e. inc 1 loop on every row, until there are 35-39-43-47-51-55 large ch-loops on row, finish the last row as follows: 1 dc + 3 ch + 1 dc in 4th ch in last ch-loop, turn piece. The inc are now complete. Continue as follows: Beg each row with 7 ch instead of 14, then 1 dc + 3 ch + 1 dc in the middle st in the first large ch-loop from previous row, continue across the row as before and finish with 1 dc + 3 ch + 1 dc in 4th ch in last ch-loop, turn piece. AT THE SAME TIME when piece measures 20-21-23-25-27-29 cm divide for armholes – see below! RIGHT FRONT PIECE: Crochet on the first 7-7-7-8-8-9 large ch-loops, turn piece after 1 dc + 3 ch + 1 dc in the last of these 7-7-7-8-8-9 ch-loops, turn with 7 ch and work return row. Continue on remaining ch-loops as before until piece measures 16-17-18-19-20-21 cm from where piece was divided, cut the thread but leave approx 200 cm to crochet tog the shoulders afterwards. LEFT FRONT PIECE: Crochet on the first 7-7-7-8-8-9 large ch-loops the other side and continue as described for right front piece. BACK PIECE: Crochet on the middle 19-19-19-21-21-23 large ch-loops, each armhole = 1-3-5-5-7-7 large loops. Continue until piece measures 16-17-18-19-20-21 cm from where piece was divided – make sure to have the same number of ch-loops on back piece as on front piece. ASSEMBLY: Crochet shoulders tog as follows: Work sl sts to the middle of the first large ch-loop on front piece, 4 ch, 1 dc in the middle of the first large ch-loop on back piece, 4 ch, 1 dc in the next large loop on front piece, 4 ch, 1 dc in the next large loop on back piece, etc. Crochet a row of dc with Cotton Viscose round the opening of the bolero as follows: approx 4 dc in each of the large ch-loops and 1 dc in each of the small ch-loops, and work 6 dc in the increases on front pieces – make sure the row is elastic. Crochet in the same way round armholes. FLOWER: Work 4 ch with crochet hook size 3 mm and 1 thread Cotton Viscose + 2 threads Glitter and form a ring with 1 sl st in first ch. ROUND 1: 6 dc in ring, finish with 1 sl st in first dc. ROUND 2: 4 ch, * 1 dc in next dc, 3 ch *, repeat from *-* a total of 5 times, finish with 1 sl st in 2nd ch from beg of round (= 6 ch-loops). ROUND 3: Crochet as follows in each ch-loop: 1 dc, 3 tr, 1 dc, finish with 1 sl st in first dc (= 6 leaves). ROUND 4: Fold leaves towards you and crochet in the back of these as follows: 1 dc round first dc from round 2, 5 ch, * 1 dc round next dc from round 2, 5 ch *, repeat from *-*, and finish with 1 sl st in first dc from beg of round (= 6 ch-loops). ROUND 5: Crochet as follows in each ch-loop: 1 dc, 5 tr, 1 dc, finish with 1 sl st in first dc (= 6 leaves), cut the thread and leave approx 20 cm – used to sew tog flowers afterwards. Make approx 29-31-35-37-39-41 flowers, and sew them tog, leaf to leaf, to a long row. Now sew the row to bolero, beg mid back. Place the centre of flower on the row of dc and sew the centre of flower to the dc row, repeat for the other flowers down along one front piece, and along bottom edge to mid back. Beg mid back at neckline again and continue to mid back at bottom edge. If you need more/less flowers, adjust this before sewing tog the flowers mid back at bottom edge. |
|
 |
|
Have you finished this pattern?Tag your pictures with #dropspattern #goldenrosesbolero or submit them to the #dropsfan gallery. Do you need help with this pattern?You'll find 7 tutorial videos, a Comments/Questions area and more by visiting the pattern on garnstudio.com. © 1982-2026 DROPS Design A/S. We reserve all rights. This document, including all its sub-sections, has copyrights. Read more about what you can do with our patterns at the bottom of each pattern on our site. |
|


With over 40 years in knitting and crochet design, DROPS Design offers one of the most extensive collections of free patterns on the internet - translated to 17 languages. As of today we count 325 catalogues and 12298 patterns translated into English (UK/cm).
We work hard to bring you the best knitting and crochet have to offer, inspiration and advice as well as great quality yarns at incredible prices! Would you like to use our patterns for other than personal use? You can read what you are allowed to do in the Copyright text at the bottom of all our patterns. Happy crafting!
Post a comment to pattern DROPS 111-25
We would love to hear what you have to say about this pattern!
If you want to leave a question, please make sure you select the correct category in the form below, to speed up the answering process. Required fields are marked *.