
Popular categories
Looking for a yarn?


Comments / Questions (154)
![]() Susannes wrote:
Susannes wrote:
:% bin schon so weit mit den großen Bögen und würde dieses ausnehmend süsse Jäckchen so gerne zuende bekommen und nicht wieder die ganze Arbeit auftrennen müssen. Wäre echt froh über Hilfe. Danke für diese tolle Strickhomepage und lieben Gruß aus Regensburg
14.02.2010 - 18:50
![]() Susanne wrote:
Susanne wrote:
Entschuldigung, dass ich schon wieder hier schreibe, aber ich verstehe eigentlich ab der Wiederholung der REIHE 3 gar nichts mehr. Weder wo das Armloch geteilt wird, noch wieso man anstelle von 4 LM (ich dachte es waren immer 14 am Ende der Reihe...?) nun 7 LM häkeln soll. Und was die Zahlen im Diagramm bedeuten ...sie stimmen für mich nicht mit denen im Text überein? Hilfe, bin ich total schwer von Kapé?
14.02.2010 - 18:49
![]() Susanne wrote:
Susanne wrote:
Mir fällt auch gerade auf, dass ich nicht verstehe, ab wo ich genau die großen Bögen zählen muss, damit ich nicht mehr Aufnahmen als 35 Bögen mache. Das Häkelstück verjüngt sich ja zu den beiden Enden links und rechts und die Anzahl der übereinander liegenden Bögen nimmt ab, bis zu dem Punkt wo ganz am Ende nur ein einziger Bogen ist, der aus den 14 LM gebildet wurde. Werden diese auch zu den 35 hinzugezählt? Ich danke für die Antwort :)
13.02.2010 - 21:02
![]() Susanne wrote:
Susanne wrote:
Liebes DropsTeam, ich verstehe die Anleitung nicht ganz, habe aber bereits sehr viel gehäkelt. Nur jetzt wo die Arme und die Seitenteile drankommen..Wie muss ich die Löcher für die Arme machen? Danke für Hilfe :) Liebe Grüsse Susanne
13.02.2010 - 20:40Emilia Ortiz wrote:
I didn't find the instructions clear, I got all the way to the back part, but it didn't make sense, It would help if the site have pictures of each piece with it, so I know how it's supposed to look like or at least mentioned someth in the text as you go and work on the piece. They is many gaps in instructions.
07.11.2009 - 19:43
![]() DROPS Deutsch wrote:
DROPS Deutsch wrote:
Ja das stimmt zwischen dem 4 Lm überspringen, 1 fM in die nächste R. müssen immer 7 Lm gehäkelt werden.
12.10.2009 - 09:52
![]() Coco wrote:
Coco wrote:
Vielen Dank für die schnelle Antwort. Ich häkle eine Luftmaschenkette, dann die erste Reihe von rechts nach links, dann drehe ich die Arbeit und häkle wieder von rechts nach links, überspringe allerdings 17-19-... Bögen, um den mit den 7 Lm zu erreichen. Ist da evtl. ein Fehler in der 1.R., häkelt man nach jeder fM wieder 7 Lm?
11.10.2009 - 08:53
![]() Drops Deutsch wrote:
Drops Deutsch wrote:
Du häkelst die fm in den ersten der 19-21-23-25-27-29 Lm-Bogen. Hast du evt. vergessen die Arbeit zu drehen?
07.10.2009 - 11:32
![]() Coco wrote:
Coco wrote:
Hallo, ich habe das gleiche Problem wie Carol vor mir. Die erste Reihe ist noch kein Problem, aber die zweite verstehe ich gar nicht. "14 Lm häkeln, 1 fM in die mittlere der 7 Lm des ersten Lm-Bogens der letzten Runde" damit bin ich doch bereits wieder fast am Ende der Reihe angelangt, wenn ich alle anderen Bögen noch erreichen will, muss ich dazu doch kreuz und quer und unten durch häkeln? Würde mich über Hilfe sehr freuen Danke
06.10.2009 - 21:12
![]() Carol wrote:
Carol wrote:
Love your website, but I need help with this pattern 111-25 I can get thru row 1 but on row 2 it says to 14 ch, 1 sc in the middle ch in the in 7 ch in first ch-loop from previous row.....you end row 1 w/sc HELP
28.07.2009 - 03:08
|
|
Golden Roses#goldenrosesbolero |
|
 |
 |
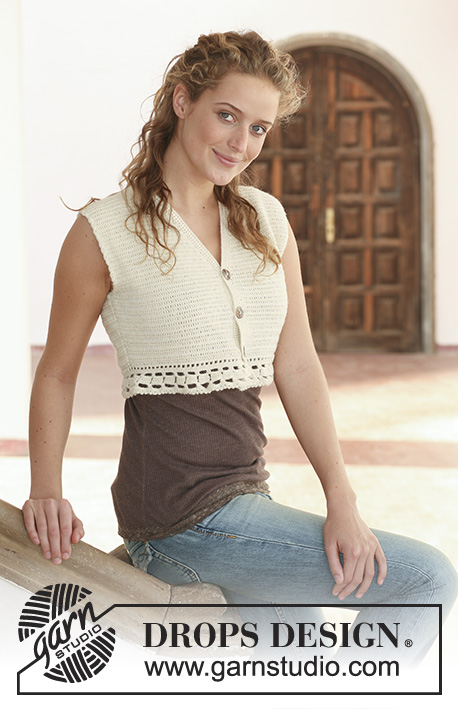
Crochet DROPS bolero in ”Cotton Viscose” with flower border round the opening. Size S - XXXL.
DROPS 111-25 |
|
|
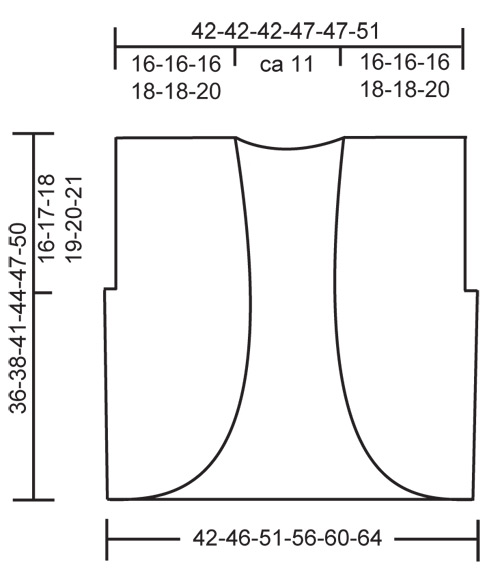
BOLERO: Work 105-115-125-135-145-155 ch with crochet hook size 3 mm and Cotton Viscose. ROW 1: 1 dc in 15th ch from hook, and continue as follows: *7 ch, skip 4 ch, 1 dc in next ch *, repeat from *-* = 19-21-23-25-27-29 ch-loops on row, turn piece. ROW 2: 14 ch, 1 dc in the middle of the 7 ch in first ch-loop from previous row, 3 ch, 1 dc in the same ch, * 7 ch, 1 dc in the middle ch in next ch-loop, 3 ch, 1 dc in the same ch *, repeat from *-*, and finish with: 7 ch, 1 dc in 3rd ch in the last ch-loop, 3 ch, 1 dc in the same ch, 7 ch and 1 dc in 8th ch in the last ch-loop, turn piece. ROW 3: 14 ch, 1 dc in the middle ch in first large loop from previous row, 3 ch, 1 dc in the same ch, * 7 ch, 1 dc in the middle ch in next large ch-loop (skip the small ch-loop), 3 ch, 1 dc in the same ch *, repeat from *-*, and finish with: 7 ch, 1 dc in 3rd ch in last large ch-loop, 3 ch, 1 dc in the same ch, 7 ch and 1 dc in 8th ch in last large ch-loop, turn piece. Repeat row 3, i.e. inc 1 loop on every row, until there are 35-39-43-47-51-55 large ch-loops on row, finish the last row as follows: 1 dc + 3 ch + 1 dc in 4th ch in last ch-loop, turn piece. The inc are now complete. Continue as follows: Beg each row with 7 ch instead of 14, then 1 dc + 3 ch + 1 dc in the middle st in the first large ch-loop from previous row, continue across the row as before and finish with 1 dc + 3 ch + 1 dc in 4th ch in last ch-loop, turn piece. AT THE SAME TIME when piece measures 20-21-23-25-27-29 cm divide for armholes – see below! RIGHT FRONT PIECE: Crochet on the first 7-7-7-8-8-9 large ch-loops, turn piece after 1 dc + 3 ch + 1 dc in the last of these 7-7-7-8-8-9 ch-loops, turn with 7 ch and work return row. Continue on remaining ch-loops as before until piece measures 16-17-18-19-20-21 cm from where piece was divided, cut the thread but leave approx 200 cm to crochet tog the shoulders afterwards. LEFT FRONT PIECE: Crochet on the first 7-7-7-8-8-9 large ch-loops the other side and continue as described for right front piece. BACK PIECE: Crochet on the middle 19-19-19-21-21-23 large ch-loops, each armhole = 1-3-5-5-7-7 large loops. Continue until piece measures 16-17-18-19-20-21 cm from where piece was divided – make sure to have the same number of ch-loops on back piece as on front piece. ASSEMBLY: Crochet shoulders tog as follows: Work sl sts to the middle of the first large ch-loop on front piece, 4 ch, 1 dc in the middle of the first large ch-loop on back piece, 4 ch, 1 dc in the next large loop on front piece, 4 ch, 1 dc in the next large loop on back piece, etc. Crochet a row of dc with Cotton Viscose round the opening of the bolero as follows: approx 4 dc in each of the large ch-loops and 1 dc in each of the small ch-loops, and work 6 dc in the increases on front pieces – make sure the row is elastic. Crochet in the same way round armholes. FLOWER: Work 4 ch with crochet hook size 3 mm and 1 thread Cotton Viscose + 2 threads Glitter and form a ring with 1 sl st in first ch. ROUND 1: 6 dc in ring, finish with 1 sl st in first dc. ROUND 2: 4 ch, * 1 dc in next dc, 3 ch *, repeat from *-* a total of 5 times, finish with 1 sl st in 2nd ch from beg of round (= 6 ch-loops). ROUND 3: Crochet as follows in each ch-loop: 1 dc, 3 tr, 1 dc, finish with 1 sl st in first dc (= 6 leaves). ROUND 4: Fold leaves towards you and crochet in the back of these as follows: 1 dc round first dc from round 2, 5 ch, * 1 dc round next dc from round 2, 5 ch *, repeat from *-*, and finish with 1 sl st in first dc from beg of round (= 6 ch-loops). ROUND 5: Crochet as follows in each ch-loop: 1 dc, 5 tr, 1 dc, finish with 1 sl st in first dc (= 6 leaves), cut the thread and leave approx 20 cm – used to sew tog flowers afterwards. Make approx 29-31-35-37-39-41 flowers, and sew them tog, leaf to leaf, to a long row. Now sew the row to bolero, beg mid back. Place the centre of flower on the row of dc and sew the centre of flower to the dc row, repeat for the other flowers down along one front piece, and along bottom edge to mid back. Beg mid back at neckline again and continue to mid back at bottom edge. If you need more/less flowers, adjust this before sewing tog the flowers mid back at bottom edge. |
|
 |
|
Have you finished this pattern?Tag your pictures with #dropspattern #goldenrosesbolero or submit them to the #dropsfan gallery. Do you need help with this pattern?You'll find 7 tutorial videos, a Comments/Questions area and more by visiting the pattern on garnstudio.com. © 1982-2026 DROPS Design A/S. We reserve all rights. This document, including all its sub-sections, has copyrights. Read more about what you can do with our patterns at the bottom of each pattern on our site. |
|


With over 40 years in knitting and crochet design, DROPS Design offers one of the most extensive collections of free patterns on the internet - translated to 17 languages. As of today we count 325 catalogues and 12298 patterns translated into English (UK/cm).
We work hard to bring you the best knitting and crochet have to offer, inspiration and advice as well as great quality yarns at incredible prices! Would you like to use our patterns for other than personal use? You can read what you are allowed to do in the Copyright text at the bottom of all our patterns. Happy crafting!
Post a comment to pattern DROPS 111-25
We would love to hear what you have to say about this pattern!
If you want to leave a question, please make sure you select the correct category in the form below, to speed up the answering process. Required fields are marked *.