
Popular categories
Looking for a yarn?


Comments / Questions (180)
![]() Annette wrote:
Annette wrote:
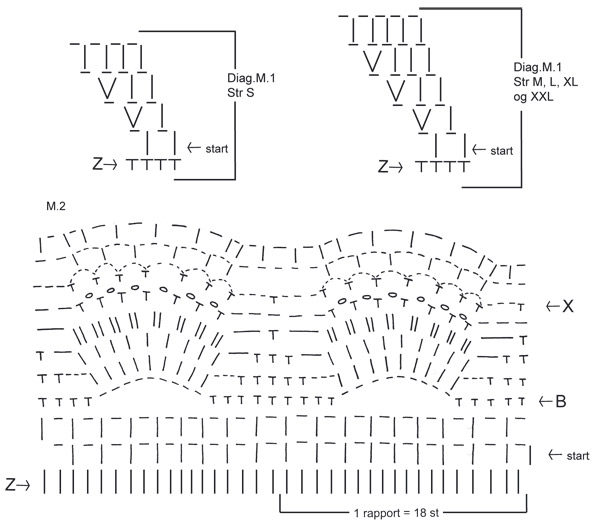
I do not understand the increasing from 101 to 216. I found this answer, but I’m still confused. “Dear Mrs Dixon, when you inc 14 tr, you only work tr (no ch in between - see Increasing tip 2), so that you have 101 tr + 101 ch + 14 tr = 216 tr/ch on this round. Happy crocheting!” Am I now crocheting in each STITCH instead of space??
04.04.2018 - 22:56DROPS Design answered:
Dear Annette, when you have 101 ch-spaces, there is a total of 202 sts, ie 101 tr + 101 ch. When inc 14 tr, you will crochet in the ch-spaces as before but 2 tr instead of 1 tr evenly spaced = 216 sts (115 tr and 101 ch-spaces). Happy crocheting!
05.04.2018 - 08:55
![]() Annette wrote:
Annette wrote:
I’m just starting this pattern. I’m to where I start the M.1, and I don’t understand what “og” means for size XXL. Please help.
19.03.2018 - 01:35DROPS Design answered:
Hi Annette, "og" is the Norwegian word for "and" and we have overlooked the translation here. Apologies. Happy crocheting!
19.03.2018 - 08:05
![]() Wendy Ambuhl wrote:
Wendy Ambuhl wrote:
I got it! I was counting spaces, not stitches! :)
21.07.2017 - 20:33
![]() Wendy Ambuhl wrote:
Wendy Ambuhl wrote:
Ok. So I got 198 stitches by adding 14 stitches. On the next row, do i put a dc and ch between the 2 stitches of my increase? For example, I have made two dc, with no ch between, in one ch-loop. On the next round, do I make a ch-loop between the 2 dc where there is no ch? I cannot get the numbers to come out even to go on from here!
20.07.2017 - 20:38DROPS Design answered:
Dear Mrs Ambuhl, there are now 198 sts (= dc and chains), repeat M.2 (= 18 sts) a total of 11 times in the round so that you have 18 sts x 11 = 198 sts. On 1st row in M.2 (= row with arrow "start"), work 1 dc, 1 ch, skip 1 ch (either dc or ch), 1 dc in next st (either dc or ch). Happy crocheting!
21.07.2017 - 08:30
![]() Wendy Ambuhl wrote:
Wendy Ambuhl wrote:
I understand the part about 198 ch-loops before the mussel pattern. But what does each symbol stand for on row z? Do they stand for each ch, dc, or both? If so, do I work into every other ch-loop? I find this diagram confusing.
18.07.2017 - 16:17DROPS Design answered:
Dear Mrs Ambuhl, each symbol on row Z represents 1 stitch, either 1 dc or 1 ch, M.2 is worked over 18 sts (dc and ch). Happy crocheting!
19.07.2017 - 08:24
![]() Brenda Lee wrote:
Brenda Lee wrote:
On the m.2 chart im trying to figure out what that long horizontal line means . its 2 rows under the x if im not mistaken. the rest i understand .
16.07.2017 - 22:17DROPS Design answered:
Dear Brenda Lee, as explained earlier, each horizontal bar = 1 chain, the length of this bar is due to the diagram and number of sts in diagram, but either short or long, 1 bar = 1 chain. Happy crocheting!
17.07.2017 - 09:28
![]() Brenda Lee wrote:
Brenda Lee wrote:
Could you tell me what the long horizontal bar means on the 2nd row under the x . thats the only part that has me stumped on want this finished so bad to take to the beach with me in aug thank you so much.
16.07.2017 - 00:39DROPS Design answered:
Dear Brenda Lee, the horizontal bar either short or long = 1 chain. Happy crocheting
17.07.2017 - 09:08
![]() NieKohle wrote:
NieKohle wrote:
Ich habe jetzt nach 8 gescheiterten Versuchen aufgegeben. Im 8. Versuch musste ich schon die Maschenanzahl erhöhen, da diese nicht annähernd auf eine XL zugeschnitten ist. Bereits der Halsausschnitt ist wesentlich enger als auf dem Bild, selbst bei sehr (!) lockeren Lm. Die Anleitung an sich ist gut. Schade nur, dass man selbst noch hin und her rechnen muss.
03.06.2017 - 21:26
![]() NieKohle wrote:
NieKohle wrote:
Hallo. Ich verzweifle an M1. ich habe jetzt 5 Mal angefangen und 5 Mal wieder alles aufgeribbelt, weil ich nach M1 nicht auf die angegebene Maschenzahl komme. Bei mir sind es jedes mal 20 maschen weniger als angegeben. Mir ist auch nicht ganz klar, wie ich von Runde zu Runde arbeiten kann, ohne eine sichtbare Kante zwischen Rundenende und Rundenanfang zu erhalten. Außerdem bin ich mir nicht sicher, wie ich M1 zu lesen habe. Von links nach recht in jeder Runde? Vielen Dank schonmal.
01.06.2017 - 13:00DROPS Design answered:
Liebe NieKohle, Diagram lesen Sie von unten nach oben und jede Runde von rechts nach links, dh 1. Rd (alle Größe): *1 Stb, 1 Lm, 1 M springen, 1 Stb, 1 Lm, 1 M springen*, von *-* wiederholen. Bei 2. Rd: *1 Stb um die Lm, 1 Lm, um die nächste Lm häkeln Sie: 1 Stb, 1 Lm, 1 Stb*, von *-* wiederholen (= 1 Stb wird in jedem M.1 zugenommen). Viel Spaß beim häkeln!
01.06.2017 - 13:42
![]() Silke wrote:
Silke wrote:
Hallo, ich beziehe mich auf die Anleitung nachdem ich M1 gehäkelt haben. Ich verstehe nicht, wie ich eine Luftmasche in Stäbchen häkle? Mir ist klar, Stäbchen in Luftmasche zu häkeln, aber wie häkle ich eine Luftmasche irgendwo hinein? :-) Sorry, bin Anfängerin und vielleicht klingt die Frage etwas ungewöhnlich. Bin aber gerade etwas hilflos!
23.04.2017 - 09:33DROPS Design answered:
Liebe Silke, Sie werden jetzt wie im letzten Runde in M.1 häkeln:1 Stb um jeder Luftmasche und 1 Luftmasche über jedes Stb. Viel Spaß beim häkeln!
24.04.2017 - 09:54
|
||||||||||||||||||||||
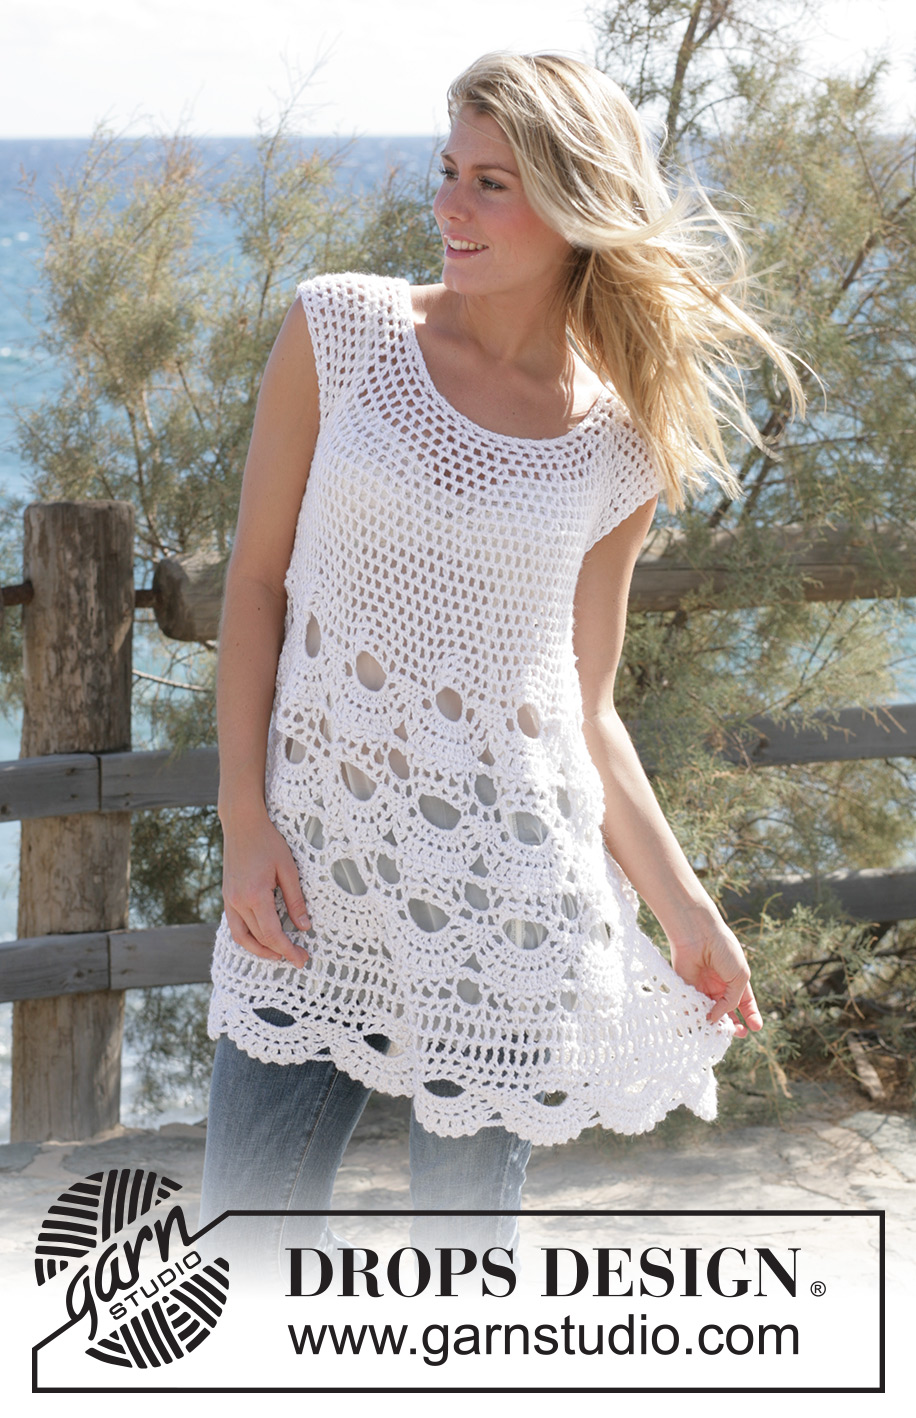
Breath of Summer#breathofsummertunic |
||||||||||||||||||||||
|
|
||||||||||||||||||||||
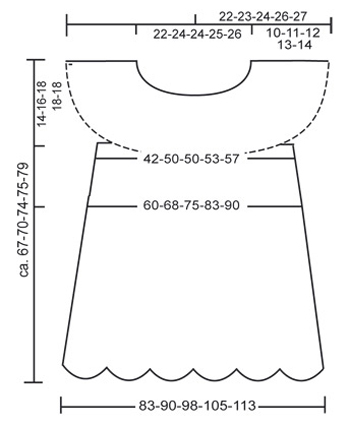
Crochet DROPS tunic with mussel pattern with 1 thread Alpaca and 1 thread Cotton Viscose or Bomull-Lin. Size S - XXL
DROPS 99-4 |
||||||||||||||||||||||
|
Crochet tension: 12 tr x 7 rows with 1 thread Alpaca and 1 thread Cotton Vicose or 1 thread Bomull-Lin = 10 x 10 cm. 1 repeat of mussel pattern = width approx 12 cm. Increasing tip 1: To inc 1 dc: crochet 2 dc in 1 dc. Increasing tip 2: To inc 1 tr: crochet 2 tr in 1 tr (no ch in between). Increasing tip 3: To inc 1 ch-loop: crochet 2 ch-loops in the same st. Crochet info: At the beg of each round replace the first tr with 3 ch. Replace first dtr with 4 ch. Finish each round with 1 sl st in 3rd/4th ch from beg of round. Pattern: See diagrams M.1 and M.2. The diagram is seen from the RS. Measuring tip: Because of the weight of the wool all measurements should be made whilst the garment is hanging. Back and front piece: The tunic is crochet in the round from the top down. Loosely crochet 71-75-75-79-83 ch on crochet hook size 5 mm with 1 thread Drops Alpaca and 1 thread Drops Cotton Viscose (double thread)or 1 thread Bomull-Lin. Form a ring with a sl st in the first ch. Crochet next round as follows: 1 dc in each of the first 3 ch, *skip 1 ch, 1 dc in each of the 3 next ch*, repeat from *-* = 54-57-57-60-63 dc. Now crochet a round of dc, at the same time inc 22-15-19-20-21 dc evenly – see Increasing tip 1 = 76-72-76-80-84 dc. Continue in M.1 – see Crochet info. After M.1 there are 76-90-95-100-105 ch-loops on round (1 ch-loop = 1 tr + 1 ch). Continue with tr in ch and ch over tr until piece measures 10-11-12-13-14 cm. Crochet next round as follows: Skip 17-19-21-22-22 ch-loops from previous round (= right sleeve), crochet 8 ch (= under arm), crochet 21-26-26-28-30 ch-loops (= front piece), skip 17-19-21-22-22 ch-loops from previous round (= left sleeve), crochet 8 ch (= under arm), crochet 21-26-27-28-31 ch-loops (= back piece). Insert a marking thread each side, in between the 8 ch crochet mid under arm. Continue in ch-loops. NB! On the first round crochet the 8 ch under each arm as follows: 1 tr in the first ch, 1 ch, skip 1 ch, 1 tr in next ch, 1 ch, 1 tr in the same ch, 1 ch, skip 1 ch, 1 tr in next ch, 1 ch, 1 tr in the same ch, 1 ch, skip 1 ch, 1 tr in next ch, 1 ch and skip 1 ch (= 6 ch-loops under each arm) = 54-64-65-68-73 ch-loops on round in total. Continue in ch-loops in the round, at the same time inc 1 ch-loop – see Increasing tip 3 – on each side of both MT on every round a total of 4-4-6-6-7 times = 70-80-89-92-101 ch-loops. After all inc piece measures approx 19-20-23-24-27 cm measured from ch-chain at neckline (you have now reached mid chest; if you wish to adjust this crochet additional rounds in ch-loops after the inc). Now crochet 1 round in ch-loops, at the same time inc 4-2-2-14-14 tr evenly on round – see Increasing tip 2 = 144-162-180-198-216 tr/ch. Now continue in mussel pattern M.2 (beg at start arrow in diagram) = 8-9-10-11-12 horizontal repeats on round. Crochet 3 vertical repeats of M.2, but beg the second and third repeat by the Arrow-B in diagram. After M.2 crochet 2-3-3-3-4 rounds in dtr as follows: Round 1: Remember crochet info! Crochet 1 dtr in each ch-loop with 1 ch in between each and finish with 1 dtr in the last tr = 72-81-90-99-108 dtr. Round 2: crochet 1 dtr in each dtr from previous round with 2 ch in between each dtr (instead of 1) – finish size S here before the last mussel pattern = 72 dtr. Round 3: crochet 1 dtr in each dtr from previous round with 3 ch between each dtr - finish size M, L and XL here before the last mussel pattern = 81-90-99 dtr. Round 4: crochet 1 dtr in each dtr from previous round with 3 ch between each dtr - finish size XXL here before the last mussel pattern = 108dtr. Now crochet a round in ch-loops as follows: 1 tr and 1 ch (= 1 ch-loop) in each dtr from previous round, at the same time inc 1 ch-loop – see Increasing tip 3 – in every 3-3-4-4-4 dtr. NB! For size L and XL finish with 1 tr and 1 ch in each of the last 2-3 dtr = 96-108-112-123-135 ch-loops. Continue with 1 round of ch-loops, at the same time inc 6-0-10-6-0 tr – see Increasing tip 2 = 198-216-234-252-270 tr/ch. Now crochet M.2 again (beg at start arrow in diagram), but finish the pattern after row 7. |
||||||||||||||||||||||
Diagram explanations |
||||||||||||||||||||||
|
||||||||||||||||||||||
 |
||||||||||||||||||||||
 |
||||||||||||||||||||||
Have you finished this pattern?Tag your pictures with #dropspattern #breathofsummertunic or submit them to the #dropsfan gallery. Do you need help with this pattern?You'll find 7 tutorial videos, a Comments/Questions area and more by visiting the pattern on garnstudio.com. © 1982-2026 DROPS Design A/S. We reserve all rights. This document, including all its sub-sections, has copyrights. Read more about what you can do with our patterns at the bottom of each pattern on our site. |
||||||||||||||||||||||


With over 40 years in knitting and crochet design, DROPS Design offers one of the most extensive collections of free patterns on the internet - translated to 17 languages. As of today we count 324 catalogues and 12290 patterns translated into English (UK/cm).
We work hard to bring you the best knitting and crochet have to offer, inspiration and advice as well as great quality yarns at incredible prices! Would you like to use our patterns for other than personal use? You can read what you are allowed to do in the Copyright text at the bottom of all our patterns. Happy crafting!
Post a comment to pattern DROPS 99-4
We would love to hear what you have to say about this pattern!
If you want to leave a question, please make sure you select the correct category in the form below, to speed up the answering process. Required fields are marked *.