
Popular categories
Looking for a yarn?


Comments / Questions (50)
![]() CAROL KENT wrote:
CAROL KENT wrote:
How do you start this.... I need a chart showing how it is worked. Doing good so far but i AM STUCK here. thank you .Front piece: = 51-60-69 dc. Place where 2 squares are crochet tog mid front and mid back on the top part. Middle of squares are placed on side of top part. Crochet next round from WS. Crochet tr in each of middle 41-48-55 sc (do not crochet over 5-6-7 sc on each side = armhole)
18.06.2015 - 22:27DROPS Design answered:
Dear Mrs Kent, place your work flat so that middle of squares are on the sides and the row worked to crochet both squaress tog are in the middle = mid back and mid front. Skip 5-6-7 sts starting from the side and crochet 41-48-55 dc accross, leaving 5-6-7 sts unworked before 2nd side and work texture pattern as explained. Happy crocheting!
19.06.2015 - 09:28
![]() Carol Kent wrote:
Carol Kent wrote:
I can NOT wrap my head around this part of the pattern.....Front piece: = 51-60-69 dc. Place where 2 squares are crochet tog mid front and mid back on the top part. Middle of squares are placed on side of top part. Crochet next round from WS. Crochet tr in each of middle 41-48-55 sc (do not crochet over 5-6-7 sc on each side = armhole) = 41-48-55 tr. Now crochet texture pattern –see explanation above. Crochet 3-4-5 pattern repeats, then split piece.
18.06.2015 - 18:11
![]() Marina wrote:
Marina wrote:
Ich komme nicht weiter.... Die beiden Vierecke habe ich nun zusammengehäkelt. Jetzt ginge es ans Oberteil. Werden die Stäbchen "nur" an der oberen Kante angebracht oder häkelt man die Stäbchen rund um die beiden Vierecke? Danke für Eure Hilfe!
27.05.2015 - 18:21DROPS Design answered:
Die ersten 4 Rd des Oberteils häkeln Sie komplett rund um den oberen Rand der "Röhre" - Sie haben die beiden Vierecke ja so zusammengehäkelt, dass Sie eine "Röhre" bilden (d.h. oben und unten offen, rechts und links geschlossen). Oben erfolgt also nun zuerst rundum quasi eine Verlängerung dieser "Röhre", nach der 4. Rd wird dann für Vorder- und Rückenteil (= Armausschnitte) geteilt.
28.05.2015 - 10:52
![]() Daniela wrote:
Daniela wrote:
Nach der Beendigung der Vierecke (inkl. der Lm-Reihe) soll das Viereck in Größe L 43 cm messen. Ich habe die entsprechende Größe erst, wenn ich das Viereck etwas ziehe/Spanne. Das (Loch)Muster kommt aber auch erst dann richtig zur Geltung. Sollen die 43 cm im "Ruhe"Zustand oder im gespannten Zustand erreicht werden? Danke für die Unterstützung.
11.02.2015 - 22:07DROPS Design answered:
Die Maße, die Sie im Diagramm sehen, sind die Endmaße. Wenn Sie die 43 cm nach dem Spannen erreichen und das Top aufgrund besserer Optik gerne spannen möchten, ist es daher richtig, wenn Sie es nach dem Spannen messen.
12.02.2015 - 09:56
![]() Daniela wrote:
Daniela wrote:
Ich benötige dringend eure Hilfe. Ich habe das Viereck zu Ende gehäkelt und habe die Reihe Picots gehäkelt. Nachdem die Arbeit gewendet wurde, verstehe ich die Anleitung nicht weiter, wie ich das Viereck zu Ende bringe. Vielen Dank schonmal
03.02.2015 - 08:53DROPS Design answered:
Nach dem Wenden haben Sie ja als erstes 1 fM am R-Beginn. In diese fM häkeln Sie 1 Kett-M. In den folgenden Picot häkeln Sie in die 1. Lm des Picots 1 Kett-M und in die 2. Lm auch 1 Kett-M. Dann häkeln Sie 6 Lm und um die Lm des nächsten Picots 1 fM. Sie stechen dafür also nicht in die 2. Lm des Picots ein, sondern greifen mit der Nadel um die Lm herum und häkeln die feste M. Das (6 Lm + 1 fM) machen Sie so weiter bis R-Ende. Ich hoffe, nun ist es klarer? Sonst gerne noch einmal fragen. Gutes Gelingen weiterhin!
04.02.2015 - 18:39
![]() Jose wrote:
Jose wrote:
Ook ik krijg geen vierkant. Klopt het patroon wel?
28.07.2014 - 22:21DROPS Design answered:
Het patroon is een cirkel die langzaam vierkant wordt - zie de foto. Het patroon komt overeen met het gehaakte model.
01.08.2014 - 08:52
![]() Briggitte wrote:
Briggitte wrote:
Toer 5 is niet goed wij krijgen geen vierkant maar hij blijft rond
26.04.2014 - 19:59
![]() Patricia wrote:
Patricia wrote:
Petit complement à ma demande d aide ..que voulez vous dire par joindre par le milieu pour commencer la bordure picot. ? Je necomprends oas du tout comment faire merci
20.04.2014 - 15:56DROPS Design answered:
La bordure picot se fait le long d'un côté, on doit commencer au coin d'un côté pour faire la bordure picot jusqu'à la fin du côté. Bon crochet!
22.04.2014 - 11:42
![]() Patricia wrote:
Patricia wrote:
Bonjour désolée de deranger je me comprends comment avoir les 12 picots merci d avance pour votre aide cordialement
20.04.2014 - 15:29DROPS Design answered:
Bonjour Patricia, en taille S, vous avez 96 DB au dernier tour du motif, soit 24 DB par côté. Crochetez 1 ms dans la 1ère DB, *1 picot, sautez 1 DB, 1 ms*, répétez de *-* le long d'un côté = 12 picots sur 24 DB. Bon crochet!
22.04.2014 - 11:41
![]() Lena Gustavsson wrote:
Lena Gustavsson wrote:
Hej Längre ned i arbetet där det ska virkas picotkanter längs motstående sidor på varje "ruta", finns inga luftmaskor med. Är detta riktigt? Här något fel. Vad? Mvh Lena
16.03.2014 - 21:58DROPS Design answered:
Hej Lena. Ja, du hekler i dst langs kanterne ikke i luftmaskorne
18.03.2014 - 17:23
|
|
Nautilus#nautilustop |
|
|
|
|
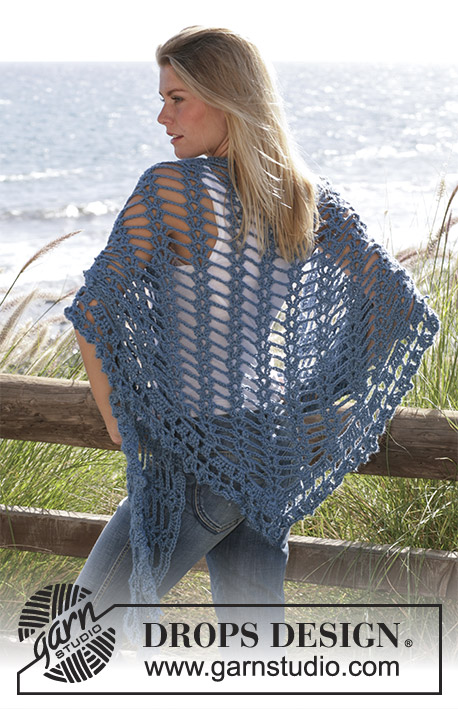
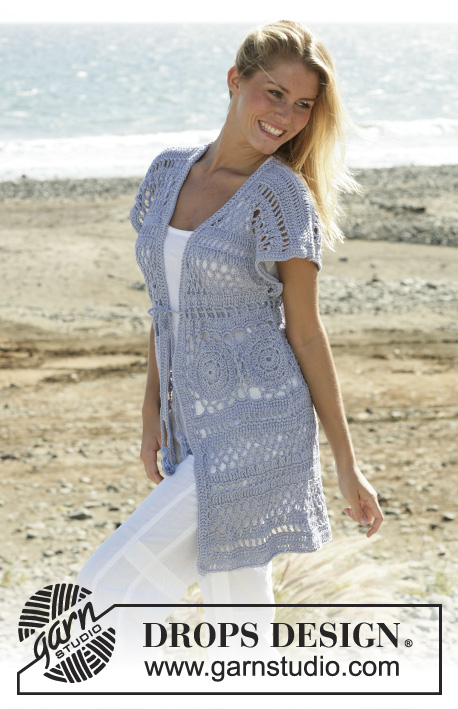
DROPS crochet top in ”Silke-Alpaca”
DROPS 99-21 |
|
|
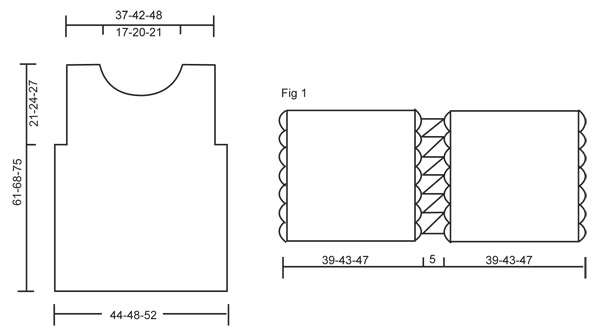
Crochet tension: 3 rounds of the crochet square measures 6.5 cm and 11 dtr x 3 rounds of texture pattern = 10 x 10 cm Crochet info: Substitute first dtr on each row/round with 4 ch. Substitute first dc on round with 1 ch. Finish round with 1 sl st in beginning of round. Picot: 1 picot = 3 ch, 1 sl st in 3rd ch from crochet hook. Texture pattern: 1st row: 1 dc in each dtr. 2nd row: 1 dtr in each dc. 1st and 2nd row = 1 pattern repeat of texture pattern. Casting off tips (applies to neckline): Cast off at beginning of row as follows: Crochet 3 sl st over 3 first dc. Cast off at end of row as follows: Turn piece when 3 dc are left. First crochet 2 squares that are put tog = bottom part of top. In Size S/M crochet to 7th round, inclusive. In Size L crochet to 8th round, inclusive. In Size XL crochet to 9th round, inclusive. Then crochet a border around the squares and at last crochet the top part of the Top onto the 2 squares. BOTTOM PART: Crochet panel: Crochet 4 ch create a ring with 1 sl st in first ch. 1st round: Read Crochet tip! Crochet 8 dc around ring. 2nd round: Crochet 3 dtr in each dc = 24 dtr. 3rd round: Crochet 1 dtr, *3 ch, skip 1 dtr, 1 dtr in next dtr*, repeat from*-* and finish with 3 ch and 1 sl st in beginning of round = 12 dtr. 4th round: Crochet 3 dtr in first dtr, *3 ch, skip 3 ch, 3 dtr in next dtr*, repeat from*-* and finish with 3 ch skip 1 dtr and 1 sl st in beginning of round = 36 dtr. 5th round: Crochet 1 dtr in each dtr and 3 dtr in each ch loop = 72 dtr. Square now measures 20 cm in diameter. 6th round: Crochet 1 dtr in first dtr, *3 ch, skip 1 dtr, 1 dtr in next dtr*, repeat from*-* and finish with 3 ch, skip 1 dtr and 1 st st in beginning of round = 36 dtr. 7th round: *1 dtr and 3 ch in each of 8 first dtr, 1 dtr in next dtr, 3 ch, 1 dtr in same dtr, (= edge), 3 ch *, repeat from *-* 4 times in total and finish with 1 sl st in beginning of round = 40 dtr. Finish size S/M here. 8th round: *1 dtr and 3 ch in each of 8 first dtr, 2 dtr in next dtr, 3 ch, 2 dtr in next dtr, (= edge), 3 ch *, repeat from *-* 4 times in total and finish with 1 sl st in beginning of round = 48 dtr. Finish size L here. 9th round: *1 dtr and 3 ch in each of 8 first dtr , 2 dtr in next dtr, 1 dtr in next dtr, 3 ch, 1 dtr in next dtr, 2 dtr in next dtr (= corner), 3 ch*, repeat from *-* 4 times in total and finish with 1 sl st in beginning of round = 56 dtr. Finish size XL here. Last round (crochet to complete all sizes): 1 dtr in each dtr and 1 dtr in each ch loop . Crochet each corner as follows: 2 dtr in each of 1-2-3 first dtr, 3-5-7 dtr in ch loop, 2 dtr in each of next 1-2-3 dtr = 96-120-144 dtr. Crochet 1 square more. Picot edge: Crochet a picot edge on 2 sides opposite each other on each square – see figure 1. Begin mid corner. Crochet as follows: 1 dc around first dtr, *1 picot – see explanation above, skip 1 dtr, 1 dc around next dtr *. Repeat from *-* 12-15-18 times in total = 12-15-18 picots. Turn piece and crochet back as follows: Crochet sl st until 2nd ch on last picot, *6 ch, 1 dc around 2nd ch on next picot*, repeat from *-*. Cut and sew thread. Panel measures approx 39-43-47 cm in diameter. Crocheting together: Place squares together and crochet tog – see Figure 1. Crochet squares tog on both sides with picot edges – so a cylinder is formed. Crochet 1 dc in first loop on the one square, 2 ch, 1 dc in first loop on second square, *3 ch, 1 dc in next loop on the one square, 2 ch, 1 dc in next loop on second square* repeat from *-* until squares are crochet tog on side. TOP PART: Crochet the top part now: Crochet around top edge as follows: 1st round: Crochet 1 dtr in first dtr, *3 ch, skip 1 dtr, 1 dtr in next dtr*, repeat from*-* and finish with 3 ch. Crochet as follows between squares: 1 dtr, *3 ch, skip approx 1 cm, 1 dtr *, repeat from *-* 4 times in total, finish off with 3 ch = 34-40-46 dtr with 3 ch between each. 2nd round: Crochet 1 dc in first dtr, *1 picot, skip 3 ch, 1 dc in next dtr * repeat from *-* on entire round = 34-40-46 picots. 3rd round: sl st to ch loop on first picot, 2 dtr in 2nd ch in each picot, finish off with 1 sl st in first dtr = 68-80-92 dtr. 4th round: *1dc in first dtr, 2 dc in next dtr*, repeat from *-* and finish with 1 sl st in first dtr = 102-120-138 dc. Split piece and crochet back and front pieces separately back and forth. Front piece: = 51-60-69 dc. Place where 2 squares are crochet tog mid front and mid back on the top part. Middle of squares are placed on side of top part. Crochet next round from WS. Crochet dtr in each of middle 41-48-55 dc (do not crochet over 5-6-7 dc on each side = armhole) = 41-48-55 dtr. Now crochet texture pattern –see explanation above. Crochet 3-4-5 pattern repeats, then split piece. Left front piece: On 1st row on 4th-5th-6th pattern repeat crochet dc but only over first 17-19-22 dtr. Turn piece. Now cast off 3 dtr for neckline towards mid front (i.e. in beginning of row of dtr) – read casting off tips 2 times in total = 11-13-16 dtr/dc left on shoulder. Cut and sew thread after 7-8-9 pattern repeats. Right front piece: On 1st row on 4th-5th-6th pattern repeat crochet dc but only over first 17-19-22 dtr (crochet from middle towards sides.) Turn piece. Now close off 3 dtr for neckline towards mid front (i.e. in beginning of row with dtr) – read casting off tips 2 times in total = 11-13-16 dtr/dc left on shoulder. Cut and sew thread after 7-8-9 pattern repeats. Top part measures approx 21-24-27 cm. Back piece: = 51-60-69 dc. Crochet 1 dtr in each of middle 41-48-55 dc (do not crochet over 5-6-7 dc on each side = armhole) = 41-48-55 dtr. Crochet 6-7-8 pattern repeats with texture pattern, now crochet 1 last pattern repeat over 11-13-16 dc/dtr only on each side (do not crochet middle 19-22-23 dc/dtr = neckline.) Cut and sew thread after 7-8-9 pattern repeats. Assembly: Sew shoulder seams. Crochet edges: Crochet around bottom edge of top as follows: 1st round: Crochet 1 dtr in first dtr, *2 ch, skip 3 dtr, 1 dtr in next dtr*, repeat from*-* and finish with 2 ch and 1 sl st in first dtr. 2. round: 2 dtr in first dtr, *4 ch, 2 dtr in same dtr, 1 ch, 2 dtr in next dtr *, repeat from *-* and finish with 4 ch, 2 dtr in same dtr, 1 ch and 1 sl st in first dtr. Crochet around neckline as follows: 1 dc , *4 ch, skip approx 2 cm on, 1 dc*, repeat from *-* finish off with 4 ch and 1 sl st in first dc. |
|
 |
|
Have you finished this pattern?Tag your pictures with #dropspattern #nautilustop or submit them to the #dropsfan gallery. Do you need help with this pattern?You'll find 9 tutorial videos, a Comments/Questions area and more by visiting the pattern on garnstudio.com. © 1982-2026 DROPS Design A/S. We reserve all rights. This document, including all its sub-sections, has copyrights. Read more about what you can do with our patterns at the bottom of each pattern on our site. |


With over 40 years in knitting and crochet design, DROPS Design offers one of the most extensive collections of free patterns on the internet - translated to 17 languages. As of today we count 325 catalogues and 12298 patterns translated into English (UK/cm).
We work hard to bring you the best knitting and crochet have to offer, inspiration and advice as well as great quality yarns at incredible prices! Would you like to use our patterns for other than personal use? You can read what you are allowed to do in the Copyright text at the bottom of all our patterns. Happy crafting!
Post a comment to pattern DROPS 99-21
We would love to hear what you have to say about this pattern!
If you want to leave a question, please make sure you select the correct category in the form below, to speed up the answering process. Required fields are marked *.