
Popular categories
Looking for a yarn?


|
|
Nautilus |
|
|
|
|
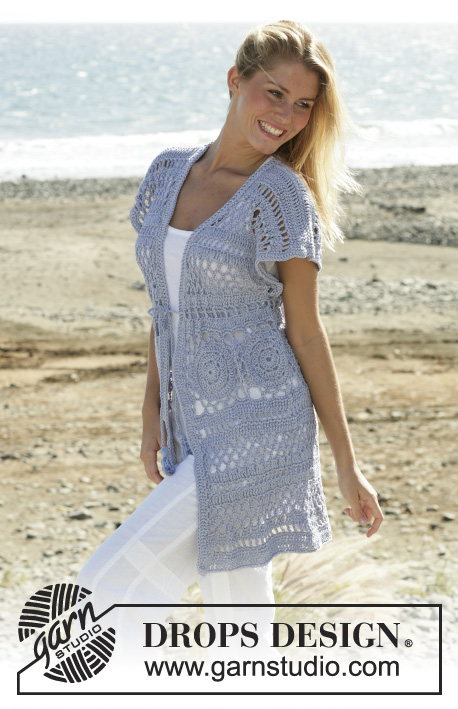
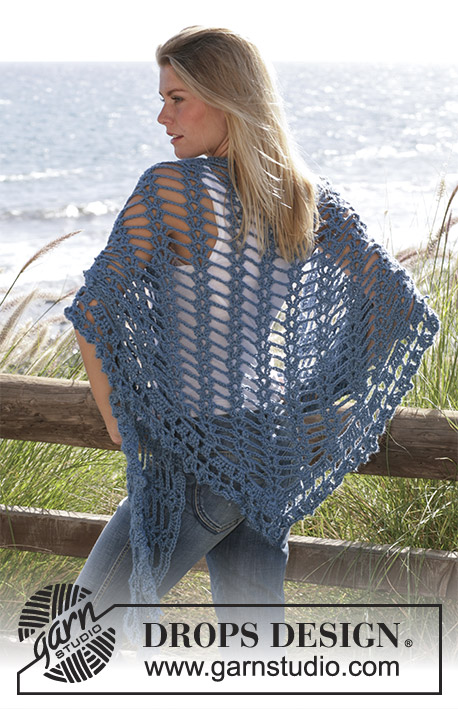
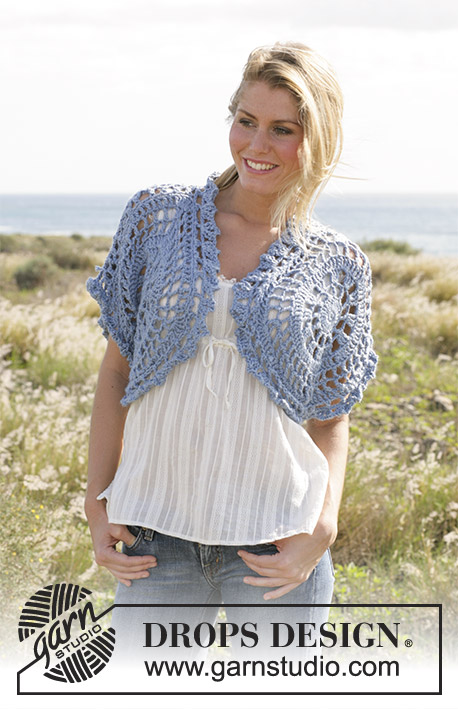
DROPS crochet top in ”Silke-Alpaca”
DROPS 99-21 |
|
|
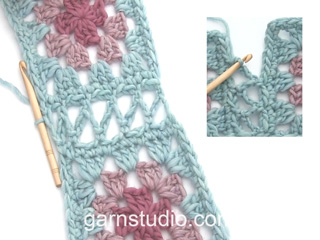
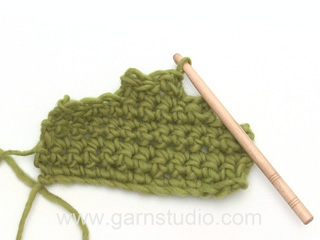
Crochet tension: 3 rounds of the crochet square measures 6.5 cm and 11 dtr x 3 rounds of texture pattern = 10 x 10 cm Crochet info: Substitute first dtr on each row/round with 4 ch. Substitute first dc on round with 1 ch. Finish round with 1 sl st in beginning of round. Picot: 1 picot = 3 ch, 1 sl st in 3rd ch from crochet hook. Texture pattern: 1st row: 1 dc in each dtr. 2nd row: 1 dtr in each dc. 1st and 2nd row = 1 pattern repeat of texture pattern. Casting off tips (applies to neckline): Cast off at beginning of row as follows: Crochet 3 sl st over 3 first dc. Cast off at end of row as follows: Turn piece when 3 dc are left. First crochet 2 squares that are put tog = bottom part of top. In Size S/M crochet to 7th round, inclusive. In Size L crochet to 8th round, inclusive. In Size XL crochet to 9th round, inclusive. Then crochet a border around the squares and at last crochet the top part of the Top onto the 2 squares. BOTTOM PART: Crochet panel: Crochet 4 ch create a ring with 1 sl st in first ch. 1st round: Read Crochet tip! Crochet 8 dc around ring. 2nd round: Crochet 3 dtr in each dc = 24 dtr. 3rd round: Crochet 1 dtr, *3 ch, skip 1 dtr, 1 dtr in next dtr*, repeat from*-* and finish with 3 ch and 1 sl st in beginning of round = 12 dtr. 4th round: Crochet 3 dtr in first dtr, *3 ch, skip 3 ch, 3 dtr in next dtr*, repeat from*-* and finish with 3 ch skip 1 dtr and 1 sl st in beginning of round = 36 dtr. 5th round: Crochet 1 dtr in each dtr and 3 dtr in each ch loop = 72 dtr. Square now measures 20 cm in diameter. 6th round: Crochet 1 dtr in first dtr, *3 ch, skip 1 dtr, 1 dtr in next dtr*, repeat from*-* and finish with 3 ch, skip 1 dtr and 1 st st in beginning of round = 36 dtr. 7th round: *1 dtr and 3 ch in each of 8 first dtr, 1 dtr in next dtr, 3 ch, 1 dtr in same dtr, (= edge), 3 ch *, repeat from *-* 4 times in total and finish with 1 sl st in beginning of round = 40 dtr. Finish size S/M here. 8th round: *1 dtr and 3 ch in each of 8 first dtr, 2 dtr in next dtr, 3 ch, 2 dtr in next dtr, (= edge), 3 ch *, repeat from *-* 4 times in total and finish with 1 sl st in beginning of round = 48 dtr. Finish size L here. 9th round: *1 dtr and 3 ch in each of 8 first dtr , 2 dtr in next dtr, 1 dtr in next dtr, 3 ch, 1 dtr in next dtr, 2 dtr in next dtr (= corner), 3 ch*, repeat from *-* 4 times in total and finish with 1 sl st in beginning of round = 56 dtr. Finish size XL here. Last round (crochet to complete all sizes): 1 dtr in each dtr and 1 dtr in each ch loop . Crochet each corner as follows: 2 dtr in each of 1-2-3 first dtr, 3-5-7 dtr in ch loop, 2 dtr in each of next 1-2-3 dtr = 96-120-144 dtr. Crochet 1 square more. Picot edge: Crochet a picot edge on 2 sides opposite each other on each square – see figure 1. Begin mid corner. Crochet as follows: 1 dc around first dtr, *1 picot – see explanation above, skip 1 dtr, 1 dc around next dtr *. Repeat from *-* 12-15-18 times in total = 12-15-18 picots. Turn piece and crochet back as follows: Crochet sl st until 2nd ch on last picot, *6 ch, 1 dc around 2nd ch on next picot*, repeat from *-*. Cut and sew thread. Panel measures approx 39-43-47 cm in diameter. Crocheting together: Place squares together and crochet tog – see Figure 1. Crochet squares tog on both sides with picot edges – so a cylinder is formed. Crochet 1 dc in first loop on the one square, 2 ch, 1 dc in first loop on second square, *3 ch, 1 dc in next loop on the one square, 2 ch, 1 dc in next loop on second square* repeat from *-* until squares are crochet tog on side. TOP PART: Crochet the top part now: Crochet around top edge as follows: 1st round: Crochet 1 dtr in first dtr, *3 ch, skip 1 dtr, 1 dtr in next dtr*, repeat from*-* and finish with 3 ch. Crochet as follows between squares: 1 dtr, *3 ch, skip approx 1 cm, 1 dtr *, repeat from *-* 4 times in total, finish off with 3 ch = 34-40-46 dtr with 3 ch between each. 2nd round: Crochet 1 dc in first dtr, *1 picot, skip 3 ch, 1 dc in next dtr * repeat from *-* on entire round = 34-40-46 picots. 3rd round: sl st to ch loop on first picot, 2 dtr in 2nd ch in each picot, finish off with 1 sl st in first dtr = 68-80-92 dtr. 4th round: *1dc in first dtr, 2 dc in next dtr*, repeat from *-* and finish with 1 sl st in first dtr = 102-120-138 dc. Split piece and crochet back and front pieces separately back and forth. Front piece: = 51-60-69 dc. Place where 2 squares are crochet tog mid front and mid back on the top part. Middle of squares are placed on side of top part. Crochet next round from WS. Crochet dtr in each of middle 41-48-55 dc (do not crochet over 5-6-7 dc on each side = armhole) = 41-48-55 dtr. Now crochet texture pattern –see explanation above. Crochet 3-4-5 pattern repeats, then split piece. Left front piece: On 1st row on 4th-5th-6th pattern repeat crochet dc but only over first 17-19-22 dtr. Turn piece. Now cast off 3 dtr for neckline towards mid front (i.e. in beginning of row of dtr) – read casting off tips 2 times in total = 11-13-16 dtr/dc left on shoulder. Cut and sew thread after 7-8-9 pattern repeats. Right front piece: On 1st row on 4th-5th-6th pattern repeat crochet dc but only over first 17-19-22 dtr (crochet from middle towards sides.) Turn piece. Now close off 3 dtr for neckline towards mid front (i.e. in beginning of row with dtr) – read casting off tips 2 times in total = 11-13-16 dtr/dc left on shoulder. Cut and sew thread after 7-8-9 pattern repeats. Top part measures approx 21-24-27 cm. Back piece: = 51-60-69 dc. Crochet 1 dtr in each of middle 41-48-55 dc (do not crochet over 5-6-7 dc on each side = armhole) = 41-48-55 dtr. Crochet 6-7-8 pattern repeats with texture pattern, now crochet 1 last pattern repeat over 11-13-16 dc/dtr only on each side (do not crochet middle 19-22-23 dc/dtr = neckline.) Cut and sew thread after 7-8-9 pattern repeats. Assembly: Sew shoulder seams. Crochet edges: Crochet around bottom edge of top as follows: 1st round: Crochet 1 dtr in first dtr, *2 ch, skip 3 dtr, 1 dtr in next dtr*, repeat from*-* and finish with 2 ch and 1 sl st in first dtr. 2. round: 2 dtr in first dtr, *4 ch, 2 dtr in same dtr, 1 ch, 2 dtr in next dtr *, repeat from *-* and finish with 4 ch, 2 dtr in same dtr, 1 ch and 1 sl st in first dtr. Crochet around neckline as follows: 1 dc , *4 ch, skip approx 2 cm on, 1 dc*, repeat from *-* finish off with 4 ch and 1 sl st in first dc. |
|

|
|
|
Have you made this or any other of our designs? Tag your pictures in social media with #dropsdesign so we can see them! Do you need help with this pattern?You'll find tutorial videos, a Comments/Questions area and more by visiting the pattern on garnstudio.com. © 1982-2024 DROPS Design A/S. We reserve all rights. This document, including all its sub-sections, has copyrights. Read more about what you can do with our patterns at the bottom of each pattern on our site. |


With over 40 years in knitting and crochet design, DROPS Design offers one of the most extensive collections of free patterns on the internet - translated to 17 languages. As of today we count 304 catalogues and 11422 patterns - 11422 of which are translated into English (UK/cm).
We work hard to bring you the best knitting and crochet have to offer, inspiration and advice as well as great quality yarns at incredible prices! Would you like to use our patterns for other than personal use? You can read what you are allowed to do in the Copyright text at the bottom of all our patterns. Happy crafting!
Comments / Questions (50)
Som Pia kan jag inte bestämma mig om den är ful eller snygg - så jag får väl virka den och se efter! :=)
03.02.2007 - 14:04du gardin wrote:
ce pull est magnifique pouriez vous me donner les explications en français pour pouvoir faire ce pull pour cet été merci d'avance
02.02.2007 - 21:41Karma wrote:
Absolutely LOVE this!
30.01.2007 - 08:01Äsa Winholm wrote:
Fräch modell, snyggt till sommar.
29.01.2007 - 22:46Katarina wrote:
Den är otroligt tuff och snygg. Häftigt när mönstret kommer.
25.01.2007 - 19:31Denne var tøff :)
07.01.2007 - 13:22jane wrote:
anderledes - lidt sjov
01.01.2007 - 17:32heel apart!
31.12.2006 - 22:17Christin wrote:
Vackert mönster och det är fräckt med virkat...lite nostalgiskt!
27.12.2006 - 12:07Pia wrote:
Kan inte bestämma mig om dena är snygg eller ful. Men på något sätt tilltalar den mig starkt.
11.12.2006 - 17:42