
Popular categories
Looking for a yarn?


Comments / Questions (31)
![]() Scandinavian Knitting Design wrote:
Scandinavian Knitting Design wrote:
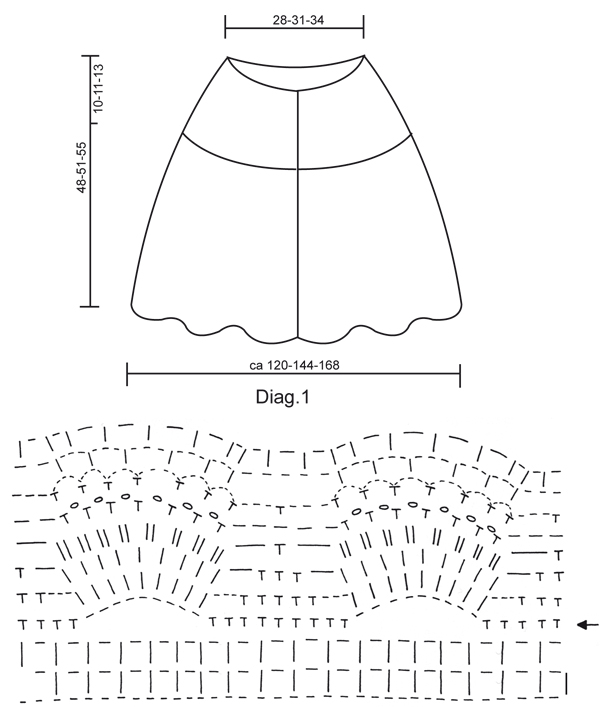
A horizontal line in the pattern diagram represents a ch (lm in the Scandinavian version. A T symbol represents a dc (fm in Scandinavian) A vertical line represents a tr (st in Scandinavian) A circle represents a picot. I hope the above is clear and helps you to understand the pattern. Kind regards Karen Scandinavian Knitting Design
20.05.2006 - 16:52
![]() amber wrote:
amber wrote:
Please explain diagram what does -=1lm T=1fm I=st mean i dont understand what the - T I stitch is. please email me if you can not understand this.
20.05.2006 - 02:37
![]() amber wrote:
amber wrote:
With the diagram on page 4 I need translation for each stitch i dont understand what -=1lm T=1fm I=1st could you please tell me what each sticht is.
20.05.2006 - 02:27
![]() scandinavian Knitting Design wrote:
scandinavian Knitting Design wrote:
Could you please let us know exactly what it is that you do not understand, and could you please E-Mail your request for help directly to sales@scandinavianknittingdesign.com. Signed by Karen at SKD.
12.05.2006 - 13:43
![]() Lora wrote:
Lora wrote:
I need serious help with this pattern. I get through the first part and then I am just lost. I need more simplified instructions if possible please. Thanks Very Much
12.05.2006 - 00:36Nissa wrote:
Veldig fin. Jeg har lyst å få oppskrift på det.
30.01.2006 - 21:02
![]() litenfossing wrote:
litenfossing wrote:
Härlig men.... är det en gardin? men vad gör det, kul att sticka är det ju så varför inte!
11.01.2006 - 23:06mette wrote:
love it ... funck
09.01.2006 - 13:58karina wrote:
Romantisk spets i värmande ull. Enkel att svepa om sig på kvällen. Är halssmycket också med???
06.01.2006 - 19:44
![]() Elise Gulbrandsen wrote:
Elise Gulbrandsen wrote:
elegant synes jeg denne var stå på dette har jeg savnet lenge.hilsen en som har hekle dilla
22.12.2005 - 12:34
|
|||||||||||||
Desert Bloom |
|||||||||||||
 |
 |
||||||||||||
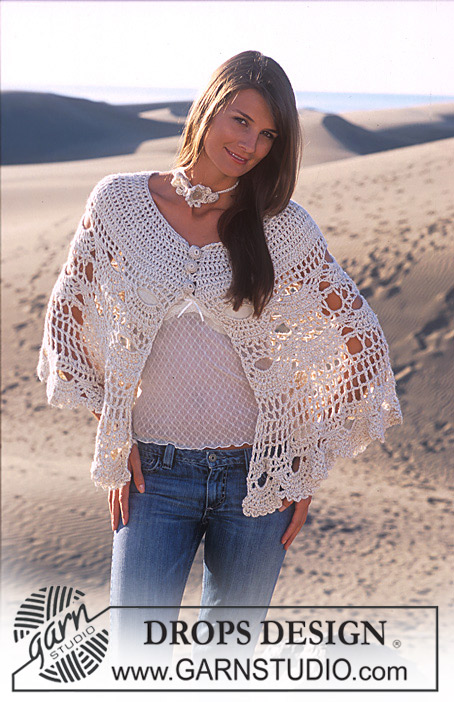
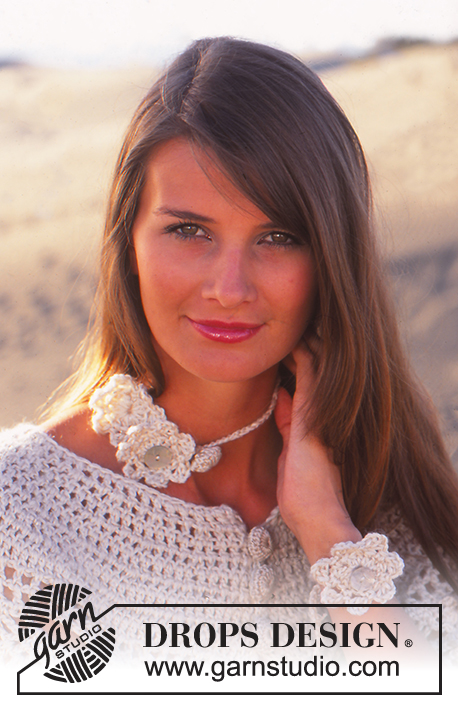
DROPS Nostalgic poncho crochet in Alpaca and Cotton Viscose and crochet necklace and bracelet
DROPS 94-10 |
|||||||||||||
|
Crochet Gauge: 12 tr x 7 rows with 1 thread of Alpaca and 1 thread of Cotton Viscose = 10 x 10 cm. 12 dtr x 5 rows = 10 x 10 cm. 1 report in pattern = width approx 12 cm. Crochet info: At the beginning of each row substitute 1 dc with a ch, 1 tr with 3 ch and 1 dtr with 4 ch. Pattern: See diagram 1 – diagram 2 shows the repeat in the width. PONCHO Crochet the piece from the top and down. Crochet loosely 70-76-84 ch on hook size 5 with 1 thread of Alpaca and 1 thread of Cotton Viscose. Crochet 1st row as follows: 1 tr in the 4th ch from the hook, 1 tr in each remaining 66-72-80 ch = 68-74-82 tr. Turn the piece. Read crochet info! Continue to crochet tr’s forward and backward at the same time inc as follows (to inc 1 tr crochet 2 tr’s in 1 tr): Size S/M: Inc 1 tr in every other tr but finish with only 1 tr in the last tr = 101 tr. Crochet 1 row without inc. On the next row inc 1 tr in every 3rd tr = 134 tr. Crochet 2 rows without any inc. On the next row inc. 47 tr evenly distributed on row = 181tr Size M/L: Inc 1 tr in every other tr but finish with only 1 tr in the last tr = 110 tr. Crochet 1 row without inc. On the next row inc 1 tr in every 3rd tr = 146 tr. Crochet 1 row without any inc. On the next row inc. 1 tr in every 4th tr = 182 tr. Crochet 1 row without any inc, and on the next row inc. 35 tr evenly distributed on row = 217 tr. Size XL/XXL: Inc 1 tr in every other tr but finish with only 1 tr in the last tr = 122 tr. Crochet 1 row without inc. On the next row inc 1 tr in every 3rd tr = 162 tr. Crochet 1 row without any inc. On the next row inc. 1 tr in every 4th tr = 202 tr. Crochet 2 rows without any inc, and on the next row inc. 51 tr evenly distributed on row = 253 tr. When all inc. are complete the piece measures 10-11-13 cm. Now crochet pattern – see diagram 1. Crochet 2 repeats, but start the second repeat in the row marked with arrows. Now crochet 2-3-4 rows of dtr as follows: NB: If you want to adjust the length of the poncho either add or subtract a row of dtr’s. 1st row: Remember crochet info: Crochet 1 dtr around each ch-loop with a ch in between = 90-109-127 dtr, turn the piece. 2nd row: Crochet 1 dtr into each dtr but instead of 1 ch in between crochet 2 ch’s – Size S/M finish here before the last pattern repeat = 91 dtr’s. 3rd row: Crochet a dtr in each dtr but now crochet 3 ch’s in between each dtr instead of 2 ch – size M/L finish here before the last pattern repeat = 109 dtr’s. 4th row: Crochet 1 dtr into each dtr with 3 ch’s in between each dtr. Size XL/XXL finish here before the last pattern repeat = 127 dtr’s. After the last row of dtr crochet Diagram 1 again from the beginning, but finish the pattern after the 7th row in diagram – NB: Crochet 1st row in diagram as follows so the pattern fits: 3 ch (=1 tr), 1 ch, *1 tr around the ch-loop, 1 ch, 1 tr around the next ch-loop*, repeat from *-* to the end of the row = 180-216-252 ch-loops. Buttons: Crochet a “cover” for the 3 buttons with Cotton Viscose as follows: Crochet 2 ch, continue to crochet 16 tr in the 1st of the 2 ch crochet, finish off with a sl st in the top of the 1st tr (= 1st round 1). 2nd round: Crochet 1 dc into each tr and finish off with a sl st in the 1st dc from beginning of round. 3rd round: Crochet 1 tr into every other dc and finish off with a sl st in the 1st tr from beginning of the round = 8 tr. Put the buttons into the cover, sew around the edge and pull together. Sew the buttons on the right side of the poncho. The top button should be approx 1 cm from the edge and leave 4-6 cm in between the others. Button loop: Crochet loops for the buttons on left side as follows: 1 dc in the corner of the neck, 1 dc into the same st, *4 ch, skip 3-3.5-4 cm, 1 dc in the next st*, repeat a total of 3 times - a total of 3 loops matching the location of the buttons. NECKLACE AND BRACELET Length: Necklace: 60 cm. Bracelet: 35 cm Materials: Alpaca and Cotton Viscose. Leftovers from the Poncho Drops crochet hook size 3 mm for the buttons and size 5 mm for flowers and chain. Drops mother of pearl button, no. 521: 2 pcs. Accessories: 1 button approx. 2 cm in diameter to crochet round. Necklace: Flower: Crochet 4 ch on hook size 5 mm with 1 thread of Alpaca and 1 thread of Cotton Viscose and make a loop with a sl st. 1st round: 3 ch (=1 tr), crochet 13 tr around the loop and finish with a sl st in the 3rd ch from beginning of round. 2nd round: *4 ch, 1 tr in the 1st of the 1st of the 4 ch, skip 1 tr, 1 dc in the next tr*, repeat from *-* a total of 7 times but finish with a sl st in the sl st from the end for the previous round (instead of a dc in the next st) = 7 leaves. To make a small loop on the backside of the flower, use the thread end from the beginning and crochet 1 dc in the centre of the flower, 2 ch, and attach with a sl st. Chain: Crochet 2 ch on hook size 5 mm with 1 thread of Alpaca and 1 thread of Cotton Viscose, crochet 1 sl st and 1 dc in the 1st ch crochet. Continue with ch’s until the chain is approx 60 cm and finish with a dc and a sl st in the second but last ch. Cut and sew the threads. Crochet 2 flowers – see explanation above. Sew a mother of pearl button in the centre of 1 flower and pull them on the chain. Crochet a button with 1 thread of Cotton Viscose on hook size 3 as explained under Poncho. Crochet 1 loop on the backside of the button the same way as done for the flowers and pull the button on the chain. Bracelet: Crochet 2 ch on hook size 5 mm with 1 thread o Alpaca and 1 thread of Cotton Viscose. Crochet a sl st and a dc in the 1st crochet ch. Continue with ch’s until the bracelet measures 35 cm and finish with a dc and a sl st in the second last ch. Cut and sew the thread. Crochet 1 flower – see explanation above. Sew a mother of pearl button in the centre of the flower and pull it on the bracelet chain. |
|||||||||||||
Diagram explanations |
|||||||||||||
|
|||||||||||||
 |
|||||||||||||
Have you finished this pattern?Tag your pictures with #dropspattern or submit them to the #dropsfan gallery. Do you need help with this pattern?You'll find 8 tutorial videos, a Comments/Questions area and more by visiting the pattern on garnstudio.com. © 1982-2026 DROPS Design A/S. We reserve all rights. This document, including all its sub-sections, has copyrights. Read more about what you can do with our patterns at the bottom of each pattern on our site. |
|||||||||||||


With over 40 years in knitting and crochet design, DROPS Design offers one of the most extensive collections of free patterns on the internet - translated to 17 languages. As of today we count 325 catalogues and 12298 patterns translated into English (UK/cm).
We work hard to bring you the best knitting and crochet have to offer, inspiration and advice as well as great quality yarns at incredible prices! Would you like to use our patterns for other than personal use? You can read what you are allowed to do in the Copyright text at the bottom of all our patterns. Happy crafting!
Post a comment to pattern DROPS 94-10
We would love to hear what you have to say about this pattern!
If you want to leave a question, please make sure you select the correct category in the form below, to speed up the answering process. Required fields are marked *.