
Popular categories
Looking for a yarn?


Comments / Questions (152)
![]() Nisse wrote:
Nisse wrote:
I do not understand the instructions for the neck, is it possible to get an elaboration? ” Cut the strand. Start from the wrong side, by the neck and continue the pattern back and forth. AT THE SAME TIME cast off at the beginning of each row from the neck as follows: 2 stitches 1 time and 1 stitch 1-1-1-2-2-2 times on each side.” Won’t i get holes in the neck if I cast off at the beginning of each row as I work the neck?
23.04.2025 - 22:17DROPS Design answered:
Dear Nisse, when you have slipped the middle stitches on a thread for neck, you will now work back and forth starting rows from wrong side = from the left side of front piece towards the right side of front piece, and you will cast off stitches at the beginning of each row both from wrong side and from right side (so that you cast off the same number of sts on each side of middle stitches, neckline is so symmetrical). After all decreases and cast off are done, cut the yarn and starting from mid back, pick up stitches around neck for neck edge = including in the stitches cast off + work the stitches from the thread and remaining sts from yoke. Happy knitting!
24.04.2025 - 08:48
![]() Elisabeth wrote:
Elisabeth wrote:
Bonjour, j’ai réalisé ce pull en KARISMA (aiguilles 4). L’échantillon correspondait bien. Le pull avant lavage allait très bien. Après lavage à la main et séchage à plat entre deux serviettes, il s’était complètement détendu et n’est plus vraiment portable … avez vous eu ce genre d’expérience ? Avez vous une idée de la raison ? Car …. Je dois en refaire un maintenant. Merci.
04.03.2025 - 10:12DROPS Design answered:
Bonjour Elisabeth, il est plutôt déconseillé de laisser sécher entre deux serviettes, car il pourrait perdre son élasticité (cf conseils entretien ici); lavez le pull en suivant bien les indications de l'étiquette/du nuancier: lavez en machine à 40, cycle délicat, sans assouplissant, séchez à plat (sans serviette), etc.. DROPS Karisma est traitée superwash, le lavage en machine est possible voire recommandé.
04.03.2025 - 17:25
![]() Mette wrote:
Mette wrote:
Der hvor man strikker raglan ligner det på billederne at der er 2 ret på hver side af mærket, men i opskriften står der kun en? Hvad er det korrekte? 😊
23.02.2025 - 17:45DROPS Design answered:
Hei Mette. Litt usikker på hvor i oppskriften du mener det står kun 1 maske. I oppskriften og nederst linje under BÆRESTYKKE står det: ... (= 2 masker glatstrik i hver overgang mellem forstykke/bagstykke og ærmer). mvh DROPS Design
03.03.2025 - 11:49
![]() Sandra wrote:
Sandra wrote:
No entiendo como se van tejiendo los puntos que vas aumentando en la manga, en A9/A10, en punto jersey?
15.02.2025 - 17:15DROPS Design answered:
Hola Sandra, como se indica en la manga: los puntos aumentados primero se trabajan en A.9/A.10 hasta tener suficiente espacio para una repetición completa, después trabajar en A.4. Es decir, al aumentar 1 punto en ese lado, se trabaja como el siguiente punto de A.9/A.10 según el diagrama. Una vez has aumentado 2 puntos en el mismo lado, estos 2 puntos se trabajan en el patrón de A.4 (elástico, 1 derecho, 1 revés). Aumentas otro más, tienes 1 punto según A.9/A.10 y 2 puntos del elástico, e.t.c.
17.02.2025 - 01:15
![]() Danaé Loeb wrote:
Danaé Loeb wrote:
Pour le col doublé, il est écrit de relever 142 mailles autour de l'encolure, en comptant celles en attente et sur l'aiguille donc 32+104=136. Faut-il donc relever 6 mailles supplémentaires pour arriver au bon nombre ? Merci pour votre aide.
10.02.2025 - 23:13DROPS Design answered:
Bonjour Mme Loeb, rappelez-vous que vous avez également rabattu des mailles pour l'encolure de chaque côté = 3 mailles de chaque côté des mailles en attente, ainsi vous avez bien: 104 + 32 + (2x3) = 142 mailles. Bon tricot!
11.02.2025 - 09:58
![]() Danaé Loeb wrote:
Danaé Loeb wrote:
Pour cette section : "Commencer sur l'envers, à l'encolure, et continuer en allers et retours. EN MÊME TEMPS, rabattre au début de chaque rang à partir de l'encolure, de chaque côté, ainsi: 1 fois 2 mailles et 1 fois 1 maille." Cela signifie que l'on diminue 3 mailles sur l'envers et donc 3 mailles sur l'endroit également pour arriver à 6 mailles diminuées ? Sommes-nous d'accord qu'il n'y a que deux rangs en allers retours ? Merci pour votre aide.
10.02.2025 - 23:11DROPS Design answered:
Bonjour Mme Loeb, vous devez rabattre (et non diminuer) ces mailles en début de rang de chaque côté, en commençant sur l'envers, vous rabattez 2 mailles au début du rang, tricotez le rang comme avant (mais sur l'envers cette fois), tournez, rabattez les 2 premières mailles au début du rang sur l'endroit, tricotez ce rang comme avant (en diminuant pour le raglan), tournez et répétez ces 2 rangs en rabattant cette fois 1 maille au début de chacun des 2 prochains rangs = vous avez rabattu 3 m de chaque côté (1 x 2 m + 1 x 1 m). Bon tricot!
11.02.2025 - 09:57
![]() Danaé Loeb wrote:
Danaé Loeb wrote:
Bonsoir, Lorsque que j'arrive à l'encolure, je diminue 6 mailles des 24 mailles du centre devant, j'ai donc 18 mailles. Dans les explications il est indiqué de mettre en attente les 32 mailles centrales. De quelles 32 mailles centrales parle t-on ? Car sur le devant j'ai 12+18(suite aux diminutions)+12 = 42 mailles Sur l'arrière j'ai 48 mailles... Pouvez-vous m'aider afin de résoudre ce problème ? Merci à vous.
10.02.2025 - 22:17DROPS Design answered:
Bonjour Mme Loeb, on parle ici toujours des mailles du milieu du devant pour l'encolure devant, autrement dit, lorsque vous avez diminué vos 6 mailles dans les 24 mailles centrales, vous mettez les 32 mailles centrales (soit ces 18m + 7 m de chaque côté) en attente. Bon tricot!
11.02.2025 - 09:55
![]() Marie Hellier wrote:
Marie Hellier wrote:
Thnk you for your suggestion. The merino super fine does sound like a suitable alternative for very sensitive skin, however I'm a bit concerned it might be too stretchy for a jumper?
02.02.2025 - 19:58DROPS Design answered:
Dear Marie, DROPS Merino Extra Fine can be used for jumpers as well: you can see for example this similar jumper for men made with Merino Extra Fine and compare the measurements of each jumper. With DROPS Merino Extra Fine it's important to maintain the knitting gauge; this way the piece will be worked more tightly and will be less stretchy. Happy knitting!
02.02.2025 - 21:01
![]() Marie Hellier wrote:
Marie Hellier wrote:
I would likevto make this jumper for my son but he has very sensitive skin, would the recommended wool be OK? If not can you recommend a good alternative? Thank you.
02.02.2025 - 17:32DROPS Design answered:
Dear Marie, DROPS Karisma is superwash treated, soft and comfortable to the skin. However, for very sensitive skins we recommend DROPS Merino Extra Fine, which is also superwash treated but softer than Karisma. Happy knitting!
02.02.2025 - 18:50
![]() Tim wrote:
Tim wrote:
När man ska sticka mönstret står det att man ska sticka A4 i 17 maskor, men mönster A4 har ett jämnt antal maskor. Innebär det att man på sista repetitionen avslutar mönster A4 halvvägs?
29.01.2025 - 20:26DROPS Design answered:
Hej Tim. Ja det stämmer. Mvh DROPS Design
30.01.2025 - 07:57
|
|||||||||||||||||||||||||||||||
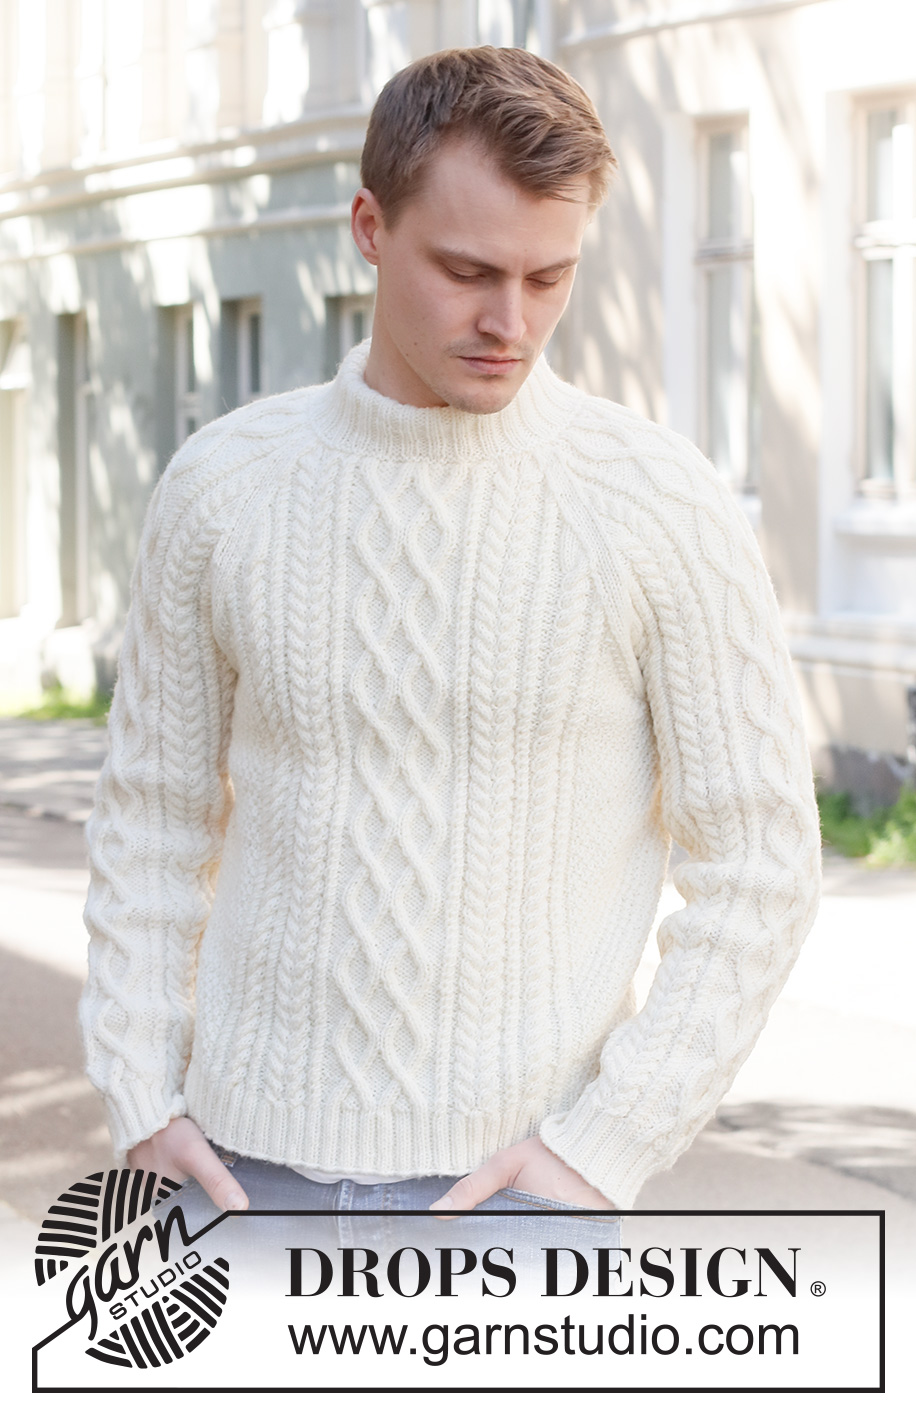
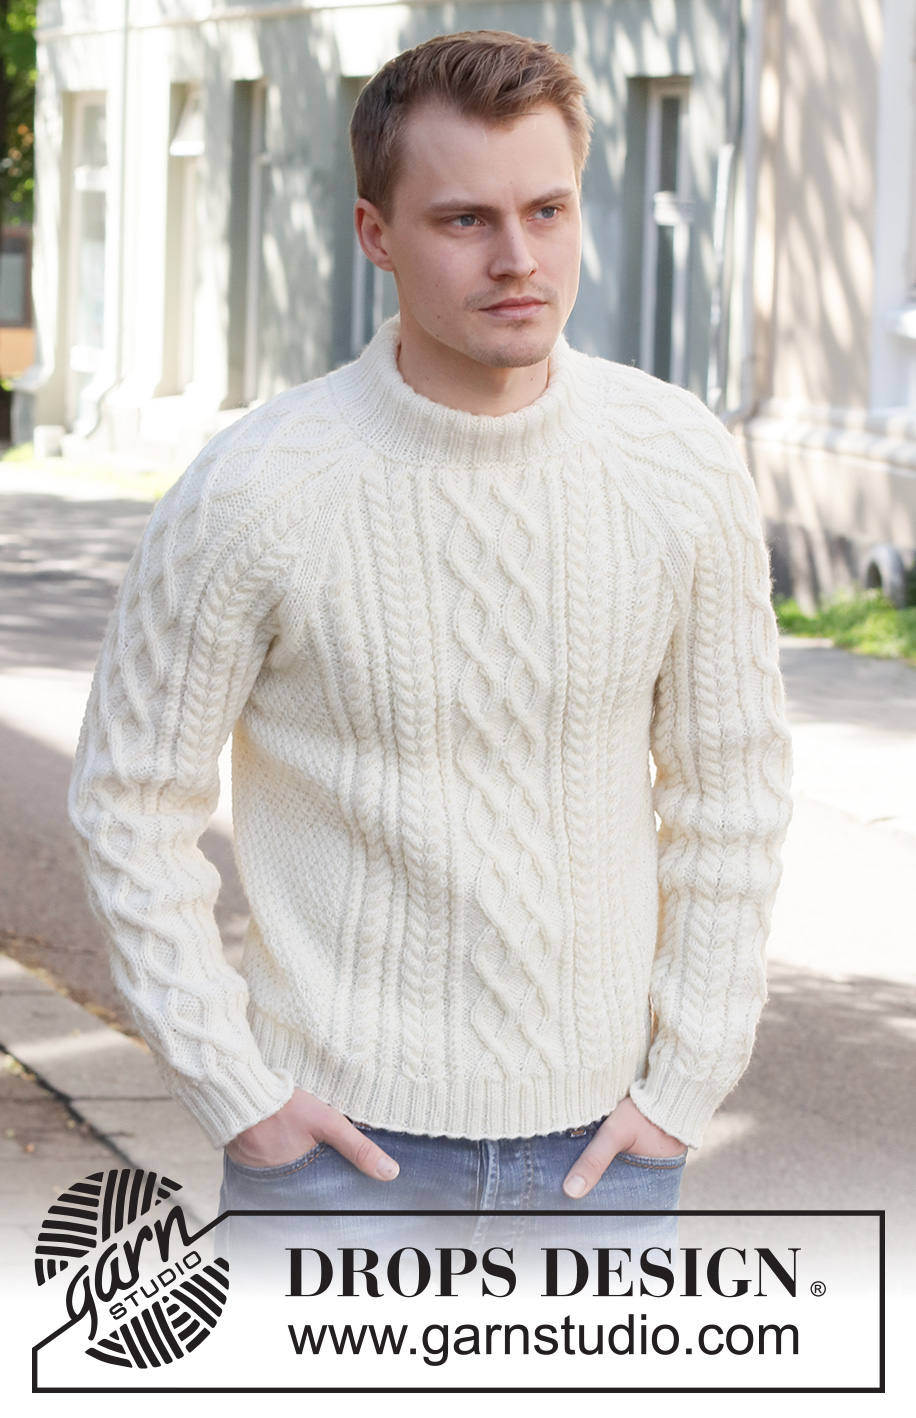
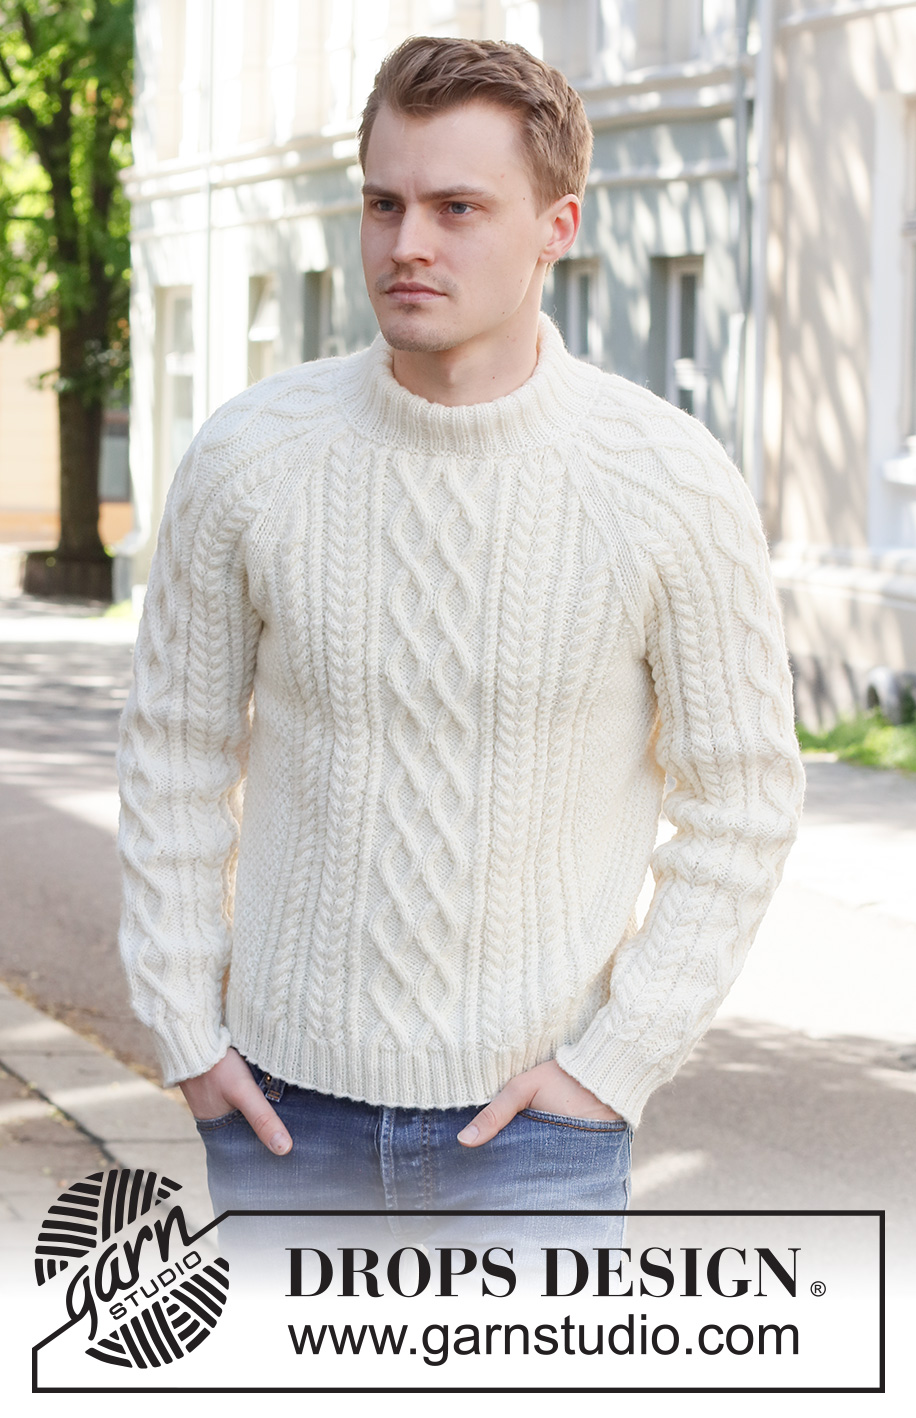
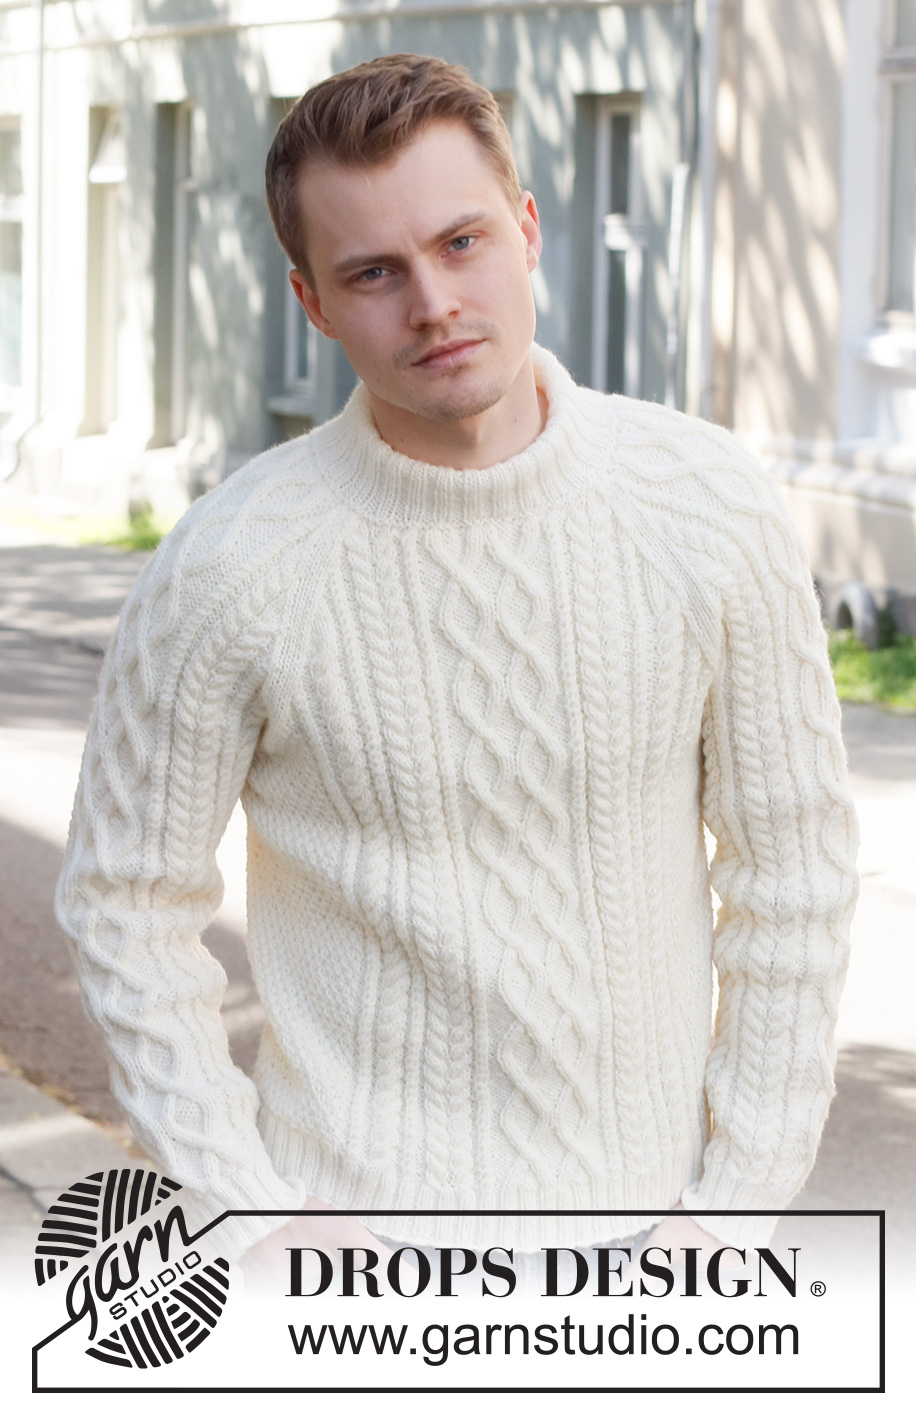
Ice Island#iceislandsweater |
|||||||||||||||||||||||||||||||
 |
 |
||||||||||||||||||||||||||||||
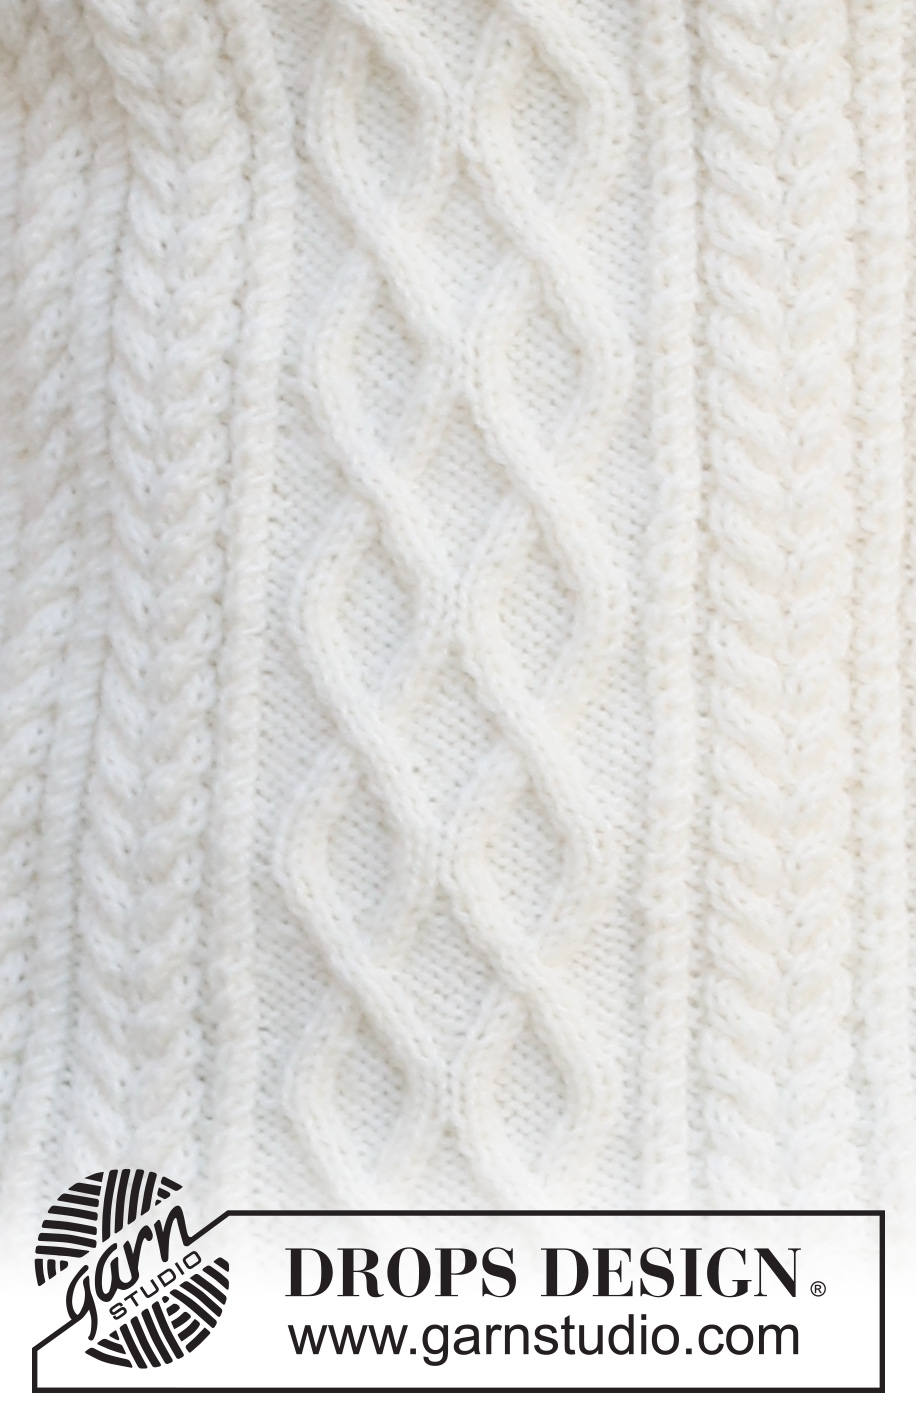
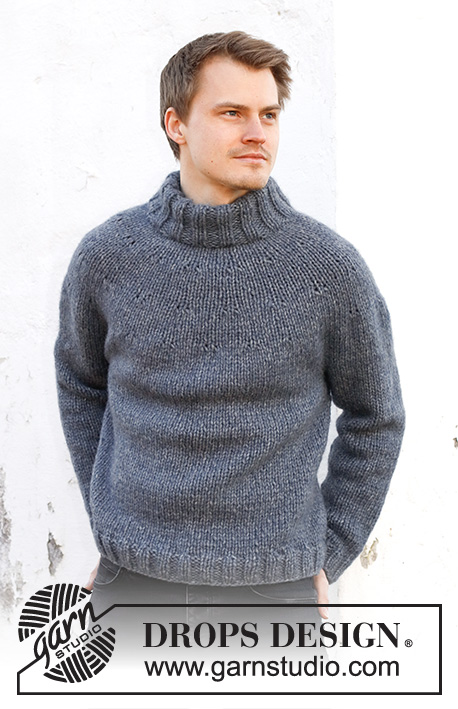
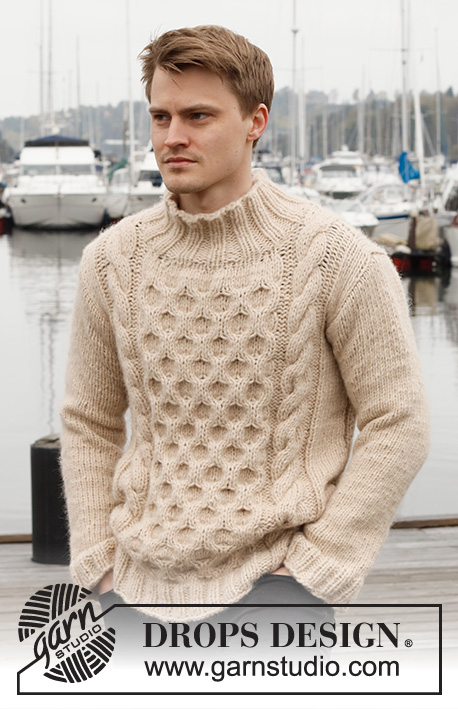
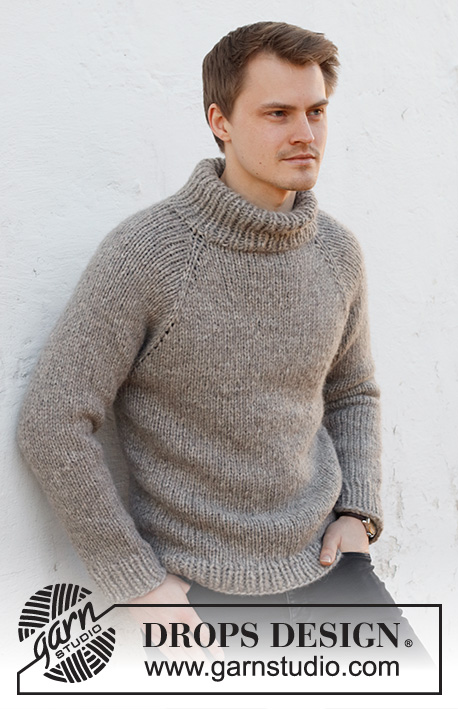
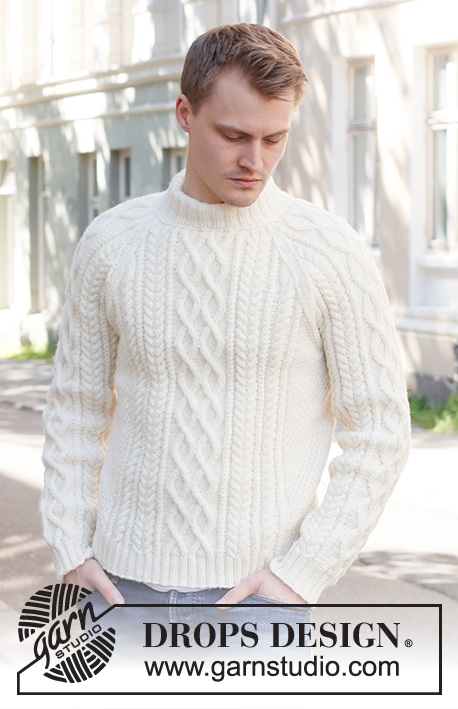
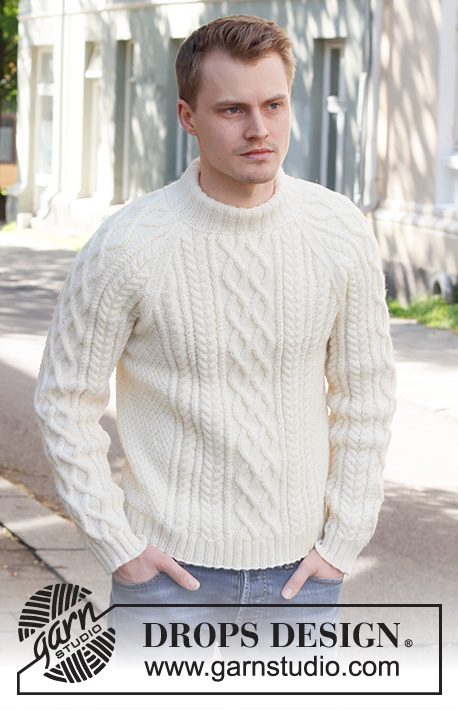
Knitted jumper for men in DROPS Karisma. The piece is worked with raglan, cables and double neck. Sizes S - XXXL.
DROPS 224-10 |
|||||||||||||||||||||||||||||||
|
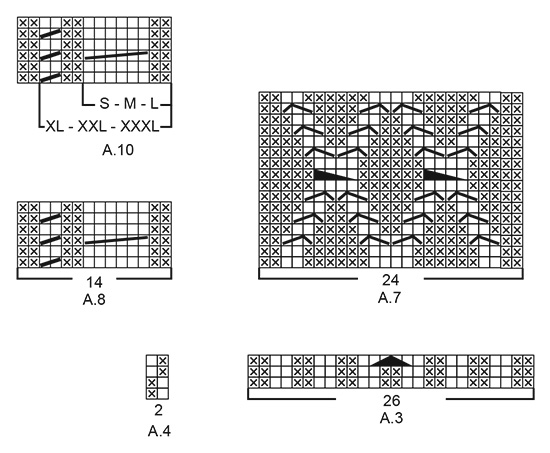
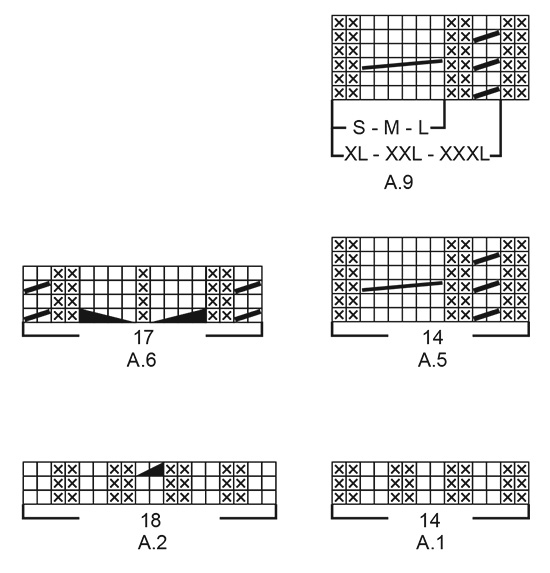
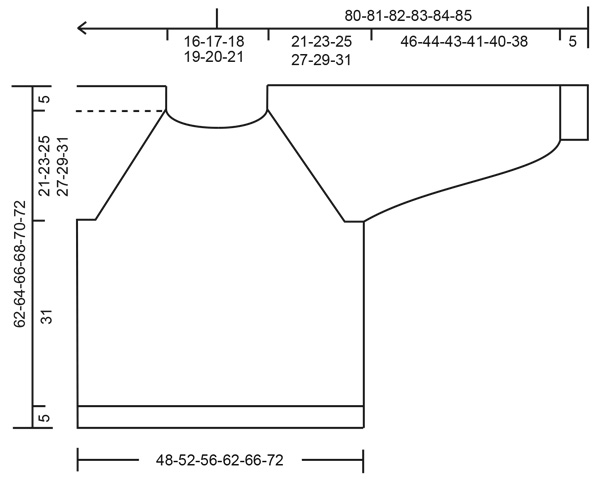
------------------------------------------------------- EXPLANATIONS FOR THE PATTERN: ------------------------------------------------------- KNITTING TIP: In sizes XL, XXL and XXXL, there will be 4 purl stitches next to each other when A.1 is worked 2 times in width. So the rib will match under A.5/A.8, which is worked after the rib. PATTERN: See diagrams A.1 to A.10. The diagrams show all rows in the pattern from the right side. DECREASE/INCREASE TIP (evenly spaced): To work out how to decrease/increase evenly, count the number of stitches to be decreased/increased over (e.g. 23 stitches), and divide by the number of decreases/increases to be made (e.g. 6) = 3.8. In this example, decrease by knitting together approx. each 3rd and 4th stitch. When increasing, make 1 yarn over after approx. each 4th stitch. On the next round work the yarn overs twisted to avoid holes. INCREASE TIP (sleeves): Increase 2 stitches under the sleeve by making 1 yarn over on each side of the marker-stitch as follows: Work the marker-stitch (always the first stitch in A.4), 1 yarn over, pattern as far as the marker-stitch, 1 yarn over (= 2 stitches increased). On the next round work the yarn overs twisted to avoid holes. Then work the new stitches into A.9/A.10 until you have room for a complete repeat, then work the stitches in A.4. RAGLAN: Decrease to raglan on each side of the marker, in each transition between body and sleeves as follows. FROM RIGHT SIDE: AFTER THE MARKER: Knit 1, slip 1 stitch as if to knit, knit 1 and pass the slipped stitch over the knitted stitch (= 1 stitch decreased) BEFORE THE MARKER: Work until there are 3 stitches left before the marker, knit 2 together, knit 1 (= 1 stitch decreased). FROM WRONG SIDE: AFTER THE MARKER: Purl 1, purl 2 together (= 1 stitch decreased) BEFORE THE MARKER: Work until there are 3 stitches left before the marker, purl 2 twisted together, purl 1 (= 1 stitch decreased). ------------------------------------------------------- START THE PIECE HERE: ------------------------------------------------------- JUMPER – SHORT OVERVIEW OF THE PIECE: The body is worked in the round with circular needle as far as the armholes. The sleeves are worked in the round with double pointed needles/short circular needle, bottom up. The body and sleeves are placed on the same circular needle and the yoke worked, decreasing to raglan at the same time. Stiches are cast off for the neck mid-front and the piece continued back and forth. The neck is worked to finish. BODY: Cast on 272-288-304-344-360-392 stitches with circular needle size 3.5 mm and DROPS Karisma. Knit 1 round. Then work the following rib: Purl 1, knit 2, * purl 2, knit 2 *, work from *-* over the next 20-24-28-24-28-36 stitches, work A.1 over the next 14-14-14-28-28-28 stitches (= 1-1-1-2-2-2 repeats of 14 stitches – read KNITTING TIP), A.2 (= 18 stitches), A.3 (= 26 stitches), A.2, A.1 over the next 14-14-14-28-28-28 stitches (= 1-1-1-2-2-2 repeats of 14 stitches – read KNITTING TIP), * knit 2, purl 2 *, work from *-* over the next 44-52-60-52-60-76 stitches, knit 2, A.1 over the next 14-14-14-28-28-28 stitches – remember KNITTING TIP, A.2, A.3, A.2, A.1 over the next 14-14-14-28-28-28 stitches – remember KNITTING TIP, * knit 2, purl 2 *, work from *-* over the next 20-24-28-24-28-36 stitches, knit 2 and purl 1. Continue this rib – NOTE: In diagrams A.2 and A.3 repeat the first 2 rounds onwards. When 1 round remains before the piece measures 5 cm, decrease stitches as follows: Work stocking stitch over the first 23-27-31-27-31-39 stitches and decrease 6-6-6-6-6-8 stitches evenly over these stitches – read DECREASE/INCREASE TIP, work A.1 as before over the next 14-14-14-28-28-28 stitches, work the last round in A.2 (= 18 stitches, 1 stitch decreased), work the last round in A.3 (= 26 stitches, 2 stitches decreased), work the last round in A.2 (= 18 stitches, 1 stitch decreased), A.1 as before over the next 14-14-14-28-28-28 stitches, work stocking stitch over the next 46-54-62-54-62-78 stitches and decrease 13-13-13-13-13-17 stitches evenly over these stitches, A.1 as before over the next 14-14-14-28-28-28 stitches, work the last round in A.2 (= 18 stitches, 1 stitch decreased), work the last round in A.3 (= 26 stitches, 2 stitches decreased), work the last round in A.2 (= 18 stitches, 1 stitch decreased), A.1 as before over the next 14-14-14-28-28-28 stitches, work stocking stitch over the last 23-27-31-27-31-39 stitches and decrease 7-7-7-7-7-9 stitches evenly over these stitches = 238-254-270-310-326-350 stitches. The rib is now finished. Insert 1 marker in the first stitch and 1 marker in the 120th-128th-136th-156th-164th-176th stitch (= sides). Allow these markers to follow your work onwards; they are used when casting off for the armholes. Change to circular needle size 4.5 mm. Work the next round as follows: A.4 over the first 17-21-25-21-25-31 stitches, A.5 over the next 14-14-14-28-28-28 stitches (= 1-1-1-2-2-2 repeats of 14 stitches), A.6 (= 17 stitches), A.7 (= 24 stitches), A.6, A.8 over the next 14-14-14-28-28-28 stitches (= 1-1-1-2-2-2 repeats of 14 stitches), A.4 over the next 33-41-49-41-49-61 stitches (marker sits in the middle of these stitches), A.5 over the next 14-14-14-28-28-28 stitches, A.6, A.7, A.6, A.8 over the next 14-14-14-28-28-28 stitches and A.4 over the last 16-20-24-20-24-30 stitches. Continue this pattern. REMEMBER THE KNITTING TENSION! When the piece measures 36 cm in all sizes, cast off for the armholes as described below. There is approx. 26-28-30-32-34-36 cm left to finished length. Adjust so that next round is an odd numbered row in the diagrams, and cast off the first 6-6-7-7-8-8 stitches, continue the pattern until there are 5-5-6-6-7-7 stitches left before the second marker-stitch, cast off 11-11-13-13-15-15 stitches, work until there are 5-5-6-6-7-7 stitches left on the round and cast off 5-5-6-6-7-7 stitches = 108-116-122-142-148-160 stitches on the front piece and 108-116-122-142-148-160 stitches on the back piece. Cut the strand. Lay the piece to one side and work the sleeves. SLEEVES: Cast on 56-60-60-64-64-68 stitches with double pointed needles size 3.5 mm and DROPS Karisma. Knit 1 round, then work rib in the round (knit 2, purl 2) for 5 cm. Knit 1 round where you increase 19-15-15-19-19-15 stitches evenly spaced – remember DECREASE/INCREASE TIP = 75-75-75-83-83-83 stitches. Insert 1 marker in the first stitch – allow the marker to follow your work onwards; it is used when increasing under the sleeve. Change to double pointed needles size 4.5 mm. Work the next round with pattern as follows: A.4 over the first stitch (marker-stitch), A.9 (= 8-8-8-12-12-12 stitches – start the diagram by the mark for your size and work from right to left), A.6 (= 17 stitches), A.7 (= 24 stitches), A.6, A.10 (= 8-8-8-12-12-12 stitches – start at the first stitch in A.10 and work from right to left as far as the mark for your size). Continue this pattern. When the piece measures 8-10-7-8-9-6 cm, increase 2 stitches under the sleeve – read INCREASE TIP. Increase like this every 4-2½-2½-2½-2-2 cm a total of 11-15-17-15-17-19 times = 97-105-109-113-117-121 stitches – NOTE: The increased stitches are first worked in A.9/A.10 until there is room for a complete repeat, then worked in A.4. Continue working until the sleeve measures approx. 51-49-48-46-45-43 cm (shorter measurements in larger sizes due to wider neck and longer yoke). Try the sleeve on and work to desired length. Adjust so that the next round is an odd numbered row in the diagrams and cast off for the armhole as follows: Cast off the first 6-6-7-7-8-8 stitches, work as before until there are 5-5-6-6-7-7 stitches left and cast off the last 5-5-6-6-7-7 stitches = 86-94-96-100-102-106 stitches. Cut the strand. Work the other sleeve in the same way. YOKE: Place the sleeves on the same circular needle size 4.5 mm as the body, where stitches were cast off for the armholes (without working the stitches) = 388-420-436-484-500-532 stitches. Insert a marker thread in each transition between the body and sleeves = 4 marker threads. Allow the threads to follow your work onwards; they are used when decreasing to raglan. Start at the transition between the back piece and the left sleeve – you can insert a marker here to show the start of the round. Continue the pattern as before, with 2 stitches in stocking stitch on each side of all 4 marker threads. OVERVIEW OF THE NEXT SECTION: On the next round start to decrease to raglan; you will also cast off stitches for the neck mid-front and finish working back and forth from mid-front. When there are not enough stitches for the cables, work stocking stitch over these stitches. Read RAGLAN and NECK before continuing. RAGLAN: Decrease to RAGLAN on each side of all 4 marker threads – read description above. Decrease every 2nd round a total of 24-27-30-32-36-38 times, then every round 7-7-6-7-4-4 times. NECK: When the piece measures 55-57-59-60-62-64 cm (adjust so the next round is an odd round in the diagrams), decrease 6-6-6-10-10-10 stitches evenly over the middle 24-24-24-32-32-32 in front – remember DECREASE/INCREASE TIP. Then place the middle 30-32-34-42-46-54 stitches on a thread for the neck. Work to the beginning of the round. Cut the strand. Start from the wrong side, by the neck and continue the pattern back and forth. AT THE SAME TIME cast off at the beginning of each row from the neck as follows: 2 stitches 1 time and 1 stitch 1-1-1-2-2-2 times on each side. After all the decreases to raglan and neck there are 98-104-102-112-116-124 stitches on the needle. Cut the strand. DOUBLE NECK: Start mid-back and knit up 134-142-142-162-170-186 stitches around the neck (including the stitches on the thread and on the needle) with short circular needle size 3.5 mm and DROPS Karisma. On the next round decrease stitches to avoid the neck being too loose – knit 1 round and decrease to 104-108-112-116-120-124 stitches evenly spaced. Purl 1 round and knit 1 round. Work the next round as follows: Knit 1, * purl 2, knit 2 *, work from *-* until there are 3 stitches left, purl 2 and knit 1. Continue this rib until the neck measures 8-8-8-10-10-10 cm. On the next round increase all purl-2 to purl-3 by making 1 yarn over after each purled section (the yarn overs are purled twisted on the next round to avoid holes). Continue working until the neck measures 11-11-11-13-13-13 cm. Switch to circular needle size 4.5 mm and cast off loosely with knit over knit and purl over purl. Fold the neck double to the inside and sew down. To avoid the neck being tight and rolling outwards, it is important that the seam is elastic. ASSEMBLY: Sew the opening under each sleeve. |
|||||||||||||||||||||||||||||||
Diagram explanations |
|||||||||||||||||||||||||||||||
|
|||||||||||||||||||||||||||||||
 |
|||||||||||||||||||||||||||||||
 |
|||||||||||||||||||||||||||||||
 |
|||||||||||||||||||||||||||||||
Have you finished this pattern?Tag your pictures with #dropspattern #iceislandsweater or submit them to the #dropsfan gallery. Do you need help with this pattern?You'll find 29 tutorial videos, a Comments/Questions area and more by visiting the pattern on garnstudio.com. © 1982-2026 DROPS Design A/S. We reserve all rights. This document, including all its sub-sections, has copyrights. Read more about what you can do with our patterns at the bottom of each pattern on our site. |
|||||||||||||||||||||||||||||||


With over 40 years in knitting and crochet design, DROPS Design offers one of the most extensive collections of free patterns on the internet - translated to 17 languages. As of today we count 324 catalogues and 12290 patterns translated into English (UK/cm).
We work hard to bring you the best knitting and crochet have to offer, inspiration and advice as well as great quality yarns at incredible prices! Would you like to use our patterns for other than personal use? You can read what you are allowed to do in the Copyright text at the bottom of all our patterns. Happy crafting!
Post a comment to pattern DROPS 224-10
We would love to hear what you have to say about this pattern!
If you want to leave a question, please make sure you select the correct category in the form below, to speed up the answering process. Required fields are marked *.