Comments / Questions (43)
![]() Gianna wrote:
Gianna wrote:
Bonjour, après le rangs sur l'endroit avec les diminutions pour obtenir 194 maille (M) je suis sur l'envers du travail et il est écrit : tricoter le dernier rang de A3 et de A4 . mais il est écrit au début des explications que les diagrammes montrent les rangs sur l'endroit. Je ne comprend pas . comment dois-je tricoter ce dernier rang de A3 et de A4 sur l'envers du travail ??
01.05.2023 - 16:09DROPS Design answered:
Bonjour Gianna, les diagrammes montrent tous les rangs, vus sur l'endroit, autrement dit, quand vous lisez les diagrammes, les rangs sur l'endroit(les rangs impairs) se lisent de droite à gauche et les rangs sur l'envers (les rangs pairs) se lisent de gauche à droite. Bon tricot!
02.05.2023 - 09:48
![]() Pierantognetti Emanuela wrote:
Pierantognetti Emanuela wrote:
Buonasera sto lavorando il modello 220-28 e non capisco la parte in cui dopo aver effettuato il bordo nel ferro successivo si dice : lavorare A1 sulle prime 7 maglie ok,A3 sulle 32 ok, ma le prossime 5 in A3 con diminuzioni????grazie
10.02.2023 - 19:27DROPS Design answered:
Buonasera Emanuela, per il diagramma A.3 deve iniziare dal ferro con la freccia come indicato, ferro in cui c'è la diminuzione. Buon lavoro!
10.02.2023 - 20:26
![]() Jess wrote:
Jess wrote:
For working the first row back after the decreases on the body, what does this mean? "Work 1 row back from wrong side as follows: Work last row in diagram A.3 and A.4, work A.1 and A.2 as before over the 7 band stitches in each side towards mid front and purl the remaining stitches on row." Does this mean work A1 first, then work last row of A3/A4 when prev row used A3/A4, and use purl st when prev row used stocking stitch? Are there decreases in the stocking stitch of this row?
24.12.2021 - 07:49DROPS Design answered:
Dear Jess, yes, you work A.3/ A.4 over the previous A.3/A.4. In each diagram, there should be one less stitch due to the decreases in the previous row. A.1 and A.2 are worked as before and you purl the stitches in stocking stitch. Happy knitting!
31.12.2021 - 20:38
![]() Carina Hansson wrote:
Carina Hansson wrote:
Hej! Jag stickar storlek S. "När arbetet mäter 4 cm ökas det en maska på varje sida av A6.Öka så med 7 cm mellanrum totalt 4 gånger". Arbetet blir då efter ökningarna, 4cm+7cm+7cm+7cm =25cm. Detta stämmer inte med att jag ska avmaska för armhål när arbetet mäter 22 cm, jag har då endast hunnit göra tre ökningar och det saknas därmed 4 maskor.
25.08.2021 - 14:35DROPS Design answered:
Hej Carina. Du har rätt, där ser det ur som det har blivit en felskrivning. Det ska vara ökningar med 5 cm mellanrum, inte 7 cm. Det kommer en rättelse på detta, tack för info! Mvh DROPS Design
26.08.2021 - 11:08
![]() Cristine wrote:
Cristine wrote:
Hola, es en la sig sección del patrón en español donde hay un error. Actualmente dice: "Ahora trabajar el patrón como sigue: Trabajar A.1, A.5 sobre los siguientes 28-35-35-35-35-42 puntos, trabajar los primeros 4 puntos en A.5, punto jersey sobre los siguientes 2-4-5-10-17-19 puntos, A.5 sobre los siguientes 70-70-77-77-77-84 puntos (...)". Aquí falta una rep de A.6 y una de 4 pts jersey, de otra manera no da el total de pts.
17.08.2021 - 00:13DROPS Design answered:
Hola Cristine. Si, tienes razón, en este apartado habia una errata. Ya está corregido. Gracias.
17.08.2021 - 18:52
![]() Kateřina wrote:
Kateřina wrote:
Dobrý den. Upletla jsem pružný lem a pokračuji. Když končí vzor A1 obrace a navazující A3 začíná obrace, jsou tedy dvě obrace vedle sebe a nenavazuje to na pružný vzor. Nevím, kde mam chybu. Děkuji.
16.08.2021 - 08:05DROPS Design answered:
Dobrý den, Kateřino, chybu neděláte, takto je to v pořádku - na přechodu vzoru a légy vychází 2 oka obrace na obou stranách dílu. Hodně zdaru! Hana
17.08.2021 - 19:14
![]() Cristine wrote:
Cristine wrote:
Hola! Creo que hay un error en el patrón luego de comenzar a tejer el cuerpo con agujas 4 mm y tejer la primera fila de revés (es decir, la última fila de A.3 y A.4). Se supone que debería haber 194 puntos, pero si se cuentan los puntos de las instrucciones siguientes suma 184 puntos. Al parecer falta incluir una repetición de A.6 sobre A.4 y una repetición de 4 puntos en punto jersey.
14.08.2021 - 17:54DROPS Design answered:
Hola Cristine, haciendo las cuentas de los puntos disminuidos, nos sale que para la talla M se disminuyen en la vuelta 33 puntos según las instrucciones. Restando este número del número de puntos inicial, que es 227, salen 194 puntos. Revisa bien que no te hayas saltado ninguna repetición de las instrucciones. Puedes usar marcapuntos para que sea más cómodo indicar las repeticiones.
16.08.2021 - 20:13
![]() Pauline wrote:
Pauline wrote:
I am having there same problem as Helen with the sleeves. The decrease instructions are incorrect. I am making the largest size. So you start with 80sts, you then say the deceased are only at the beginning of each row -2sts x 2 times(4) = 76, 1st x 14times (14) = 62, 2sts x 1 time (2) = 60 and then 3 sts at each end (6) =54. Your instruction state that this should leave34 are, but this adds up to 54? I think you with mean decrease each time at both ends of each row or there should be more rows
08.08.2021 - 22:33DROPS Design answered:
Dear Pauline, you first cast off 10 sts mid under sleeve = 70 sts remain, then cast off on each side (at the beg of every row on each side): 2 sts x 3 times + 1 st x 5times + 2 sts x 3 times + 3 sts x 1 time = 6+5+6+3=20 sts on each side x 2 sides = 40sts are cast off in total; remain: 70 - 40=30 sts. Hope this can help. Happy knitting!
09.08.2021 - 08:23
![]() Jeanet Van Rosendal wrote:
Jeanet Van Rosendal wrote:
Wat betekent in de omschrijving A6. over A4? Het gaat om dit doel van de omschrijving.. Brei nu in patroon als volgt: Brei A.1, A.5 over de volgende 28-35-35-35-35-42 steken, brei de eerste 4 steken in A.5, tricotsteek over de volgende 2-4-5-10-17-19 steken, A.6 over A.4, tricotsteek over de volgende 2-4-5-10-17-19 steken, A.5 over de volgende 70-70-77-77-77-84 steken, brei de eerste 4 steken in A.5, tricotsteek over de volgende 2-4-5-10-17-19 steken, A.6 over A.4, tricotsteek over de volgende 2
07.08.2021 - 23:18DROPS Design answered:
Dag Jeanet,
Je hebt hiervoor A.4 gebreid en boven de steken van A.4 brei je nu A.6.
18.08.2021 - 19:42
![]() Debby wrote:
Debby wrote:
Jullie zeggen bij maat S dat je om na de eerste meerdering op 4 cm daarna iedere 7 cm moet meerderen. Dat betekent op 4 cm (de eerste meerdering), op 11, 18, 24 cm. Maar bij 22 cm lengte moet je de panden gaan scheiden. Je hebt dan pas 3x gemeerderd ipv 4 x. De maten M en L geven aan meerderen na iedere 5 cm na de eerste: 4 cm (1e meerdering, 9, 14 ,19 cm de volgende 3 meerderingen. Zou dit ook niet moeten gelden voor maat S.
12.07.2021 - 22:50
Coral Gables Cardigan#coralgablescardigan |
||||||||||||||||||||||
 |
 |
|||||||||||||||||||||
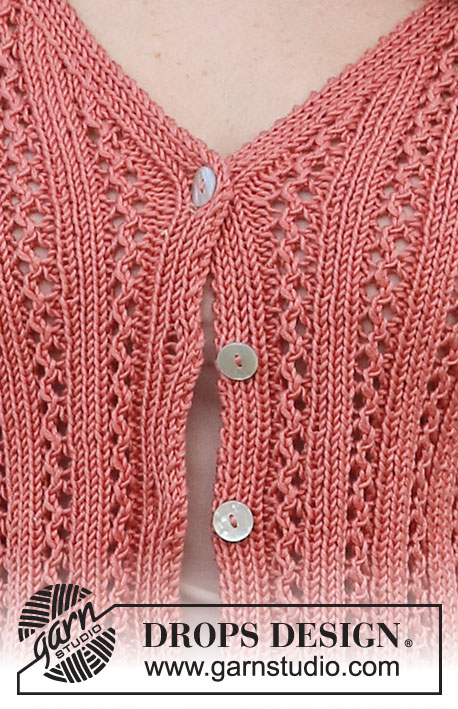
Knitted jacket in DROPS Muskat. The piece is worked with lace pattern, V-neck and short sleeves. Sizes S - XXXL.
DROPS 220-28 |
||||||||||||||||||||||
|
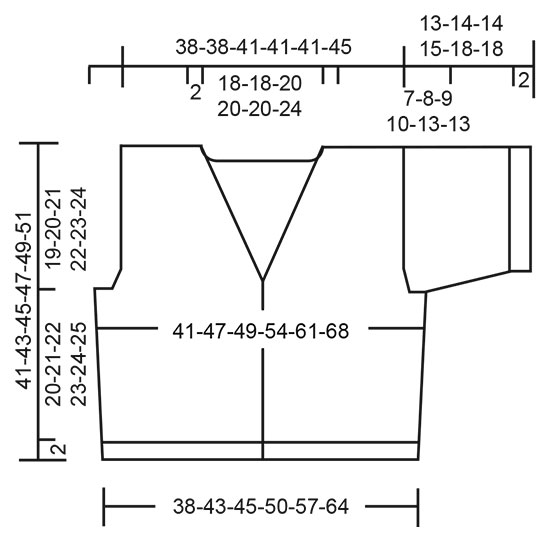
------------------------------------------------------- EXPLANATIONS FOR THE PATTERN: ------------------------------------------------------- PATTERN: See diagrams A.1 to A.6. The diagrams show all rows in the pattern from the right side. INCREASE TIP: Work as far as A.6, make 1 yarn over, work A.6, make 1 yarn over. On the next row work the yarn overs twisted to avoid holes. Then work the new stitches in stocking stitch. BUTTONHOLES: Work the buttonholes on the right band. 1 BUTTONHOLE = Knit together the third and fourth stitches from the edge and make 1 yarn over. On the next row knit the yarn over to leave a hole. Work the buttonholes when the piece measures: S: 2, 9, 16 and 23 cm. M: 3, 10, 17 and 24 cm. L: 2, 10, 17 and 25 cm. XL: 3, 11, 18 and 26 cm. XXL: 3, 11, 17 and 25 cm. XXXL: 2, 11, 19 and 28 cm. ------------------------------------------------------- START THE PIECE HERE: ------------------------------------------------------- JACKET – SHORT OVERVIEW OF THE PIECE. The body is worked back and forth with circular needle, as far as the armholes. Then the front and back pieces are finished separately. The sleeves are worked in the round with double pointed needles/short circular needle as far as the armhole, then the sleeve cap is finished back and forth. The sections are sewn together to finish. BODY: Cast on 195-227-243-259-291-323 stitches (including 7 band stitches on each side) with circular needle size 3 mm and Muskat. Purl 1 row (= wrong side). Then work rib as follows: A.1 over the first 7 stitches (= band), * knit 1, purl 1 *, work from *-* until there are 8 stitches left, knit 1 and work A.2 over the last 7 stitches (= band). Continue back and forth like this for 2 cm – adjust so the next row is from the right side – remember the BUTTONHOLES on the right band – read description above. The next row is worked as follows (start on the rows with arrows in A.3 and A.4): Work A.1 over the first 7 stitches, A.3 over the next 32-40-40-40-40-48 stitches (= 4-5-5-5-5-6 repeats of 8 stitches), work the first 5 stitches in A.3 (= 5-6-6-6-6-7 stitches decreased), stocking stitch over the next 2-6-8-12-20-22 stitches and decrease 0-2-3-2-3-3 stitches evenly over these stitches, A.4 over the next 7 stitches (= 1 stitch decreased), stocking stitch over the next 2-6-8-12-20-22 stitches and decrease 0-2-3-2-3-3 stitches evenly over these stitches, A.3 over the next 80-80-88-88-88-96 stitches, work the first 5 stitches in A.3 (= 11-11-12-12-12-13 stitches decreased), stocking stitch over the next 2-6-8-12-20-22 stitches and decrease 0-2-3-2-3-3 stitches evenly over these stitches, A.4 over the next 7 stitches (= 1 stitch decreased), stocking stitch over the next 2-6-8-12-20-22 stitches and decrease 0-2-3-2-3-3 stitches evenly over these stitches, A.3 over the next 32-40-40-40-40-48 stitches, work the first 5 stitches in A.3 (= 5-6-6-6-6-7 stitches decreased) and A.2 over the last 7 stitches = 172-194-205-225-253-282 stitches. Change to circular needle size 4 mm. Work 1 row back from wrong side as follows: Work last row in diagram A.3 and A.4, work A.1 and A.2 as before over the 7 band stitches in each side towards mid front and purl the remaining stitches on row. Now work pattern as follows: Work A.1, A.5 over the next 28-35-35-35-35-42 stitches, work the first 4 stitches in A.5, stocking stitch over the next 2-4-5-10-17-19 stitches, A.6 over A.4, stocking stitch over the next 2-4-5-10-17-19 stitches, A.5 over the next 70-70-77-77-77-84 stitches, work the first 4 stitches in A.5, stocking stitch over the next 2-4-5-10-17-19 stitches, A.6 over A.4, stocking stitch over the next 2-4-5-10-17-19 stitches, A.5 over the next 28-35-35-35-35-42 stitches, work the first 4 stitches in A.5 and finish with A.2. Continue back and forth like this. REMEMBER THE KNITTING TENSION! When the piece measures 4-5-5-5-5-5 cm, increase 1 stitch on each side of A.6 – read INCREASE TIP. Increase like this every 5-5-5-5-5½-6 cm a total of 4-4-4-4-4-4 times = 188-210-221-241-269-298 stitches. When the piece measures 22-23-24-25-26-27 cm, cast off for the armholes on the next row from the wrong side as follows: Work the first 45-53-53-57-63-71 stitches (= left front piece), cast off 6-8-10-12-14-16 stitches, work the next 86-88-95-103-115-124 stitches (= back piece), cast off 6-8-10-12-14-16 stitches, work the next 45-53-53-57-63-71 stitches (= right front piece). The front and back pieces are finished separately. RIGHT FRONT PIECE: = 45-53-53-57-63-71 stitches. Continue the pattern and cast off for the armhole, AT THE SAME TIME as you decrease for the V-neck as follows: ARMHOLE: At the beginning of each row from the armhole cast off as follows: 2 stitches 1-1-1-2-5-5 times then 1 stitch 0-1-1-3-3-4 times. V-NECK: AT THE SAME TIME when the piece measures 1 cm from the division, decrease for the neck from the right side as follows: Work the first 5 stitches, slip 1 stitch as if to knit, knit 1 and pass the slipped stitch over the knitted stitch (= 1 stitch decreased). Decrease like this every 2nd row (each row from the right side) a total of 15-22-21-21-21-28 times. When there is not enough room to work the yarn over and decrease in the lace pattern, work these stitches in stocking stitch until the decreases for the neck are finished. When all the decreases for the armhole and neck are finished, there are 28-28-29-29-29-29 stitches on the shoulder. Continue working until the piece measures 41-43-45-47-49-51 cm – adjust so the next row is from the wrong side. Cast off the first 22-22-23-23-23-23 stitches, continue back and forth over the band stitches until the band measures 12-12-14-14-14-15 cm from where you cast off on the shoulder. Cast off. LEFT FRONT PIECE: = 45-53-53-57-63-71 stitches. Continue the pattern and cast off for the armhole, AT THE SAME TIME as you decrease for the V-neck as follows: ARMHOLE: At the beginning of each row from the armhole cast off as follows: 2 stitches 1-1-1-2-5-5 times. then 1 stitch 0-1-1-3-3-4 times. V-NECK: AT THE SAME TIME when the piece measures 1 cm from the division, decrease for the neck from the right side as follows: Work until there are 7 stitches left on the row, knit 2 together (= 1 stitch decreased) and work to end of row. Decrease like this every 2nd row (each row from the right side) a total of 15-22-21-21-21-28 times. When there is not enough room to work the yarn over and decrease in the lace pattern, work these stitches in stocking stitch until the decreases for the neck are finished. When all the decreases for the armhole and neck are finished, there are 28-28-29-29-29-29 stitches on the shoulder. Continue working until the piece measures 41-43-45-47-49-51 cm – adjust so the next row is from the right side. Cast off the first 22-22-23-23-23-23 stitches, continue back and forth over the band stitches until the band measures 12-12-14-14-14-15 cm from where you cast off on the shoulder. Cast off. BACK PIECE: = 86-88-95-103-115-124 stitches. Continue the pattern back and forth, AT THE SAME TIME cast off for the armholes on each side at the beginning of each row as follows: 2 stitches 1-1-1-2-5-5 times, then 1 stitch 0-1-1-3-3-4 times on both sides = 82-82-89-89-89-96 stitches. When the back piece measures 17-18-19-20-21-22 cm from the bottom of the armhole (the piece measures approx. 39-41-43-45-47-49 cm from the cast-on edge), cast off the middle 36-36-41-41-41-48 stitches for the neck and each shoulder is finished separately. Then cast off 1 stitch on the next row from the neck = 22-22-23-23-23-23 stitches on the shoulder. Continue working until the piece measures 41-43-45-47-49-49 cm. Cast off. Work the other shoulder in the same way. SLEEVES: Cast on 66-70-74-80-84-90 stitches with double pointed needles size 3 mm and Muskat. Knit 1 round, then work rib (knit 1, purl 1) in the round for 2 cm. Knit 1 round where you increase 6 stitches evenly spaced in all sizes = 72-76-80-86-90-96 stitches. Change to double pointed needles size 4 mm, and work in stocking stitch. When the sleeve measures 6-6-5-5-5-5 cm, cast off 6-8-10-12-14-16 stitches mid-under the sleeve = 66-68-70-74-76-80 stitches. Then work the sleeve cap back and forth, AT THE SAME TIME as casting stitches off at the beginning of each row as follows: 2 stitches 3-3-3-3-2-2 times, 1 stitch 2-3-5-8-14-14 times, 2 stitches 4-4-3-2-1-1 times and 4-3-3-4-3-3 stitches 1 time on each side = 26-28-30-30-30-34 stitches. Cast off. The sleeve measures approx. 13-14-14-15-18-18 cm. Work the other sleeve in the same way. ASSEMBLY: Sew the shoulder seams. Sew the sleeves into the body. Sew the buttons onto the left band. Sew the bands together inside the cast-off edge and then sew the bands to the back of the neck. |
||||||||||||||||||||||
Diagram explanations |
||||||||||||||||||||||
|
||||||||||||||||||||||
 |
||||||||||||||||||||||
 |
||||||||||||||||||||||
Have you finished this pattern?Tag your pictures with #dropspattern #coralgablescardigan or submit them to the #dropsfan gallery. Do you need help with this pattern?You'll find 23 tutorial videos, a Comments/Questions area and more by visiting the pattern on garnstudio.com. © 1982-2026 DROPS Design A/S. We reserve all rights. This document, including all its sub-sections, has copyrights. Read more about what you can do with our patterns at the bottom of each pattern on our site. |
||||||||||||||||||||||


Post a comment to pattern DROPS 220-28
We would love to hear what you have to say about this pattern!
If you want to leave a question, please make sure you select the correct category in the form below, to speed up the answering process. Required fields are marked *.