
Popular categories
Looking for a yarn?


Comments / Questions (49)
![]() Maisie wrote:
Maisie wrote:
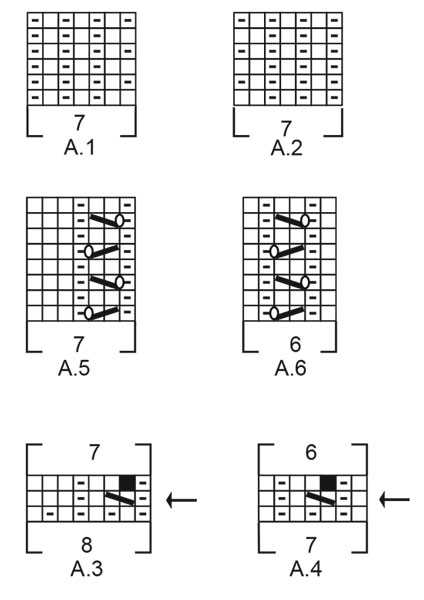
Hello, How do i count the stitches for the front pannel decreasing. should the first 5 stitches be, the purl, yo, slip, knit, slip? or does the slip knit slip count as 2 stitches not 3?
02.05.2026 - 14:09DROPS Design answered:
Dear Maisie, work the first 5 sts as before, ie as shown in A.1 and now work the last 2 sts decreasing 1 st: slip 1 (the 6th st A.1), knit 1 (the last stitch A.1) and psso = there are now only 6 sts in A.1, just continue working these sts as before and decrease the same way all the way (on next decrease you will slip the last st A.1 knit the next stitch front piece/pattern and psso). Happy knitting!
04.05.2026 - 11:48
![]() Muriel wrote:
Muriel wrote:
Explications incompréhensibles !!! J'ai mis plusieurs heures à comprendre et l'adapter à ma sauce C'est un très joli modele
16.04.2026 - 12:37DROPS Design answered:
Bonjour Muriel, nous sommes désolés de lire que vous n'avez pas compris les explications, dans ces cas-là, n'hésitez pas à poser votre question ici en indiquant la ou les parties que vous ne comprenez pas, ainsi, nous pourrons vous aider. Bonne continuation!
16.04.2026 - 16:42
![]() Selena wrote:
Selena wrote:
Hi, I have a question about the decreases for the V-neck. The pattern says to decrease after the 5th stitch, but that would make the band more narrow and in the pictures it remains the same width. Do you need to decrease in the button band and move your stitch marker to keep the 7 stitches or decrease in the lace pattern? Thanks!
26.03.2026 - 22:53DROPS Design answered:
Hi Selena, The button bands remain the same throughout (7 stitches) and the decreases for the V-neck are after these stitches, so in the lace pattern. Regards, Drops Team.
27.03.2026 - 06:20
![]() Sylvi Lian wrote:
Sylvi Lian wrote:
Lurer som sagt på hvilke masker som skal strikkes vrangt etter å ha strikket A3 og A4, siste pinne.
20.03.2026 - 20:07DROPS Design answered:
Hei Sylvi. Du strikker da fra vrangen og de 2-6-8-12-20-22 maskene som strikkes i glattstrikk (rett fra retten) 4 steder /på hver side av A.4, strikkes vrang fra vrangen (= de resterende maskene). mvh DROPS Design
23.03.2026 - 08:03
![]() Sylvi Lian wrote:
Sylvi Lian wrote:
Lurer også på dette etter å ha byttet til pinne 4: strikk siste pinne i diagrammene over A3 og A4. Strikk vrang over de resterende masker. Hvilke masker?
20.03.2026 - 12:41
![]() Sylvi Lian wrote:
Sylvi Lian wrote:
Hva betyr det at A6 strikkes over A4? Fint med en ordentlig forklaring på dette.
19.03.2026 - 22:07DROPS Design answered:
Hei Sylvi, Når A.4 er ferdig er det 6 masker i hver rapport. Da fortsetter du med å strikke A.6 rett ovenfor A.4 (over de samme 6 maskene). Hilsen Drops Team.
20.03.2026 - 05:36
![]() Susanna wrote:
Susanna wrote:
Hei, en ymmärrä miten edetä kun vaihdetaan koon 4 puikkoihin ja aloitetaan neulomaan mallineuleen ensimmäistä nurjaa puolta. Ohjeessa käsketään neulomaan mallineuleiden A.3 ja A.4 viimeistä riviä, mutta pitäisikö tällä kierroksella neuloa vain kuvioita A.5 ja A.6? Ja miten neulon 7 reunasilmukan jälkeen ennen kuin aloitan neulomaan 28 silmukkaa A.5 mallin mukaan?
23.07.2025 - 17:54DROPS Design answered:
Hei, neulo piirrosten A.3 ja A.4 silmukoiden kohdalla mallineuletta piirosten viimeisen kerroksen mukaisesti, neulo etureunojen 7 silmukkaa kuten aiemmin ja neulo muilla silmukoilla nurjaa. Vasta tämän kerroksen jälkeen neulotaan mallineuletta piirrosten A.5 ja A.6 mukaan.
24.07.2025 - 17:02
![]() Eva wrote:
Eva wrote:
How do I attach the yarn to the second (left) sleeve and the back to continue knitting them now that they are without yarn to knit with.?
24.02.2025 - 14:18DROPS Design answered:
Dear Eva, after you have cast off the stitches for armhole you will continue each piece separately back and forth. so start with right front piece with yarn ball, then use a new ball to work first left front piece and finally back piece. Just start working with the new ball, then when weaving end just make sure to avoid that this change is visible. Happy knitting!
26.02.2025 - 10:03
![]() Eva wrote:
Eva wrote:
I don’t understand the instructions when the 4mm circular needle is introduced. I think you start with A1 for the band. After that I’m lost.
31.12.2024 - 02:08DROPS Design answered:
Dear Eva, when switching with larger needle just work from WS as before but work the last row in A.3/A.4 = you have decreased 1 stitch on previous row from WS so that there are only 7 sts left in A.3 and 6 sts left in A.4, and work front bands A.1/A.2 as before. Happy knitting!
02.01.2025 - 15:14
![]() Tanja wrote:
Tanja wrote:
Hallo, ich habe eine Frage zu den Ärmeln. Nach dem Wechsel zum Nadelspiel 4,0 mm steht für meine Größe:" Bei einer Länge vom 6 cm 8 Machen ..." Ist mit der Länge die Gesamtlänge des Ärmels bis dahin gemeint? Oder soll die Länge von 6 cm glatt rechts auf dem Nadelspiel 4,0 mm gestrickt werden? Danke.
01.09.2024 - 16:51DROPS Design answered:
Liebe Tanja, diese Länge wird von der Anschlagskante gemessen. Viel Spaß beim Stricken!
02.09.2024 - 09:02
|
||||||||||||||||||||||
Coral Gables Cardigan#coralgablescardigan |
||||||||||||||||||||||
 |
 |
|||||||||||||||||||||
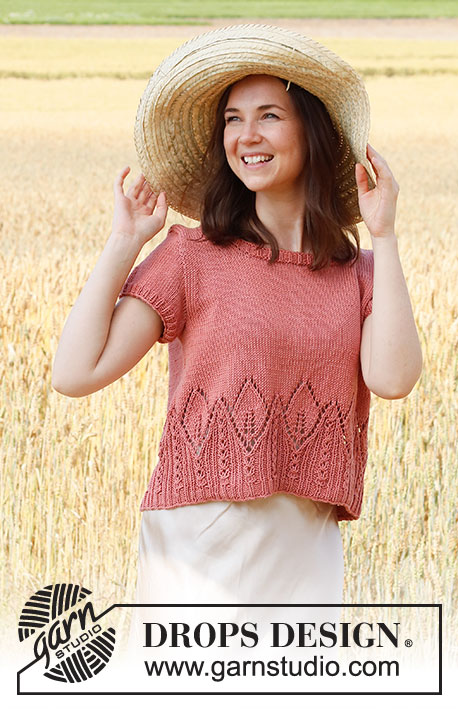
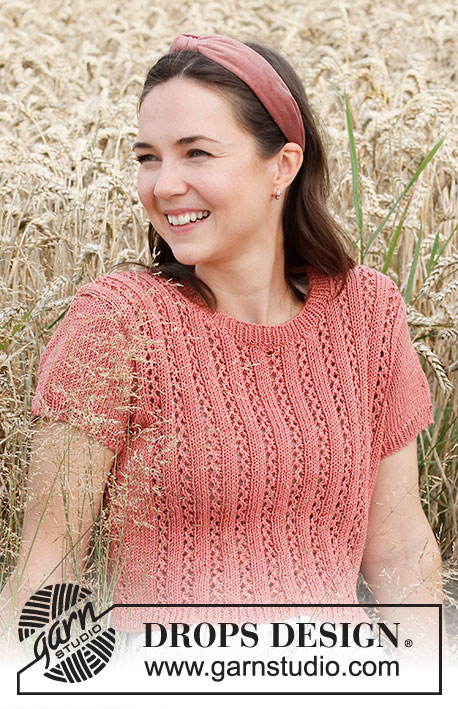
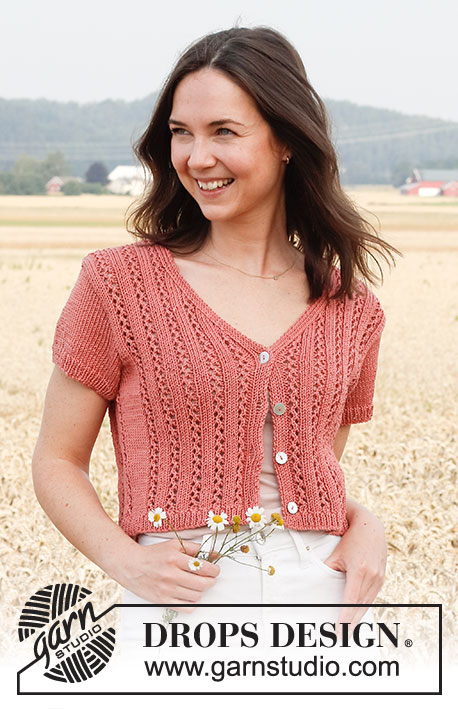
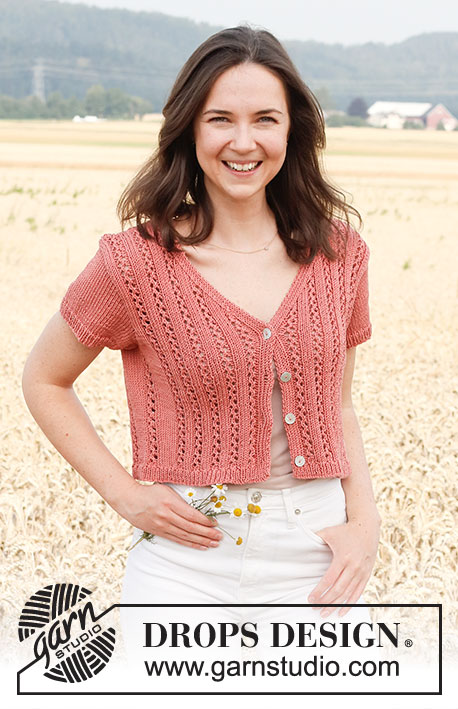
Knitted jacket in DROPS Muskat. The piece is worked with lace pattern, V-neck and short sleeves. Sizes S - XXXL.
DROPS 220-28 |
||||||||||||||||||||||
|
------------------------------------------------------- EXPLANATIONS FOR THE PATTERN: ------------------------------------------------------- PATTERN: See diagrams A.1 to A.6. The diagrams show all rows in the pattern from the right side. INCREASE TIP: Work as far as A.6, make 1 yarn over, work A.6, make 1 yarn over. On the next row work the yarn overs twisted to avoid holes. Then work the new stitches in stocking stitch. BUTTONHOLES: Work the buttonholes on the right band. 1 BUTTONHOLE = Knit together the third and fourth stitches from the edge and make 1 yarn over. On the next row knit the yarn over to leave a hole. Work the buttonholes when the piece measures: S: 2, 9, 16 and 23 cm. M: 3, 10, 17 and 24 cm. L: 2, 10, 17 and 25 cm. XL: 3, 11, 18 and 26 cm. XXL: 3, 11, 17 and 25 cm. XXXL: 2, 11, 19 and 28 cm. ------------------------------------------------------- START THE PIECE HERE: ------------------------------------------------------- JACKET – SHORT OVERVIEW OF THE PIECE. The body is worked back and forth with circular needle, as far as the armholes. Then the front and back pieces are finished separately. The sleeves are worked in the round with double pointed needles/short circular needle as far as the armhole, then the sleeve cap is finished back and forth. The sections are sewn together to finish. BODY: Cast on 195-227-243-259-291-323 stitches (including 7 band stitches on each side) with circular needle size 3 mm and Muskat. Purl 1 row (= wrong side). Then work rib as follows: A.1 over the first 7 stitches (= band), * knit 1, purl 1 *, work from *-* until there are 8 stitches left, knit 1 and work A.2 over the last 7 stitches (= band). Continue back and forth like this for 2 cm – adjust so the next row is from the right side – remember the BUTTONHOLES on the right band – read description above. The next row is worked as follows (start on the rows with arrows in A.3 and A.4): Work A.1 over the first 7 stitches, A.3 over the next 32-40-40-40-40-48 stitches (= 4-5-5-5-5-6 repeats of 8 stitches), work the first 5 stitches in A.3 (= 5-6-6-6-6-7 stitches decreased), stocking stitch over the next 2-6-8-12-20-22 stitches and decrease 0-2-3-2-3-3 stitches evenly over these stitches, A.4 over the next 7 stitches (= 1 stitch decreased), stocking stitch over the next 2-6-8-12-20-22 stitches and decrease 0-2-3-2-3-3 stitches evenly over these stitches, A.3 over the next 80-80-88-88-88-96 stitches, work the first 5 stitches in A.3 (= 11-11-12-12-12-13 stitches decreased), stocking stitch over the next 2-6-8-12-20-22 stitches and decrease 0-2-3-2-3-3 stitches evenly over these stitches, A.4 over the next 7 stitches (= 1 stitch decreased), stocking stitch over the next 2-6-8-12-20-22 stitches and decrease 0-2-3-2-3-3 stitches evenly over these stitches, A.3 over the next 32-40-40-40-40-48 stitches, work the first 5 stitches in A.3 (= 5-6-6-6-6-7 stitches decreased) and A.2 over the last 7 stitches = 172-194-205-225-253-282 stitches. Change to circular needle size 4 mm. Work 1 row back from wrong side as follows: Work last row in diagram A.3 and A.4, work A.1 and A.2 as before over the 7 band stitches in each side towards mid front and purl the remaining stitches on row. Now work pattern as follows: Work A.1, A.5 over the next 28-35-35-35-35-42 stitches, work the first 4 stitches in A.5, stocking stitch over the next 2-4-5-10-17-19 stitches, A.6 over A.4, stocking stitch over the next 2-4-5-10-17-19 stitches, A.5 over the next 70-70-77-77-77-84 stitches, work the first 4 stitches in A.5, stocking stitch over the next 2-4-5-10-17-19 stitches, A.6 over A.4, stocking stitch over the next 2-4-5-10-17-19 stitches, A.5 over the next 28-35-35-35-35-42 stitches, work the first 4 stitches in A.5 and finish with A.2. Continue back and forth like this. REMEMBER THE KNITTING TENSION! When the piece measures 4-5-5-5-5-5 cm, increase 1 stitch on each side of A.6 – read INCREASE TIP. Increase like this every 5-5-5-5-5½-6 cm a total of 4-4-4-4-4-4 times = 188-210-221-241-269-298 stitches. When the piece measures 22-23-24-25-26-27 cm, cast off for the armholes on the next row from the wrong side as follows: Work the first 45-53-53-57-63-71 stitches (= left front piece), cast off 6-8-10-12-14-16 stitches, work the next 86-88-95-103-115-124 stitches (= back piece), cast off 6-8-10-12-14-16 stitches, work the next 45-53-53-57-63-71 stitches (= right front piece). The front and back pieces are finished separately. RIGHT FRONT PIECE: = 45-53-53-57-63-71 stitches. Continue the pattern and cast off for the armhole, AT THE SAME TIME as you decrease for the V-neck as follows: ARMHOLE: At the beginning of each row from the armhole cast off as follows: 2 stitches 1-1-1-2-5-5 times then 1 stitch 0-1-1-3-3-4 times. V-NECK: AT THE SAME TIME when the piece measures 1 cm from the division, decrease for the neck from the right side as follows: Work the first 5 stitches, slip 1 stitch as if to knit, knit 1 and pass the slipped stitch over the knitted stitch (= 1 stitch decreased). Decrease like this every 2nd row (each row from the right side) a total of 15-22-21-21-21-28 times. When there is not enough room to work the yarn over and decrease in the lace pattern, work these stitches in stocking stitch until the decreases for the neck are finished. When all the decreases for the armhole and neck are finished, there are 28-28-29-29-29-29 stitches on the shoulder. Continue working until the piece measures 41-43-45-47-49-51 cm – adjust so the next row is from the wrong side. Cast off the first 22-22-23-23-23-23 stitches, continue back and forth over the band stitches until the band measures 12-12-14-14-14-15 cm from where you cast off on the shoulder. Cast off. LEFT FRONT PIECE: = 45-53-53-57-63-71 stitches. Continue the pattern and cast off for the armhole, AT THE SAME TIME as you decrease for the V-neck as follows: ARMHOLE: At the beginning of each row from the armhole cast off as follows: 2 stitches 1-1-1-2-5-5 times. then 1 stitch 0-1-1-3-3-4 times. V-NECK: AT THE SAME TIME when the piece measures 1 cm from the division, decrease for the neck from the right side as follows: Work until there are 7 stitches left on the row, knit 2 together (= 1 stitch decreased) and work to end of row. Decrease like this every 2nd row (each row from the right side) a total of 15-22-21-21-21-28 times. When there is not enough room to work the yarn over and decrease in the lace pattern, work these stitches in stocking stitch until the decreases for the neck are finished. When all the decreases for the armhole and neck are finished, there are 28-28-29-29-29-29 stitches on the shoulder. Continue working until the piece measures 41-43-45-47-49-51 cm – adjust so the next row is from the right side. Cast off the first 22-22-23-23-23-23 stitches, continue back and forth over the band stitches until the band measures 12-12-14-14-14-15 cm from where you cast off on the shoulder. Cast off. BACK PIECE: = 86-88-95-103-115-124 stitches. Continue the pattern back and forth, AT THE SAME TIME cast off for the armholes on each side at the beginning of each row as follows: 2 stitches 1-1-1-2-5-5 times, then 1 stitch 0-1-1-3-3-4 times on both sides = 82-82-89-89-89-96 stitches. When the back piece measures 17-18-19-20-21-22 cm from the bottom of the armhole (the piece measures approx. 39-41-43-45-47-49 cm from the cast-on edge), cast off the middle 36-36-41-41-41-48 stitches for the neck and each shoulder is finished separately. Then cast off 1 stitch on the next row from the neck = 22-22-23-23-23-23 stitches on the shoulder. Continue working until the piece measures 41-43-45-47-49-49 cm. Cast off. Work the other shoulder in the same way. SLEEVES: Cast on 66-70-74-80-84-90 stitches with double pointed needles size 3 mm and Muskat. Knit 1 round, then work rib (knit 1, purl 1) in the round for 2 cm. Knit 1 round where you increase 6 stitches evenly spaced in all sizes = 72-76-80-86-90-96 stitches. Change to double pointed needles size 4 mm, and work in stocking stitch. When the sleeve measures 6-6-5-5-5-5 cm, cast off 6-8-10-12-14-16 stitches mid-under the sleeve = 66-68-70-74-76-80 stitches. Then work the sleeve cap back and forth, AT THE SAME TIME as casting stitches off at the beginning of each row as follows: 2 stitches 3-3-3-3-2-2 times, 1 stitch 2-3-5-8-14-14 times, 2 stitches 4-4-3-2-1-1 times and 4-3-3-4-3-3 stitches 1 time on each side = 26-28-30-30-30-34 stitches. Cast off. The sleeve measures approx. 13-14-14-15-18-18 cm. Work the other sleeve in the same way. ASSEMBLY: Sew the shoulder seams. Sew the sleeves into the body. Sew the buttons onto the left band. Sew the bands together inside the cast-off edge and then sew the bands to the back of the neck. |
||||||||||||||||||||||
Diagram explanations |
||||||||||||||||||||||
|
||||||||||||||||||||||
 |
||||||||||||||||||||||
 |
||||||||||||||||||||||
Have you finished this pattern?Tag your pictures with #dropspattern #coralgablescardigan or submit them to the #dropsfan gallery. Do you need help with this pattern?You'll find 24 tutorial videos, a Comments/Questions area and more by visiting the pattern on garnstudio.com. © 1982-2026 DROPS Design A/S. We reserve all rights. This document, including all its sub-sections, has copyrights. Read more about what you can do with our patterns at the bottom of each pattern on our site. |
||||||||||||||||||||||


With over 40 years in knitting and crochet design, DROPS Design offers one of the most extensive collections of free patterns on the internet - translated to 17 languages. As of today we count 325 catalogues and 12298 patterns translated into English (UK/cm).
We work hard to bring you the best knitting and crochet have to offer, inspiration and advice as well as great quality yarns at incredible prices! Would you like to use our patterns for other than personal use? You can read what you are allowed to do in the Copyright text at the bottom of all our patterns. Happy crafting!
Post a comment to pattern DROPS 220-28
We would love to hear what you have to say about this pattern!
If you want to leave a question, please make sure you select the correct category in the form below, to speed up the answering process. Required fields are marked *.