
Popular categories
Looking for a yarn?


Comments / Questions (17)
![]() Sofia wrote:
Sofia wrote:
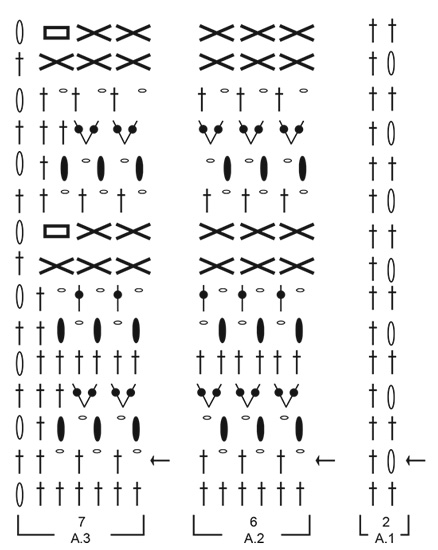
Hej, jag försöker virka en babyfilt: Men i diagrammet finns inte förklaring över hur man stickar det jag markerat med rött på bifogad bild??? Vad betyder det??
22.04.2025 - 11:44DROPS Design answered:
Hei Sofia. Ikonet betyr: = 1 stolpe om luftmaskan. Du finner forklaringene til ikonene over diagrammene. Her hekles det 2 stolper i 1 luftmaske, slik at ikonene står litt på skrå. mvh DROPS Design
22.04.2025 - 11:51
![]() Jeanette Schyberg wrote:
Jeanette Schyberg wrote:
Jag undrar hur man ska tänka med antalet luftmaskor när man börjar med filten. Det står 77-107 luftmaskor när man lägger upp arbetet men hur gör jag om jag vill ha den mindre eller större? Och ska antalet luftmaskor alltid sluta med en 7:a för att det ska bli rätt?
19.03.2025 - 09:19DROPS Design answered:
Hei Jeanette. Om du skal hekle det større eller mindre en 77-107 luftmasker, må du ha et maskeantall der du får plass til diagrammene / x antall A.2 som skal gjentas. A.1 går over 2 masker og A.3 går over 7 masker, men A.2 må ha et maskeantall som går opp med 6 masker (f.eks ved mindre teppe: 48, 54, 60 eller 66. Ved større teppe: 102, 108, 114 osv). Og så må du huske at på 1 rad hekles 1 stav i 4. luftmaske fra nålen. mvh DROPS Design
24.03.2025 - 11:33
![]() HOANG wrote:
HOANG wrote:
Bonjour, lorsque l'on crochète le point soufflé, et après avoir tiré le jeté à travers les 5 grandes boucles, faut il faire une maille en l'air pour les fermer ensemble ou continuer directement ?
09.03.2025 - 14:52DROPS Design answered:
Bonjour Mme Hoang, dans cette vidéo, nous montrons comment crocheter ces points soufflés, cela devrait vous aider. Bon crochet!
10.03.2025 - 10:25
![]() Tine wrote:
Tine wrote:
Det står feil garnmengde i norske versjonen. Står 150 gram, men når jeg bytter til engelsk står det 250 gram.
27.09.2024 - 23:40DROPS Design answered:
Hei Tine. Takk for tilbakemeldingen. Dette skal vi få ordnet asap. mvh DROPS Design
07.10.2024 - 13:24
![]() Caitlin Burns wrote:
Caitlin Burns wrote:
When ending row 1 with 3 chain stitches and moving on to 2nd row which starts with chain 3 is this a total of 6 chains? Or is it the same 3 you start from as you end with?
14.09.2024 - 23:05DROPS Design answered:
Dear Caitlin, the blanket is crocheted back and forth, though the diagram shows you every row as you would see it from the right side. In this case, you should read the rows from right to left and then left to righ, right to left, left to right etc, and this way, a two always starts with 3 chain stitches and ends with a treble. I hope this helps. Happy Stitching!
15.09.2024 - 03:01
![]() Anais wrote:
Anais wrote:
Tendrá algún video del patrón de la manta ya qué no entiendo un punto...
19.08.2023 - 01:01DROPS Design answered:
Hola Anais, puedes ver los vídeos relevantes para este patrón bajo las explicaciones del patrón y los diagramas. No tenemos un vídeo completo de cómo realizar la manta, pero puedes decirnos qué sección te está dando problemas y podemos intentar ayudarte.
20.08.2023 - 17:49
![]() Marie Noëlle wrote:
Marie Noëlle wrote:
Allo J'ai commencé la couverture mais mon premier rang de maille en l'air devient très tendu au fur et à mesure que javance dans le patron. On dirait que j'ai plus de maille qu'au début...je comprends pas. La couverture fait des vagues, quelqu'un peut m'aider? Merci
10.05.2023 - 13:58DROPS Design answered:
Bonjour Marie Noëlle, pensez à bien vérifier votre tension et à conserver cette même tension, si votre chaînette de base est un peu trop serrée, essayez de la crocheter avec un crochet d'une taille au-dessus pour bien conserver la même largeur. Bon crochet!
10.05.2023 - 16:47
![]() Anne Laure wrote:
Anne Laure wrote:
Bonjour avez vous une video pour expliquerai les rangs
24.01.2023 - 09:39DROPS Design answered:
Bonjour Anne-Laure, cette leçon explique comment lire un diagramme au crochet, et cette vidéo comment crocheter les rangs avec les points soufflés du diagramme. Bon crochet!
24.01.2023 - 12:15
![]() Josie wrote:
Josie wrote:
Bonjour à vous tous Je commence la couverture au crochet mais je ne me souviens plus si on lit le diagramme un rang en partant de la droite, le suivant en partant de la gauche ou bien tous les rangs en partant de la droite. Merci beaucoup et bonne journée
15.04.2022 - 10:49DROPS Design answered:
Bonjour Josie, dans ce modèle, le 1er rang des diagrammes (sous la flèche) a été fait sur l'envers, vous commencez ainsi par le 1er rang (celui avec la flèche) sur l'endroit: A.1, répétez A.2 et terminez par A.3; sur l'envers, lisez en sens inverse de gauche à droite: A.3, répétez A.2 (en lisant aussi de gauche à droite) et terminez par A.1. Bon crochet!
19.04.2022 - 09:10
![]() Elizabeth wrote:
Elizabeth wrote:
Når ein hekler ein stav i maske + ei luftmaske, hoppar ein då over ei maske ved neste stav i maske?
19.07.2021 - 23:27
|
|||||||||||||||||||||||||
Big Dreams#bigdreamsblanket |
|||||||||||||||||||||||||
 |
 |
||||||||||||||||||||||||
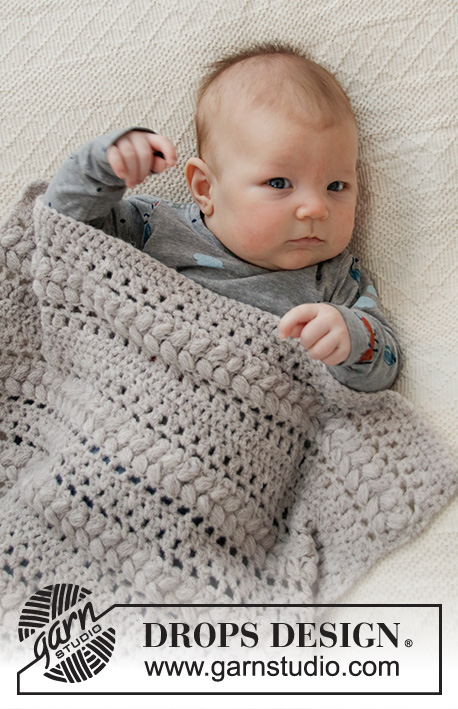
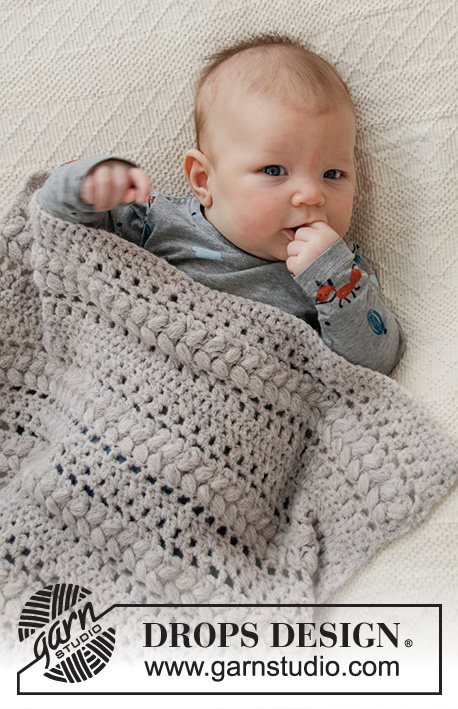
Crocheted blanket for babies in DROPS Sky. The piece is worked with lace pattern, texture and puff-stitches. Theme: Baby blanket
DROPS Baby 36-3 |
|||||||||||||||||||||||||
|
------------------------------------------------------- EXPLANATIONS FOR THE PATTERN: ------------------------------------------------------- CROCHET TIP FOR CHAIN STITCH: If you work outermost on the hook the chain stitch will often be too tight; 1 chain stitch should be as long as 1 treble crochet is wide. PATTERN: See diagrams A.1 to A.3. 1 PUFF-STITCH: Work as follows in the same chain stitch (important to work in the stitch not around the stitch): * Make 1 yarn over, insert the hook through the chain stitch, make 1 yarn over and pull it through the chain stitch; make both yarn overs long (to avoid the puff-stitch being small and compact it is important to pull the yarn overs to approx. 2 cm in length) *, work from *-* a total of 5 times, make a yarn over and pull the strand through all loops on the hook. ------------------------------------------------------- START THE PIECE HERE: ------------------------------------------------------- BLANKET – SHORT OVERVIEW OF THE PIECE: The piece is worked back and forth. BLANKET: Work 77-107 chain stitches – read CROCHET TIP FOR CHAIN STITCH, with hook size 4.5 mm and Sky. The first row is worked as follows: Work 1 treble crochet in the 4th chain stitch from the hook (= 2 treble crochets), then work 1 treble crochet in each chain stitch = 75-105 treble crochets. Now work pattern as follows: A.1 over the first 2 stitches, A.2 over the next 66-96 stitches (= 11-16 repeats in width of 6 stitches), work A.3 over the last 7 stitches. REMEMBER THE CROCHET TENSION! When A.1 to A.3 have been completed in height, repeat the pattern from the rows with an arrow until the piece measures approx. 51-79 cm – adjust so you finish after a row without puff-stitches. Work 1 row with 1 treble crochet in each stitch (around each chain stitch). Cut and fasten the strand. The piece measures approx. 52-80 cm. |
|||||||||||||||||||||||||
Diagram explanations |
|||||||||||||||||||||||||
|
|||||||||||||||||||||||||
 |
|||||||||||||||||||||||||
Have you finished this pattern?Tag your pictures with #dropspattern #bigdreamsblanket or submit them to the #dropsfan gallery. Do you need help with this pattern?You'll find 6 tutorial videos, a Comments/Questions area and more by visiting the pattern on garnstudio.com. © 1982-2026 DROPS Design A/S. We reserve all rights. This document, including all its sub-sections, has copyrights. Read more about what you can do with our patterns at the bottom of each pattern on our site. |
|||||||||||||||||||||||||


With over 40 years in knitting and crochet design, DROPS Design offers one of the most extensive collections of free patterns on the internet - translated to 17 languages. As of today we count 325 catalogues and 12298 patterns translated into English (UK/cm). 12298
We work hard to bring you the best knitting and crochet have to offer, inspiration and advice as well as great quality yarns at incredible prices! Would you like to use our patterns for other than personal use? You can read what you are allowed to do in the Copyright text at the bottom of all our patterns. Happy crafting!
Post a comment to pattern DROPS Baby 36-3
We would love to hear what you have to say about this pattern!
If you want to leave a question, please make sure you select the correct category in the form below, to speed up the answering process. Required fields are marked *.