
Popular categories
Looking for a yarn?


Comments / Questions (37)
![]() Kathy wrote:
Kathy wrote:
The pattern is so confusing to me, can you rewrite like most patterns are, in written form for each row. I love these and want to make them but do not understand this wording. Thank you in advanced
03.05.2025 - 21:59DROPS Design answered:
Dear Kathy, we don't make custom patterns. Our patterns are a combination of written instructions and charts; if you have trouble following the charts you can read this lesson. You can also ask us about any specific part of the written instructions or the chart and we will explain it in other words as best as we can. Happy knitting!
04.05.2025 - 19:49
![]() Kathy wrote:
Kathy wrote:
The pattern is so confusing to me, can you rewrite like most patterns are, such as k5,purl 5 for each row. I love these and want to make them but do not understand this wording. Thank you in advanced
03.05.2025 - 19:40DROPS Design answered:
Dear Kathy, we don't make custom patterns. Our patterns are a combination of written instructions and charts; if you have trouble following the charts you can read this lesson. You can also ask us about any specific part of the written instructions or the chart and we will explain it in other words as best as we can. Happy knitting!
04.05.2025 - 19:49
![]() Melanie Hungerbühler wrote:
Melanie Hungerbühler wrote:
Sehr geehrte Damen und Herren! Ich frage mich, ob die Mengenangaben für das Handtuch mit Hebemaschen in der Größe 29x42 cm mit 200 Gramm, also 640 Meter nicht viel zu viel ist. Herzlichen Dank im Voraus für Ihre Antwort, Melanie Hungerbühler
10.04.2025 - 19:06DROPS Design answered:
Liebe Frau Hungerbühler, diese Garnmenge in DROPS Safran haben wir für dieses Handtuch gebraucht. Beachten Sie, daß Ihre Maschenprobe stimmt - es kann auch sein, dass beide Knäuel in beide Farben nicht ganz benutzt werden, aber trotzdem würde je 1 Knäuel in jeder Farbe nicht genügen. Viel Spaß beim Stricken!
11.04.2025 - 09:01
![]() Anna wrote:
Anna wrote:
Hej, jeg ville høre om håndklædet med dobbeltperlestrik bruger alle 100 g garn i primær og de 50 g i sekundær farve og om den matchene karklud bruger alle 50 g af begge farver. Jeg vil nemlig gerne lave 2 af hver og vil undgå at købe for meget garn.
01.01.2025 - 21:05DROPS Design answered:
Hei Anna. Helt nøyaktig gram forbruk har vi dessverre ikke. mvh DROPS Design
07.01.2025 - 10:27
![]() Nishil wrote:
Nishil wrote:
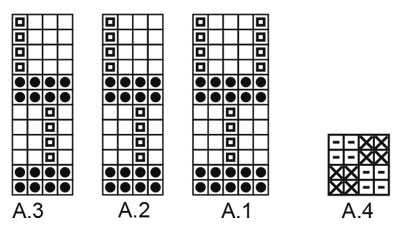
I have a question about the towel with the slipped stitches. The pattern says „all rows are knitted“ and also says the charts A1 A2 and A3 show all the rows as seen from the right side. Do I knit stockinette (knit right side purl wrong side) with slipped stitches or garter stitch(knit right and wrong side) with slip stitches ? Thanks
27.06.2024 - 22:52DROPS Design answered:
Dear Nishil, stitches in A.1, A.2 and A.3 are worked in garter stitch, this means they will be knitted from both right side and wrong side (with slipped stitches), the last 2 symbols under diagram text apply to diagram A.4. Happy knitting!
28.06.2024 - 08:33
![]() Yvonne Danielsen wrote:
Yvonne Danielsen wrote:
Opskrift e-284 håndklæde med løftede masker. Jeg kan ikke forstå opskriften. Skal man have den blå tråd med/ eller er den kun med i de pinde der strikkes med blåt?
07.10.2022 - 12:49DROPS Design answered:
Hei Yvonne. Når det ikke strikkes med farge blå, blir den blå tråden værende i siden, men la den blå tråden følge med oppover i siden. Tvinn den blå tråden sammen med fargen hvit. mvh DROPS Design
10.10.2022 - 13:47
![]() Suzy wrote:
Suzy wrote:
Merci pour la réponse, grâce à une vidéo YouTube j'ai compris. C'est la première fois que je fais du point mosaïque et je faisais suivre les deux fils ! Vraiment ce patron pourrait être plus précis. Cette fois l'ouvrage ressemble au modèle.
06.07.2022 - 11:41
![]() Suzy wrote:
Suzy wrote:
Vous dites pour le modèle à mailles glissées, tous les rangs à l'endroit et fil de la maille glissée tenue derrière. C'est ce que je fais mais n'ai pas le résultat de la photo, on voit mon fil bleu de M Glissée passer devant les autres mailles. Cette même m est glissée sur 4rgs ? Pourquoi n'y a t il pas de vidéo alors que vous en mettez sur ce que l'on sait faire, les basiques ?
05.07.2022 - 15:38DROPS Design answered:
Bonjour Suzy, lorsque vous glissez une maille, placez le fil côté envers de l'ouvrage, ainsi, vu sur l'endroit, le fil ne passera pas devant les mailles. Bon tricot!
05.07.2022 - 15:47
![]() Vass Petra wrote:
Vass Petra wrote:
Bocsánat elütés a lenti kérdésben 70 szem akart lenni
05.02.2022 - 19:07
![]() Vass Petra wrote:
Vass Petra wrote:
Üdv, a TÖRÖLKÖZŐ (Leemelt szemekkel) leírásában A.3 mintánál 5 szem szerepel, de az ábrán csak 4 szemet jelöl ( a tűn is 5 szem marad fent ha 60 szemmel kezdem ahogy a leírás is ajánlja) így valami ott nem kerek. Mi lehet gond? Köszönöm!
05.02.2022 - 19:06DROPS Design answered:
Hi, if you could write your question in English, we will try to answer :)
22.04.2022 - 11:47
|
||||||||||||||||
Cottage Charm#cottagecharmwashcloth |
||||||||||||||||
 |
 |
|||||||||||||||
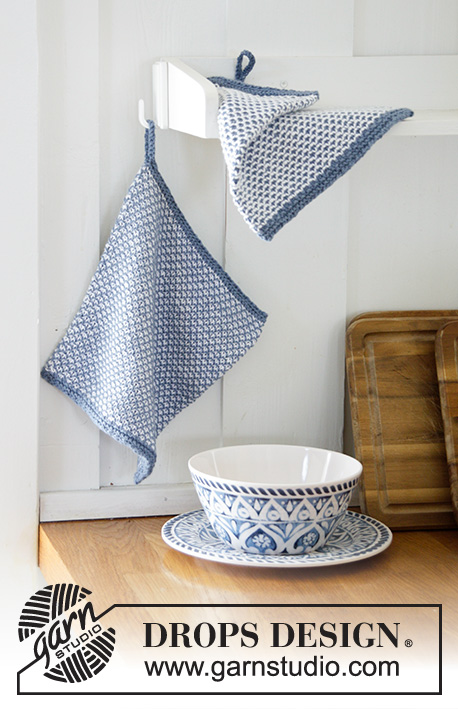
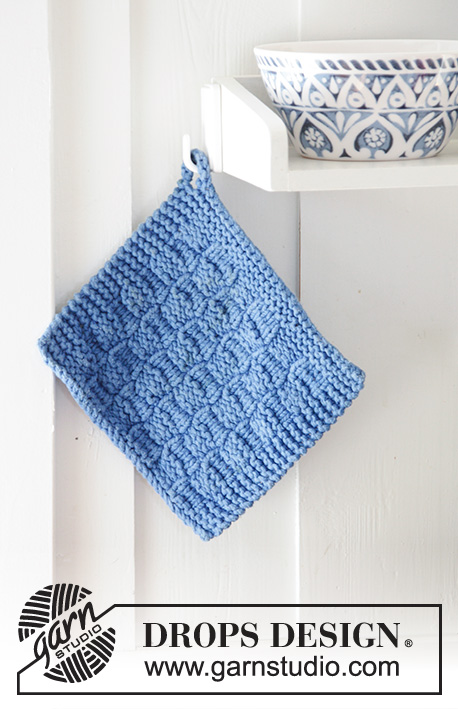
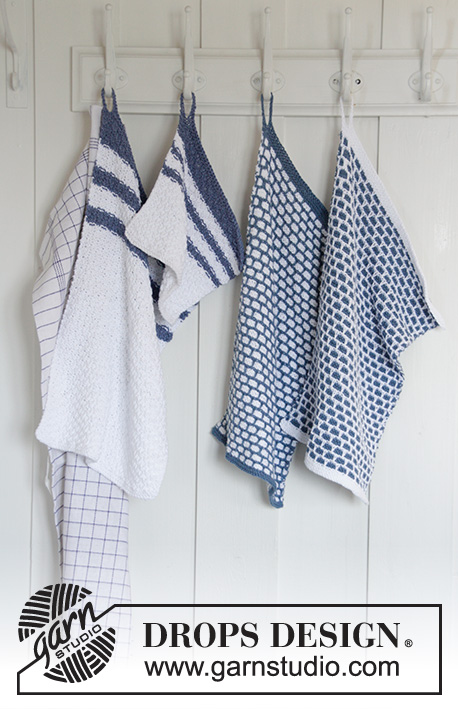
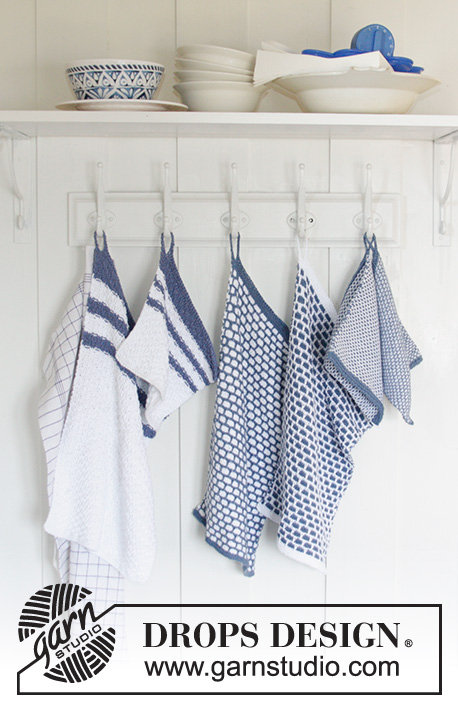
Knitted towel with slipped stitches; knitted cloth and towel with double moss stitch and stripes. The pieces are worked in DROPS Safran.
DROPS 189-16 |
||||||||||||||||
|
INFORMATION FOR THE PATTERN: RIDGE/GARTER STITCH (worked back and forth): 1 ridge = Knit 2 rows. PATTERN (for towel with slipped stitches): See diagrams A.1, A.2 and A.3. NOTE! All rows are knitted. The diagrams show all the rows seen from the right side. PATTERN (for towel and cloth with double moss stitch): See diagram A.4. The diagram shows all the rows seen from the right side. STRIPES (for cloth with double moss stitch): You work stripes while working pattern according to A.4 as before. 4 rows denim blue. 6 rows white. 4 rows denim blue. 6 rows white. 8 rows denim blue STRIPES (for towel with double moss stitch): You work stripes while working pattern according to A.4 as before. 6 rows denim blue. 8 rows white. 6 rows denim blue. 8 rows white. 10 rows denim blue ---------------------------------------------------------- TOWEL (with slipped stitches): The piece is worked back and forth on the needle. Cast on 69 stitches with denim blue and needle size 3 mm. Work 2 RIDGES – see description above. Then work according to diagrams A.1, A.2 and A.3 (NOTE! All rows are knitted) as follows from the right side: A.1 over 5 stitches, A.2 repeated over the next 60 stitches (15 times) and A.3 over the last 4 stitches. Do not cut the strand in the side when changing colour, but allow it to follow your work upwards at the side and make sure it is not tight. Work according to the diagram like this until the piece measures approx. 40 cm, adjust to after a complete repeat in height. Work 2 ridges with denim blue. Then work an in-laid loop on the next row as follows: Knit until there are 2 stitches left, cast on 14 new stitches on the needle and knit the last 2 stitches together. On the next row loosely cast off all stitches with knit (the new loop stitches as well). Work 1 more towel in the same way but with colours reversed. TOWEL (with double moss stitch): The piece is worked back and forth on needle. Cast on 68 stitches with needle size 3 mm and white. Work 2 RIDGES - see description above. Work 2 edge stitches in garter stitch, work according to A.4 until there are 2 stitches left on the row and work 2 edge stitches in garter stitch. Continue like this until the piece measures approx. 29 cm. Now work STRIPES - see description above. When the stripes are finished, work 1 ridge with denim blue. Then work the next row with in-laid loop as follows: Knit until there are 2 stitches left on the row. Cast on 12 new stitches and knit the last 2 stitches together. On the next row loosely cast off all stitches with knit (the new loop stitches as well). Cut and fasten the strands. CLOTH (with double moss stitch): The piece is worked back and forth on needle. Cast on 48 stitches with needle size 3 mm and white. Work 2 RIDGES - see description above. Work 2 edge stitches in garter stitch, work according to A.4 until there are 2 stitches left and work 2 edge stitches in garter stitch. Continue working like this until the piece measures approx. 11 cm. Now work STRIPES - see description above. When the stripes are finished, work 1 ridge with denim blue. Then work the next row with in-laid loop as follows: Knit until there are 2 stitches left on the row. Cast on 12 new stitches and knit the last 2 stitches together. On the next row loosely cast off all stitches (the new loop stitches as well). Cut and fasten the strands. |
||||||||||||||||
Diagram explanations |
||||||||||||||||
|
||||||||||||||||
 |
||||||||||||||||
Have you finished this pattern?Tag your pictures with #dropspattern #cottagecharmwashcloth or submit them to the #dropsfan gallery. Do you need help with this pattern?You'll find 16 tutorial videos, a Comments/Questions area and more by visiting the pattern on garnstudio.com. © 1982-2026 DROPS Design A/S. We reserve all rights. This document, including all its sub-sections, has copyrights. Read more about what you can do with our patterns at the bottom of each pattern on our site. |
||||||||||||||||


With over 40 years in knitting and crochet design, DROPS Design offers one of the most extensive collections of free patterns on the internet - translated to 17 languages. As of today we count 324 catalogues and 12290 patterns translated into English (UK/cm). 12290
We work hard to bring you the best knitting and crochet have to offer, inspiration and advice as well as great quality yarns at incredible prices! Would you like to use our patterns for other than personal use? You can read what you are allowed to do in the Copyright text at the bottom of all our patterns. Happy crafting!
Post a comment to pattern DROPS 189-16
We would love to hear what you have to say about this pattern!
If you want to leave a question, please make sure you select the correct category in the form below, to speed up the answering process. Required fields are marked *.