
Popular categories
Looking for a yarn?


Comments / Questions (234)
![]() Elin wrote:
Elin wrote:
Jeg tror jeg har funnet ut av det, Nina. Hvis du lar det første kastet på den første raglanøkningen være på forstykkesiden av merketråden din vil maskeantallet på forstykket øke. Når du kommer til det andre merket blir det omvendt, da blir det kastet ETTER de tre raglanmaskene som blir økningen på bakstykket. Så gjentar du når du kommer til det andre ermet. Oppskriften er litt kronglete skrevet, men hvis du gjør det sånn blir det riktig! :)
07.03.2015 - 21:24
![]() Nina Skaug wrote:
Nina Skaug wrote:
Strikker står S og det blir kun øking på ermene mellom ermemarkørene og ikke noe økning på for og bakstykket. Dette bli feil!!!!!
07.03.2015 - 13:45Andrea wrote:
I have a question on how to exactly work the raglan increases: I am knitting a size xl. So are the increases only worked on the sleeves? You never give a note on where to slip markers for the first two increases. What I did was to work " 1 YO , K 1, 1 YO, K 1 twisted, K 1, K 1 twisted, 1 YO, K 1, 1 YO" after the first and before the second marker. But then if I work the second set of increases, the holes are not at the same position as before.... some advice here, please?
06.03.2015 - 16:58DROPS Design answered:
Dear Andrea, when increasing for raglan, you will get every inc row 2 more sts per piece (1 at the beg + 1 at the end of the piece). Repeat the inc ligned up with the previous ones, to keep K1 twisted, K1, K1 twisted "ligned up" for raglan. Happy knitting!
06.03.2015 - 17:40
![]() Elin wrote:
Elin wrote:
Er det noe feil med oppskriften i 2. avsnitt? Slik jeg leser oppskriften vil de økte raglanmaskene havne mellom merketrådene som markerer ermene og ikke på for- og bakstykket. Det må da bli feil?
04.03.2015 - 17:58DROPS Design answered:
Hej Elin, jeg kan se at du har fået svar :) God fornøjelse!
21.05.2015 - 15:48
![]() Ada wrote:
Ada wrote:
Buongiorno! Non riesco a capire come devo fare gli aumenti prima e dopo il segnapunti taglia S/M. Arrivando a 0 maglie prima del 2° e 4° segno il raglan viene eseguito sulle maniche e il davanti e il dietro nn aumentano come numero di maglie...... Probabilmente nn ho capito qualcosa nella spiegazione.... Posso avere un aiuto? Grazie
03.03.2015 - 07:47DROPS Design answered:
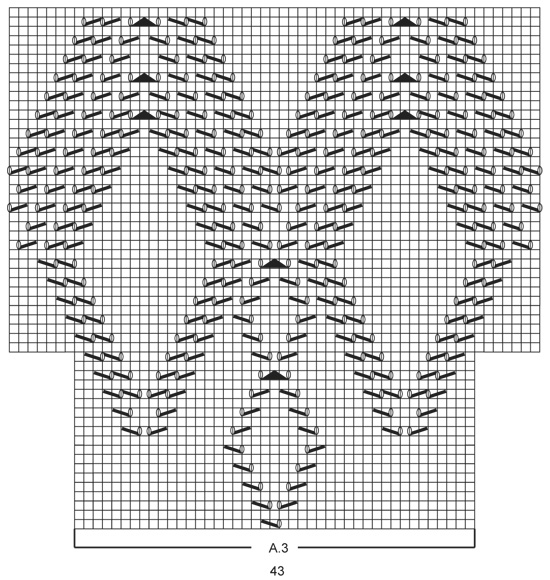
Buongiorno Ada. Quando arriva a 0 m dai segni 2 e 4, lavora gli aumenti del raglan: quindi 1 gettato, (segno), 1 m ritorta, 1 m dir, 1 m ritorta, 1 gettato. Ad ogni giro con aumenti, ci saranno 2 m gettate sul davanti, 2 sul dietro e 2 su ogni manica. Arriverà una correzione per la seguente istruzione: 2-3-6-11-14 m dir, diagramma A.3 (= 43 m), in quanto per una taglia manca l’indicazione di quante m lavorare prima del diagramma A.3. Buon lavoro!
03.03.2015 - 10:13
![]() Helen wrote:
Helen wrote:
I have tried to print you lovely pattern but the graph will not print. could you please help. Thank you
01.03.2015 - 20:36DROPS Design answered:
Dear Helen, there will be several pages when printing pattern, make sure you will print them all. Happy knitting!
02.03.2015 - 10:41
![]() Miryam Van Ommen wrote:
Miryam Van Ommen wrote:
Zowel vraag als opmerking: om A3 in het midden te krijgen moet je geen 6 (voor mt L) maar slechts 2 steken tussen raglan en A3 breien. Bovendien zorgt de plaatsing van de markeerders ervoor dat de raglan niet mooi boven elkaar komt. Markeerders tussen 1 r en 1 r gedr, zorgt ervoor dat je dat makkelijker voor elkaar krijgt, telkens 1 (aanvankelijk 2) meerdering in (voor/rug)pand en mouw.
28.02.2015 - 09:36DROPS Design answered:
Hoi Miryam. Wij hebben RAGLAN en PAS herschreven. Kijk of dat niet het probleem oplost.
03.06.2015 - 13:45
![]() Nina wrote:
Nina wrote:
Jeg tror jeg har oppdaget en feil i oppskriften. Den ligger i andre avsnitt under BÆRESTK: ''(...) 3.merke, strikk raglan, 2-3-6-11-14 m rett.'' Måtte ta den ut et par ganger fordi jeg ikke skjønte hvorfor mønsteret ikke endte på midt på ryggen, men så oppdaget at det er en str for lite i oppskriften.
20.02.2015 - 23:18
![]() Mari C wrote:
Mari C wrote:
Can't wait to get home to print this off on my computer!!! .... go raibh mile mhaith agat!!! As Gaeillge.... THANKS. : ))
20.02.2015 - 17:25
![]() Loredana wrote:
Loredana wrote:
Buonasera! Ho iniziato l'abito e già' ho un problema,ho diviso le maglie con i segnapunti,inizio con 16 m.diagramma A2,lavoro fino a1 m prima del 2° segno,raglan,lavoro finche' non restano 4 m prima del 3° segno,raglan,6 m,diagramma A3 (43 m)....dovrei lavorare fino a 1 m prima del 4° segno MA,per terminare il diagramma A3 vado oltre il 4° segno!!!!!!!! Ho sfilato e ricontrollato,non riesco a capire dove sbaglio! Grazie per l'attenzione Lory
19.02.2015 - 19:00DROPS Design answered:
Buonasera Loredana. Nelle spiegazioni della prima riga con aumenti per il raglan, manca, per una taglia, l'indicazione di quante m lavorare a dir prima del diagramma A.3. Segnaliamo l'errore alla casa madre. Il testo verrà corretto quanto prima. La ringraziamo per la segnalazione. Buon lavoro.
19.02.2015 - 21:46
|
|||||||||||||||||||
Summer Feeling#summerfeelingdress |
|||||||||||||||||||
 |
 |
||||||||||||||||||
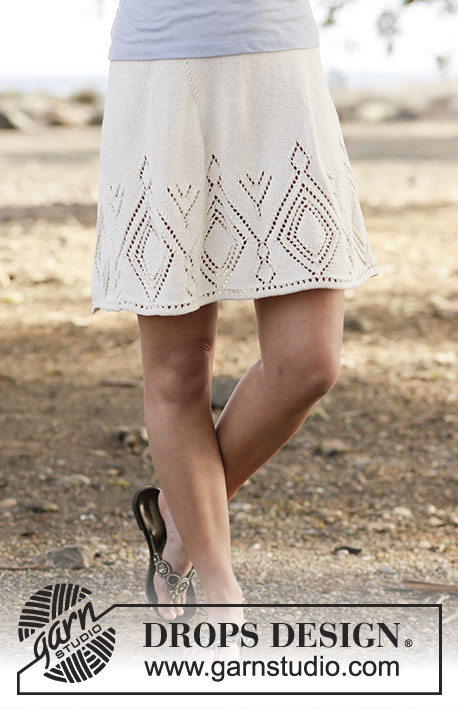
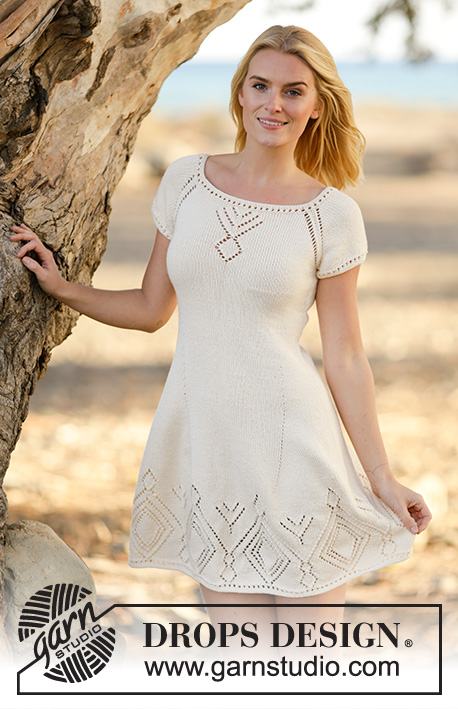
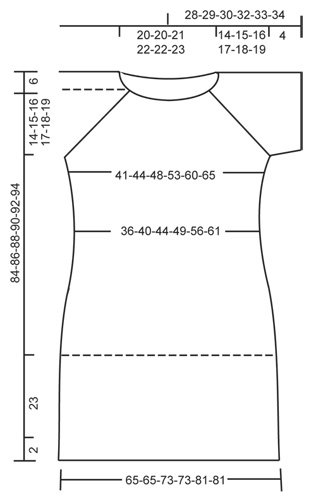
Knitted DROPS dress with lace pattern and raglan in ”Muskat” or "Belle". Worked top down. Size: S - XXXL.
DROPS 160-1 |
|||||||||||||||||||
|
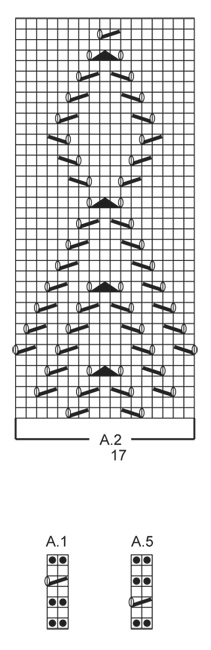
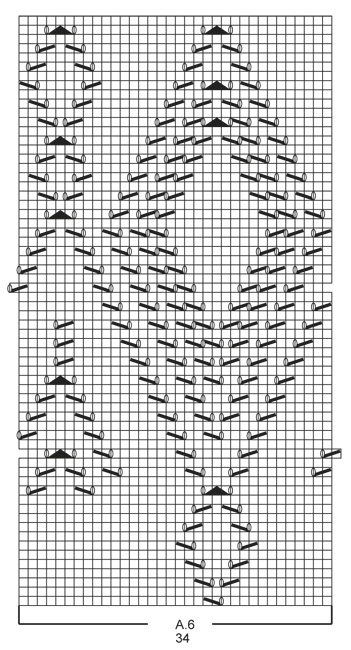
PATTERN: See diagrams A.1 to A.6. DECREASE TIP: Dec 1 st before marker as follows: Work until 2 sts remain before marker, slip 1 st as if to K, K 1, psso. Dec 1 st after marker as follows: K 2 tog. RAGLAN: Inc differently for raglan in the different sizes: SIZE S-M: Inc 1 sts on each side of each marker (= 8 sts inc in total) as follows: 1 YO, K 1 twisted, K 1 (= st with marker), K 1 twisted, 1 YO. NOTE: The inc on each sides of 1st marker (= in the last st on round) is worked as follows: at beginning of round, K 1 twisted, 1 YO. At the end of round: 1 YO, K 1 twisted, K.1 (= st with marker) Do not work YOs twisted on next round, they should make holes, repeat inc every other round 17-19 more times. SIZE L-XL-XXL-XXXL: Inc 2 sts on each side of each marker (= 16 sts inc in total each round) as follows: 1 YO, K 1, 1 YO, K 1 twisted, K 1(= st with marker), K 1 twisted, 1 YO, K 1, 1 YO (first and last YO is worked twisted on next round, it should not make a hole but, the 2 midle YO should be K as normal and make a hole). Repeat inc on every other round 1-1-1-3 more times. NOTE: The inc on eich side of 1st marker(= in the last st on round) is worked as follows: at beginning of round, K 1 twisted, 1 YO, K 1, 1 YO. At the end of round: 1 YO, K 1, 1 YO, K 1 twisted, K.1 (= st with marker) Then inc like as follows: Inc 1 sts at each side of each marker (= 8 sts inc in total) as follows: 1 YO, K 1 twisted, K 1(= st with marker), K 1 twisted, 1 YO. Do not K YOs twisted on next round, they should make holes. Repeat inc every other round 19-20-22-21 more times in total. INCREASE TIP: Inc 1 st by making a YO. On next round K YO twisted to avoid holes. ---------------------------------------------------------- YOKE: Worked in the round on circular needle, top down. Cast on 134-134-140-144-144-148 sts on circular needle size 3.5 mm with Muskat. Work A.1 (= 2 sts) over all sts. When A.1 has been worked 1 time vertically, switch to circular needle size 4 mm. On next round K all sts and inc 16-20-14-22-42-46 sts evenly = 150-154-154-166-186-194 sts. On next round insert 4 markers in the midle st of each raglan as follows: Insert 1st in last st on round, K 45-47-49-55-65-71 sts (= front piece), K 1 sts and insert 2nd marker in this st, K 28-28-26-26-26-24 sts (= sleeve), K 1 sts and insert 3rd marker in this st, K 45-47-49-55-65-71 sts (= back piece), K 1 st and insert 4th marker in this st, K 28-28-26-26-26-24 sts (= sleeve), K 1 sts (1st marker is placed in this st). REMEMBER THE KNITTING TENSION Then work as follows - AT THE SAME TIME inc for RAGLAN - see explanation above. Work half the raglan inc for 1st marker (see explanation above) K 13-14-14-17-22-25 sts, A.2 (= 17 sts), K until 1-1-2-2-2-2 st remains before 2nd marker, work RAGLAN - see explanation above, K until 1-1-2-2-2-2 sts remain before 3rd marker, work raglan, K 0-1-1-4-9-12 sts, A.3 (= 43 sts), K until 1-1-2-2-2-2 st remains before 4th marker, work raglan, K until 1-1-2-2-2-2 sts remain before 1st marker, work raglan. Work the inc sts in stocking st until they can be worked in pattern as shown in A.3. When A.2 has been worked 1 time vertically, work in stocking st over all these sts. When A.3 has been worked 1 time vertically, work A.4 (= 57 sts) over A.3. After all inc are done there are 294-314-338-358-394-426 sts on needle. Piece measures approx. 14-15-16-17-18-19 cm. Continue with pattern and stocking st as before AT THE SAME TIME work as follows: Work the first 81-87-95-103-117-129 sts (= front piece), slip the next 66-70-74-76-80-84 sts on a stitch holder for sleeve, cast on 6-6-6-8-8-8 sts under sleeve (insert a marker in the middle of the new sts), work the next 81-87-95-103-117-129 sts (= back piece), slip the next 66-70-74-76-80-84 sts on a stitch holder for sleeve, cast on 6-6-6-8-8-8 sts under sleeve (insert a marker in the middle of the new sts) = 174-186-202-222-250-274 sts remain on needle. Insert 1 marker in piece, NOW MEASURE PIECE FROM HERE. Continue to work A.4 and stocking st over the remaining sts. When piece measures 3 cm, dec 1 st on each side of each markers in the sides (= 4 sts dec) - READ DECREASE TIP! Repeat dec every 2½-4-4-4-4-4 cm 5-3-3-3-3-3 more times = 150-170-186-206-234-258 sts. When A.4 has been worked 1 time vertically, work in stocking st over all sts. When piece measures 18-19-20-21-22-23 cm insert 4 markers as follows: Work 15-17-19-21-25-27 sts, insert 1st marker, work 45-51-55-61-67-75 sts, insert 2nd marker, work 30-34-38-42-50-54 sts, insert 3rd marker, work 45-51-55-61-67-75 sts, insert 4th marker, work the remaining 15-17-19-21-25-27 sts. 1st and 2nd marker are on front piece, and 3rd and 4th marker are on back piece. Move the markers upwards when working. On next round inc 1 st before 1st and 3rd marker and 1 st after 2nd and 4th marker (= 4 sts inc) - READ INCREASE TIP. NOTE: No of sts mid front and mid back is the same, inc in side sts. Repeat inc every 6th round 1 more time, then every 4th round 6-5-6-5-6-10 times, then every other round 22-18-22-18-18-8 times = 270-270-306-306-338-338 sts. On next round, inc 2-2-0-0-2-2 sts evenly = 272-272-306-306-340-340 sts. Work in stocking st until piece measures 45-46-47-48-49-50 cm (or desired length, approx. 25 cm remain). Then work A.6 (= 34 sts) 8-8-9-9-10-10 times in total in width. When A.6 has been worked 1 time vertically, switch to circular needle size 3.5 mm. Work A.5 over all sts. Cast off. SLEEVE: Worked in the round on double pointed needles. Slip sts from stitch holder back on double pointed needles size 4 mm and cast on 6-6-6-8-8-8 sts under sleeve = 72-76-80-84-88-92 sts. Work in stocking st for 2 cm, on next round dec 8 sts evenly = 64-68-72-76-80-84 sts. Switch to double pointed needles size 3.5 mm. Work A.5 over all sts. Cast off. Work the other sleeve the same way. |
|||||||||||||||||||
Diagram explanations |
|||||||||||||||||||
|
|||||||||||||||||||
 |
|||||||||||||||||||
 |
|||||||||||||||||||
 |
|||||||||||||||||||
 |
|||||||||||||||||||
 |
|||||||||||||||||||
Have you finished this pattern?Tag your pictures with #dropspattern #summerfeelingdress or submit them to the #dropsfan gallery. Do you need help with this pattern?You'll find 24 tutorial videos, a Comments/Questions area and more by visiting the pattern on garnstudio.com. © 1982-2026 DROPS Design A/S. We reserve all rights. This document, including all its sub-sections, has copyrights. Read more about what you can do with our patterns at the bottom of each pattern on our site. |
|||||||||||||||||||


With over 40 years in knitting and crochet design, DROPS Design offers one of the most extensive collections of free patterns on the internet - translated to 17 languages. As of today we count 324 catalogues and 12290 patterns translated into English (UK/cm). 12290
We work hard to bring you the best knitting and crochet have to offer, inspiration and advice as well as great quality yarns at incredible prices! Would you like to use our patterns for other than personal use? You can read what you are allowed to do in the Copyright text at the bottom of all our patterns. Happy crafting!
Post a comment to pattern DROPS 160-1
We would love to hear what you have to say about this pattern!
If you want to leave a question, please make sure you select the correct category in the form below, to speed up the answering process. Required fields are marked *.