
Popular categories
Looking for a yarn?


Comments / Questions (234)
Erin wrote:
Can I check what does the last sentence of the second paragraph means? "Work the inc sts in stockinette st until they can be worked in pattern as shown in A.3." Also, when do we stop working the raglan?
08.03.2017 - 22:05DROPS Design answered:
Dear Erin, you will work the inc sts in stocking st before you are on the row in A.3 where they will be worked in pattern. See under RAGLAN how to inc for raglan and number of inc for raglan in your size. Happy knitting!
09.03.2017 - 09:10
![]() Nadja Kathrine wrote:
Nadja Kathrine wrote:
Hej Drops. Jeg behøver hjælp for, at kunne komme videre. Jeg strikker str. L og jeg har lavet udtagninger som opskriften foreskriver mit arbejder måler 16 cm og m.antal er 338. Ifølge opskriften skal jeg nu sætte 74 m. på tråd til ærmet og derefter strikke videre i A.4. Mit problem er, at jeg mangler at strikke 14 omg. af A.3. Hvordan kommer jeg videre herfra? Strikker jeg A.3 færdig men hvad gør jeg så med raglanen?
15.01.2017 - 10:50DROPS Design answered:
Hej Nadja. Du er faerdig med raglanen, saa her skal du ikke göre mere. Du fortsaetter med A.3 0 det er korrekt, det ikke er faerdig endnu, men din raglan er faerdig.
18.01.2017 - 16:05
![]() Anna Virkki wrote:
Anna Virkki wrote:
Raglanlisäyksissä on virhe L-Xxxl kokojen kohdalla. Kun vertaa englanninkieliseen tai alkuperäiseen puuttuu suomenkielisestä yksi langankierto, samoin kiertäen neulottu silmukka on Ennen silmukkamerkkiä, ei jälkeen.
12.12.2016 - 21:51
![]() Rebekah Russo wrote:
Rebekah Russo wrote:
Thank you so much for the fast response! I have few more questions, if you don't mind...the Raglan is conpleted every other row? I have been knitting it ever odd number row, is that correct? And if so, when do you start counting the knits for the front and back panels? After the Raglan? Again, thank you so so much for your help :)
24.10.2016 - 18:33DROPS Design answered:
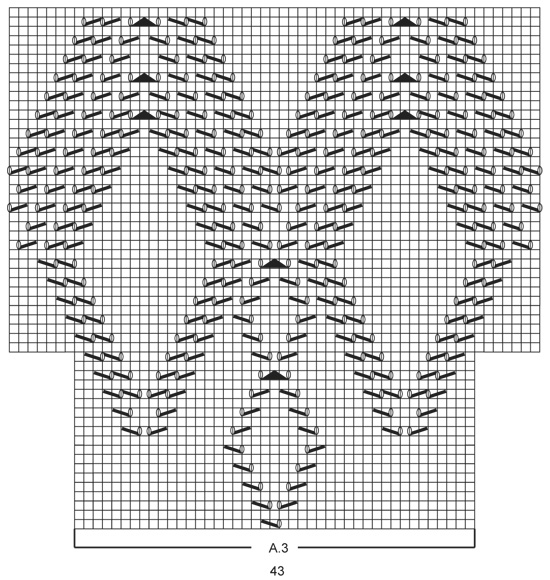
Dear Mrs Russo, the inc for raglan are worked every other round. A.2/A.3 are started when you inc for raglan the first time, insert a marker before and after the sts in diagram (= 17 sts in A.2 and 43 at the beg of A.3) to mark the sts where you will work each of them. You will have then more sts before and after the diagrams due to the inc for raglan. Happy knitting!
25.10.2016 - 09:05
![]() Diana Duggento wrote:
Diana Duggento wrote:
Ich bin Strickanfänger und komme nicht ganz klar mit dem Muster. In der ersten Reihe sollen 14 Maschen rechts und dann A2 gestrickt werden, später folgen dann 2 Maschen rechts und A3. Ich habe dann in jeder weiteren Musterreihe mit 14 bzw. 2 Maschen rechts für die Muster begonnen. Das Muster passt so überhaupt nicht überein. Wo liegt mein Fehler?
11.08.2016 - 08:29DROPS Design answered:
Liebe Diana, A.3 ist breiter als A.2, daher sind dort seitlich weniger Maschen.
27.08.2016 - 15:33Manosha wrote:
Your website is the best of all sites. The models , sizes and explaination are perfect, thanks a lot, I do many things for me, my mom, my kids
19.07.2016 - 10:38
![]() Ragnhild Hjälmhult wrote:
Ragnhild Hjälmhult wrote:
Hei! Strikker størrelse L. Har 14 omganger igjen av A3, og økt til raglan slik oppskriften sier, og har nå 338 masker. Får ikke dette til å stemme. Øker tot 24 ganger annenhver pinne. Først 2 ganger med 16 masker pr omgang og så 22 omganger med 8 masker. Dvs tot 48 omganger. Mønster A3 går over 56 omganger. Takknemlig for en forklaring her :)
23.06.2016 - 00:12DROPS Design answered:
Hej Ragnhild. Du strikker videre paa A.3 naar ogsaa raglan er afsluttet.
23.06.2016 - 15:07
![]() Britt Sperstad wrote:
Britt Sperstad wrote:
Hei,strikker str S,garn Puna. Skjønner ikke helt oppskriften i avsnitt 3 under bærestykket. Har strikket ferdig A2, har igjen 14 omg på A3,arbeidet måler nå 14 cm. Skal jeg ta ermemaskene på en tråd nå eller når jeg er ferdig m A3??
13.06.2016 - 23:19DROPS Design answered:
Hej Britt. Du skal sette ermemaskene paa en traad naar du er faerdig med alle ökninger (du har 294 m) og arbejdet maaler 14 cm.
14.06.2016 - 15:42
![]() Nadine wrote:
Nadine wrote:
Hallo, ich stricke das Kleid (Größe L) mit Belle und komme mit der Einteilung des Raglan und Rückenteil nicht zurecht. Bis zur Einteilung 49 M + 1 (Markierer) , 26 M + 1, 49 M +1 , 26 M + 1 M (Vordere Runde) passt alles. Aber das Rückenteil mit 49 M sollte wie folgt gestrickt werden: 2 M Raglan, 3 M re., 43 M Muster , bis 2 vor M Markierer. Somit habe ich aber 50 M und das Muster ist micht nicht mittig !? Und wie viele M sollten zwischen Muster und 2 vor Maschenmarkierer sein?
17.05.2016 - 22:15
![]() Hanne Gunnertoft Pedersen wrote:
Hanne Gunnertoft Pedersen wrote:
Færdig med min kjole, er vildt glad for den. Har planer om een i en anden farve 😍
14.04.2016 - 15:56
|
|||||||||||||||||||
Summer Feeling#summerfeelingdress |
|||||||||||||||||||
 |
 |
||||||||||||||||||
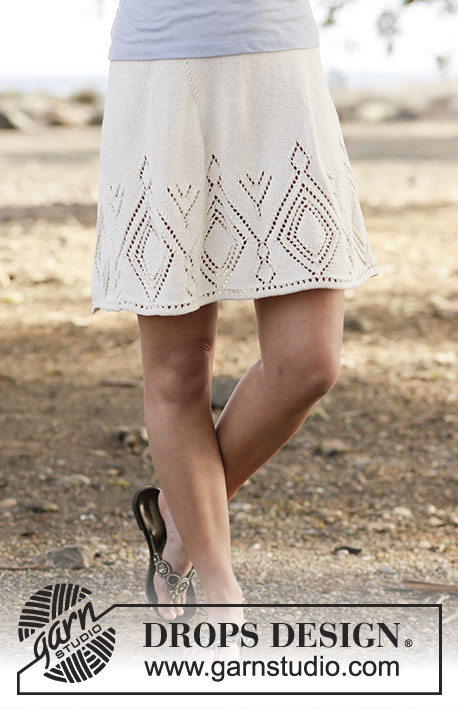
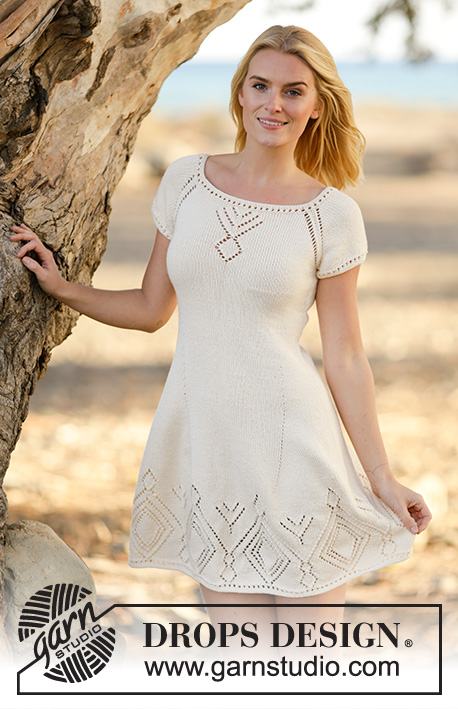
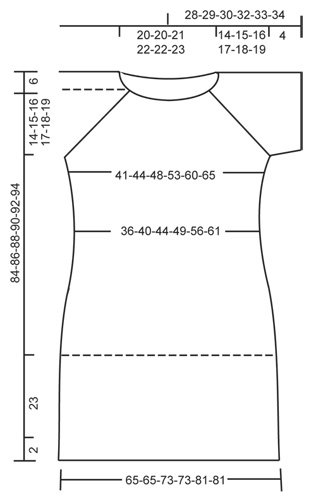
Knitted DROPS dress with lace pattern and raglan in ”Muskat” or "Belle". Worked top down. Size: S - XXXL.
DROPS 160-1 |
|||||||||||||||||||
|
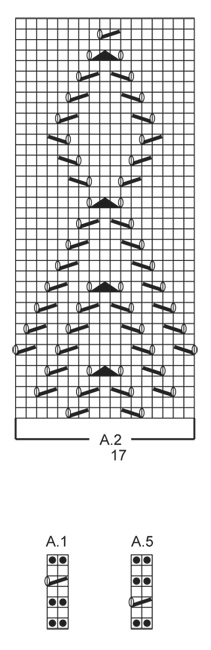
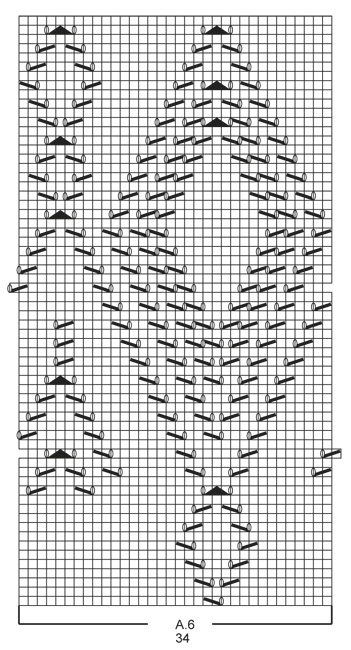
PATTERN: See diagrams A.1 to A.6. DECREASE TIP: Dec 1 st before marker as follows: Work until 2 sts remain before marker, slip 1 st as if to K, K 1, psso. Dec 1 st after marker as follows: K 2 tog. RAGLAN: Inc differently for raglan in the different sizes: SIZE S-M: Inc 1 sts on each side of each marker (= 8 sts inc in total) as follows: 1 YO, K 1 twisted, K 1 (= st with marker), K 1 twisted, 1 YO. NOTE: The inc on each sides of 1st marker (= in the last st on round) is worked as follows: at beginning of round, K 1 twisted, 1 YO. At the end of round: 1 YO, K 1 twisted, K.1 (= st with marker) Do not work YOs twisted on next round, they should make holes, repeat inc every other round 17-19 more times. SIZE L-XL-XXL-XXXL: Inc 2 sts on each side of each marker (= 16 sts inc in total each round) as follows: 1 YO, K 1, 1 YO, K 1 twisted, K 1(= st with marker), K 1 twisted, 1 YO, K 1, 1 YO (first and last YO is worked twisted on next round, it should not make a hole but, the 2 midle YO should be K as normal and make a hole). Repeat inc on every other round 1-1-1-3 more times. NOTE: The inc on eich side of 1st marker(= in the last st on round) is worked as follows: at beginning of round, K 1 twisted, 1 YO, K 1, 1 YO. At the end of round: 1 YO, K 1, 1 YO, K 1 twisted, K.1 (= st with marker) Then inc like as follows: Inc 1 sts at each side of each marker (= 8 sts inc in total) as follows: 1 YO, K 1 twisted, K 1(= st with marker), K 1 twisted, 1 YO. Do not K YOs twisted on next round, they should make holes. Repeat inc every other round 19-20-22-21 more times in total. INCREASE TIP: Inc 1 st by making a YO. On next round K YO twisted to avoid holes. ---------------------------------------------------------- YOKE: Worked in the round on circular needle, top down. Cast on 134-134-140-144-144-148 sts on circular needle size 3.5 mm with Muskat. Work A.1 (= 2 sts) over all sts. When A.1 has been worked 1 time vertically, switch to circular needle size 4 mm. On next round K all sts and inc 16-20-14-22-42-46 sts evenly = 150-154-154-166-186-194 sts. On next round insert 4 markers in the midle st of each raglan as follows: Insert 1st in last st on round, K 45-47-49-55-65-71 sts (= front piece), K 1 sts and insert 2nd marker in this st, K 28-28-26-26-26-24 sts (= sleeve), K 1 sts and insert 3rd marker in this st, K 45-47-49-55-65-71 sts (= back piece), K 1 st and insert 4th marker in this st, K 28-28-26-26-26-24 sts (= sleeve), K 1 sts (1st marker is placed in this st). REMEMBER THE KNITTING TENSION Then work as follows - AT THE SAME TIME inc for RAGLAN - see explanation above. Work half the raglan inc for 1st marker (see explanation above) K 13-14-14-17-22-25 sts, A.2 (= 17 sts), K until 1-1-2-2-2-2 st remains before 2nd marker, work RAGLAN - see explanation above, K until 1-1-2-2-2-2 sts remain before 3rd marker, work raglan, K 0-1-1-4-9-12 sts, A.3 (= 43 sts), K until 1-1-2-2-2-2 st remains before 4th marker, work raglan, K until 1-1-2-2-2-2 sts remain before 1st marker, work raglan. Work the inc sts in stocking st until they can be worked in pattern as shown in A.3. When A.2 has been worked 1 time vertically, work in stocking st over all these sts. When A.3 has been worked 1 time vertically, work A.4 (= 57 sts) over A.3. After all inc are done there are 294-314-338-358-394-426 sts on needle. Piece measures approx. 14-15-16-17-18-19 cm. Continue with pattern and stocking st as before AT THE SAME TIME work as follows: Work the first 81-87-95-103-117-129 sts (= front piece), slip the next 66-70-74-76-80-84 sts on a stitch holder for sleeve, cast on 6-6-6-8-8-8 sts under sleeve (insert a marker in the middle of the new sts), work the next 81-87-95-103-117-129 sts (= back piece), slip the next 66-70-74-76-80-84 sts on a stitch holder for sleeve, cast on 6-6-6-8-8-8 sts under sleeve (insert a marker in the middle of the new sts) = 174-186-202-222-250-274 sts remain on needle. Insert 1 marker in piece, NOW MEASURE PIECE FROM HERE. Continue to work A.4 and stocking st over the remaining sts. When piece measures 3 cm, dec 1 st on each side of each markers in the sides (= 4 sts dec) - READ DECREASE TIP! Repeat dec every 2½-4-4-4-4-4 cm 5-3-3-3-3-3 more times = 150-170-186-206-234-258 sts. When A.4 has been worked 1 time vertically, work in stocking st over all sts. When piece measures 18-19-20-21-22-23 cm insert 4 markers as follows: Work 15-17-19-21-25-27 sts, insert 1st marker, work 45-51-55-61-67-75 sts, insert 2nd marker, work 30-34-38-42-50-54 sts, insert 3rd marker, work 45-51-55-61-67-75 sts, insert 4th marker, work the remaining 15-17-19-21-25-27 sts. 1st and 2nd marker are on front piece, and 3rd and 4th marker are on back piece. Move the markers upwards when working. On next round inc 1 st before 1st and 3rd marker and 1 st after 2nd and 4th marker (= 4 sts inc) - READ INCREASE TIP. NOTE: No of sts mid front and mid back is the same, inc in side sts. Repeat inc every 6th round 1 more time, then every 4th round 6-5-6-5-6-10 times, then every other round 22-18-22-18-18-8 times = 270-270-306-306-338-338 sts. On next round, inc 2-2-0-0-2-2 sts evenly = 272-272-306-306-340-340 sts. Work in stocking st until piece measures 45-46-47-48-49-50 cm (or desired length, approx. 25 cm remain). Then work A.6 (= 34 sts) 8-8-9-9-10-10 times in total in width. When A.6 has been worked 1 time vertically, switch to circular needle size 3.5 mm. Work A.5 over all sts. Cast off. SLEEVE: Worked in the round on double pointed needles. Slip sts from stitch holder back on double pointed needles size 4 mm and cast on 6-6-6-8-8-8 sts under sleeve = 72-76-80-84-88-92 sts. Work in stocking st for 2 cm, on next round dec 8 sts evenly = 64-68-72-76-80-84 sts. Switch to double pointed needles size 3.5 mm. Work A.5 over all sts. Cast off. Work the other sleeve the same way. |
|||||||||||||||||||
Diagram explanations |
|||||||||||||||||||
|
|||||||||||||||||||
 |
|||||||||||||||||||
 |
|||||||||||||||||||
 |
|||||||||||||||||||
 |
|||||||||||||||||||
 |
|||||||||||||||||||
Have you finished this pattern?Tag your pictures with #dropspattern #summerfeelingdress or submit them to the #dropsfan gallery. Do you need help with this pattern?You'll find 24 tutorial videos, a Comments/Questions area and more by visiting the pattern on garnstudio.com. © 1982-2026 DROPS Design A/S. We reserve all rights. This document, including all its sub-sections, has copyrights. Read more about what you can do with our patterns at the bottom of each pattern on our site. |
|||||||||||||||||||


With over 40 years in knitting and crochet design, DROPS Design offers one of the most extensive collections of free patterns on the internet - translated to 17 languages. As of today we count 324 catalogues and 12290 patterns translated into English (UK/cm). 12290
We work hard to bring you the best knitting and crochet have to offer, inspiration and advice as well as great quality yarns at incredible prices! Would you like to use our patterns for other than personal use? You can read what you are allowed to do in the Copyright text at the bottom of all our patterns. Happy crafting!
Post a comment to pattern DROPS 160-1
We would love to hear what you have to say about this pattern!
If you want to leave a question, please make sure you select the correct category in the form below, to speed up the answering process. Required fields are marked *.