
Popular categories
Looking for a yarn?


Comments / Questions (44)
![]() Hanna Borecka-Bielska wrote:
Hanna Borecka-Bielska wrote:
Hi, I finished the back and front part of the vent and combined the two together following instructions from the "BODY" section. The right and left side were combined by knitting together 1 stitch from each front and back. I should now be doing the 2nd round from English Rib (in the round) but looking at the stitches I have: 2tog (from YO and slip from the previous round), 1 stitch, 1 stitch and 2together and then as normal 1 stitch and 2tog repeated. How to start this round?
17.07.2024 - 16:53DROPS Design answered:
Dear Hanna, the 2nd round is worked all in the 2nd round of English rib, so directly start the round as indicated in ENGLISH RIB (in the round on circular needle): ROUND 2. The previous stitches were for adjusting the transfer from English rib back and forth to the English rib in the round, so they aren't necessary now. Happy knitting!
21.07.2024 - 20:25
![]() Hanna Borecka-Bielska wrote:
Hanna Borecka-Bielska wrote:
Hi, I finished the back and front part of the vent and combined the two together following instructions from the "BODY" section. The right and left side were combined by knitting together 1 stitch from each front and back. I should now be doing the 2nd round from English Rib (in the round) but looking at the stitches I have: 2tog (from YO and slip from the previous round), 1 stitch, 1 stitch and 2together and then as normal 1 stitch and 2tog repeated. How to start this round?
17.07.2024 - 16:52
![]() Iris Müller wrote:
Iris Müller wrote:
Hallo, leider scheitere ich schon an der Maschenprobe. Ich komme mit der Original Drops kidsilk und Nadeln Nr. 6 nur auf 6 cm bei 13 Maschen. Mit Nadeln Nr. 8 auf 8 cm. Mit größeren Nadeln möchte ich nicht stricken, dann gefällt mir das Maschenbild nicht. Am liebsten wäre mir Nadelgröße 6. Was kann ich tun? Warum passt die Maschenprobe so gar nicht?
16.09.2023 - 16:00DROPS Design answered:
Liebe Frau Müller, stricken Sie mit 2 Fäden Kid-Silk und mit Patent muster, dh nicht glatt rechts? Die ganze Anleitung, dh die Maßnahmen sowie die Garnmenge wird mit dieser Maschenprobe kalkuliert, wenn sie nicht stimmt, dann sollen Sie beide Anleitung und Garnmenge anpassen. Viel Spaß beim stricken!
18.09.2023 - 08:28
![]() Laetitia wrote:
Laetitia wrote:
Bonjour Je ne comprends pas le fait de mettre le dos en attente pour faire le devant: faut il couper le fil pour commencer le devant?
26.07.2023 - 08:03DROPS Design answered:
Bonjour Laetitia, vous coupez le fil avant de mettre le dos en attente. Bon tricot!
26.07.2023 - 08:09
![]() Magdalena Louise Ebeling wrote:
Magdalena Louise Ebeling wrote:
Ska jag fortsätta med mönstret A. 1 när jag stickar raglan?
27.10.2022 - 23:23DROPS Design answered:
Hej Magdalena, ja du fortsætter mønsteret og minskar till raglan på varje sida av A.1. Se RAGLAN i början på mönstret :)
16.11.2022 - 13:20
![]() Magdalena Louise Ebeling wrote:
Magdalena Louise Ebeling wrote:
Ska jag fortsätta med mönstret A. 1 när jag stickar raglan?
27.10.2022 - 23:22DROPS Design answered:
Hei Magdalena. Raglan: Det felles på hver side av hver A.1 (= 8 m felt). Det felles 1 maske ved å strikke 2 masker vrang sammen. NB: Kastene i helpatent regnes ikke som en egen maske. På neste omgang strikkes masken på hver side av A.1 vrang. mvh DROPS Design
31.10.2022 - 09:42
![]() Kirsten Ross wrote:
Kirsten Ross wrote:
Leider immer noch kein Erfolg bei der Ärmelzunahme. Wie werden die neu aufgenommenen Maschen in den Folgerunden gestrickt,mit oder ohne Umschlag? Woran muss ich mich orientieren—? Das Muster wird ja gebrochen. Es geht bei mir einfach nicht auf,. Wenn ich in einer Reihe bin wo rechts mit Umschlag abgehoben wird,muss ich dann alle drei rechte Maschen mit Umschlag abheben ?vielleicht könnte man einmal ein Video dazu machen…danke. Ich bin habe schon 20mal neu angefangen.
27.06.2021 - 21:51DROPS Design answered:
Liebe Kirsten, nach der ersten Zunahme ist das Muster tatsächlich "gebrochen", erst nach 2 Zunahme-Runden sind Sie wieder im "Mustertakt". Stricken Sie die zugenommene Masche jeweils so, wie es die daneben liegende Masche des Vollpatents erfordert. Es kann daher passieren, dass Sie 3x 1 Masche rechts abheben + jeweils 1 Umschlag arbeiten, d.h. es wird 3x nacheinander die gleiche Maschenart gestrickt (= zugenommene Masche + Masche der unteren Ärmelmitte + zugenommene Masche). Erst bei der nächsten Zunahme sind Sie wieder im richtigen Rhythmus des Musters. Nach der darauf folgenden Zunahme haben Sie dann wieder 3x nacheinander die gleiche Maschenart.
28.06.2021 - 23:00
![]() Kirsten Ross wrote:
Kirsten Ross wrote:
Leider klappt es nicht mit den Zunahmen am Ärmel,irgendetwas mache ich falsch. Muss die über den Querfaden aufgenommene Masche direkt rechts verschränkt ab gestrickt werden so wie im 2. Video? In der Anleitung steht unter Zunahmetipp erst in der nächsten Runde verschränkt Rechts Stricken.Und muss ich immer auch direkt den Umschlag aufnehmen ? Oder erst in der 2.Runde ab Zunahme?
15.06.2021 - 08:20DROPS Design answered:
Liebe Frau Ross, in dieses Modell wurden die Zunahmen für die Ärmel mit dem Querfaden gestrickt, aber wenn Sie es lieber haben, können Sie auch mit einem Umschlag beidseitig der mittleren Maschen zunehmen. Hauptsache ist, daß die Maschen im Patentmuster gestrickt werden. Viel Spaß beim stricken!
15.06.2021 - 08:22
![]() Kirsten Roß wrote:
Kirsten Roß wrote:
Hallo, ich noch einmal, ich habe nun den Querfaden rechts abgestrickt und auf edr Rückseite verschränkt rechts was erstmal richtig aussieht. Nun habe ich aber 3 rechte Maschen nebeneinander in dedr nächsten Runde, also die ursprünglich erste Masche und davor bzw danach. Ist das so gedacht und wie verfahre ich wenn ich dann noch weitere Maschen aufnehme? Dann würde das Feld aus rechten Maschen ja immer größer werden. Irgendwo ist da ein Fehler. Danke!
06.06.2021 - 16:04DROPS Design answered:
Liebe Frau Roß, so stimmt es, nächstes Mal werden Sie die Zunahme links stricken und dann wird das Patentmuster wieder in Runden stimmen. Und immer so weiter stricken. Viel Spaß beim stricken!
07.06.2021 - 07:46
![]() Kirsten Roß wrote:
Kirsten Roß wrote:
Ich verstehe die Zunahme für die Ärmel nicht. Wenn ich den Querfaden der beiden Maschen aus der vorigen Reihe rechts aufnehme liegt der Faden doch hinter der neuen Masche, was mache ich dann damit? Und auf der Rückrunde passt es dann doch nicht mehr mit rechts und links abwechselnd, oder sehe ich das falsch?
06.06.2021 - 11:32
|
|||||||||||||
Dorothea#dorotheasweater |
|||||||||||||
 |
 |
||||||||||||
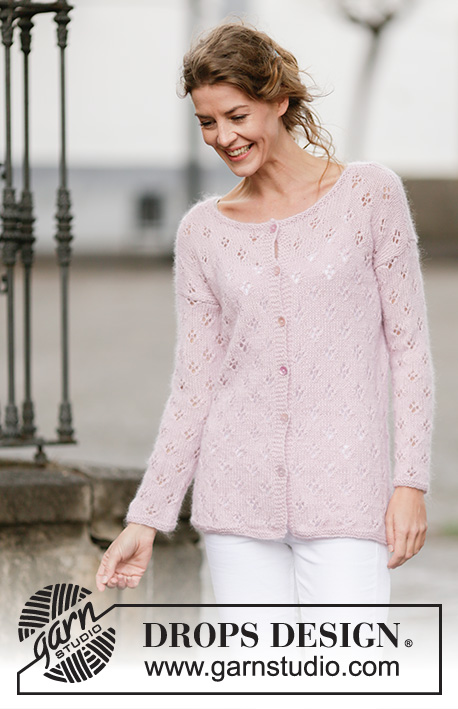
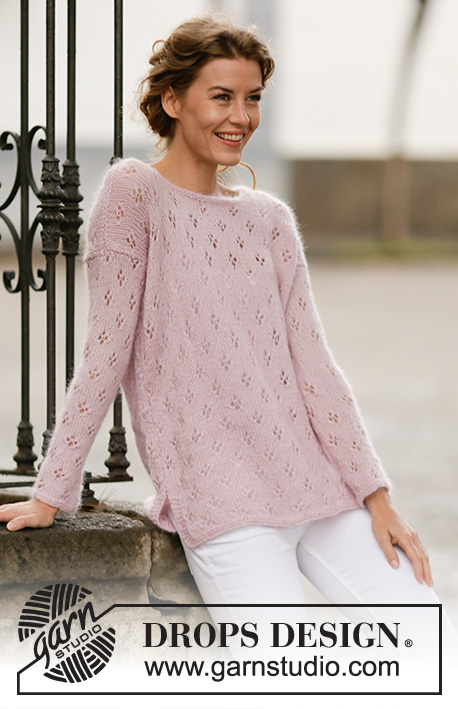
Knitted DROPS jumper with English rib, vent and raglan in 2 strands "Kid-Silk". Size S-XXXL.
DROPS 160-27 |
|||||||||||||
|
GARTER ST (back and forth): K all rows. 1 ridge = 2 rows K. GARTER ST (worked in the round): * K 1 round and P 1 round *, repeat from *-*. 1 ridge = 2 rounds. ENGLISH RIB (back and forth on needle): ROW 1 (= RS): 3 sts in garter st, * K 1, 1 YO, slip 1 st as if to P *, repeat from *-* until 4 sts remain, K 1, 3 sts in garter st. ROW 2 (= WS): 3 sts in garter st, * 1 YO, slip 1 st as if to P, K tog YO and slipped st *, repeat from *-* until 4 sts remain, 1 YO, slip 1 st as if to P, 3 sts in garter st. ROW 3 (= RS): 3 sts in garter st, * K tog YO and slipped st, 1 YO, slip 1 st as if to P *, repeat from *-* until 4 sts remain, K tog YO and slipped st, 3 sts in garter st. Repeat 2nd and 3rd row upwards. ENGLISH RIB (in the round on circular needle): ROUND 1: * K 1, 1 YO, slip 1 st as if to P *, repeat from *-*. ROUND 2: * 1 YO, slip 1 st as if to P, P tog YO and slipped st *, repeat from *-*. ROUND 3: * K tog YO and slipped st, 1 YO, slip 1 st as if to P *, repeat from *-*. Repeat 2nd and 3rd round upwards. PATTERN: See diagram A.1. Repeat 2nd and 3rd round. INCREASE TIP: Inc 1 st by getting yarn between 2 sts from previous round - K this st twisted on next round, i.e. work in back loop of st instead of front to avoid holes. Work new sts into English rib. RAGLAN: Dec on each side of every A.1 (= 8 sts dec). Dec 1 st by P 2 tog. NOTE: YO in English rib are not counted as a st. On next round P 1 sts on each side of A.1. ---------------------------------------------------------- JUMPER: First work back and forth on circular needle until vent is done. Then work in the round. Back piece is long than front piece. BACK PIECE: LOOSELY cast on 66-72-78-86-95-104 sts on circular needle size 6 mm with 1 strand light pink and 1 strand medium pink (= 2 strands). Work 2 ridges in GARTER ST - see explanation above, AT THE SAME TIME on last row from RS dec 9-11-11-13-14-15 sts evenly = 57-61-67-73-81-89 sts. Now work ENGLISH RIB back and forth - see explanation above. REMEMBER THE KNITTING TENSION When piece measures 25 cm, adjust so that last row is 2nd row in English rib, put piece aside. FRONT PIECE: Cast on and work as back piece. When piece measures 15 cm, adjust so that last row is 2nd row in English rib, work body in the round on circular needle. BODY: Now work front and back piece tog as follows: Beg with front piece, K 1, 1 YO, slip 1 st as if to P, K 1, work 3rd round in ENGLISH RIB in the round on circular needle - see explanation above, until 4 sts remain on front piece, K YO and slipped st tog, K 1, 1 YO, slip 1 st as if to P, K 2 tog (= right side), 1 YO, slip 1 st as if to P, K 1, continue with English rib over back piece until 4 sts remain, K YO and slipped st tog, K 1, 1 YO, slip 1 st as if to P, K 2 tog (= left side) = 112-120-132-144-160-176 sts. Continue with English rib from 2nd round. When piece measures 36-37-38-39-40-41 cm (measured from back piece), cast off 7 sts in each side for armholes = 49-53-59-65-73-81 sts for both front and piece. Work 25-27-30-33-37-44 sts in English rib. Now round beg here (= mid back). Put piece aside and knit the sleeves. SLEEVE: Work sleeve in the round on circular needle/double pointed needles. Cast on 38-40-41-41-44-44 sts on double pointed needles size 6 mm with a strand light pink and 1 strand medium pink (= 2 strands). Work 2 ridges in GARTER ST in the round – see explanation above, AT THE SAME TIME on last round with K dec 6-6-5-5-6-6 sts evenly = 32-34-36-36-38-38 sts. Now work English rib over all sts. NOTE: Insert a marker in first st at beg of round = mid under sleeve. When piece measures 15-15-15-15-10-10 cm, inc 1 st on each side of st with marker - read INCREASE TIP. Repeat inc every 4-3-3-2-2-1½ cm 6-7-8-11-13-17 more times = 46-50-54-60-66-74 sts. When piece measures 39-39-39-39-38-38 cm (shorter measurements in the larger sizes because of wider neck and shoulders), cast off the 7 sts mid under sleeve = 39-43-47-53-59-67 sts. Put piece aside and knit another sleeve the same way. YOKE: Slip sleeves on to same circular needle as body where armholes were cast off = 176-192-212-236-264-296 sts. Now continue with English rib as before on arms, back and front piece from mid back, work PATTERN - see explanation above, between pieces as follows: Work 20-22-25-28-32-36 sts, A.1 (= 7 sts) 33-37-41-47-53-61 sts (= sleeve), A.1, 41-45-51-57-65-73 sts (= front piece), A.1, 33-37-41-47-53-61 sts (= sleeve), A.1, work the remaining 21-23-26-29-34-37 sts. On next round start dec for RAGLAN – see explanation above! Dec every round 0-0-0-0-3-9 times, every other round 6-10-14-21-22-20 times and every 3rd round 9-7-5-1-0-0 times = 56-56-60-60-64-64 sts. K 1 round, AT THE SAME TIME inc 11-11-12-12-12-12 sts evenly = 67-67-72-72-76-76 sts. Work 2 ridges and loosely cast off. ASSEMBLY: Sew the openings under the sleeves. |
|||||||||||||
Diagram explanations |
|||||||||||||
|
|||||||||||||
 |
|||||||||||||
Have you finished this pattern?Tag your pictures with #dropspattern #dorotheasweater or submit them to the #dropsfan gallery. Do you need help with this pattern?You'll find 19 tutorial videos, a Comments/Questions area and more by visiting the pattern on garnstudio.com. © 1982-2026 DROPS Design A/S. We reserve all rights. This document, including all its sub-sections, has copyrights. Read more about what you can do with our patterns at the bottom of each pattern on our site. |
|||||||||||||


With over 40 years in knitting and crochet design, DROPS Design offers one of the most extensive collections of free patterns on the internet - translated to 17 languages. As of today we count 324 catalogues and 12290 patterns translated into English (UK/cm). 12290
We work hard to bring you the best knitting and crochet have to offer, inspiration and advice as well as great quality yarns at incredible prices! Would you like to use our patterns for other than personal use? You can read what you are allowed to do in the Copyright text at the bottom of all our patterns. Happy crafting!
Post a comment to pattern DROPS 160-27
We would love to hear what you have to say about this pattern!
If you want to leave a question, please make sure you select the correct category in the form below, to speed up the answering process. Required fields are marked *.