
Popular categories
Looking for a yarn?


Comments / Questions (56)
![]() STELLA wrote:
STELLA wrote:
Buongiorno. Sto avviando questo lavoro, ma sonoina neofita del mestiere. Vorrei capire cosa intendere per "nessuna maglia, saltate questo quadrato". Evidentemente non è un gettato, ma allora come faccio a saltate questa maglia? Vi ringrazio in anticipo per l'aiuto che vorrete darmi e, probabilmente ci sentiremo ancora, visto che appunto, mi reputo una neofita del mestiere.
06.06.2016 - 06:43DROPS Design answered:
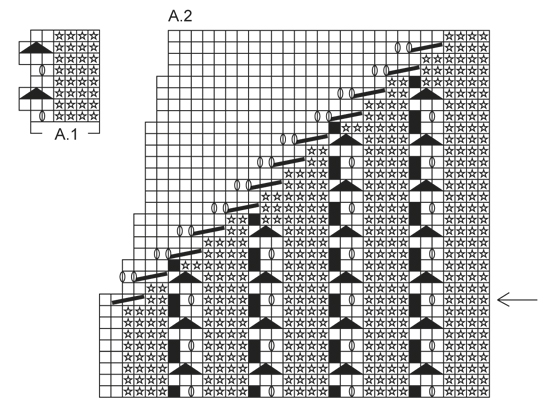
Buongiorno Stella. Il quadratino nero non corrisponde a nessuna m sul ferro. Quindi, partendo dal basso verso l'alto e da destra verso sinistra, dovrà lavorare: 4 m rov sul diritto del lavoro, 1 m dir, 1 gettato, 1 m dir, 4 m rov, 1 m dir, 1 gettato, 1 m dir, 4 m rov e così via. Buon lavoro!
06.06.2016 - 06:58Hazel wrote:
What does it mean to: K from RS, P from WS P from RS, K from WS ....since this is knitting in the round and you are only working on the right side. Thanks in advance.
11.03.2016 - 06:58DROPS Design answered:
Dear Mrs Hazel, it explains how to work the sts when you are working from RS and from WS - you first work in the round but then when dividing piece for armhole, you will have to continue diagram back and forth (ie you will now have WS rows). Happy knitting!
11.03.2016 - 09:41
![]() Simone Verweij wrote:
Simone Verweij wrote:
Heb een zelfde vraag als bovenstaand maar snap het antwoord niet. Bij A2 begin je bij de pijl. Je breit 24 naalden en dan? Ga je verder met opnieuw de naald bij de pijl of continueer je de 4 naalden in patroon. Maar er zit wel verschil in de omzettingen...
06.03.2016 - 10:25DROPS Design answered:
Hoi Simone. Je breit door op dezelfde manier (dus volgens het patroon met steeds minder st in het patroon en steeds meer in tricotsteek) tot alle st in patroon op zowel voor- als achterpand in tricotst zijn gebreid.
08.03.2016 - 12:46
![]() CAROLINE wrote:
CAROLINE wrote:
Votre modèle est très élégant, je l'ai réalisé en coton jaune, cependant je rencontre des difficultés au niveau du col. J'ai relevé 73 mailles sur l'endroit sur aiguille circulaire et ajouté les 10 mailles centrales, or en les tricotant à l'envers, j'obtiens un "motif" disgracieux. J'ai commis sans aucun doute une erreur, mais je ne parviens pas à la définir et à y remédier. Je vous remercie sincèrement par avance de votre aide. Cordialement. Caroline.
12.08.2015 - 21:06DROPS Design answered:
Bonjour Caroline, après avoir relevé les mailles sur l'endroit, on tricote le col en rond, le 1er tour envers forme comme une "côte mousse" en bas de l'encolure, on tricote ensuite 1 tour end et 1 tour env pour former une 2ème côte mousse, puis on rabat à l'end au tour suivant. Bon tricot!
13.08.2015 - 09:35
![]() Mary Tournour wrote:
Mary Tournour wrote:
After 1st round in A-2 there is supposed to be 2 less sts on the front piece than the back piece. I am not sure how that occurs as I seem to be getting more sts on the front piece than the back piece. This pattern does not have great explanations with it especially for a novice knitter. Any help would be appreciated .
17.07.2015 - 04:56DROPS Design answered:
Dear Mrs Tournour, at the end of 1st round in A.2 number of sts will be the same. When you start displacing the pattern (after the arrow in diagram), total number of sts remain the same, only number of sts worked in pattern dec while number of sts worked in st st increase. Happy knitting!
27.07.2015 - 14:23
![]() Titti wrote:
Titti wrote:
“ quando il lavoro misura 39 cm, lavorare 2 coste sulle 8 m centrali a ogni lato “ Le mie domande sono : 1 - ma se le coste , nella spiegazione, si eseguono così “* 4 m rov, 2 m dir “ dovrei lavorare 6 maglie. 2 - Per 8 maglie centrali a ogni lato si intendono 4 + 4 ai lati di ogni segnapunti ? Grazie per la pazienza
09.07.2015 - 18:03DROPS Design answered:
Buonasera Titti, abbiamo modificato il testo per renderlo più comprensibile: in questo caso le coste a cui si fa riferimento sono quelle a m legaccio, per cui deve lavorare 4 giri a m legaccio sulle 8 m centrali dei lati (4 m prima e 4 m dopo il segnapunti) lavorando le altre m come prima. Buon lavoro!
09.07.2015 - 18:38
![]() Titti wrote:
Titti wrote:
Rif : pattern DROPS 161-28 Scusatemi e abbiate pazienza... Diagramma A2 : va lavorato sulle m. comprese tra i 2 segnap. Nel mio caso ho 78 m davanti: lo schema parte da 34 m ( x arrivare alle 28 finali ) Non mi torna..Per potelo lavorare tutto dovrei , nel mio caso, avere 102m...Come devo fare? Lavoro solo le prime 34 ?
03.07.2015 - 12:02DROPS Design answered:
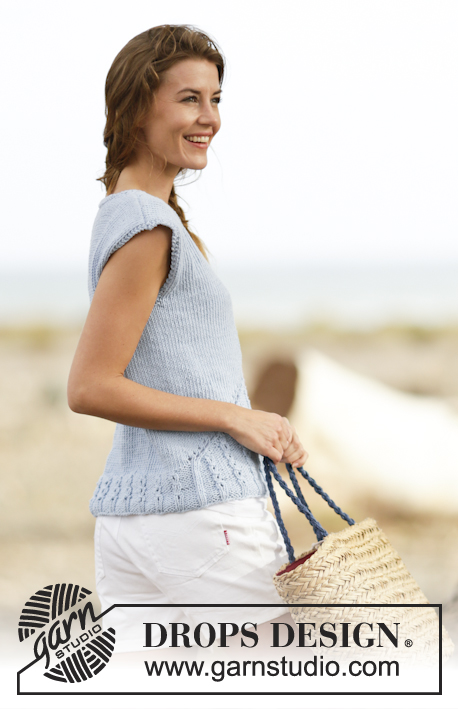
Buongiorno Titti. Quando inizia A.2, lavora 4 m rov, 1 m dir, 1 gettato, 1 m dir per 12 volte (= 72 m) e le ultime 6 m prima del segno le lavora: 2 m rov, 3 m insieme a dir, 1 m dir. Poi ha il segno e lavora il dietro. Prosegue come indicato nel diagramma: il motivo si sposta in diagonale e aumentano le m lavorate a maglia rasata. Le fotografie del modello le possono essere di aiuto. In particolare quella presa di fianco, mostra bene come iniziare A.2. Buon lavoro!
03.07.2015 - 13:37
![]() Titti wrote:
Titti wrote:
Rif : pattern DROPS 161-28 . Ancora una volta chiedo aiuto... Terminata la riga 32 del diagramma A.2 come continuo? Ricomincio dalla riga 1 o faccio solo maglia rasata? Grazie mille
02.07.2015 - 11:41DROPS Design answered:
Buongiorno Titti. Una volta completato il diagramma A.2, prosegue a maglia rasata; inoltre lavora le prime 2 e le ultime 2 m sul ferro a legaccio per i bordi delle maniche. Buon lavoro!
02.07.2015 - 12:13
![]() Titti wrote:
Titti wrote:
Sono in difficoltà con il modello 161-28 . Nel grafico A1 / A2 la legenda dice di fare : Diagramma = 1 m dir dal diritto del lavoro, 1 m rov dal rovescio del lavoro = 1 m rov dal diritto del lavoro, 1 m dir dal rovescio del lavoro Non mi è assolutamente chiaro e il video non mi è stato di aiuto. Si intende che in ogni maglia devo fare 1 rovescio e 1 diritto insieme ? Ringrazio per l'attenzione
28.06.2015 - 15:24DROPS Design answered:
Buongiorno Titti. Deve lavorare una sola maglia, a dir o a rov a seconda del caso. P.es il quadratino bianco: se sta lavorando sul diritto del lavoro, lavora la m a dir; se sta lavorando sul rovescio, lavora la m a rov. Il quadratino con la stella: se sta lavorando sul diritto, lavora la m a rov; se sta lavorando sul rovescio, lavora la m a dir. Ci riscriva se non è chiaro. Buon lavoro!
28.06.2015 - 17:30
![]() Bodil wrote:
Bodil wrote:
Har fått god hjelp her inne, men har fremdeles problemer med å skjønne oppskriften på toppen. Har strikket ferdig omgang 32, skal jeg begynne på omgang 9 igjen? Eller hvordan fortsetter jeg?
17.04.2015 - 20:56DROPS Design answered:
Hej Bodil. Naar du er faerdig med mönstret (dvs, du har ikke flere mönstermasker, men kun glatstrik tilbage, saa stopper mönstret ogsaa. Du fortsaetter da med glatstrik og 2 rillemasker (ermekant) i begge sider.
20.04.2015 - 13:26
|
|||||||||||||||||||
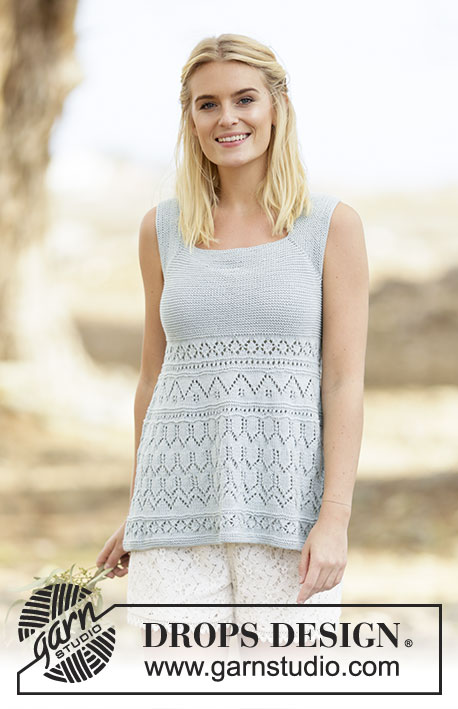
Light Breeze#lightbreezetop |
|||||||||||||||||||
 |
 |
||||||||||||||||||
Knitted DROPS top with lace pattern and diagonal line in ”Paris”. Size: S - XXXL.
DROPS 161-28 |
|||||||||||||||||||
|
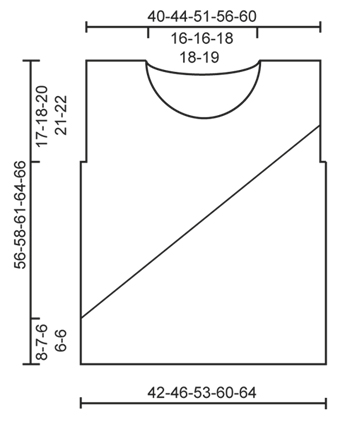
GARTER ST (worked in the round): * K 1 round and P 1 round *, repeat from *-*. 1 ridge = 2 rounds. GARTER ST (back and forth): K all rows. 1 ridge = 2 rows K. RIB: * P 4, K 2 *, repeat from *-*. PATTERN: See diagrams A.1 and A.2. The diagrams show all rows in pattern seen from RS. ---------------------------------------------------------- BODY: Worked in the round on circular needle. Cast on 144-156-180-204-216 sts on circular needle size 4.5 mm with Paris. K 1 round. Then work RIB - see explanation above. When rib measures 2 cm, switch to circular needle size 5 mm. Insert 1 marker at beg of round and 1 marker after 72-78-90-102-108 sts (= the sides). Then work pattern in the round according to diagram A.1 (pattern should fit over rib) BUT K the last 2 sts before both markers on every round onwards. REMEMBER THE KNITTING TENSION When piece measures approx. 8-7-6-6-6 cm (finish after 4th or 8th round in A.1), continue as follows: Beg on round marked with arrow in A.2 and work pattern according to diagram A.2 until 2nd marker (= front piece – NOTE: Diagram shows how eyelet rows goes over into stocking st), then work in stocking st over the remaining sts (= back piece). After 1st round in A.2 there are now 2 sts less on front piece than on back piece. Continue pattern according to A.2 on front piece and stocking st on back piece until all P sts and eyelet row sts have been worked into stocking st (pattern will finish approx. 2-2-6-9-11 cm after cast off for armholes). AT THE SAME TIME when piece measures 38-39-40-42-43 cm, work 2 ridges over the middle 8-8-8-10-10 sts in each side (work the other sts as before). On next round after the 2 ridges, cast off the middle 4-4-4-6-6 sts in each side for armhole and finish front and back piece separately. BACK PIECE: = 68-74-86-96-102 sts. Continue in stocking st but work the outermost 2 sts in each side in garter st (= sleeve edge). When piece measures 54-56-59-62-64 cm, cast off the middle 26-26-28-28-30 sts for neck and finish each shoulder separately. Then cast off 1 st on next row from neck = 20-23-28-33-35 sts remain on shoulder. Cast off when piece measures 56-58-61-64-66 cm. Repeat on the other shoulder. FRONT PIECE: = 66-72-84-94-100 sts. Continue in stocking st and A.2 as before but work the outermost 2 sts in each side in garter st (= sleeve edge). After A.2 continue in stocking st with 2 sts in garter st in each side. When piece measures 46-48-49-51-53 cm, slip the middle 10-10-12-12-14 sts on 1 stitch holder for neck and finish each shoulder separately. Then cast off at beg of every row from neck as follows: Cast off 2 sts 3 times and 1 st 2 times = 20-23-28-33-35 sts remain on shoulder. Cast off when piece measures 56-58-61-64-66 cm. Repeat on the other shoulder. ASSEMBLY: Sew the shoulder seams. NECK EDGE: Pick up approx. 74 to 92 sts around the neck (incl sts on stitch holder at the front) on circular needle size 4.5 mm with Paris. P 1 round, K 1 round and P 1 round, then loosely cast off with K. |
|||||||||||||||||||
Diagram explanations |
|||||||||||||||||||
|
|||||||||||||||||||
 |
|||||||||||||||||||
 |
|||||||||||||||||||
Have you finished this pattern?Tag your pictures with #dropspattern #lightbreezetop or submit them to the #dropsfan gallery. Do you need help with this pattern?You'll find 26 tutorial videos, a Comments/Questions area and more by visiting the pattern on garnstudio.com. © 1982-2026 DROPS Design A/S. We reserve all rights. This document, including all its sub-sections, has copyrights. Read more about what you can do with our patterns at the bottom of each pattern on our site. |
|||||||||||||||||||


With over 40 years in knitting and crochet design, DROPS Design offers one of the most extensive collections of free patterns on the internet - translated to 17 languages. As of today we count 324 catalogues and 12290 patterns translated into English (UK/cm). 12290
We work hard to bring you the best knitting and crochet have to offer, inspiration and advice as well as great quality yarns at incredible prices! Would you like to use our patterns for other than personal use? You can read what you are allowed to do in the Copyright text at the bottom of all our patterns. Happy crafting!
Post a comment to pattern DROPS 161-28
We would love to hear what you have to say about this pattern!
If you want to leave a question, please make sure you select the correct category in the form below, to speed up the answering process. Required fields are marked *.