Comments / Questions (127)
![]() Cara Weeks wrote:
Cara Weeks wrote:
Can you download your free patterns or just print them?
25.03.2015 - 19:21DROPS Design answered:
Dear Mrs Weeks, you can use a virtual printer to save them as pdf if you rather like that way. Happy crocheting!
26.03.2015 - 08:51
![]() Veerle Dol wrote:
Veerle Dol wrote:
Kan u misschien wat meer uitleg over de mouwen geven? Ik heb nu 21 steken zoals aangegeven, maar wanneer minder ik nu? Snap dit goed in welke toeren ik dit moet doen?
22.03.2015 - 20:45DROPS Design answered:
Hoi Veerle. Er staat in het patroon (voor maat XXXL): Herhaal de 1e en 2e TOER - minder TEGELIJKERTIJD 1 stk en 3 l aan het begin van de 6e toer door 2 stk samen te haken – LEES TIP VOOR HET MINDEREN – midden onder de mouw. Herhaal dit minderen elke 4e toer = 14 stk. Dwz, je mindert de eerste keer in de 6e toer en daarna herhaal je in elke 4e toer tot je 14 stk over hebt.
23.03.2015 - 14:44
![]() Liz wrote:
Liz wrote:
Hi I'm just starting this pattern, about 10 rounds in. I'm increasing by 1 tr and 3 chain in between each corner and I find it's creating a very scalloped/wavy effect on the work. It's certainly not flat. Is this correct? I'm hoping as the pattern grows in size the scalloping will reduce. I increase at the same tr space each time, should I increase at a different space each time round? Appreciate your help.
11.03.2015 - 14:50DROPS Design answered:
Dear Liz, make sure you get the correct tension 3 x (1 tr + 3 ch) in width x 7 rounds = 10 x 10 cm and keep this tension when working the square. Happy crocheting!
11.03.2015 - 15:05
![]() Veerle wrote:
Veerle wrote:
Ik snap de voorpanden niet. Ook niet als ik het uitteken, eerst rij heb ik gedaan, maar hoe ga je dan verder met rij 2? Moeten er eerst lossen om te keren? Want als ik het volg, krijg ik een rare zijkant en minder hokjes dan in rij 1. Vind het zo een mooie trui, maar is het misschien mogelijk,een diagram van het voorpand te maken?
05.03.2015 - 17:04DROPS Design answered:
Hoi Veerle. Je haakt heen en weer over de voorpanden, het aantal lussen moet gelijk blijven. Ik kan helaas niet een tekening voor je maken.
25.03.2015 - 16:07
![]() Marisa wrote:
Marisa wrote:
When you say chain for armho!e shaping, do you mean slip stitch along or create a chain loop?
18.02.2015 - 12:08DROPS Design answered:
Dear Marisa, you create a ch-loop to make the hole for sleeve, ie you work 1 ch for every st (ch or tr) skipped on the side. Happy crocheting!
18.02.2015 - 14:57
![]() Gina wrote:
Gina wrote:
How many stitches do I skip for the arm holes? And what does it mean until the middle of corners?
21.01.2015 - 22:58DROPS Design answered:
Dear Gina, number of sts skiped for armholes depends on your size and tension, ie work round to first corner and work 3dc,3ch,3dc in the ch-space on 1st corner, then count number of sts between first corner and middle side between 1st and 2nd corner and ch this number of sts, then continue as before until 3rd corner and repeat from the middle between 3rd and 4th corner, and work 3dc,3ch,3dc in ch-space on 4th corner. Happy crocheting!
22.01.2015 - 10:03
![]() Mayte Olmo Méndez wrote:
Mayte Olmo Méndez wrote:
Me he quedado parada cuando empezamos a tejer las sisas, No entiendo muy bien que debo hacer. este paragrafo no logro descifrarlo. Trabajar 1 p.de cad. por cada p.de cad/p.a. saltado. Me podriais echar una mano?
03.01.2015 - 17:55DROPS Design answered:
Hola Mayte! debes realizar una cadeneta para la sisa. El largo de la cadeneta se calcula así: 1 pt de cad por cada pt que vamos a saltar y luego unimos el extremo de esta cadeneta en el pt sig al último pt saltado.
18.01.2015 - 20:51
![]() Stanske wrote:
Stanske wrote:
Goede avond, Als beginnende haakster zit ik al vast in t begin namelijk het proeflapje... moet ik eerst een rij losse haken? hoeveel? moet ik extra losse rekenen of gelijk met het stokje beginnen? Ik haak nu 12 losse+3 losse omdat ik een stokje moet haken keer het om en haak dan 3 X 1 stokje en 3 losse waarbij ik bij de losse 3 steken oversla en in de 4de steek een stokje haak, maar dan zit ik op t einde met 3 losse over ... Help!!!!!! Van een radeloze beginner
06.12.2014 - 22:53DROPS Design answered:
Hoi Stanske. Bij dit vest zou ik eigenlijk maar beginnen in het midden en het diagram volgen. Als je 7 toeren in de hoogte hebt met 1 stk + 3 l, meet je de steekverhouding.
10.12.2014 - 14:02
![]() Jessica wrote:
Jessica wrote:
Hello, I'm new to crocheting..only about 8 months. I'm not sure what do do for the armholes. I'm lost on that part of the pattern. Please help. Thank you
03.12.2014 - 05:25DROPS Design answered:
Dear Jessica, to shape armholes, you will crochet some chains and at the same time skip some sts (to create "holes" for sleeves each side), ie work until 1st corner, 3dc+3ch+3ch in ch-space at corner, then chain for 1st armhole: count number of sts you have to skip until 1st and 2nd corner and chain this number of sts, continue working as before until 2nd corner as before, then as before again until middle side between 3rd and 4th corner and ch same number of sts as for 1st armhole, and crochet 3dc,3ch,3dc in 4th corner. Happy crocheting!
03.12.2014 - 10:18
![]() Anita wrote:
Anita wrote:
Hej! Jag undrar över ökningen var 6:e varv. Ska jag göra två stolpar med 3 lm emellan i samma lmbåge? Ökningen sker ju automatiskt när jag virkar fyrkant... Eller? Mvh Anita Svensson
28.10.2014 - 13:09DROPS Design answered:
Hej Anita, ja fast på 6:e varv gör du en ökning extra på varje sida av varje hörn se * i diagrammet.
29.10.2014 - 15:13
Around the World#aroundtheworldcardigan |
||||||||||||||||||||||
 |
 |
|||||||||||||||||||||
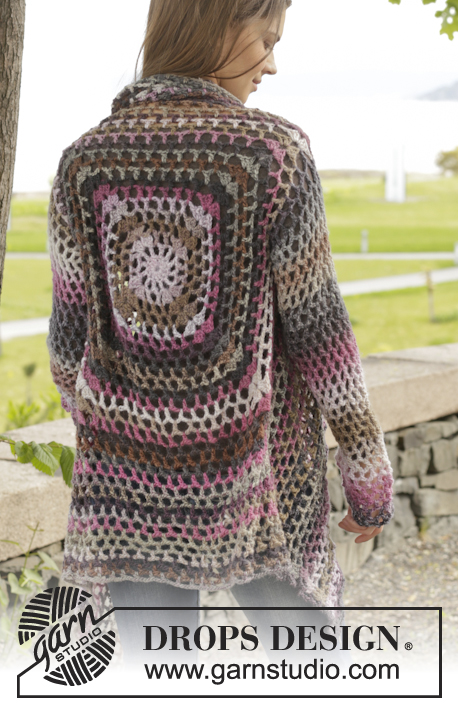
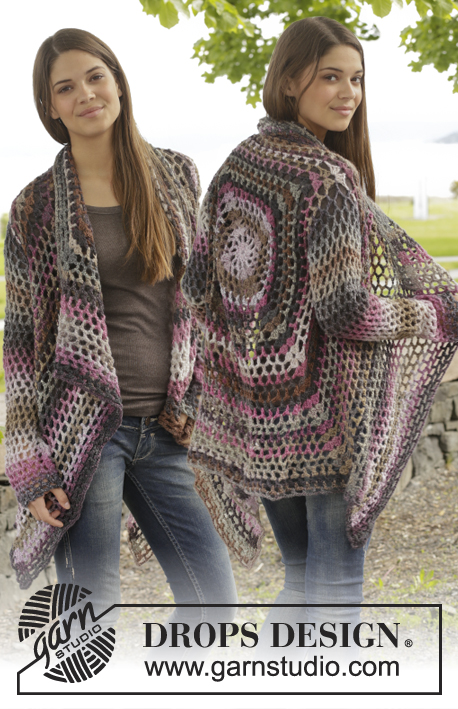
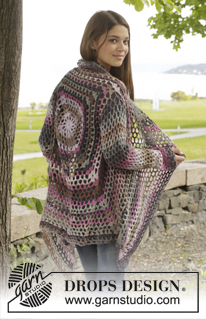
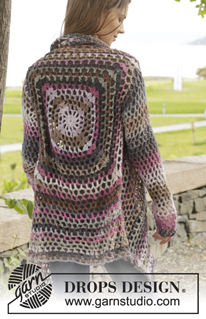
Crochet DROPS jacket with lace pattern in ”Big Delight”. Size: S - XXXL
DROPS 156-42 |
||||||||||||||||||||||
|
PATTERN: See diagram A.1. DECREASE TIP (applies to sleeves): Dec 1 repetition (= 1 tr + 3 ch) by not working ch, but work 2 tr into 1 tr as follows: Work 1 tr but wait with last pull through (= 2 strands on hook), then work next tr but on last pull through, pull yarn through all sts on hook. ---------------------------------------------------------- BODY: Worked in the round from mid back on the back. Work 6 ch on hook size 5 mm with Big Delight and form a ring with 1 sl st in first ch. Work according to diagram A.1, i.e. work as follows: ROUND 1: Work 3 ch, 13 tr in ch-ring, finish with 1 sl st in 3rd ch from beg of round. ROUND 2: 5 ch, skip 1 tr, 1 tr in next tr, * 2 ch, 1 tr in next tr *, repeat from *-* the entire round, finish with 2 ch = 12 tr + 2 ch. ROUND 3: Now work the circle into a square, i.e. work as follows: Work 3 tr + 3 ch + 3 tr (= corner) in first ch-space, 3 ch, 1 tr in next ch-space, 3 ch, 1 tr in next ch-space, 3 ch, * 3 tr + 3 ch + 3 tr (= corner) in next ch-space, 3 ch, 1 tr in next ch-space, 3 ch, 1 tr in next ch-space, 3 ch *, repeat from *-* 3 times in total, 1 tr in next ch-space (= last 2 ch from previous round), 3 ch. ROUND 4: Work 3 tr + 3 ch + 3 tr (= corner) in first ch-space, * 3 ch, 1 tr in next ch-space, 3 ch, 1 tr in next ch-space, 3 ch, 1 tr in next ch-space, 3 ch, 3 tr + 3 ch + 3 tr (= corner) in next ch-space *, repeat from *-* 3 times in total, 3 ch, 1 tr in next ch-space, 3 ch, 1 tr in next ch-space, 3 ch, 1 tr in next ch-space, 3 ch, 1 tr in next ch-space, 3 ch. REMEMBER THE CROCHET TENSION! Repeat 4th round with inc, i.e. work 1 tr + 3 ch more between each corner on every round (= 4 inc per round) AT THE SAME TIME on every 6th round inc 1 tr + 3 ch extra on each side of each corner – see star in diagram (= 8 extra inc per round). Continue like this until square measures 36-38-40-42-44-46 cm x 36-38-40-42-44-46 cm. Now work armhole as follows: Work as before until first corner, work 3 tr + 3 ch + 3 tr in ch-space in the corner. Now work ch until the middle of next side (i.e. in the middle between 1st and 2nd corner) as follows: Work 1 ch for every ch/tr skipped. Then work pattern as before until the middle between 3rd and 4th corner. Now work ch until beg of round as follows: Work 1 ch for every ch/tr skipped. On next round work pattern and inc as before over all sts, also in ch for armholes. Continue like this until square measures 78-80-82-84-86-88 cm x 78-80-82-84-86-88 cm (i.e. 21 cm in all sizes from armhole). Fasten off. FRONT PIECE: Now work back and forth between first and second corner. NOTE! Work front piece without inc. 1st ROW: Work from first corner as follows: 3 tr in ch-space in the corner, * 3 ch, 1 tr in ch-space *, repeat from *-* ending with 3 ch and 3 tr in the corner. 2nd ROW: Turn and work like this: 1 tr in each of the first 3 tr, * 1 tr in the ch-space, 3 ch *, repeat from *-* ending with 1 tr in the last ch-space and 1 tr in each of the 3 tr. 3rd ROW: Turn and work like this: 1 tr in each of the first 3 tr, * 3 ch, 1 tr in the ch-spance *, repeat from *-* and end with 3 ch and 1 tr in each of the last 3 tr. Continue repeating 2nd and 3rd row. Continue working like this until 19-20-21-22-23-24 cm have been worked back and forth, fasten off. Repeat on the other side, now work back and forth from third to fourth corner. Finally work a round around the entire square, work pattern as before but in ch-space in each corner work 6 tr. Fasten off. SLEEVE: Work in the round, top down from armhole, beg from mid under sleeve from RS. ROUND 1: Work 6 ch (= 1 tr + 3 ch), * 1 tr in next ch-space, 3 ch *, repeat from *-* 16-17-18-19-20-21 times in total, finish with 1 sl st in 3rd ch. ROUND 2: Work 5 ch, * 1 tr in next ch-space, 3 ch *, repeat from *-* 16-17-18-19-20-21 times in total, work 1 ch, finish with 1 sl st in 3rd ch at beg of round. Repeat 1st and 2nd ROUND - AT THE SAME TIME dec 1 tr + 3 ch at beg of 4th-6th-6th-8th-8th-6th round by working 2 tr tog – READ DECREASE TIP – mid under sleeve. Repeat dec every 6th-6th-6th-4th-4th-4th round = 12-12-13-13-14-14 tr. Repeat round without dec until sleeve measures approx. 56 cm in all sizes. Fasten off. Work another sleeve. |
||||||||||||||||||||||
Diagram explanations |
||||||||||||||||||||||
|
||||||||||||||||||||||
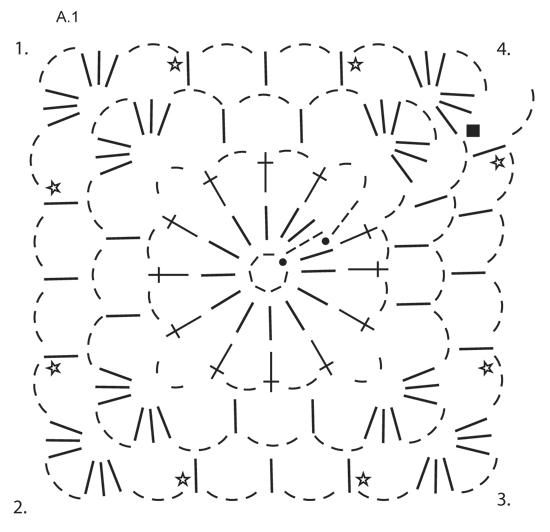 |
||||||||||||||||||||||
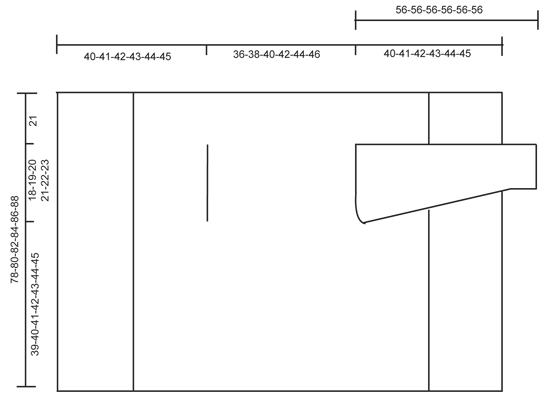 |
||||||||||||||||||||||
Have you finished this pattern?Tag your pictures with #dropspattern #aroundtheworldcardigan or submit them to the #dropsfan gallery. Do you need help with this pattern?You'll find 7 tutorial videos, a Comments/Questions area and more by visiting the pattern on garnstudio.com. © 1982-2026 DROPS Design A/S. We reserve all rights. This document, including all its sub-sections, has copyrights. Read more about what you can do with our patterns at the bottom of each pattern on our site. |
||||||||||||||||||||||





Post a comment to pattern DROPS 156-42
We would love to hear what you have to say about this pattern!
If you want to leave a question, please make sure you select the correct category in the form below, to speed up the answering process. Required fields are marked *.